Mother’s day gift Ideas Resurfaced
So, I’ve noticed a new trend surfacing or, on second thought I think it’s probably an old trend resurfacing! 😁 Pressed flowers!! They’re everywhere!! On sheer blouses, embroidered onto jeans, phone cases, tulle skirts, nylons, embroidery hoops , and the list goes on. I’m sure the ones on clothing aren’t real pressed flowers but they sure mimic the real ones. We won’t be making clothing for this gift idea but, as you can see I am pretty inspired by it. When I was trying to think of what to make my mom for mother’s day I wanted to incorporate flowers. Don’t get me wrong fresh flowers are always the best but, I hate that they eventually wilt and get thrown into the bin.
this post may include affiliate links* for more info visit my disclosure policy
Framed Flowers
As I was saying. After searching pinterest I came across framed leaf art and I thought,😲 oh my gosh this would be perfect for flowers! So, I carefully filled up a book full of flowers 3 weeks in advance and patiently waited on them to dry and flatten out. I remember doing this in school and from what I remembered the flowers were supposed to dry beautifully. After three weeks I pulled my flowers out and UUUGGHH! I don’t know where I went wrong. They weren’t very thin and lost all their color. I’m sure this is probably normal but, I was expecting pretty vivid colors and paper thin flowers. I can’t fit 1/2″ thick flowers between two pieces of glass and make it look good. Plus the more I thought about the 3 weeks dry time the more I cringed. I started to wonder how many people actually have the patients to wait three weeks. HAHA😂 I like to get stuff done quick if I have an idea!
Pressed Flower Trick
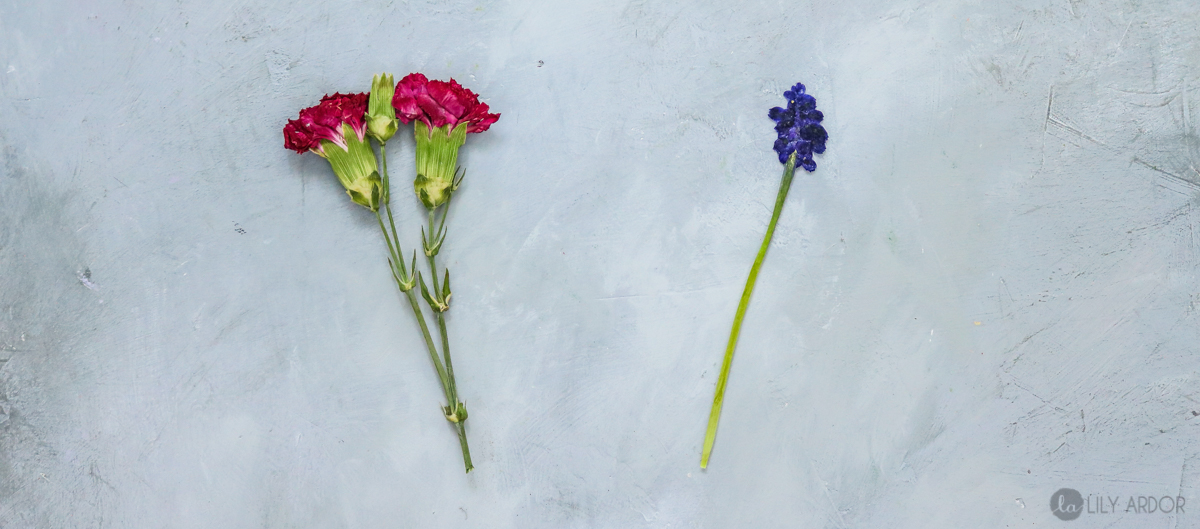
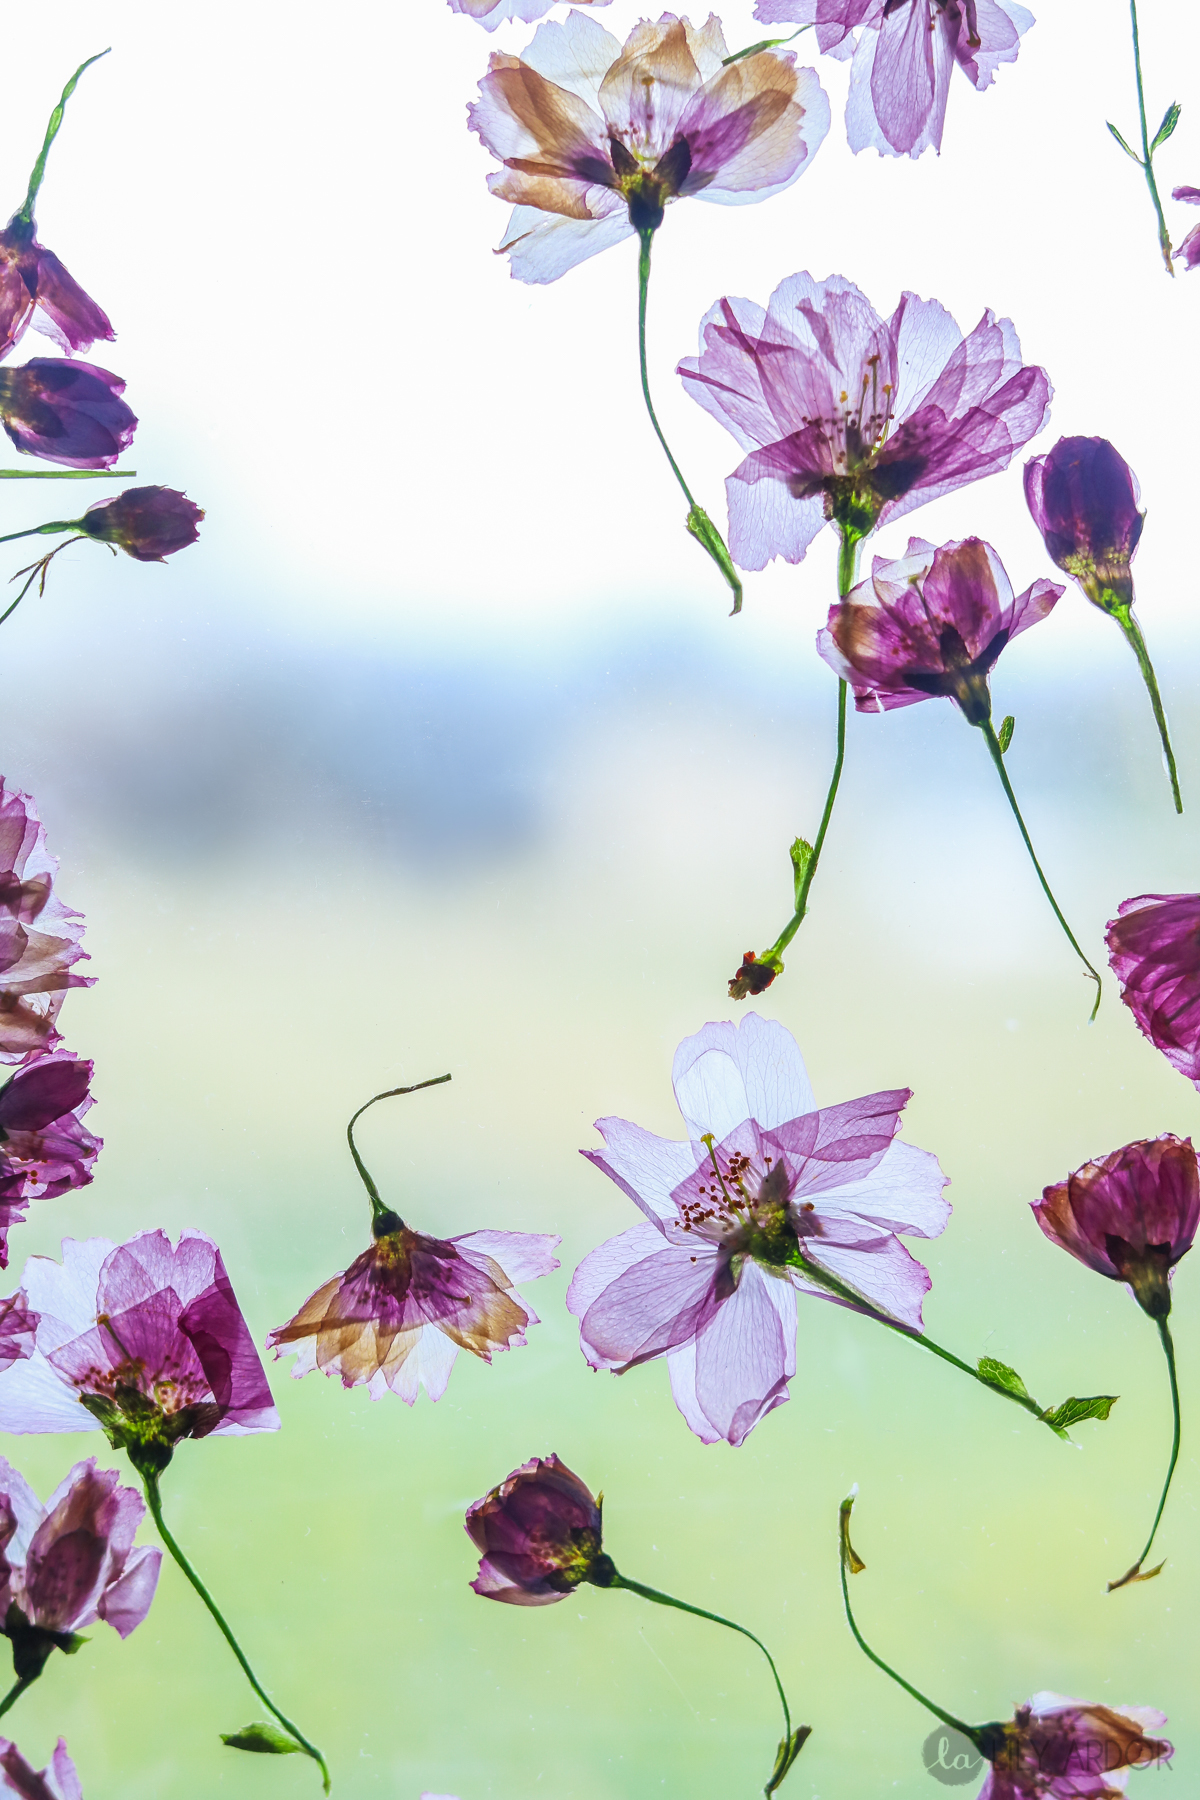
So the pink flower on the left (photo below) was dried in a book. YES I put a heavy brick on top! The purple flower on the right was dried with my quick method that I’ll be sharing. I know a lot of you were pretty excited about this flower drying method when I shared it on Instagram and to be honest I was super stoked that the flower got that paper thin! I MEAN WOW😍!! Wasn’t expecting it at all! 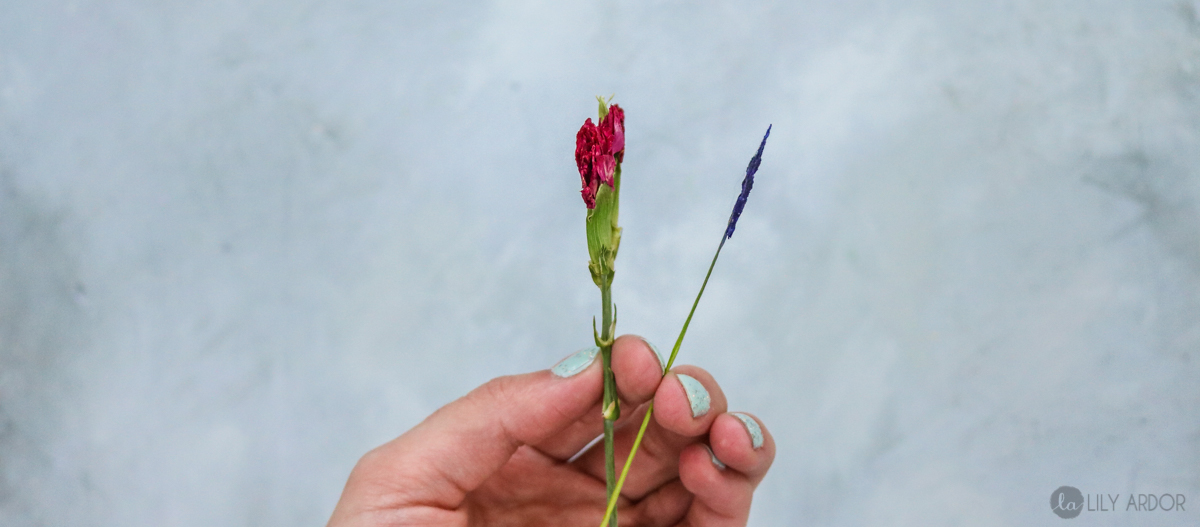
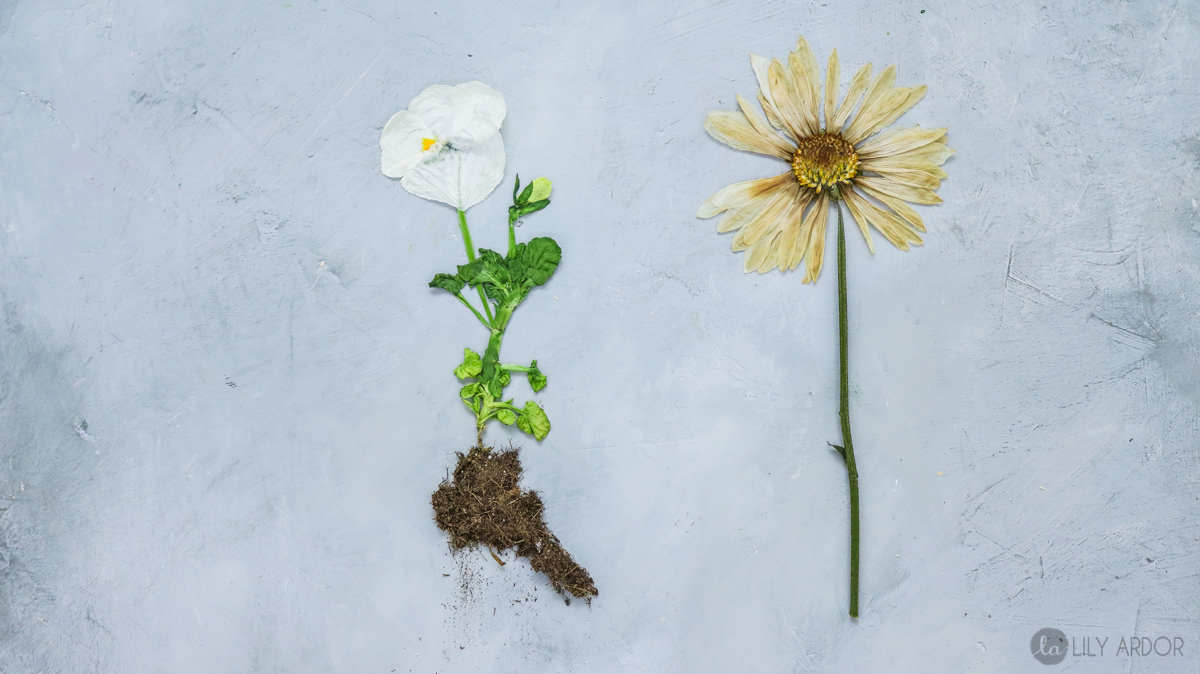
 And talk about color preservation!! Both flowers were white to start off with (photo below) . The one on the left was dried with my quick method and the one on the right was dried in a book! Are you starting to see why😄👏👏 I’m ssssso excited about this! OH the possibilities are endless!
How I came up with this idea
Are you wondering where on earth I came up with this idea? Okay Okay I’ll tell you my little story behind it! Since I was trying to think of a way to dry flowers quick I started thinking what would be the fasted way. After much thought I realized the microwave always dries the bajeebeez out of my food. HAHA😂 So I figured it would probably do the same with flowers. That’s when I remembered reading a thread a while back and they were talking about terracotta and flower drying in the microwave. So, I made a trip to our shed because I wasn’t about to go buy some terracotta and found these flat bricks. Okay honestly! I had no idea what they were until I asked my hubby and he said they were firebricks! HAHA SCORE What a coincidence! PERFECT! In the microwave they went and it was a fail the first time around because I didn’t put fabric in between and the flowers got stuck to the bricks. Once I figured out to put the fabric in their I felt like a 😁genius! HAHA😂 Funny thing is, I told my hubby I had this idea of drying flowers and he looked at me weird. I was so excited it worked I even stopped by his shop and had to share! 😬 LOL. “He was like oooooh I see what you mean and dang those are thin! ” YEP! That’s how this method came to life! (PS. Turns out I’m not a genius😆 I googled microwaved flowers and someone already came up with the idea…I knew it! Shoulda just googled it.. would of saved me some brain cells coming up with the idea😂😂)
What you’ll need
- Frames (I did one 8″x10″ and two 5″x7″) (you’ll need two of each because you’ll be needing two pieces of glass to display the flowers in between)
- 2 Fire bricks (you can get away with using one if you use your microwave tray instead. This was easier for me because my microwave is up high and I wouldn’t be able to see how to lay the flowers out)
- Cotton fabric or paper towel (if using fabric stay away from polyester fabric it might melt)
- Flowers (I picked mine from the yard and my friends yard.LOL😁 Weeds look great as well)
- Hot glue
Here is what bricks I used. You can also use tile I’m just not sure if it let’s out any toxins when heated in the microwave from all the treatment it has on it. The firebricks are made to go in the woodstove as insulation to keep the heat in for longer.
OOH also this cute copper frame is a great option if you want an elegant look. Already comes with two pieces of glass. It’s see through glass with slim copper edges and a copper stand in the back!
Or a more modern copper frame featuring a beautiful geometrical pattern. Gosh they have the coolest frames on amazon! I wish I could have one of each! 😀
Instructions: Okay so for the steps the following photos say it all. But, just in case I’ll tell you whats going on. Step one. Lay your fabric onto your brick. 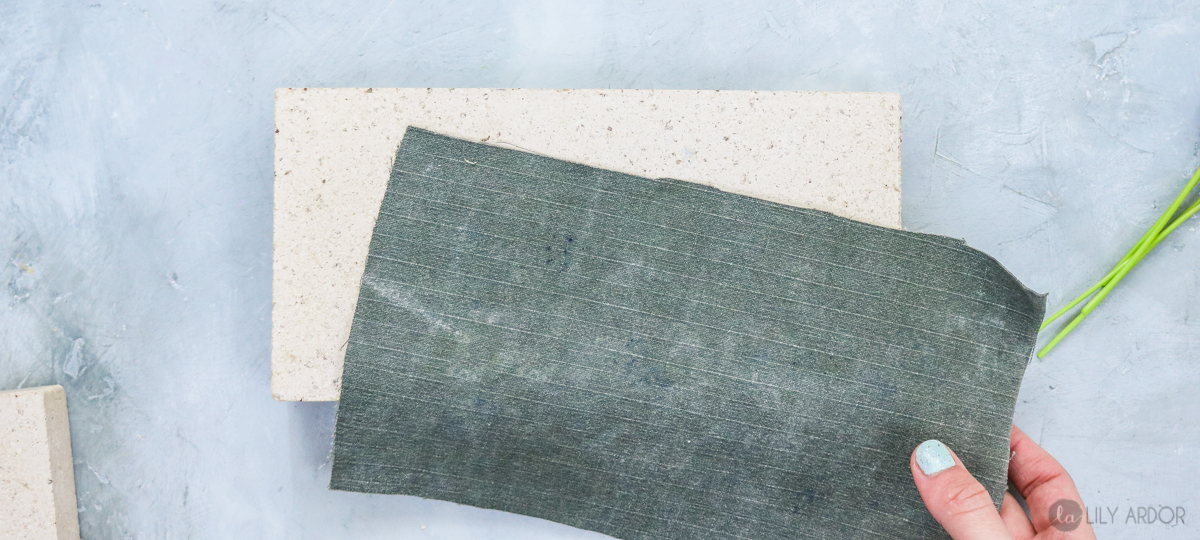 Step two. Lay your flowers onto your fabric.
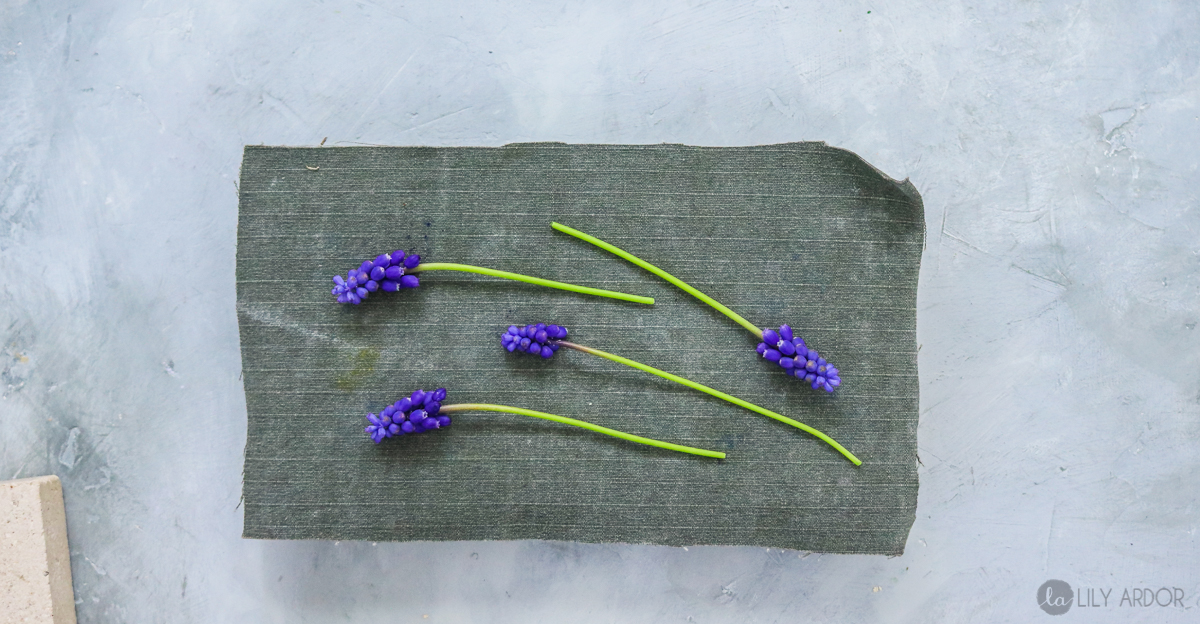 Step three. Lay more fabric over your flowers.
 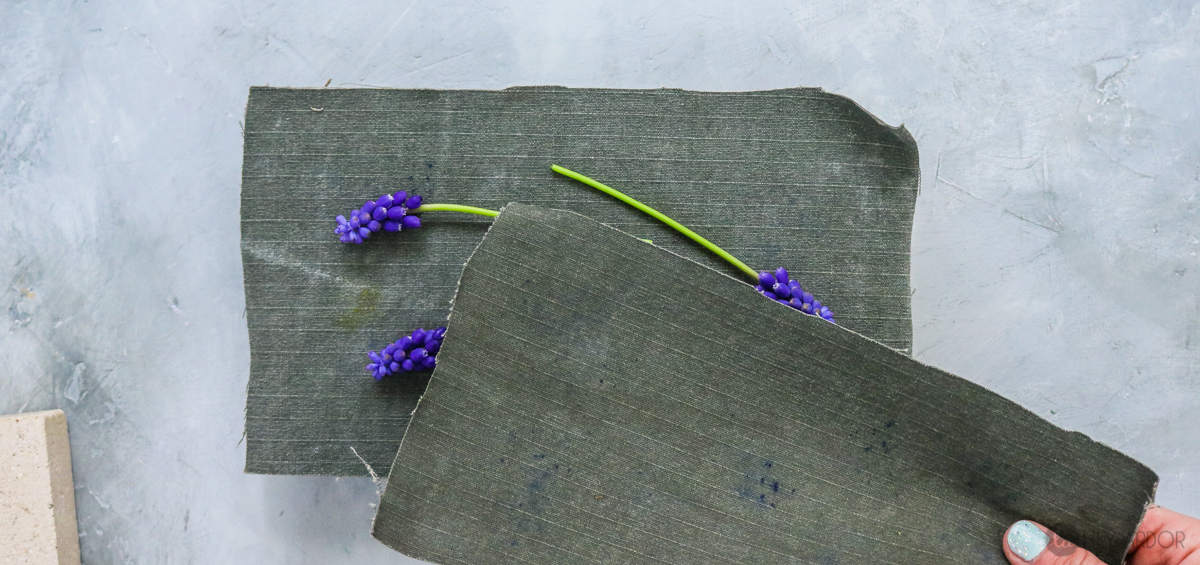 Step four. Finish it off with another brick! PRETTY EASY EHH?!! 😬 Like making a sandwich!
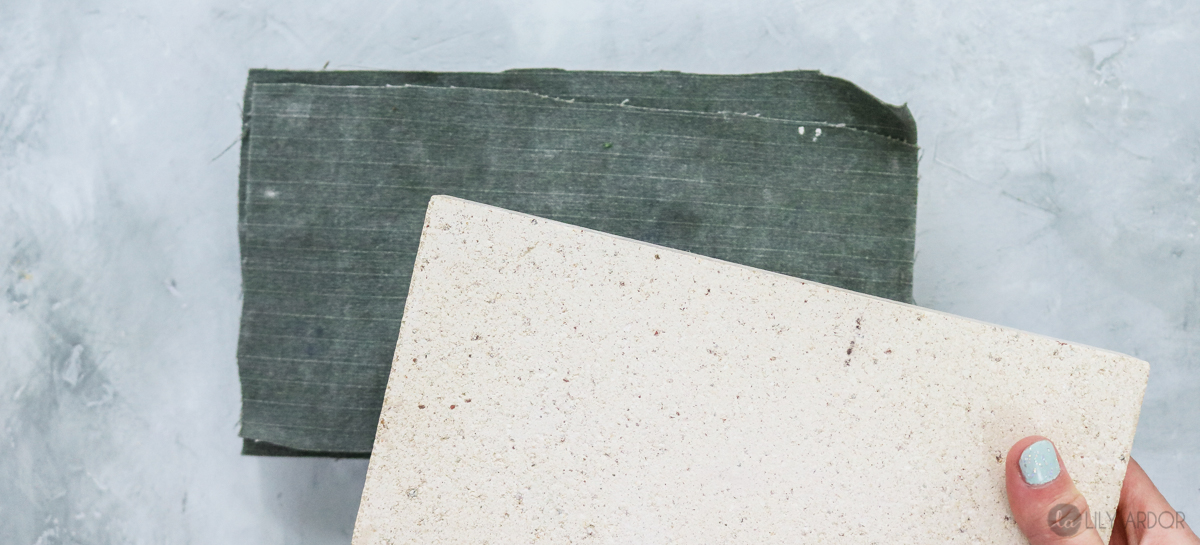 And step 5 is to nuke it in the microwave! TA DA!!!! You should have flat colorful little flowers! OH man almost forgot! Whatever you do DO NOT and I’m saying this again DO NOT press down onto your bricks once your flowers are sandwiched in their. It will break your flowers. Trust me I learned the hard way thinking I would help them flatten out. HAHA😂 Don’t worry about them flattening out. They will do it on it’s own. The heat will cause the water to evaporate from the flower and the weight of the brick will flatten it down as the water evaporates.
How long to Microwave them
Oh yes how long should you nuke them for? I held mine in the microwave from 1-3 minutes. The bigger or thicker flowers definitely took longer. For the smaller or white ones I did one minute then removed the top brick left the top fabric and did another minute or two. I feel like leaving the brick on top all three minutes keeps bringing back the moisture into the flower. That said, either way any flower needs to be microwaved for at least 30 seconds without the top brick to completely dry it out. (note: don’t microwave without the top fabric. It helps keep the flower flat and ripples at bay. Also white flowers burn super quick so, check every 10 seconds if you have to until you get your time down)
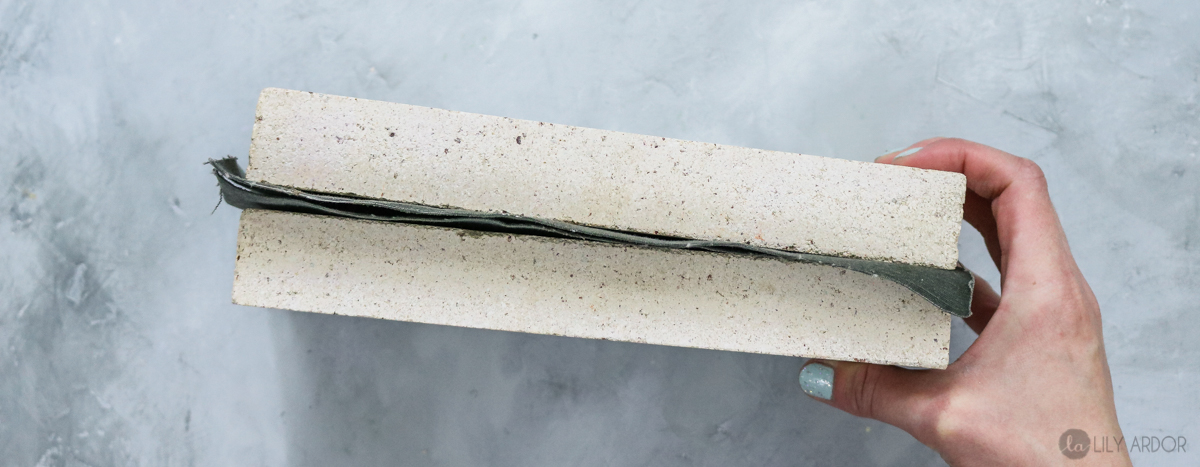
This is how the layers look from the side before going in the microwave! 
Here’s more Mother’s day gift ideas ..
Make some concrete garden planters! Get the full tutorial here..


Putting it together
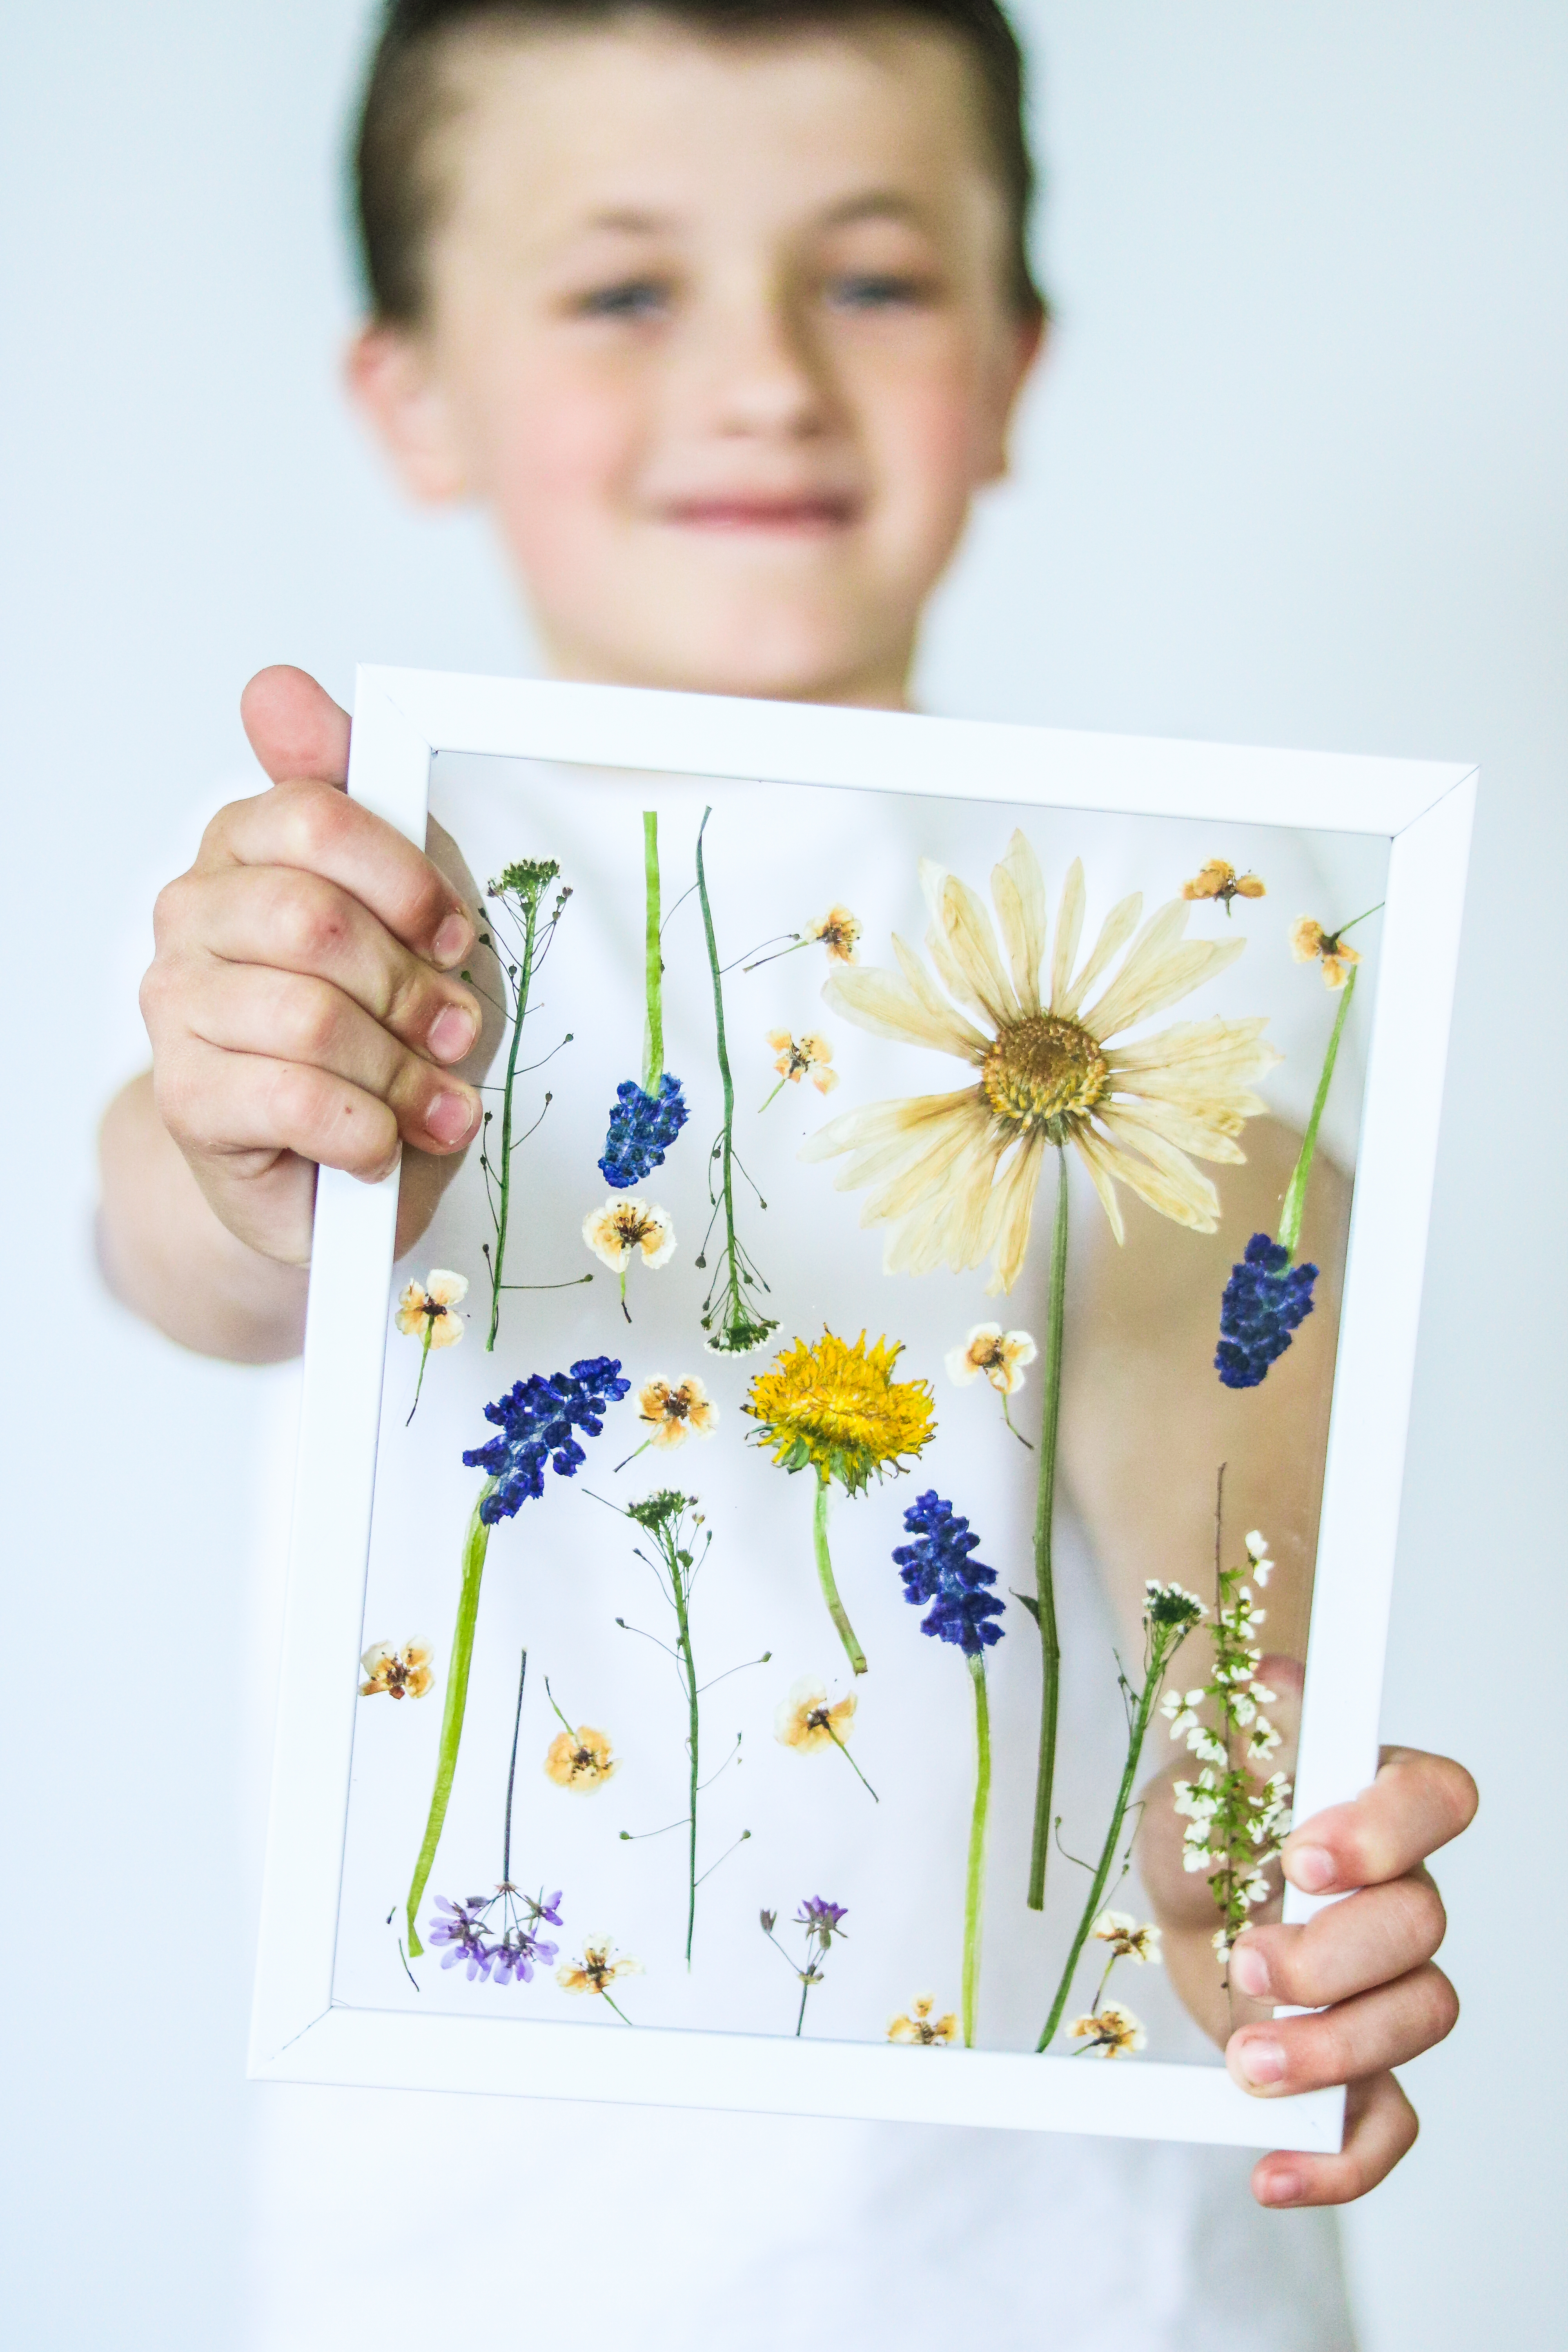
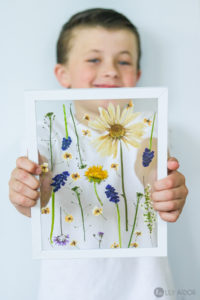
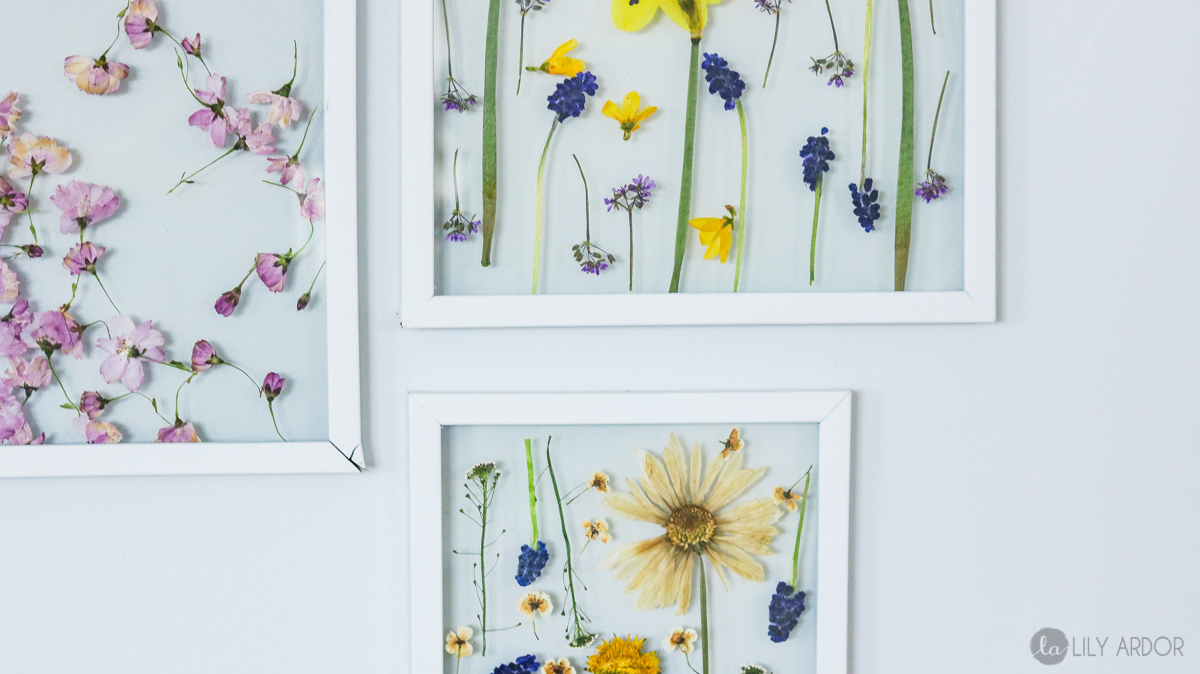
I spray painted my frames white. Don’t know why I wasn’t feeling the black. 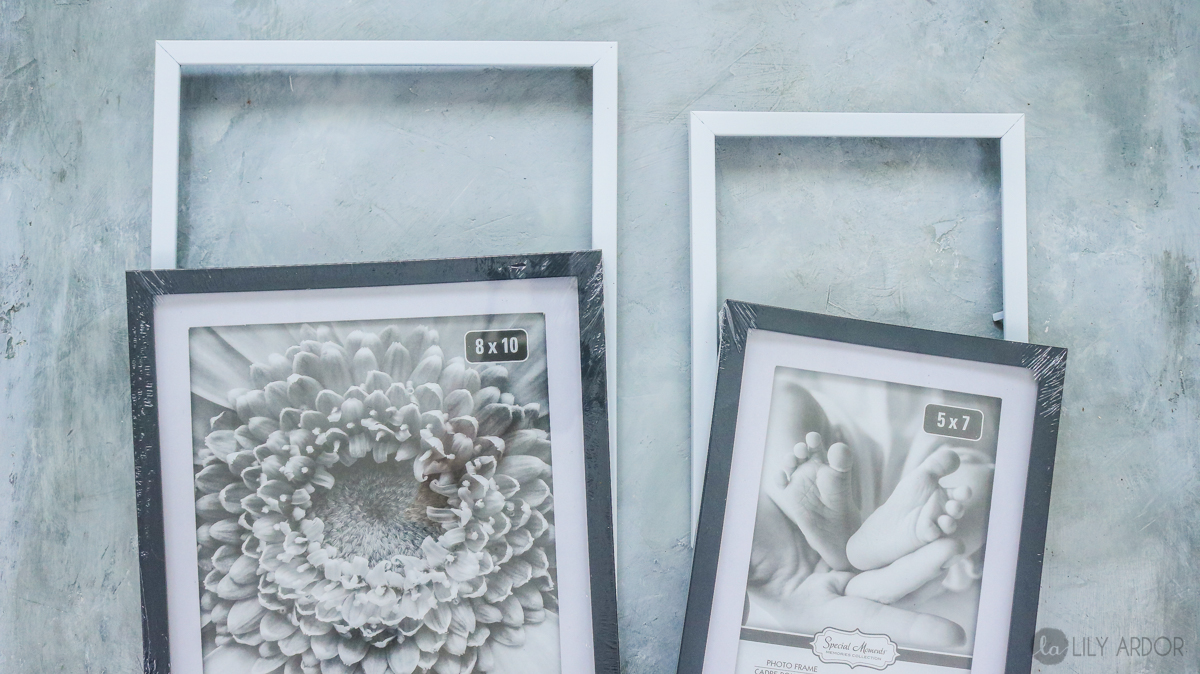 Then I displayed my flowers in the glass frame. Gosh those flowers look so pretty!
 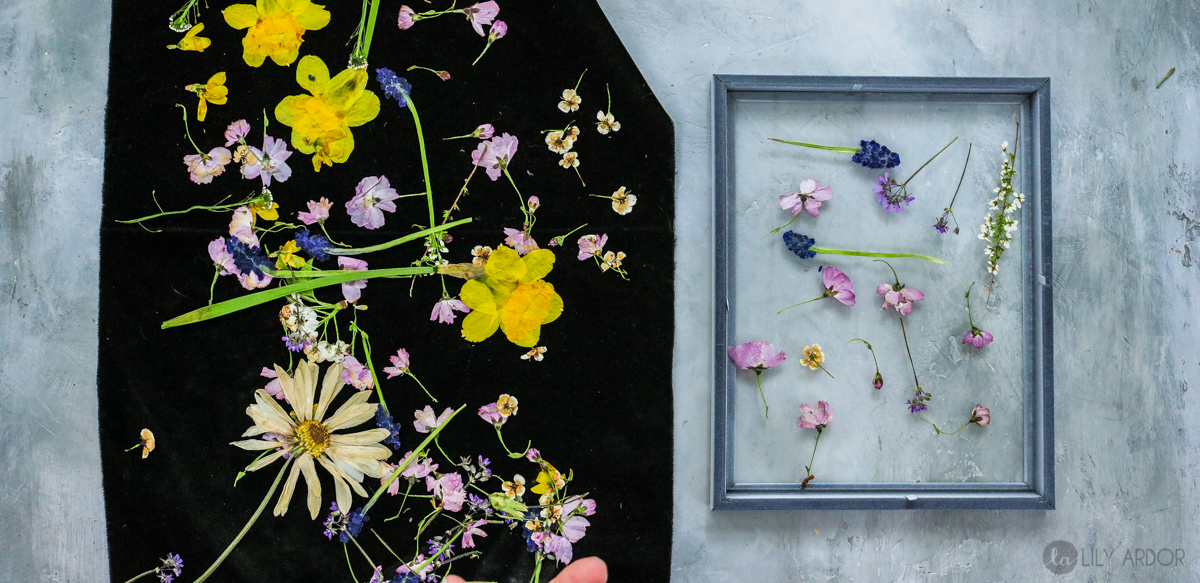 I installed my other piece of glass on top and hot glued it! Okay here’s a tip you won’t want to miss. If you want your flowers to move between the glass use something lightweight (like a soda pop or your phone) to lay on your glass while the glue is drying. If you want no movement use your bricks! YEP. Just make sure you don’t use to many your glass might break. LOL. I used 2 bricks for the 5×7 frames and 4 for the 8×10.
 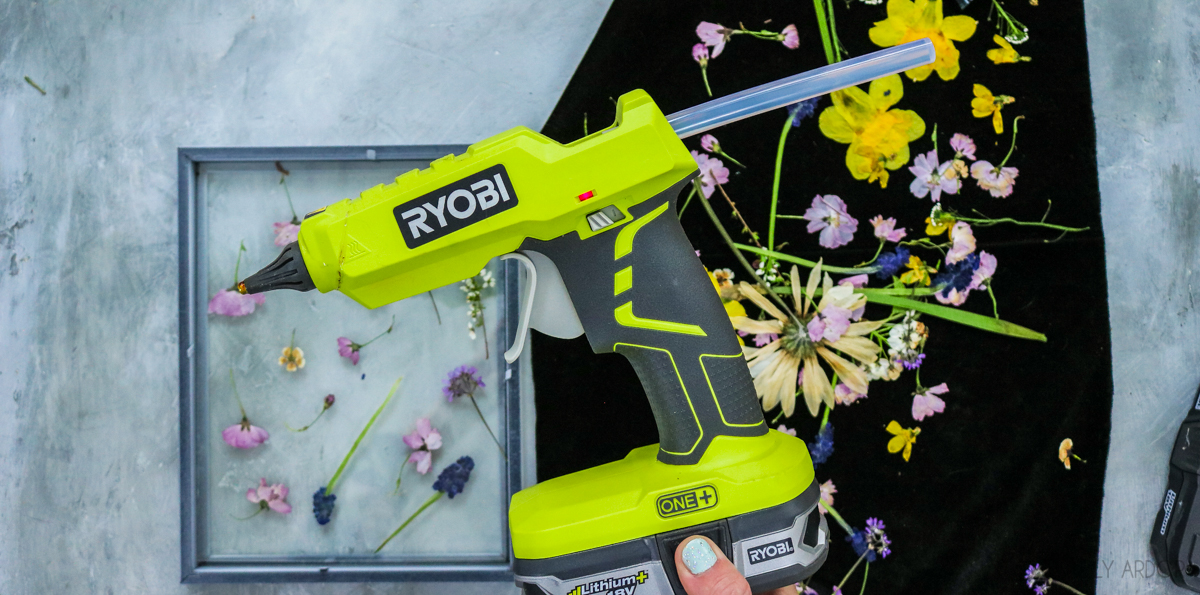 And that’s it!! I displayed them on the window and wall just to show you how they look on both. You can also write a message to your mom with a sharpie. They sell white sharpies here. ( I’ve tried this sharpie and loved it! ) 🙂
Ok I’ve been thinking about making this for a while now. Wouldn’t it be ssso cute to frame butterflies too. Another DIY added to my list 😁👏👏.
TA DA!!
Here’s how they look on the window. I love that the colors or so bright and really pop!! 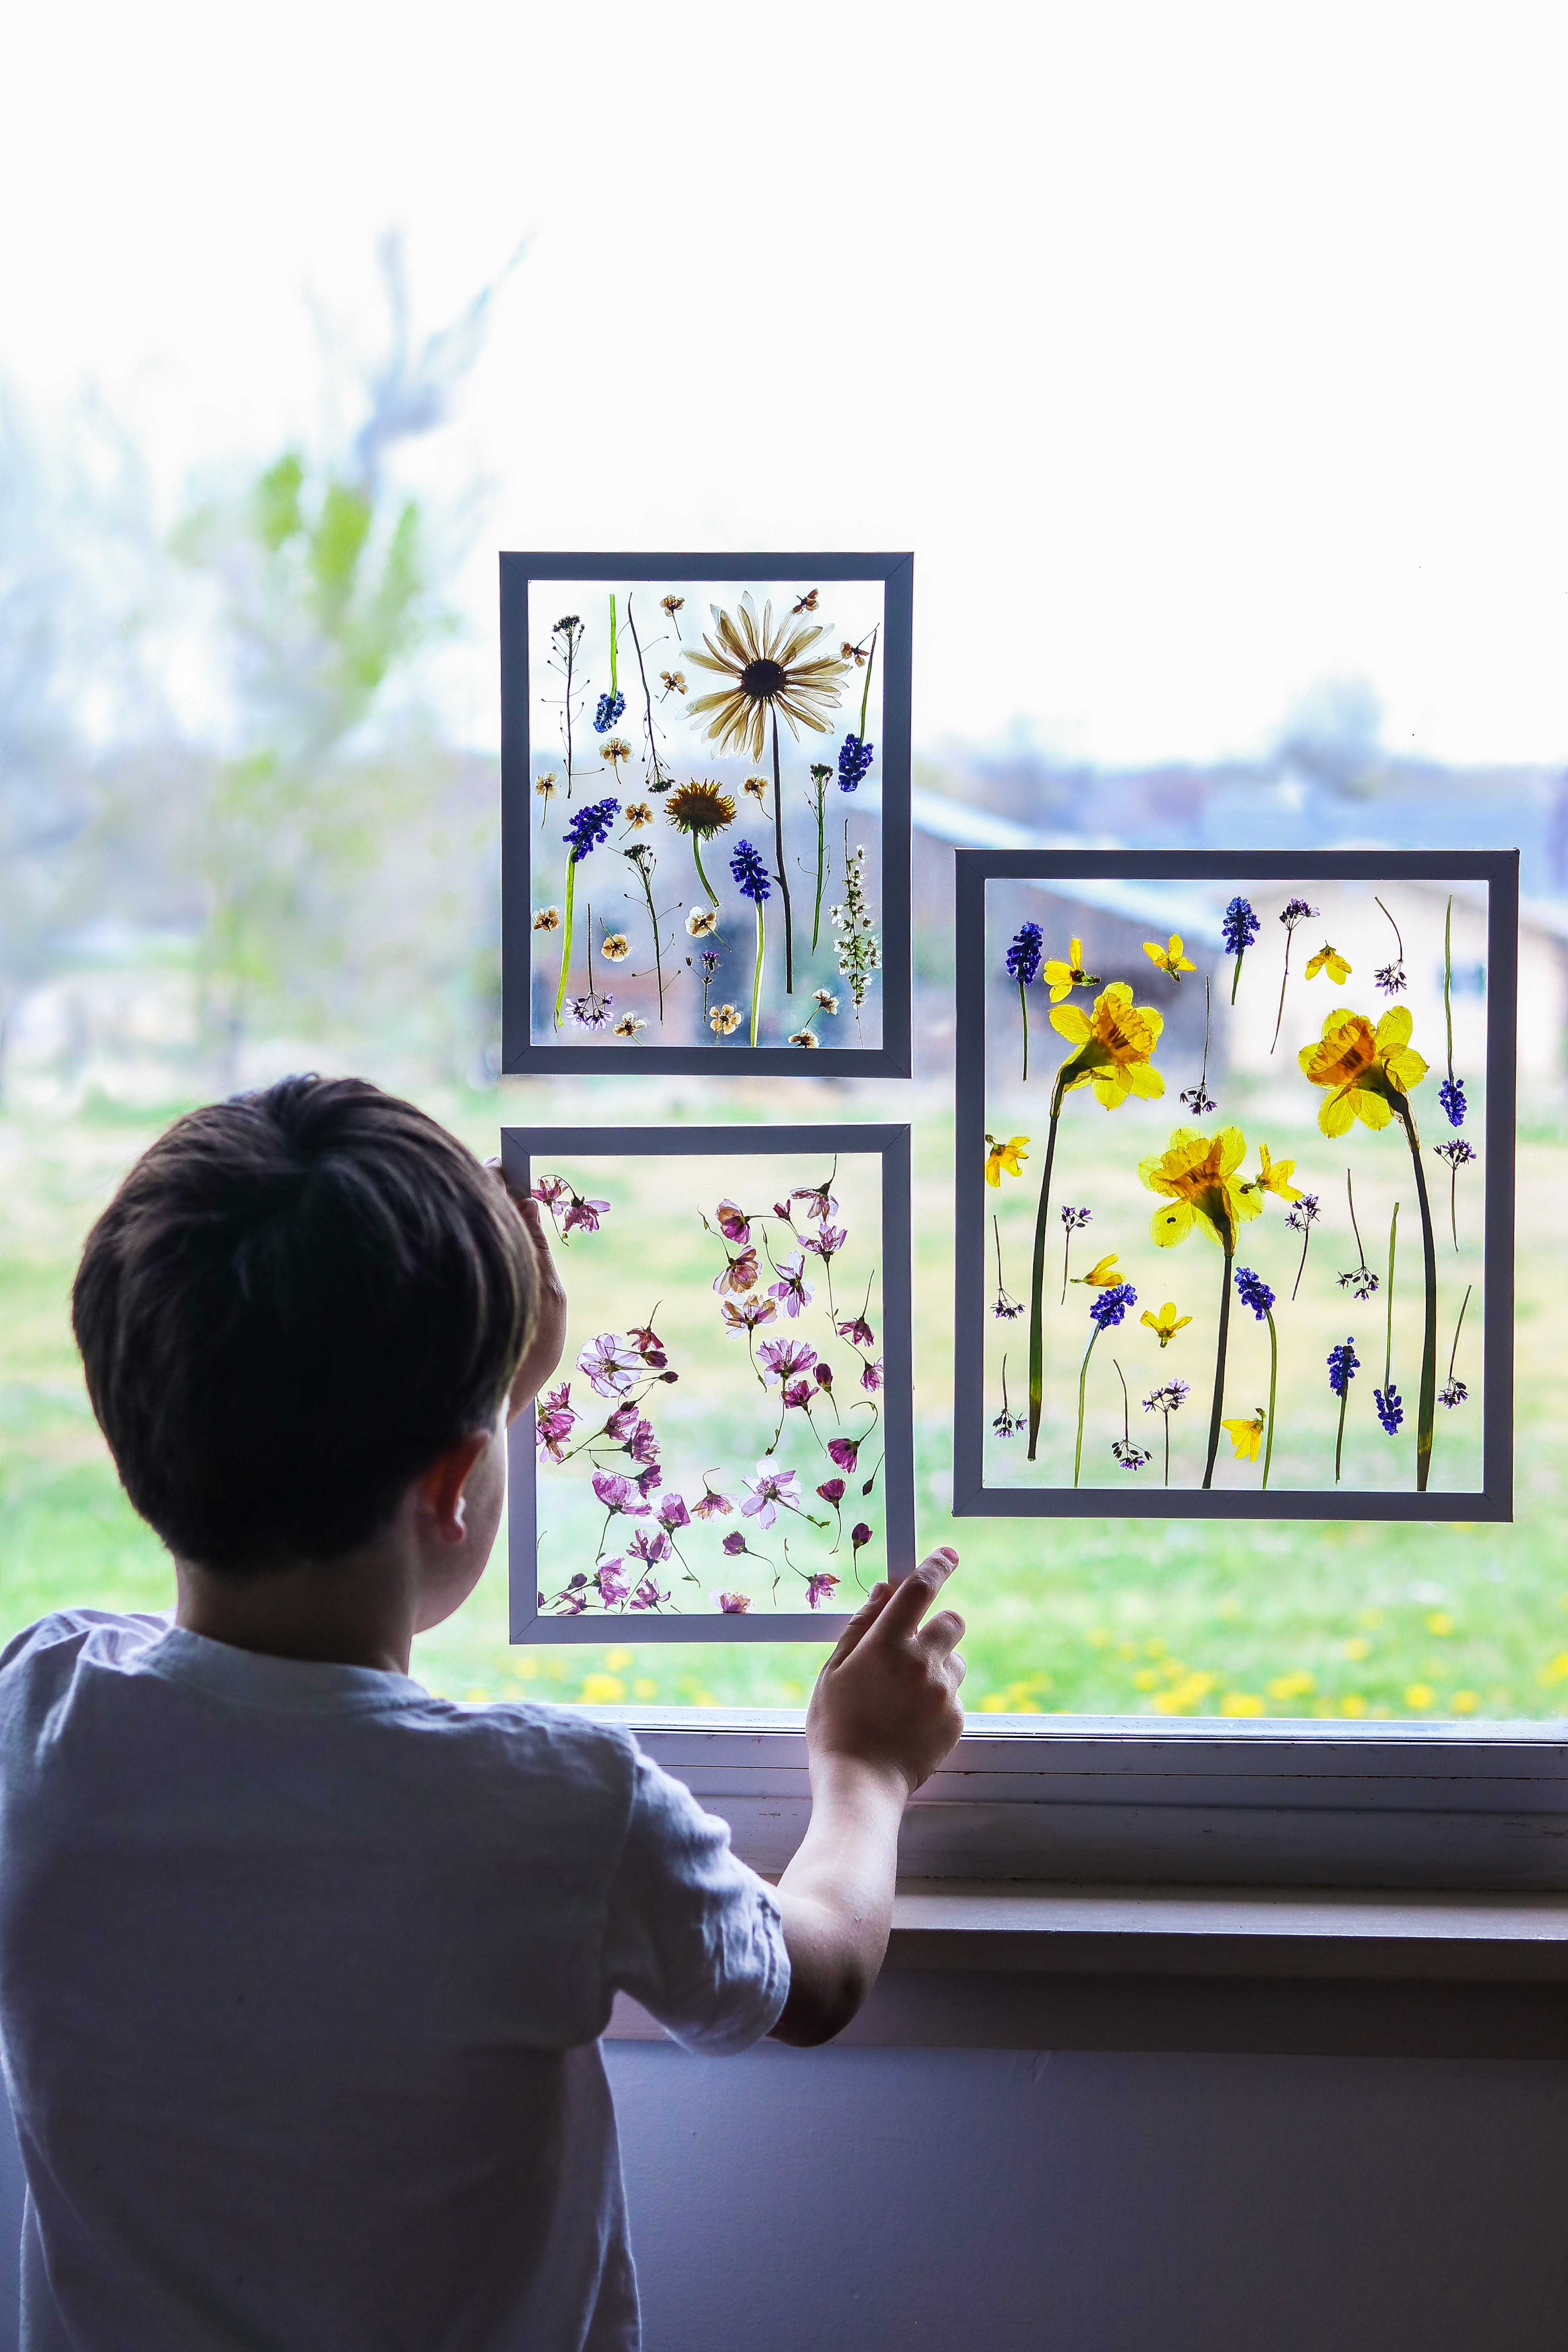

 Honestly I think I like them on the window more. Just because the colors pop so much but, they look just as cute on the walls.
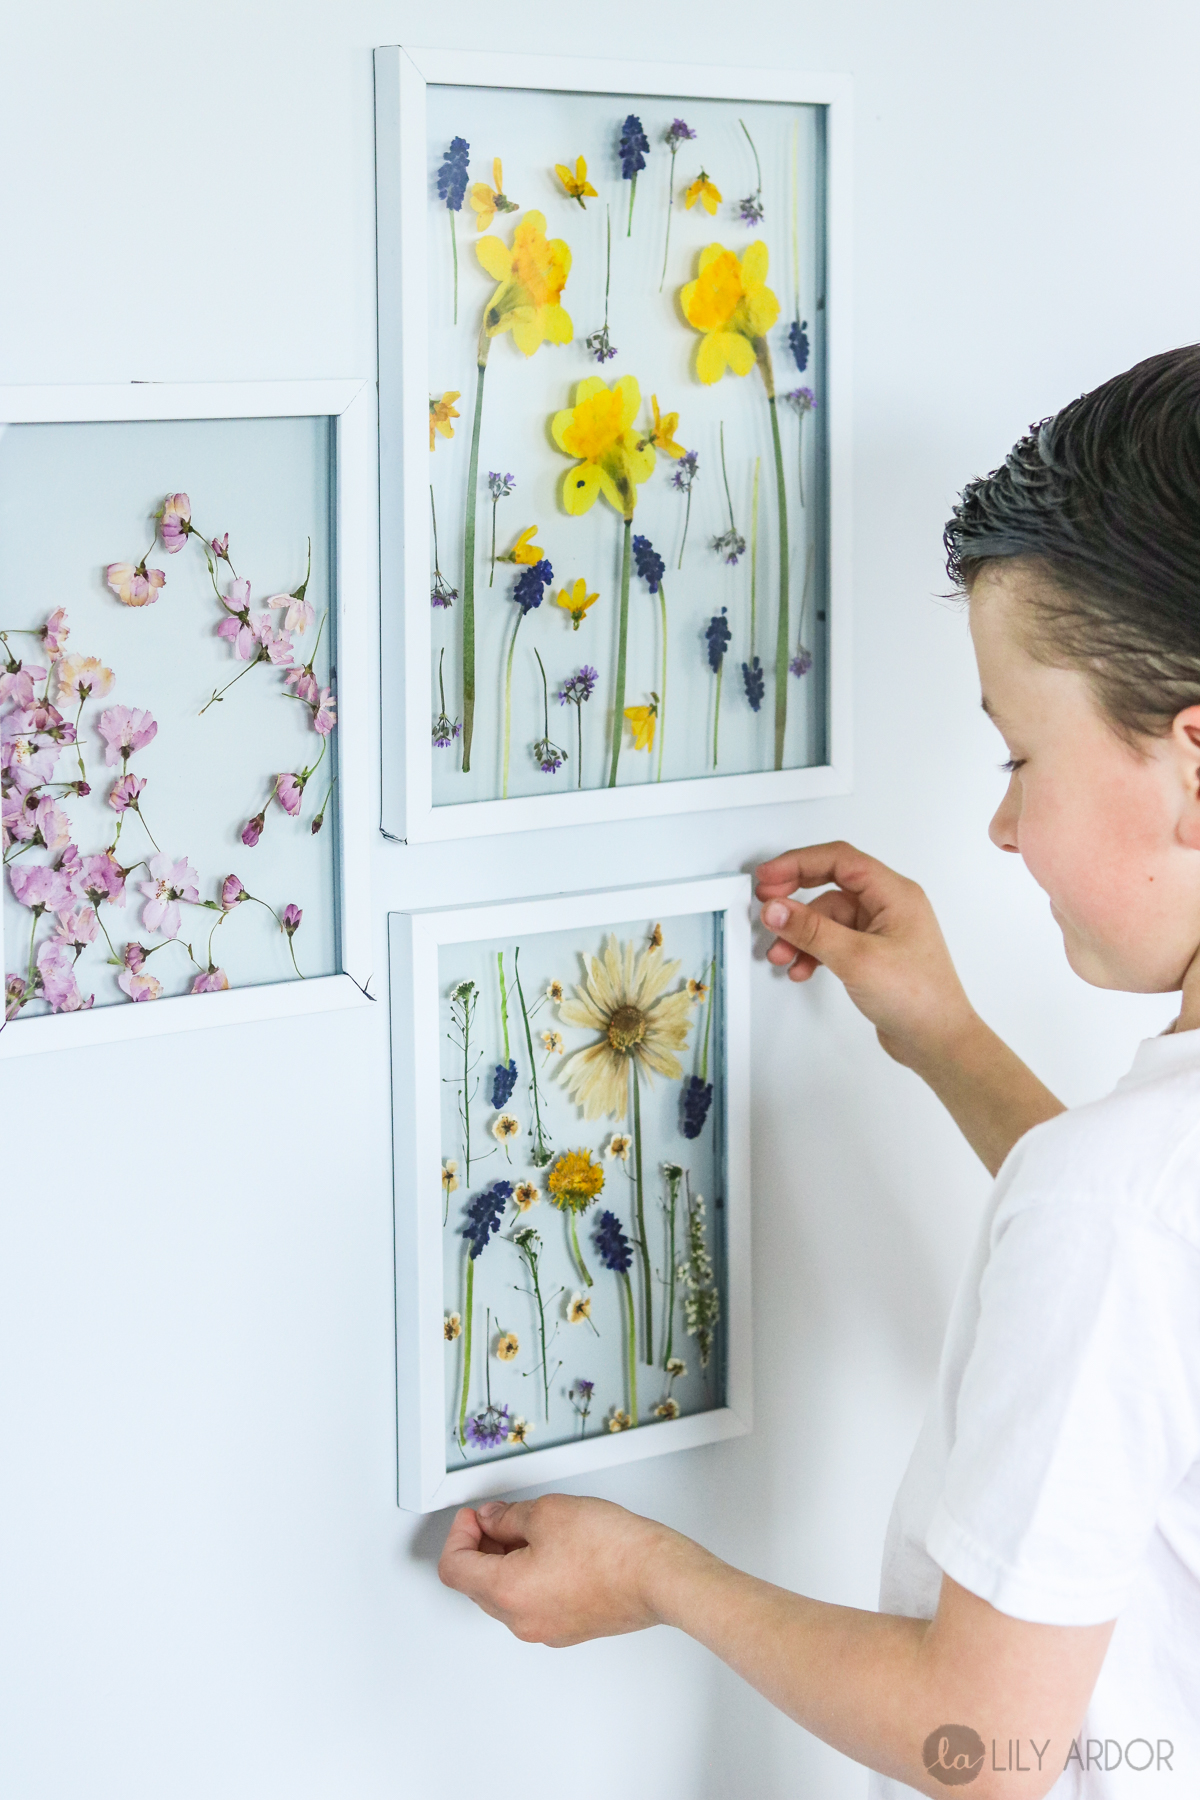

Oh the many faces of Oleg! 😃 he’s always such a goof..😊 So every time we have a photo session we agree to do photos that we need and then he gets to do a few photos where he goofs off and I let him make faces at the camera. HAHA 😂 He always says ” did you get it? Let me see!” 😂👌
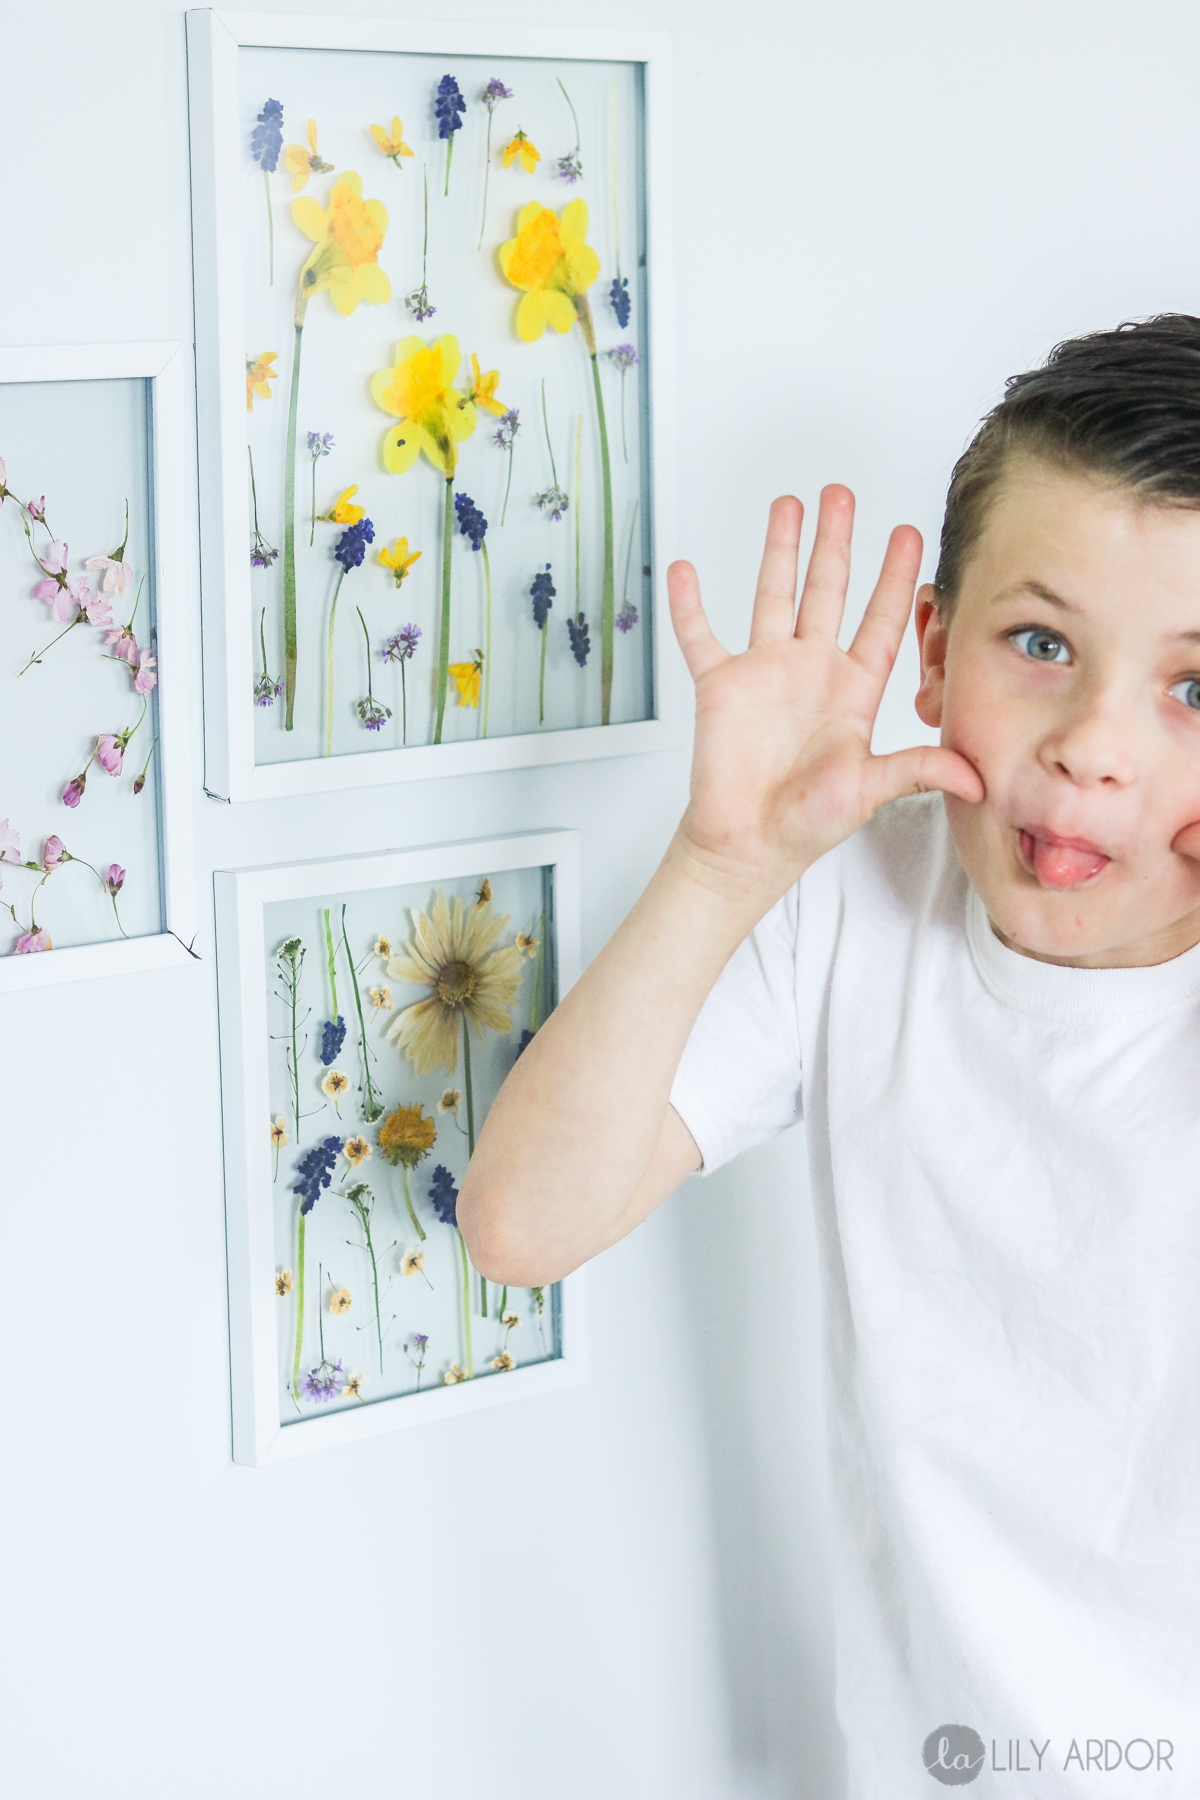
Here’s one of him goofing off..
 That’s it for now! I hope you got inspired to nuke some flowers! HAHA 😂 Happy Mother’s day! All you mama’s are the BEST and the world couldn’t do without you! Have a great day because, YOU DESERVE IT
Here’s more Mother’s day gift ideas ..
Make her some concrete garden planters! Get the full tutorial here..
Or some faux agate cheese boards using food safe resin . Get the tutorial here.


Photo String art


 Pressed flower Art
What an amazing idea! They came out absolutely gorgeous and perfect. I can’t believe that this worked even with daffodils! Alas, I don’t have a microwave, but I just might have to “borrow” a friend’s microwave someday that I go visiting! 😉 Lisa
Awe thank you Lisa. Yes!!! I was a bit surprised myself to see it works on big flowers. 😀 😀 Oh YAY that’s what friends are for. 😀 😀 It’s so much fun!!
I am so looking forward to making these for my daughter and daughter-in-law for Mothers Day…I have a question about how to attach a wire or fishing line for hanging…your photos don’t show how they are hung. Do I really need to use the frame, or could I just put fishing line between glass when gluing and leave them frameless? The frames I got at the dollar store have glass that barely overlaps the cutout opening, an d I am concerned I won’t be able to get the glass and frame to attach. Your thoughts, please?
I love your ideas, and Oleg is so precious! Thank you for all your ingenious ceeations!
Hi Teresa, Awe thank you. 😀 I am so thankful to have a son like him. Such a blessing and I’m glad to hear your enjoy my DIYS!
I used double sided foam tape to attach mine to the wall and window. Although honestly it’s not the safest route. It worked well for the photo shoot but if you look close one of the frames had eventually fallen and broke around the bottom edge. A wire or string would make more sense for sure. Oh man, I see what you mean. Not much room to glue it in. The only thing that scares me about leaving it frameless is that fact that the glass edges are sharp and someone can cut themselves. OOOH why not apply copper foil tape around the edges instead of the frame. That would look so cute. You can glue the string loop between the two pieces of glass on top and if you decide to use copper tape to seal off the edges it should hide where the loop was glued at the top. Does that make sense?
Thanks for your thoughts! My husband had suggested white duct tape for a white frame. Copper foil tape sounds even better! Where do you get it?
Ohh white duct tape wood look cute too. The copper tape is called slug and snail tape. You can find it at homedepot or they also sell it on amazon. Walmart might even have it. 😀 Let me know how it goes. 😀 !
Quick question……can I use any brick or does it have to be a fire brick? I don’t want the regular brick to explode on me in the microwave 😱
I’m sure you can use any brick as long as it has a smooth surface. I would probably stay away from anything that has too much chemicals on it because when heated it can be toxic, so I would definitely keep that in mind. But I’ve seen it done with tile too (not sure if the treatment on tile is toxic when heated though) I’m also wondering how flat a tile would make the flowers and if it would actually be enough weight from the tile.
No no, don’t use any brick, especially if it’s been wet recently. Ever been camping and thought you put a dry rock in the fire only for it to explode? Water trapped in rocks/bricks will start to boil and create pressure and explode. Be careful!
OMG I never knew that. That’s crazy!!! Totally adding it as a per-caution to the blog post. Thank you! 😀 😀
I also don’t have a microwave! Do you think this will work in the oven?
Oh that sucks 🙁 Hmm I don’t see why not. It might take a little longer though. I would give it a try.
I use an Iron with light pressure and it takes seconds to a minute. The same idea, use fabric to protect the flowers and to keep them from sticking to the iron, and the colours stay vibrant like the microwave method. For “juicier” flowers you might have to change the fabric to make sure they moisture still wicks. I’ve also used a paper towel and it works.
how do the colors stand up in the sunlight? I live in Az and the sun is brutal. do they bleach out?
Hi Ruth, I haven’t really had them on in the sun long enough to say for sure and we live in Idaho. Probably don’t get as much sunlight a AZ but, I’m sure they shouldn’t fade too much. The color’s are super vibrant and the flowers are completely dried which should give them a longer life. I find that book dried flowers are still kinda moist once pulled out which turns them brown and they loose more color once more air hits them so, I’m thinking they should be fine if dried using this method.
I suppose by now you have noticed that they do fade in the sinlight. Even here in Idaho.
Hi! I absolutely love the idea but I’m very confuse about the brick, what kind of brick is? As the ones they use in buildings? 😂 what kind of material? Or where can l buy it?
This is the bricks they put in wood stoves as insulatation to keep the heat in and heat the home. You can use any brick as long they are flat. I’ve also seen people use tile I’m just not sure if it becomes toxic when heated in the microwave. Hope this helps let me know if you have anymore questions. 😀
Amazing idea! Just curious about how exactly did you use the glue? Did you glue the edges of the glass or put glue directly on the flowers? Will the glue show?
Also, will any hot glue work or do you have a go-to.
Thanks!
Hi Carla, 🙂 Glad you like it. I didn’t glue the flowers at all I only glued the two pieces of glass together and into the frame with the glue. If you don’t want your flowers to have movement between the glass than set a brick on top while the glue is drying. 🙂 And I made sure the glue wasn’t visible. I used hotglue for this project since it was the quickest and did the job great. Depending on what project I’m doing I like to alternate between E6000 and hotglue. I probably wouldn’t bother doing E6000 for this project it could get messy. hot glue keeps it clean and quick and it’s strong enough to hold the glass in place.
Hi! I’m confused with the glue as well. Where did you place the glue for the two pieces of glass? All around the edges or just 4 dots on the edges? I’m nervous I’ll be able to see the glue.
I did mine all around the edges. Nice thin line. My frame was thick enough to cover it. If your frame is thinner you can try 4 dots although I don’t know how it will hold. Hope this helps. (maybe do like 10 dots in total)
Hi Lily, this pressed flower diy tutorial is so awesome. Saw you joined a DIY contest right ?
Yes I did at dear lives I won the toothbrush. 😀 😀 😀 Thank you 😀 so glad you like the flower diy.
I absolutely love this idea!!!!
Awe thank you Penny so glad you love it 😀 😀
How did you hang them on the window?
I used super strong double tape 😀 😀
Are those bricks too heavy? or is the weight safe for the microwave?.
Thank you, i want to do this right now 😀
YAY I’m so glad you liked it. I don’t know exactly how much each brick weighs but two bricks at a time worked great in the microwave. You can get away with using once brick if you’d like by substituting the microwave tray for the bottom brick. I used two bricks because my microwave was up high and harder to get to. It was easier to remove the bricks than to keep getting up on the chair to get to my microwave. Plus with my setup it felt safer for the flowers to do it with two bricks. 🙂 Hope this helps.
Thanks for the tutorial. The only fire brick I could find was a 6-pack for $30. So I used a heavy, flat bottomed microwavable dish and it worked great!
Oh wow how cool! I guess anything flat and microwavable would work. Didn’t realized the bricks are only sold in packs of 6 and for $30 that’s a bit too much. Glad you got it to work. Thank you Melanie. 😀
I was wondering how long does the flowers keep it’s color in this DIY
They hold up pretty well. I’ve noticed slight discoloration after about 3 months but nothing major. The pinks still look pink and purples hold up really well. The white stay white. I would have to say they just slightly faded that’s it.
Im still confused about the glue. Did you put the flowers on one glass panel then glue around and quickly put on the other glass panel. Or did you put it together and glue around the outside edges. Either way i love your pictures! Thank you
Hi Linda, so I put it together then glued around the outside edges making sure there was enough presser to keep the two pieces of glass tightly together. Hope that makes since. Awe your too sweet so glad you like them thank you Linda 🙂
Great idea. However I noticed so so many grammar errors in your post. Don’t mean to be critical, but please get help editing. Thanks for info.
Thank you. I appreciate it 🙂
Gee. I noticed that you couldn’t be grateful for the tutorial without showing off how darn grammatical you are. Please get help being kind. Thanks.
Beautiful gift, Lily. You did a great job on the picture and the instructions for putting it together. In addition to glueing the glass plates together, it might help to also put hot glue on the inside of the wood frame, then reinstall the glass, for extra security. Thanks. Rubi
Yes that’s great tip. thank you Rubi 🙂
I want to know where you got your cool glue gun!i love your flower idea too!
Hi Doreen, I got my glue gun at home depot! It’s a Ryobi glue gun. Battery operated so there’s no cord ever in my way plus it’s rechargeable. Oh and also super strong way stronger than the mini ones. 🙂
Many years ago I loved to make stationery with dried flowers. I took wax paper (wax side down) and the plastic wrap (between the wax paper and the stationery) and put the iron on HOT HOT HOT!
Then I ironed it all, trimmed the edges, and voila dried flower stationery.
I love your method of drying flowers Joanne. Sounds super easy and pretty 🙂 .
Oh my! I am surprised that you contacted me. Thank you very much. I know that your time is important. Again…thank you!
Oh course. I appreciate your time 🙂
Is there a video of this process?
Yes there is. https://youtu.be/23Hacry-Qvw?t=1m2s
Hi Lily, thanks for this tutorial! I picked up some wood frames from Dollar General to create a nice, clean look in my living room with my wood floors and frames.
Can you tell me, without the back of the frame how did you choose to hang them on the wall? I am thinking some kind of command strip but am looking for suggestions.
Hi Mae, how exciting your living room will look lovely. 😀 I tried using double tape. It didn’t do really well and eventually fell off. I’m not sure if it was as strong as the command strips though. I would def try them though because it give it a clean look. My second option would be to hotglue a strip of string across the top and hang on a push pin.
Muchos Gracias for your blog article.Really thank you!
These look stunning! I’m so happy this trend is back in! I’m flower obsessed, so I can’t wait to try this…
Thank you Brooke-Lyn I love how trends always cycle around. Totally flower obsessed as well. These are so fun. Let me know how it goes 😀 😀 Happy Crafting!
Beautiful! Going to try his! I love the frames on the window! Did you use command strips for the window? Thanks
YEs that’s what I used. So glad you liked them 😀
I tried this and they turned out wonderful!! I will caution, when drying out my flowers without the top brick, my last batch of flowers caught on fire! That got my adrenaline going! So just be careful not to microwave them too long.
OH wow how scary! Yes be safe. I’m glad to hear they turned out great.
Thanks for this idea. I am thinking to maybe laminate the flowers to turn them into bookmarks. Has anyone else tried this?
OOOH that sounds so pretty. Nope haven’t tried it but I would love to try that. LEt me know how it goes if you do?
Hi ms.Lily i love your diy so smart to preserved the beauty of flower after picking it up hehe im just confuse what kind of heat it need in the oven? Hight heat or meduim heat?- menchie frm PHL.
Hi, I’m so glad to hear you liked this idea. Are you referring to a microwave oven?
Ps. How long the vibrant color will last or the the freshness of it?hehe thank you
It really depends on the flower. I have flowers that were purple and yellow and the color still look very vibrant but I did a few pink flowers and those have faded quite a bit.
Hi I want to try this, yours look beautiful. Bit I have a question – how did you fit 2 pieces of glass back into a single frame? Do you leave the back off the frame? If so, how do u keep the 2 pieces of glass securely together and in the frame???
Hi Lin, I removed all the backing from the frame and once I displayed my flowers on the glass and put another piece of glass over it I simply used hot glue and secured the glass to the frame all around the edges. Hope this make sense. Let me know if you have anymore questions.
Hello ma’am ,it was really beautiful idea i had never thought.hoping more beautiful ideas in future
Thank you 😀 😀 I am so glad to hear you liked it.
Hi Lily,
How did you get the petals to fan out on the smaller pink and purple flowers without them breaking off after they were dried?
Love the tutorial and thanks for sharing!
Hi Tara, thank you so much. so I tried to lay the pedals all in one direction as long as they’re not fanning out when your laying them out to dry. Once you apply the brick on top it’ll squeeze them flat and that should also help keep the pedals in tact.