How were your Holidays?
Hello😀, Happy January! How was your Christmas and New years?
We got to visit family for Christmas in California. Attended Christmas service. Spent quality family time! Lots of cooking and baking! Oh and we played white elephant for the first time. Tony decided to wrap his (male) gift in a victorias secret box! The poor guy that picked out the gift was so scared to open it! Oh man we had a good laugh!
For New years I got a cold so we stayed in watching family movies. Later that evening our awesome friends took us out for dinner! 😊 Couldn’t have spent the time better!
New Year New Challenges
This month has turned out to be far from crafting for me. I love a fresh start to the year and this year the first thing I decided to do is embark on a 30 day home organizing challenge. Have you ever tired something like this?
Okay,…to say the least I suck at organizing!! No REALLY🙈! It just doesn’t not come natural to me.
I went as far as googling how to organize my home and was a bit sad with what turned up in the search results. I was looking for lists,categories, where to start and instead I found a bunch of articles none of which related to my home at all. Sneaky internet must of known I wasn’t happy with the search results because that same evening I stumbled on the ” tidying up ” show on netflix. After watching only one episode and taking notes I had an overall idea on where to start.
YAY!! My plan is to invest at least 30 minutes to 3 hours a day organizing one area at a time and by the end of the month I hope to have the whole house organized. I wouldn’t say I’m a super clean person🙈. I clean daily (sorta) and deep clean my house out about 1-2 times a year. Just throwing junk away! However, I’ve never approached it with the mindset of organizing and going the extra mile to make a little home for every category. I’m super excited to share all the cool little organizing tricks I’ve picked up along the way!!! ( hopefully relatable to your home) I plan on sharing photos and my 30 day challenge with you sometime early next month or maybe even this month if I finish sooner. Wish me LUCK!!
Okay onto this awesome gift idea DIY!
NOTE you do not need good handwriting to make this. Trust me, my handwriting is not great. In fact I can hardly read what I wrote half the time myself. If that’s something you’re worried about than I’m hear to tell ya. This DIY does not involve any writing at all! It’s all . It’s one big print that’s transformed onto fabric. You won’t even need to touch up the printed letters. PRETTY AWESOME RIGHT!
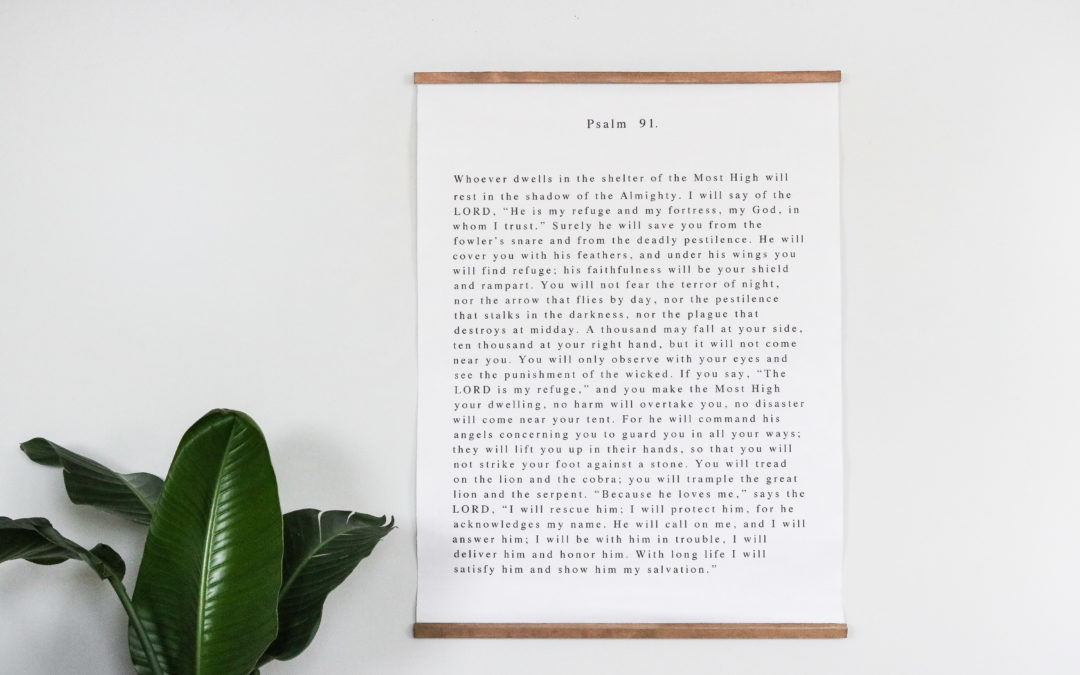
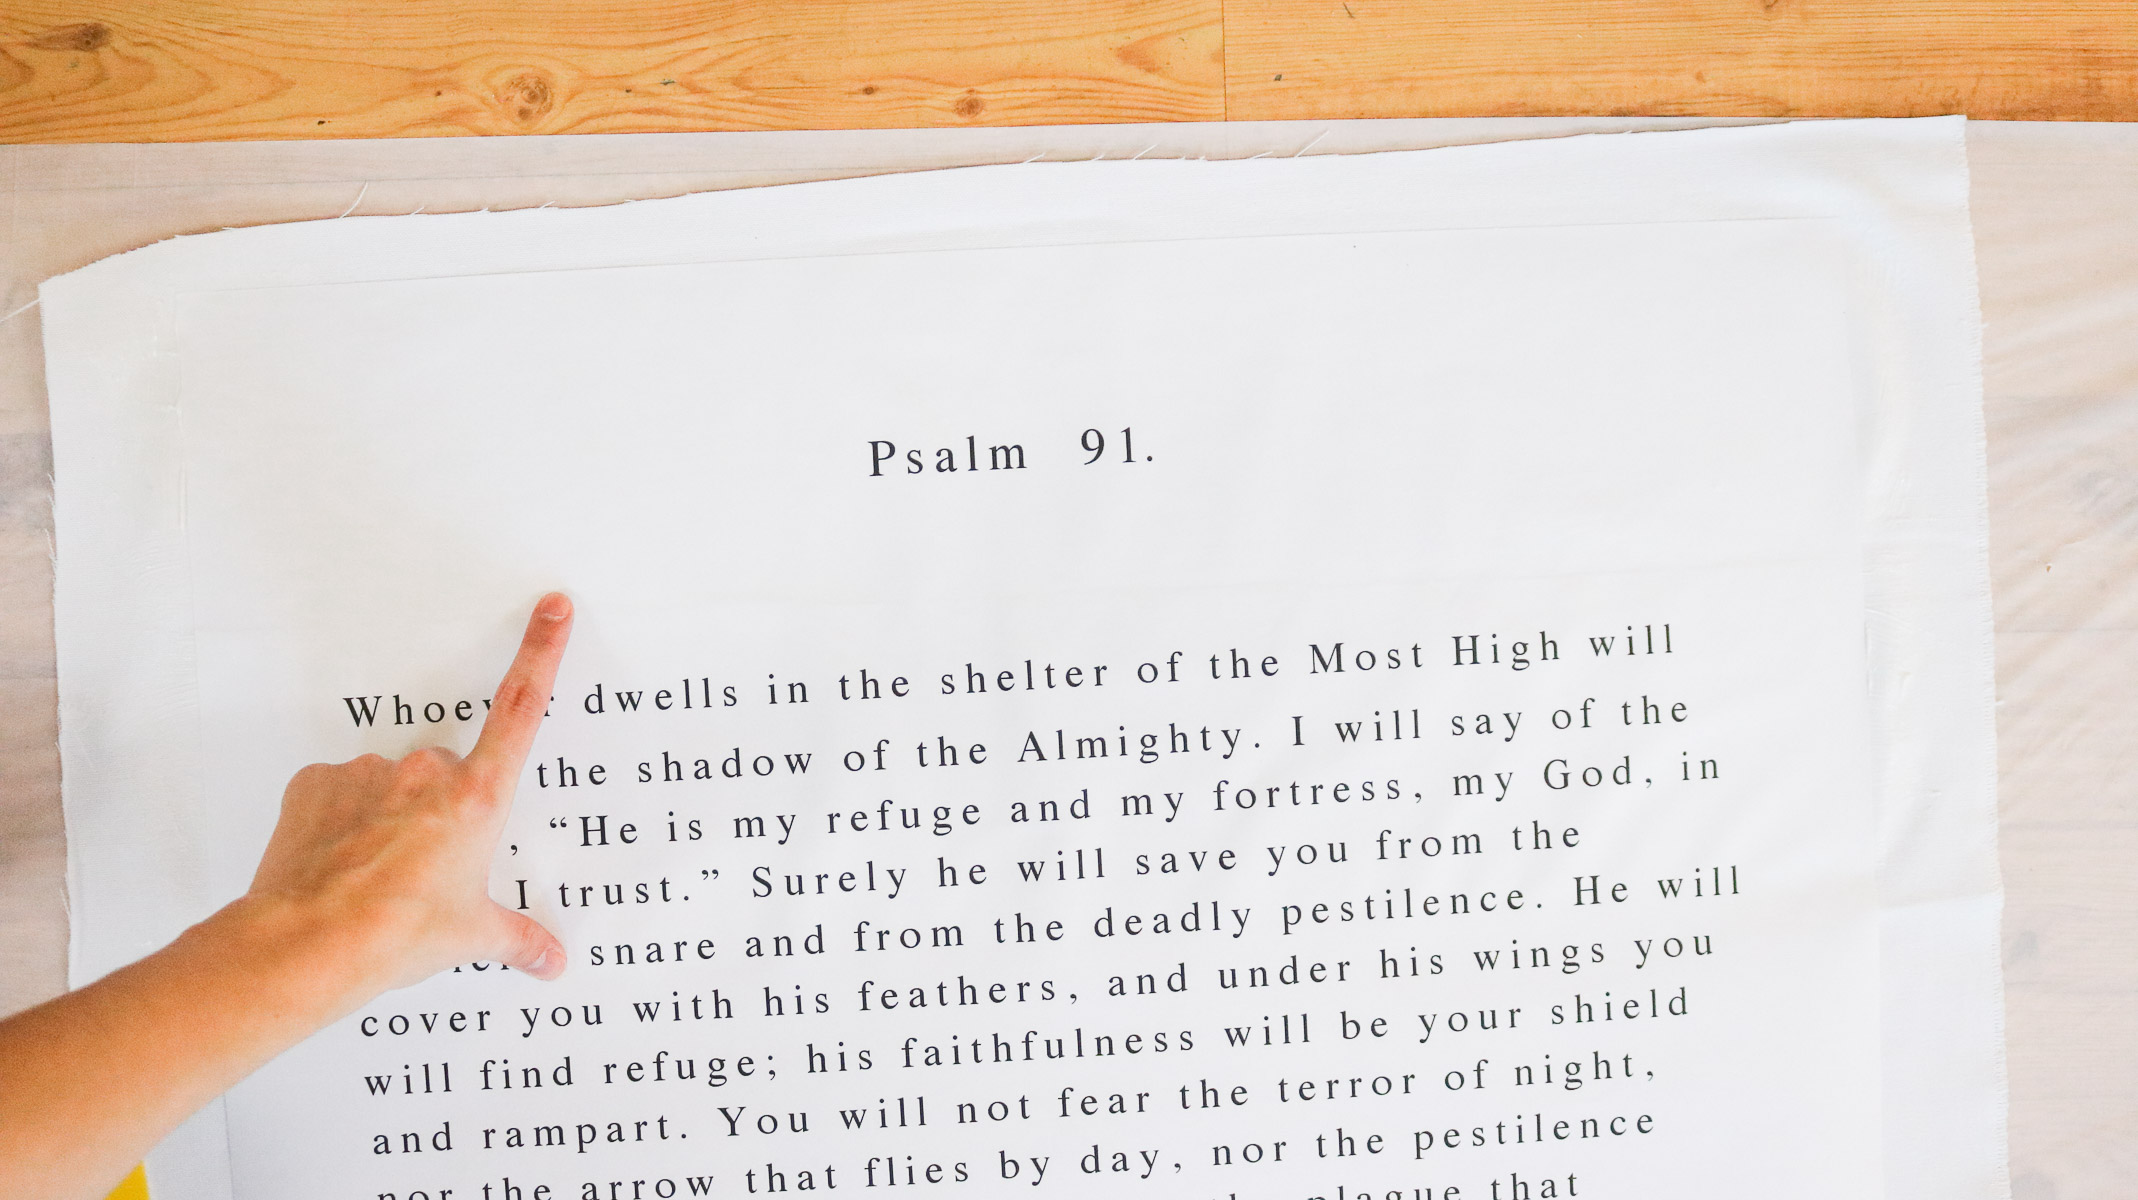
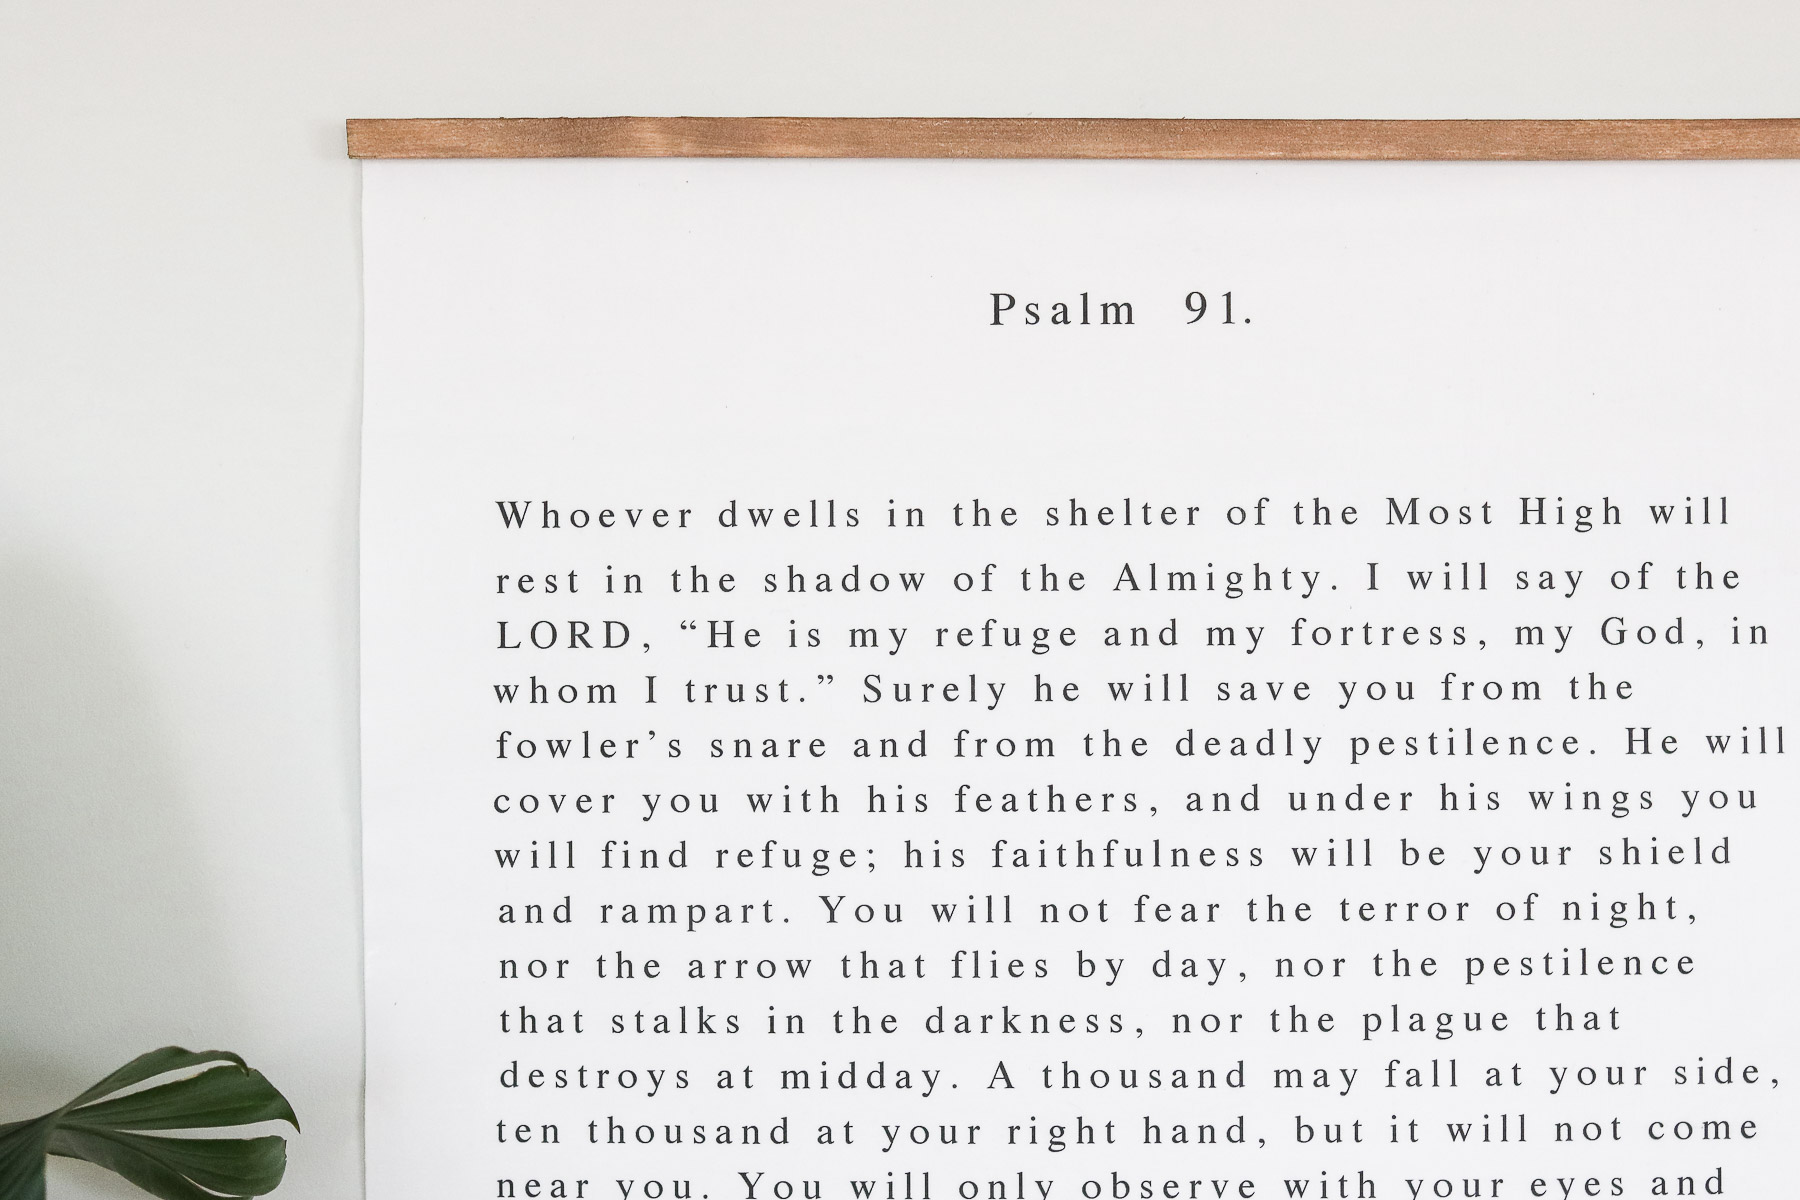
Bible Verse Gift Idea using a print
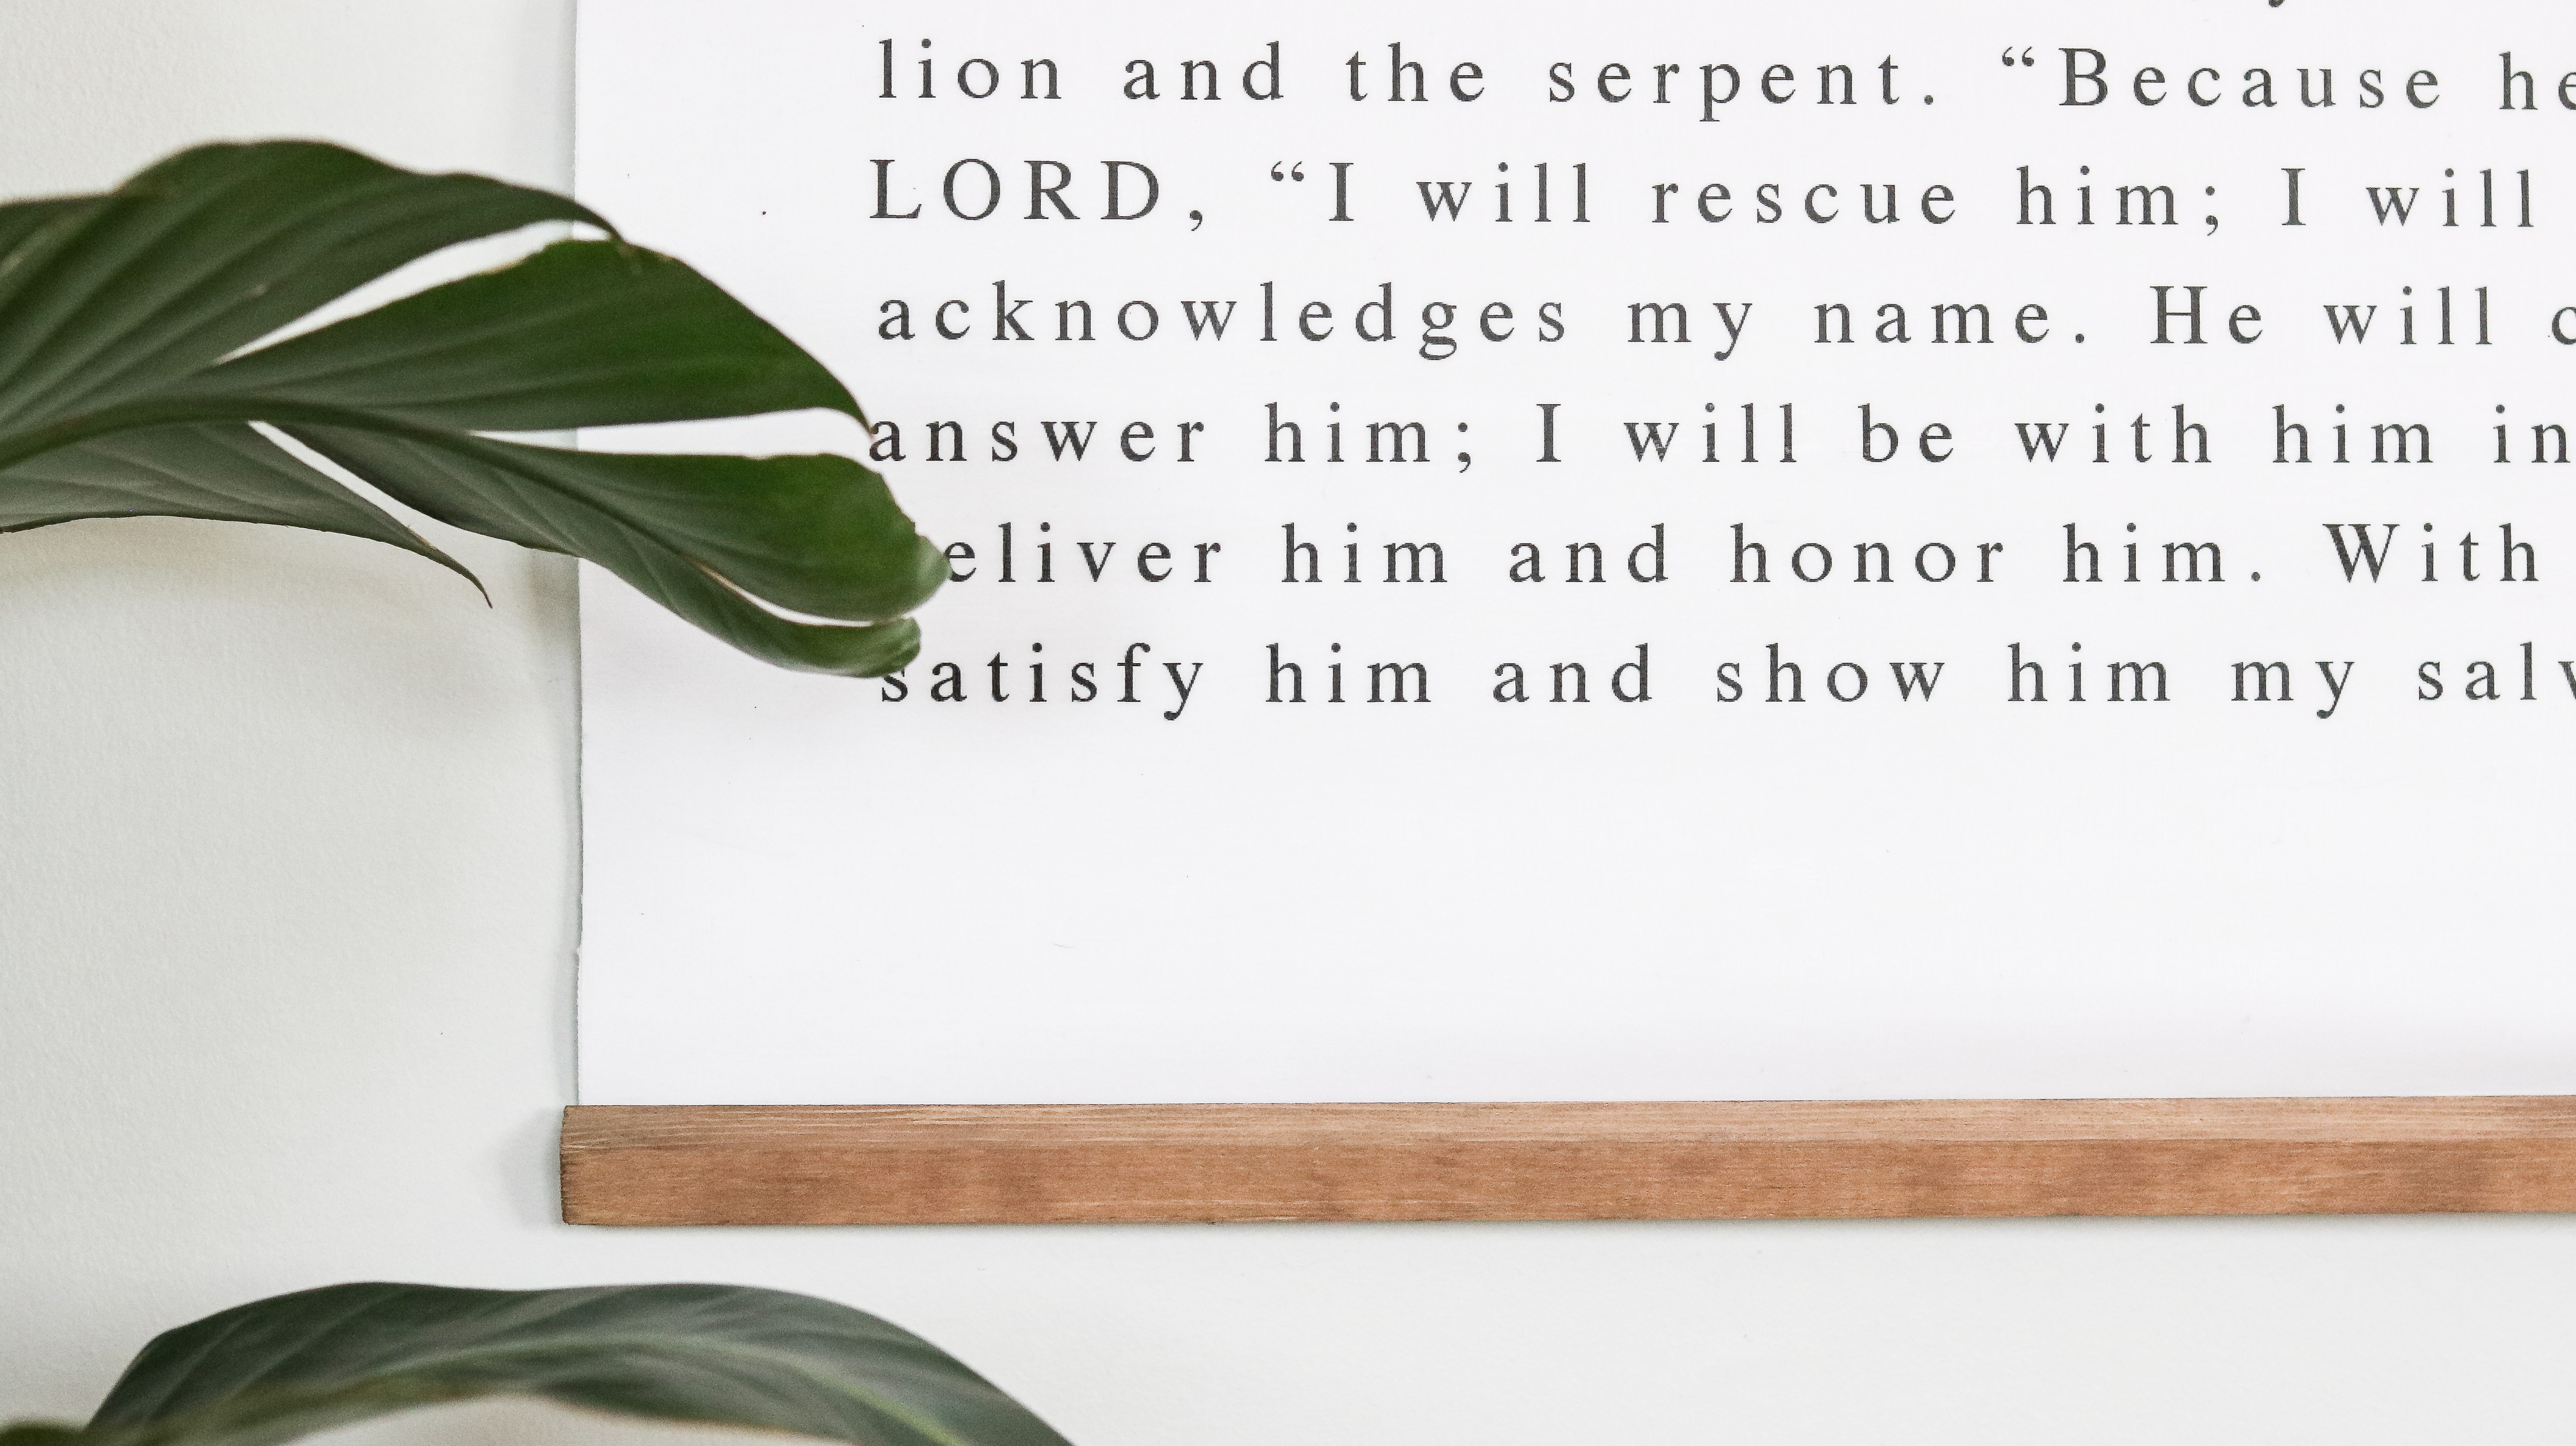
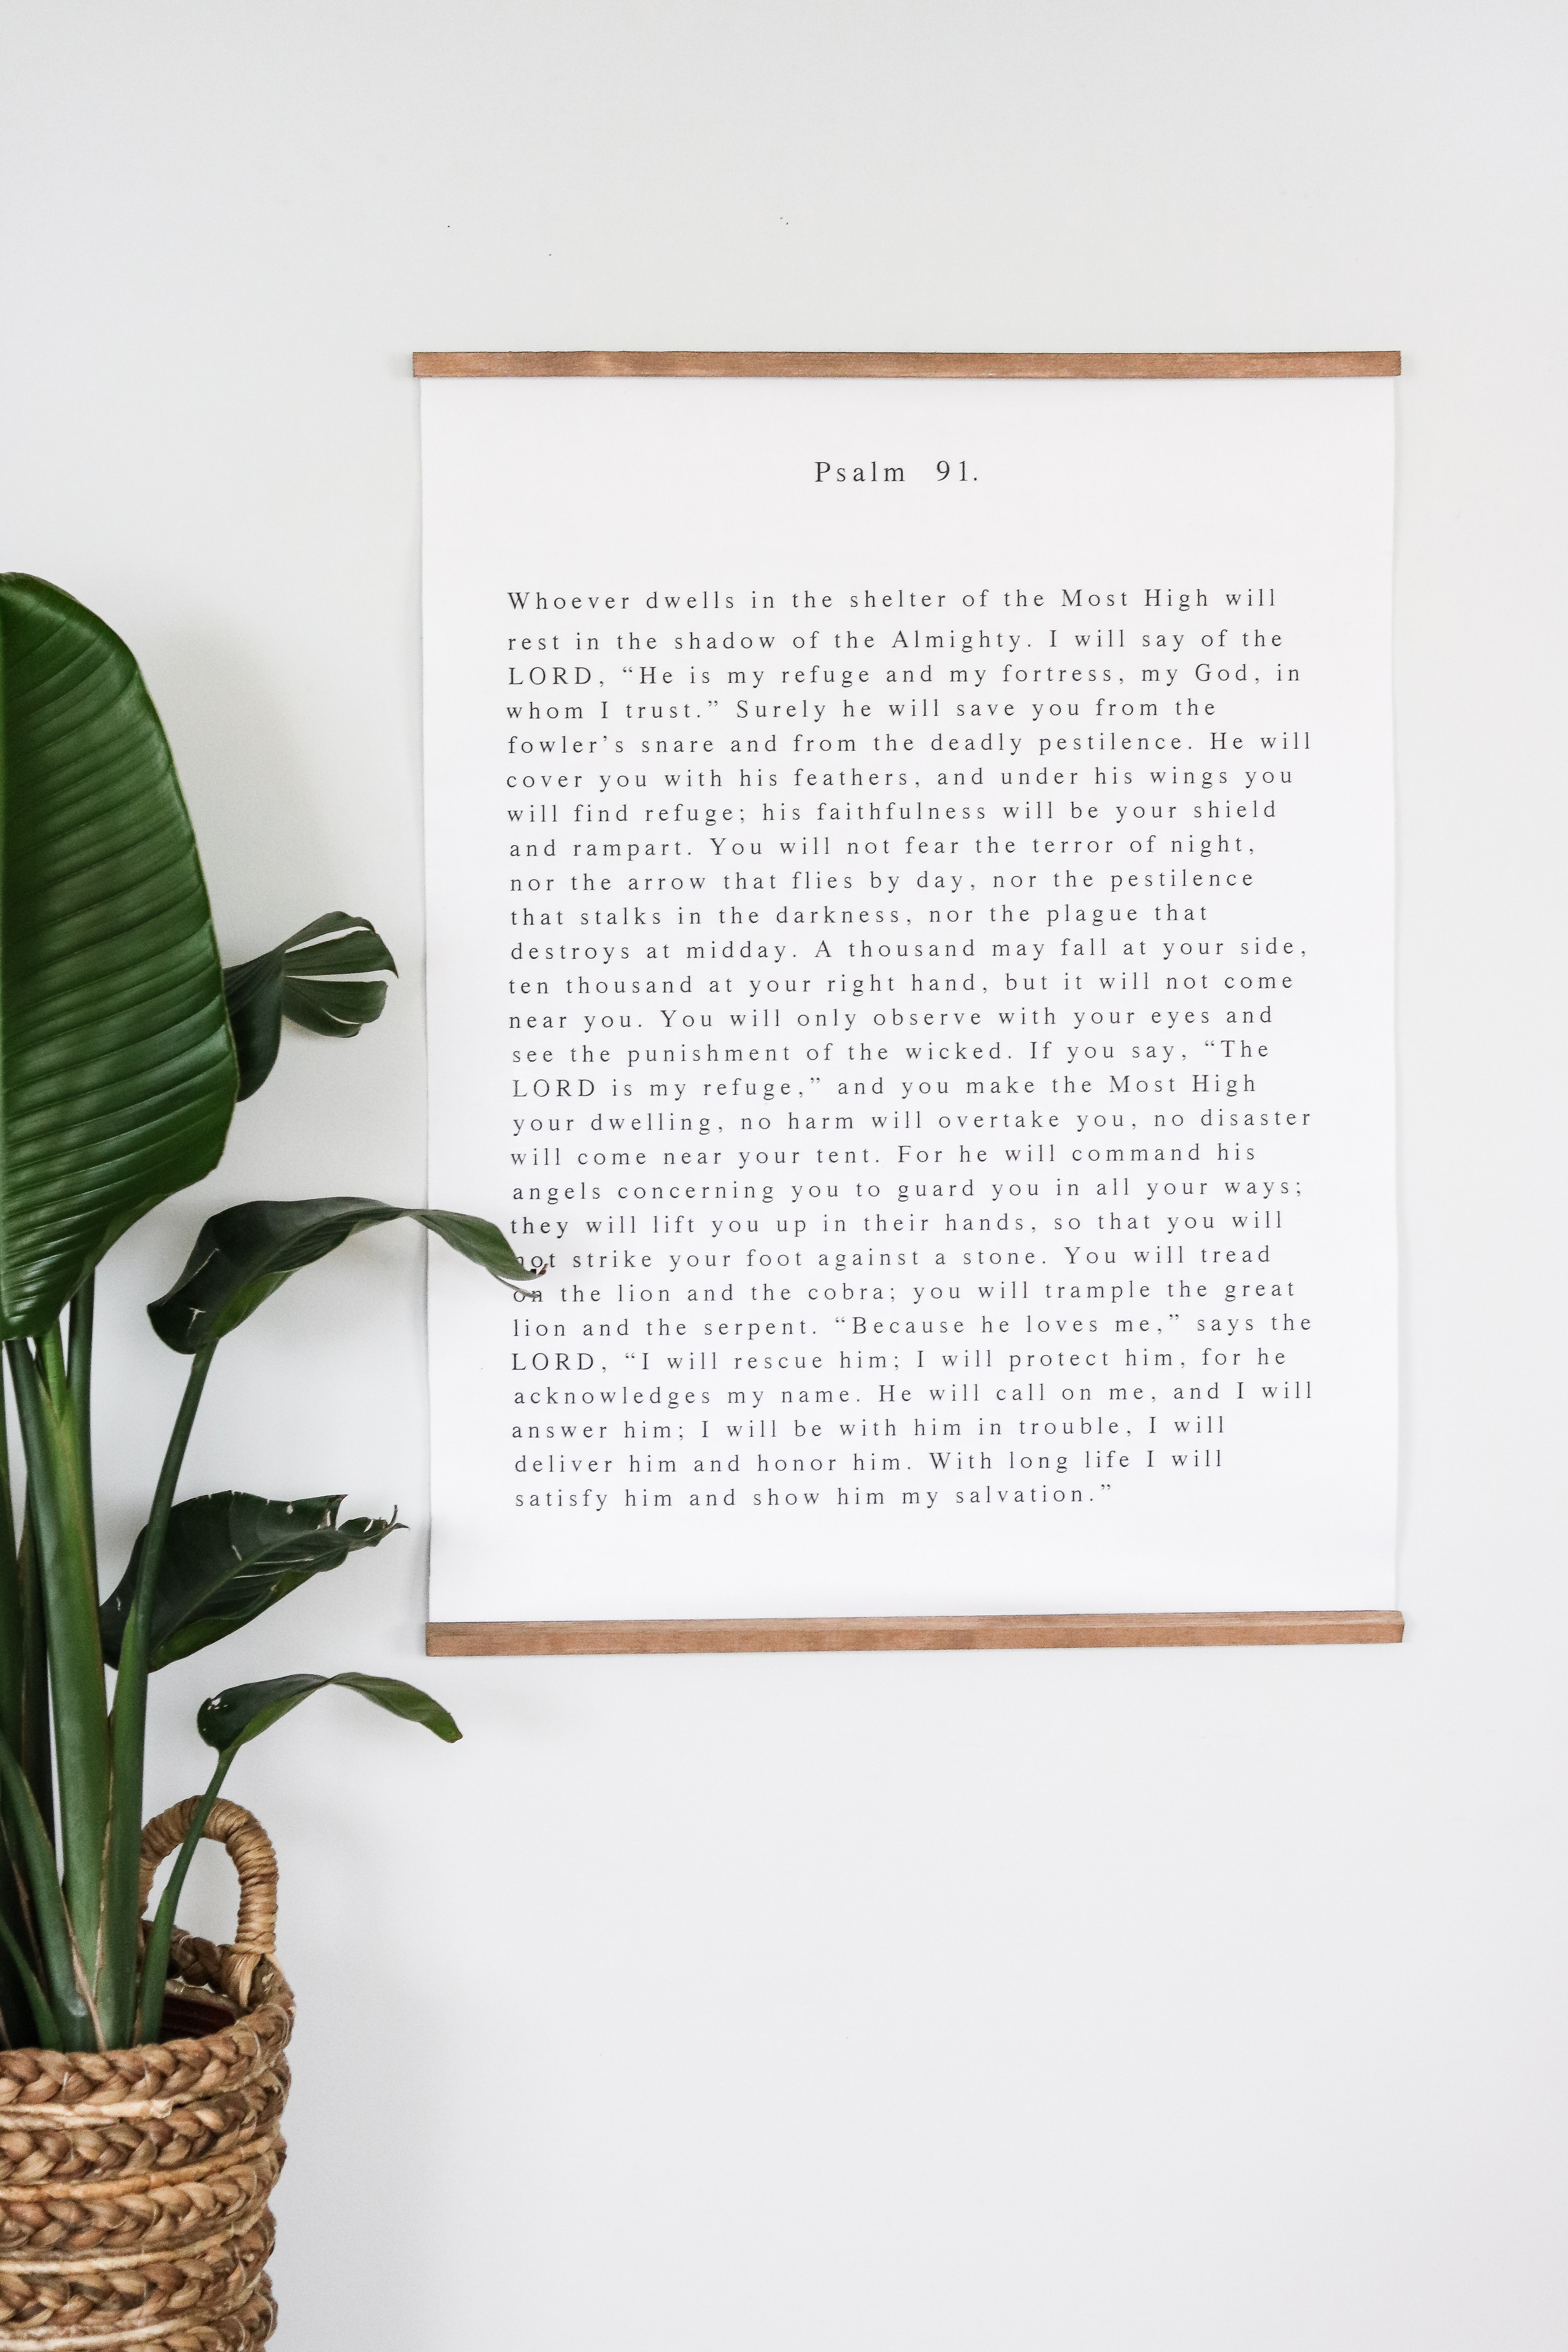
This gift idea was inspired by my mom. When we were kids she would teach the 91st chapter of Psalms to us daily. September of last year we celebrated our 10th year anniversary and since the first day of my marriage I’ve lived hundreds of miles away from home. It’s not easy being away from family and in honor of child hood memories I decided to create this tapestry for my parents as a Christmas gift.
I’m actually pretty upset with myself. I wish I would of had time to share this way before Christmas because this made such a cute gift. I guess it would make sense though because it was quite a struggle getting this project right so, I guess it’s better late than never🙈! On the upside if you have an anniversary, mother’s day, father’s day, or a special birthday coming up this will make a cute gift too. I ended up making three of these and they’re so easy to make my hubby actually made two of them all by himself as Christmas gifts for friends and family. Oh or you can just make this as super cute decor for your home with a meaningful message you want to be reminded of.
TIME NEEDED:
This project takes about an hour to complete. That doesn’t include a trip to the store to get your print printed. 😊 I got my print printed at staples on regular paper ( inkjet printer). My favorite place for prints.
You’ll need to create a document with the typed up psalms 91 and save it. Then get it printed at the print shop.
SUPPLIES:
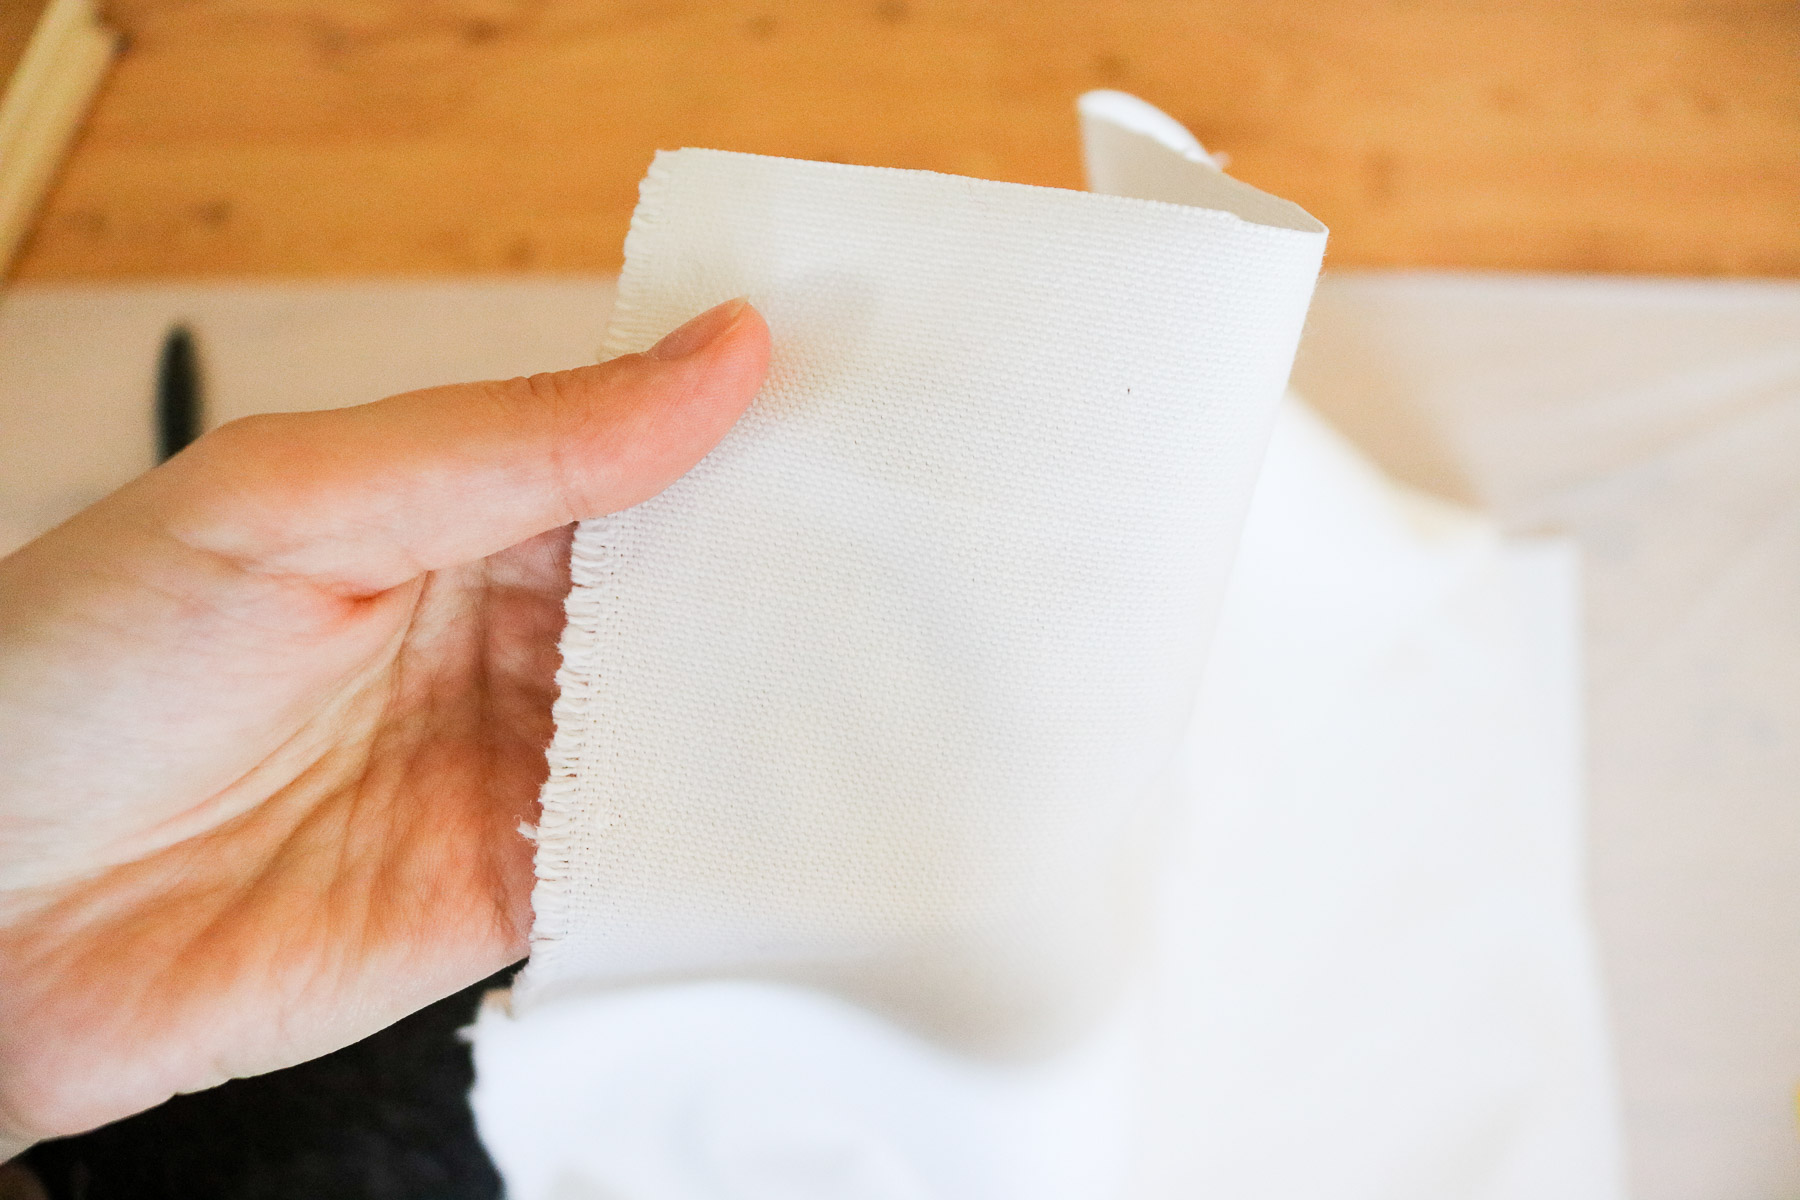
- Fabric ( I purchased mine at Joanns fabric. It was a thicker canvas fabric. Or white upholstery. Photo example below shows close up texture on my fabric.)
- Fabric Mod Podge
- Matte Mod Podge
- Bible Verse Print (mine was 25″ width and cost around $3 ) (or any print of your choice preferably done by an inkjet printer. I haven’t tried this with a laser printer. Not sure if it would smudge or not)
- brush
- dowels
- stain or paint
- plastic spreader
- plastic (to protect your floor. I used a dollar store table cloth)
- scissors
- staple gun
TOTAL COST: Around $25
This will also depend on how big you decide to make your tapestry. The bigger it is the more mod podge you’ll need and more fabric.
Turning paper into Fabric – WHAT DIDN’T WORK!
This was quite a challenge. Originally I had planned on doing a print transfer onto fabric. To successfully transfer a print onto fabric a laser printer is required. Only problem was the biggest size all the printing shops could offer on a laser printer was 12″x18″. Which was way to small for me! However, they all mentioned there inkjet printers could print up to 3 feet in width! YAY! I thought. To bad inkjet prints can’t be transferred!
If you’re not familiar with the difference between the two types of printers. Laser printers apply the ink in a way that doesn’t seep into the paper as much making it easier to transfer. Where as the inkjet printer soaks the print into the paper more. (correct me if I’m wrong that’s what I picked up from my research)
After multiple trips to the print store and hitting pretty much a dead end with this project a crazy idea sparked ! I’ve never seen this done before but I starting thinking…. A transfer takes a lot of work. Plus I would have to touch up the spots that didn’t transfer to well! Why not, use an inkjet print and turn it into fabric. I quickly searched youtube to see if I could find any tips and came across this video on youtube. That’s where I learned about fabric mod podge. BINGO! This DIY was on again!
Why you need both types of mod podge!
-
- matte mod podge
-

- fabric mod podge
If you’re wondering why I used two types of mod podge for the project..
Here’s why.. The original matte mod podge is a pretty runny consistency which makes it perfect to apply on top of the print. However when applied to attach the paper to the fabric it’s too runny. It turns the paper soppy and crumples up pretty quick. So, to glue the paper to the fabric I used the fabric mod podge which is way thicker in consistency. The reason I couldn’t use this thicker mod podge to seal the top of the print is because it’s to thick and would smudge the print. That’s where the runny matte mod podge came in handy and was way easier to apply without smudging the print. Hope this makes sense! 😊
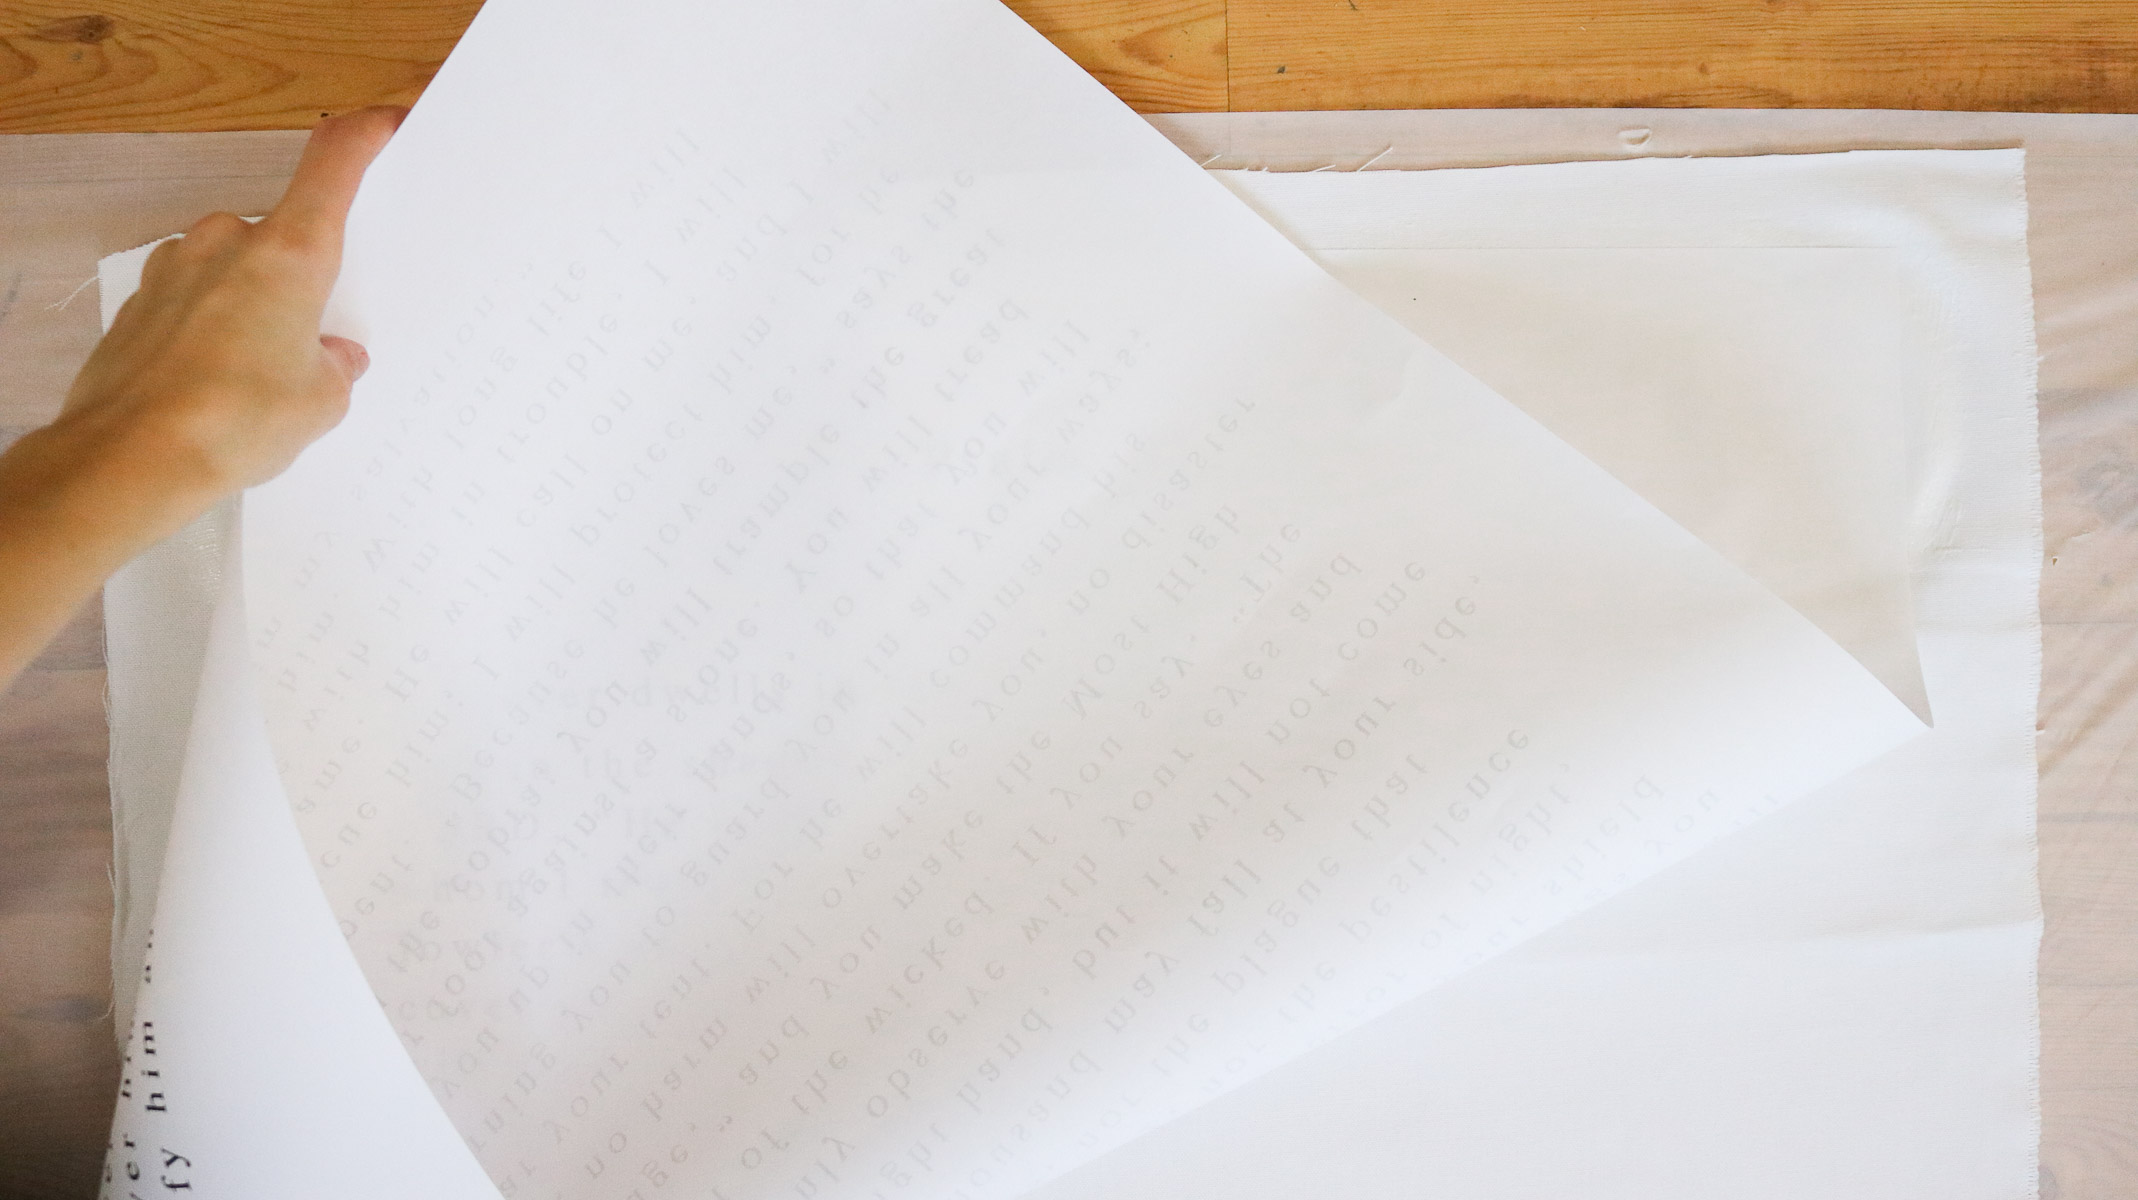
Step one : Securing your print to your fabric!
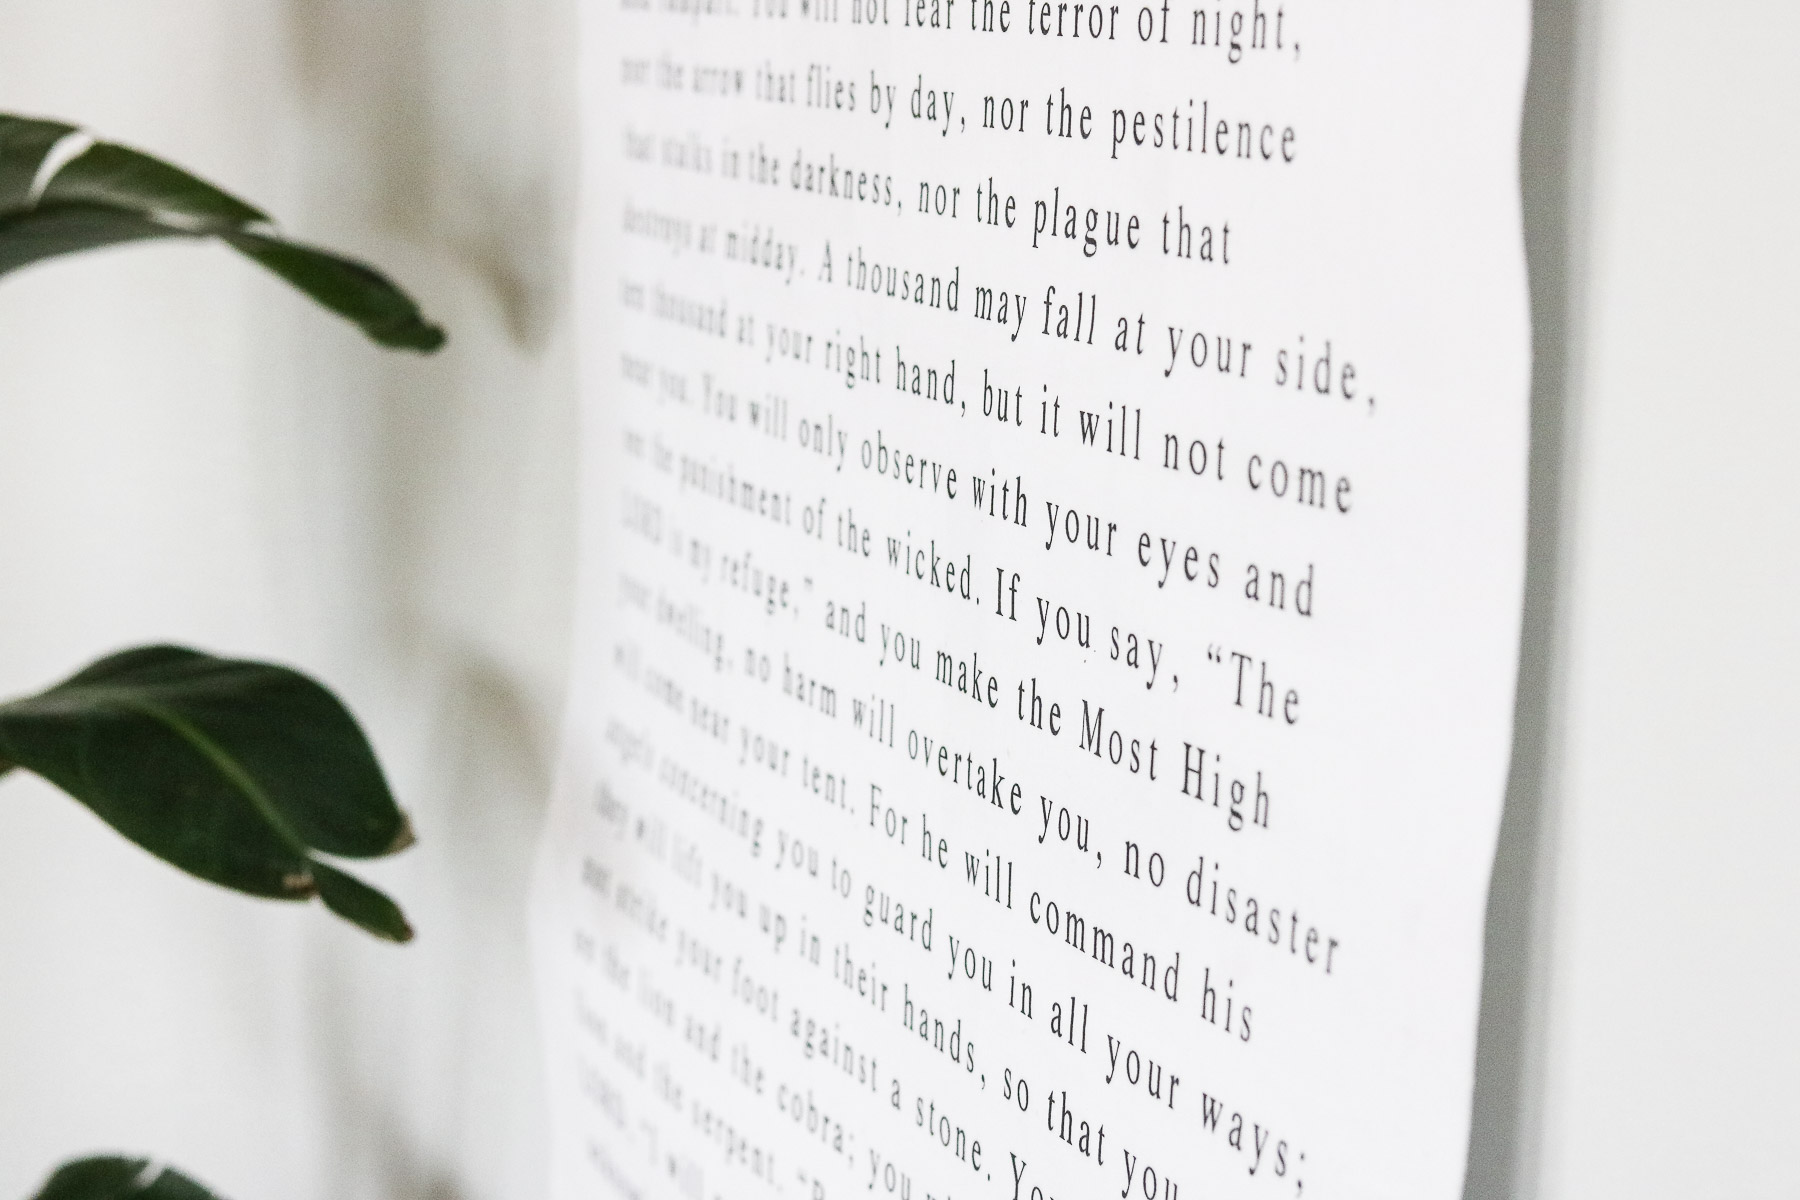
Okay to begin start by ironing your fabric if it’s crumpled. Than lay your print onto your fabric making sure there’s plenty of fabric around the edges. I left about 3 extra inches of fabric all around just in case. Than pull back your print. Apply a generous amount of fabric mod podge onto your fabric with the brush. I worked in about 5 inch strips at a time. This stuff dries quick. Gently lay your print over and use your plsatic spreader to gently push out any bubble working your way from the center to the edges. Be careful not to get any mod podge onto your spreader as you don’t want to smudge your print while pulling out bubbles.

In the photo the width of my fingers shows the amount of glue I would apply at one time. Just a strip of glue that thick across the fabric at one time. Also we worked our way from the top of our print to the bottom.
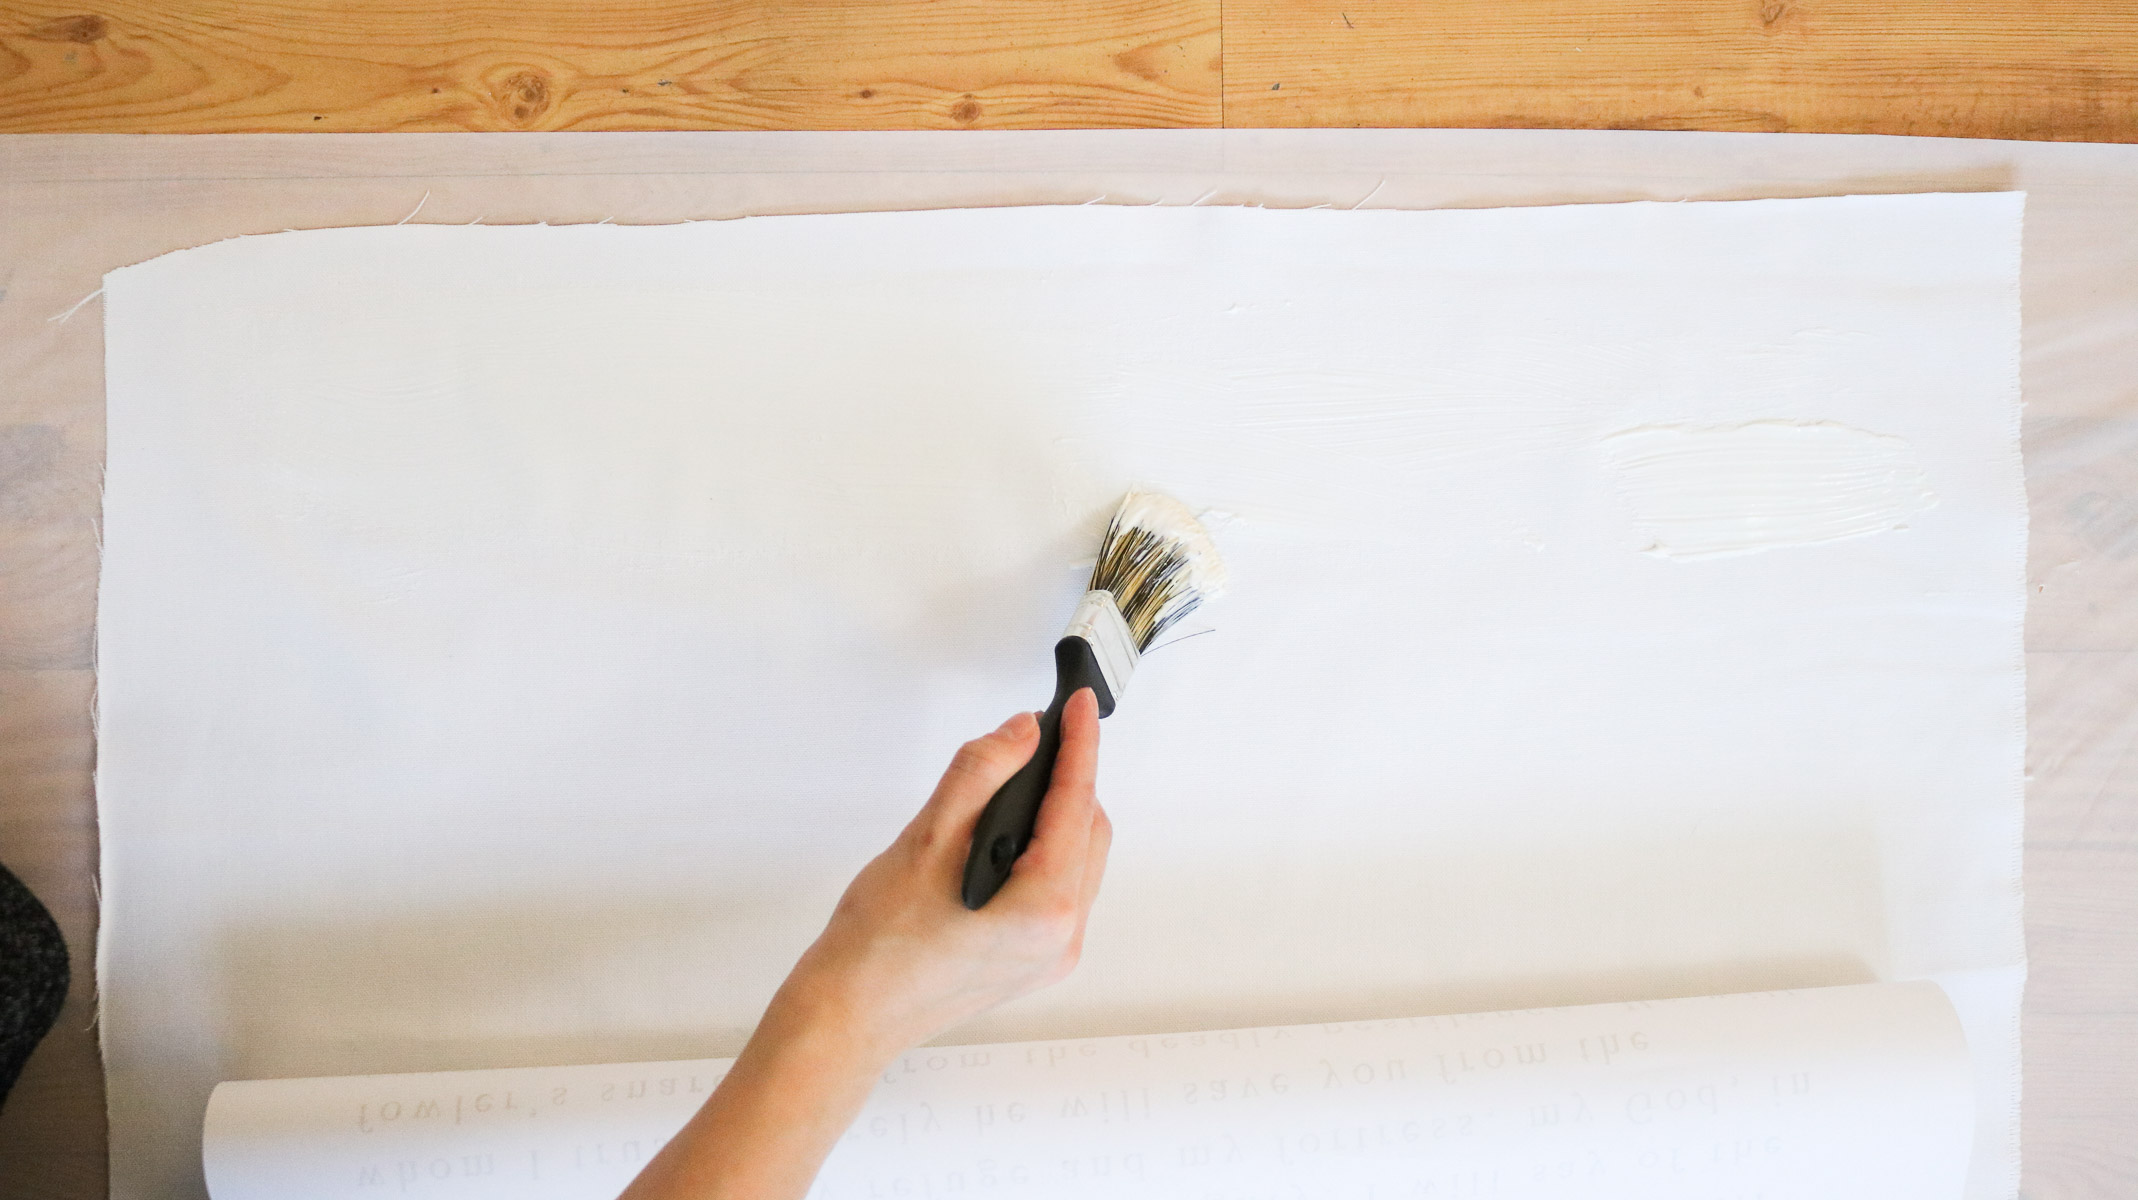
Here I am with the print pulled back applying my first 5 inch strip of mod podge.
Once you attach the first 5 inches of your print pull your print back gently. Do not fold or pull to hard as this will create a crease line. Let it lay on it’s own and to avoid gaps of no mod podge use your brush to get into the crease as much as possible.
Keep applying 5 inch strips of mod podge and gluing the paper to the fabric following these steps until you’ve glued the whole print to the fabric.
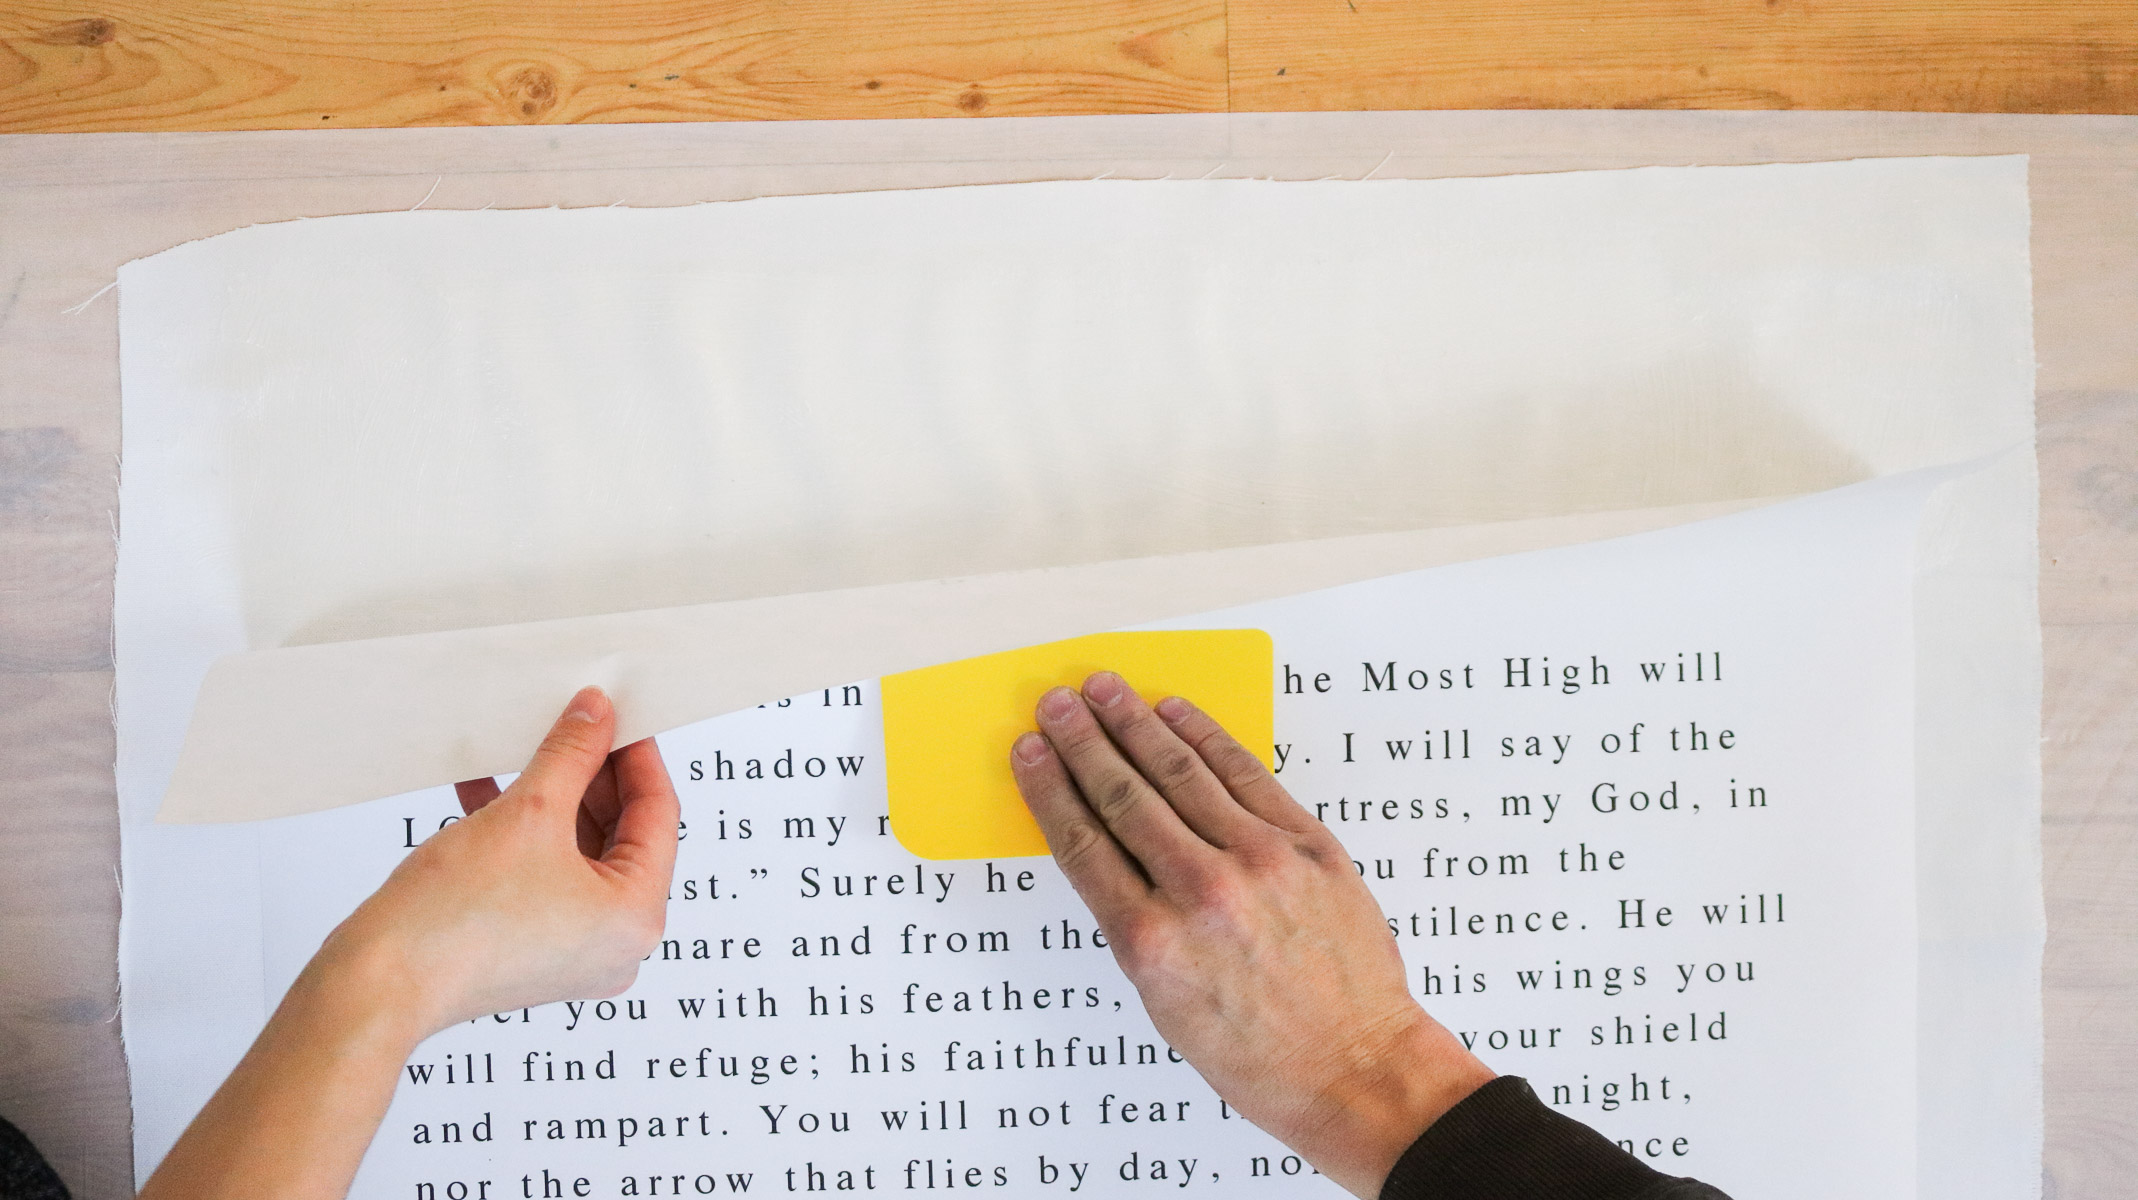
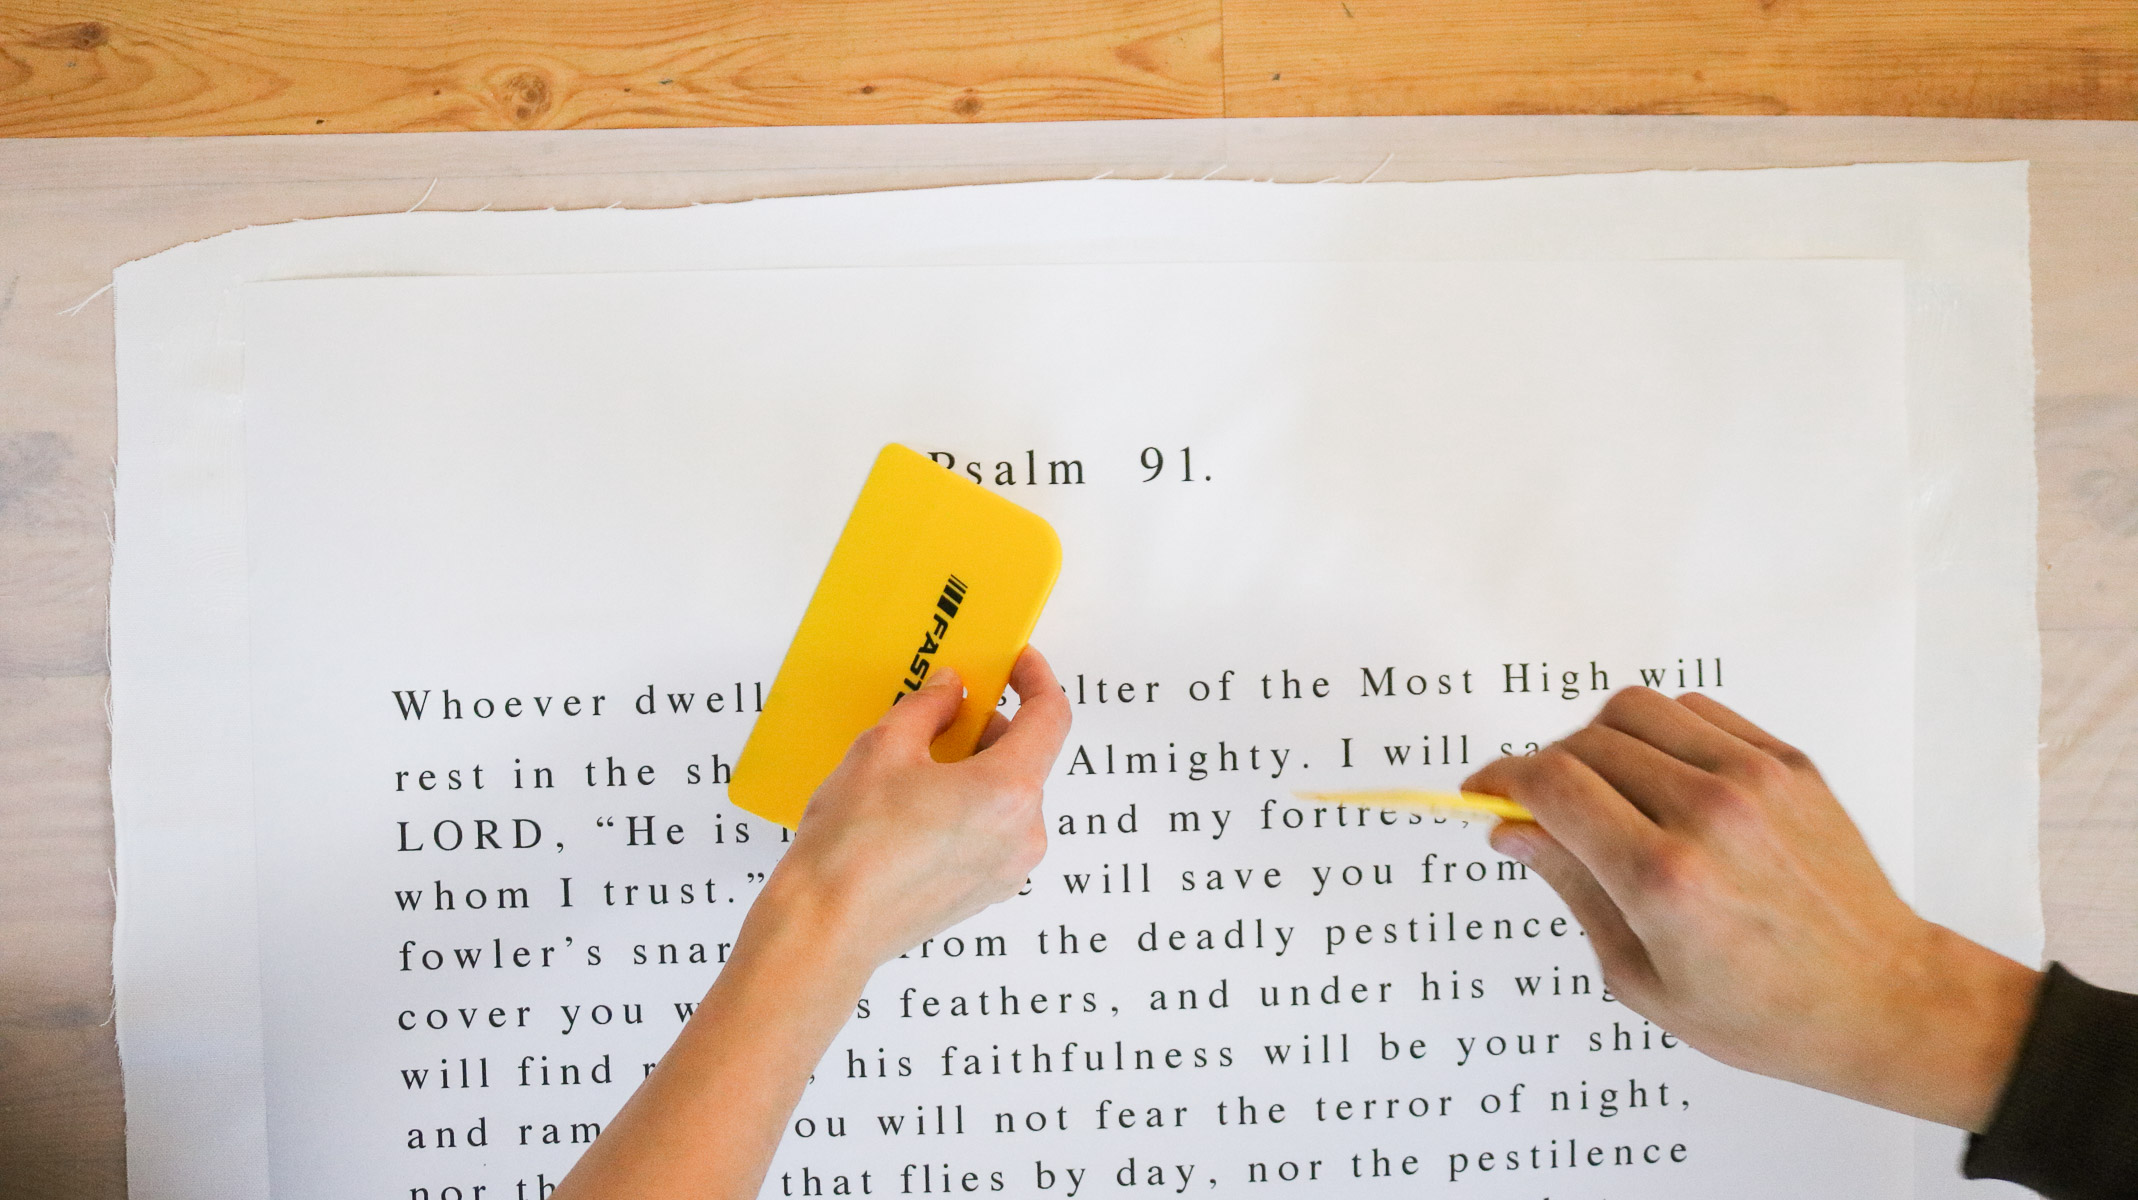
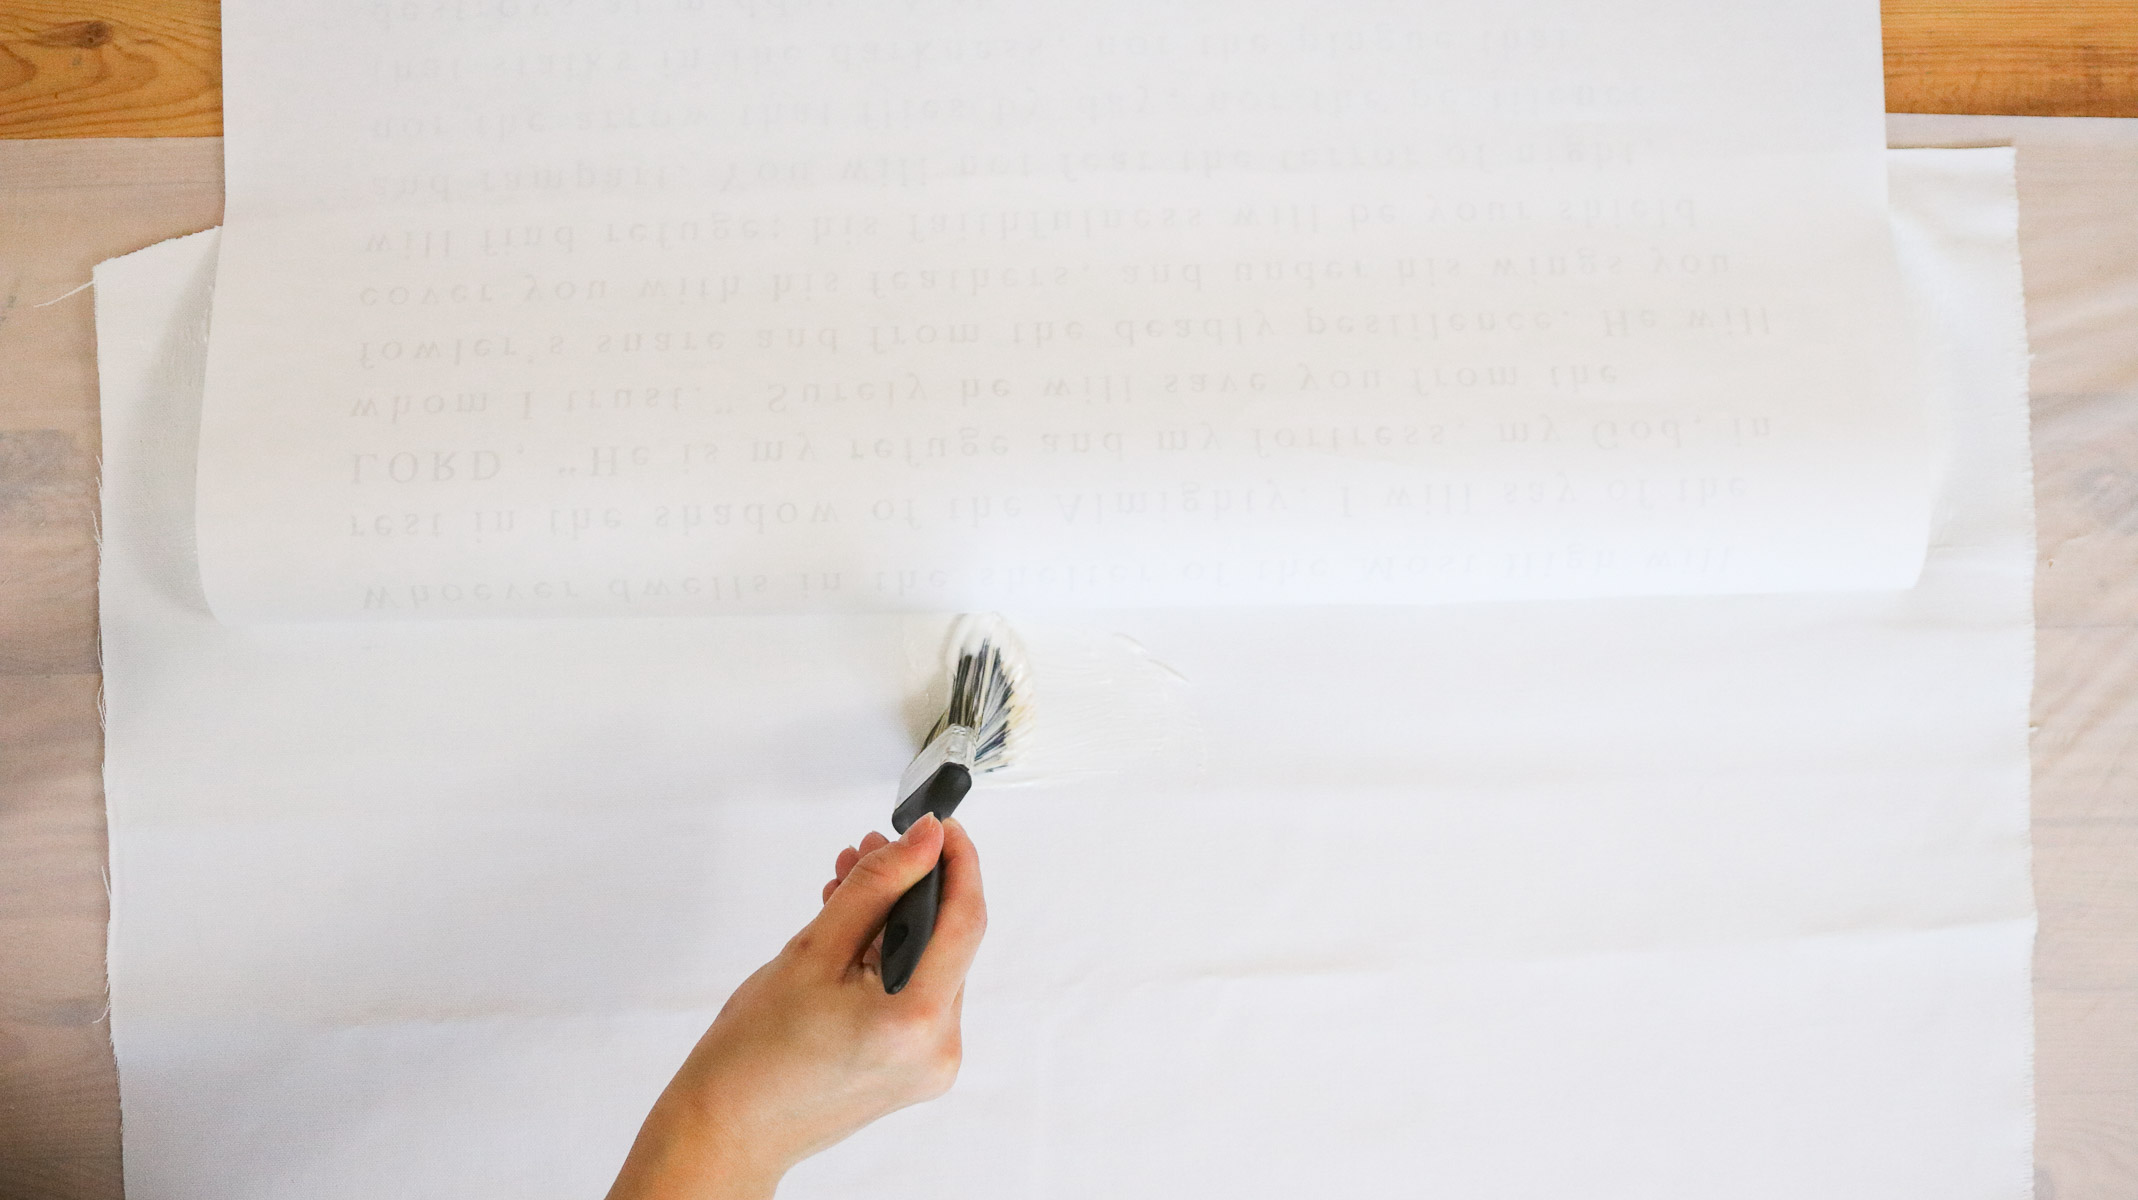
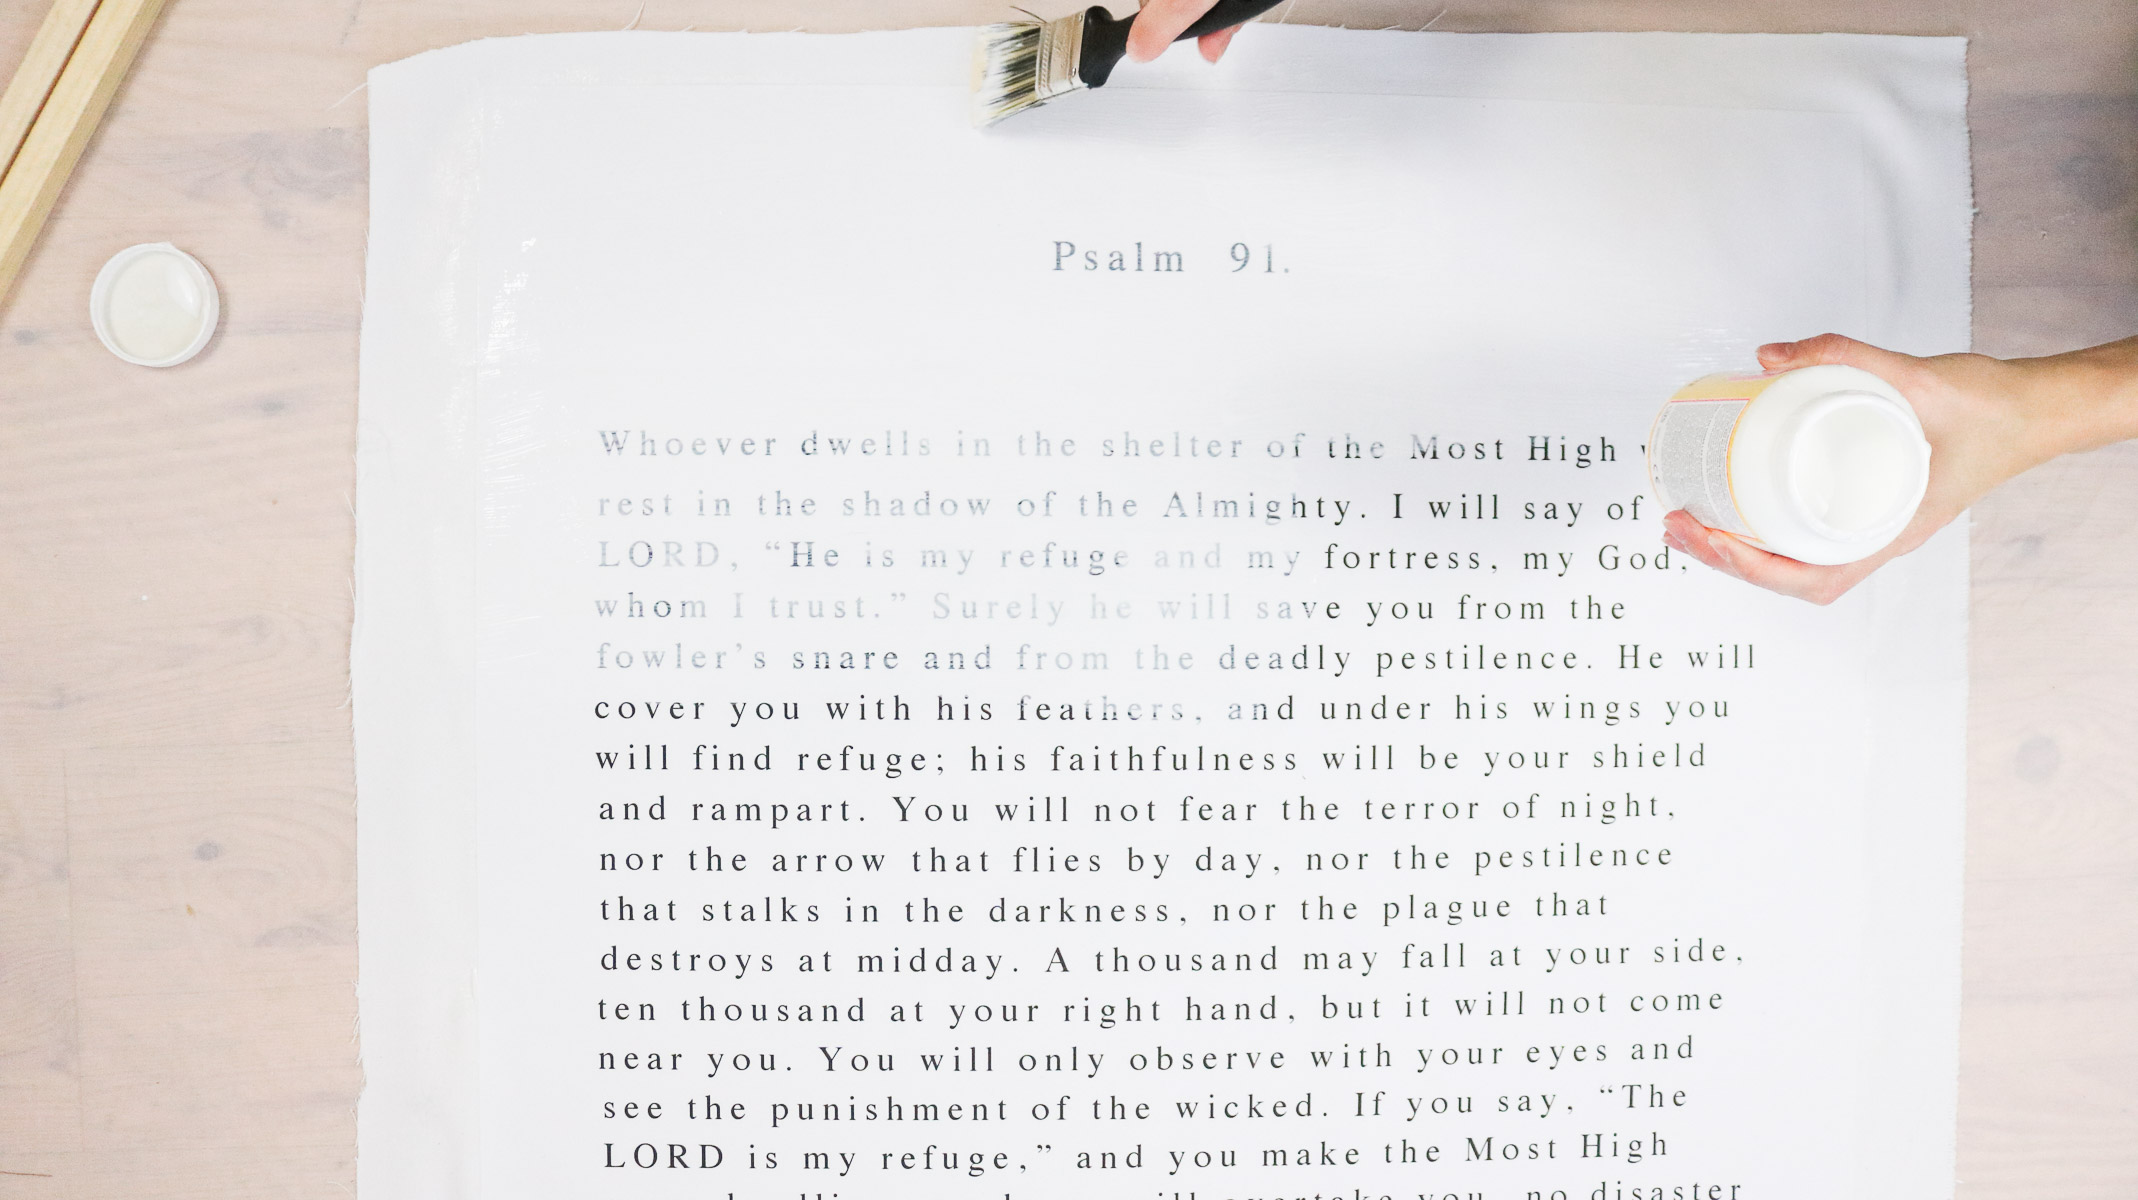
STEP 2 : Sealing your print!
To seal your print simply apply a thick coat of the matte mod podge over your print. It will dry clear. Avoid going over one area too many times to minimize smudging. Since we’ve made about 4 of these tapestries in total we’ve noticed that this step seems to work best while the fabric mod podge is still wet under. So, I would recommend sealing your print immediately after gluing the print to your fabric. Do not wait for the fabric mod podge to dry. It also helps if two people are doing it. Double the hands gets the job done faster and gives you more time to seal it while the glue beneath hasn’t dried.
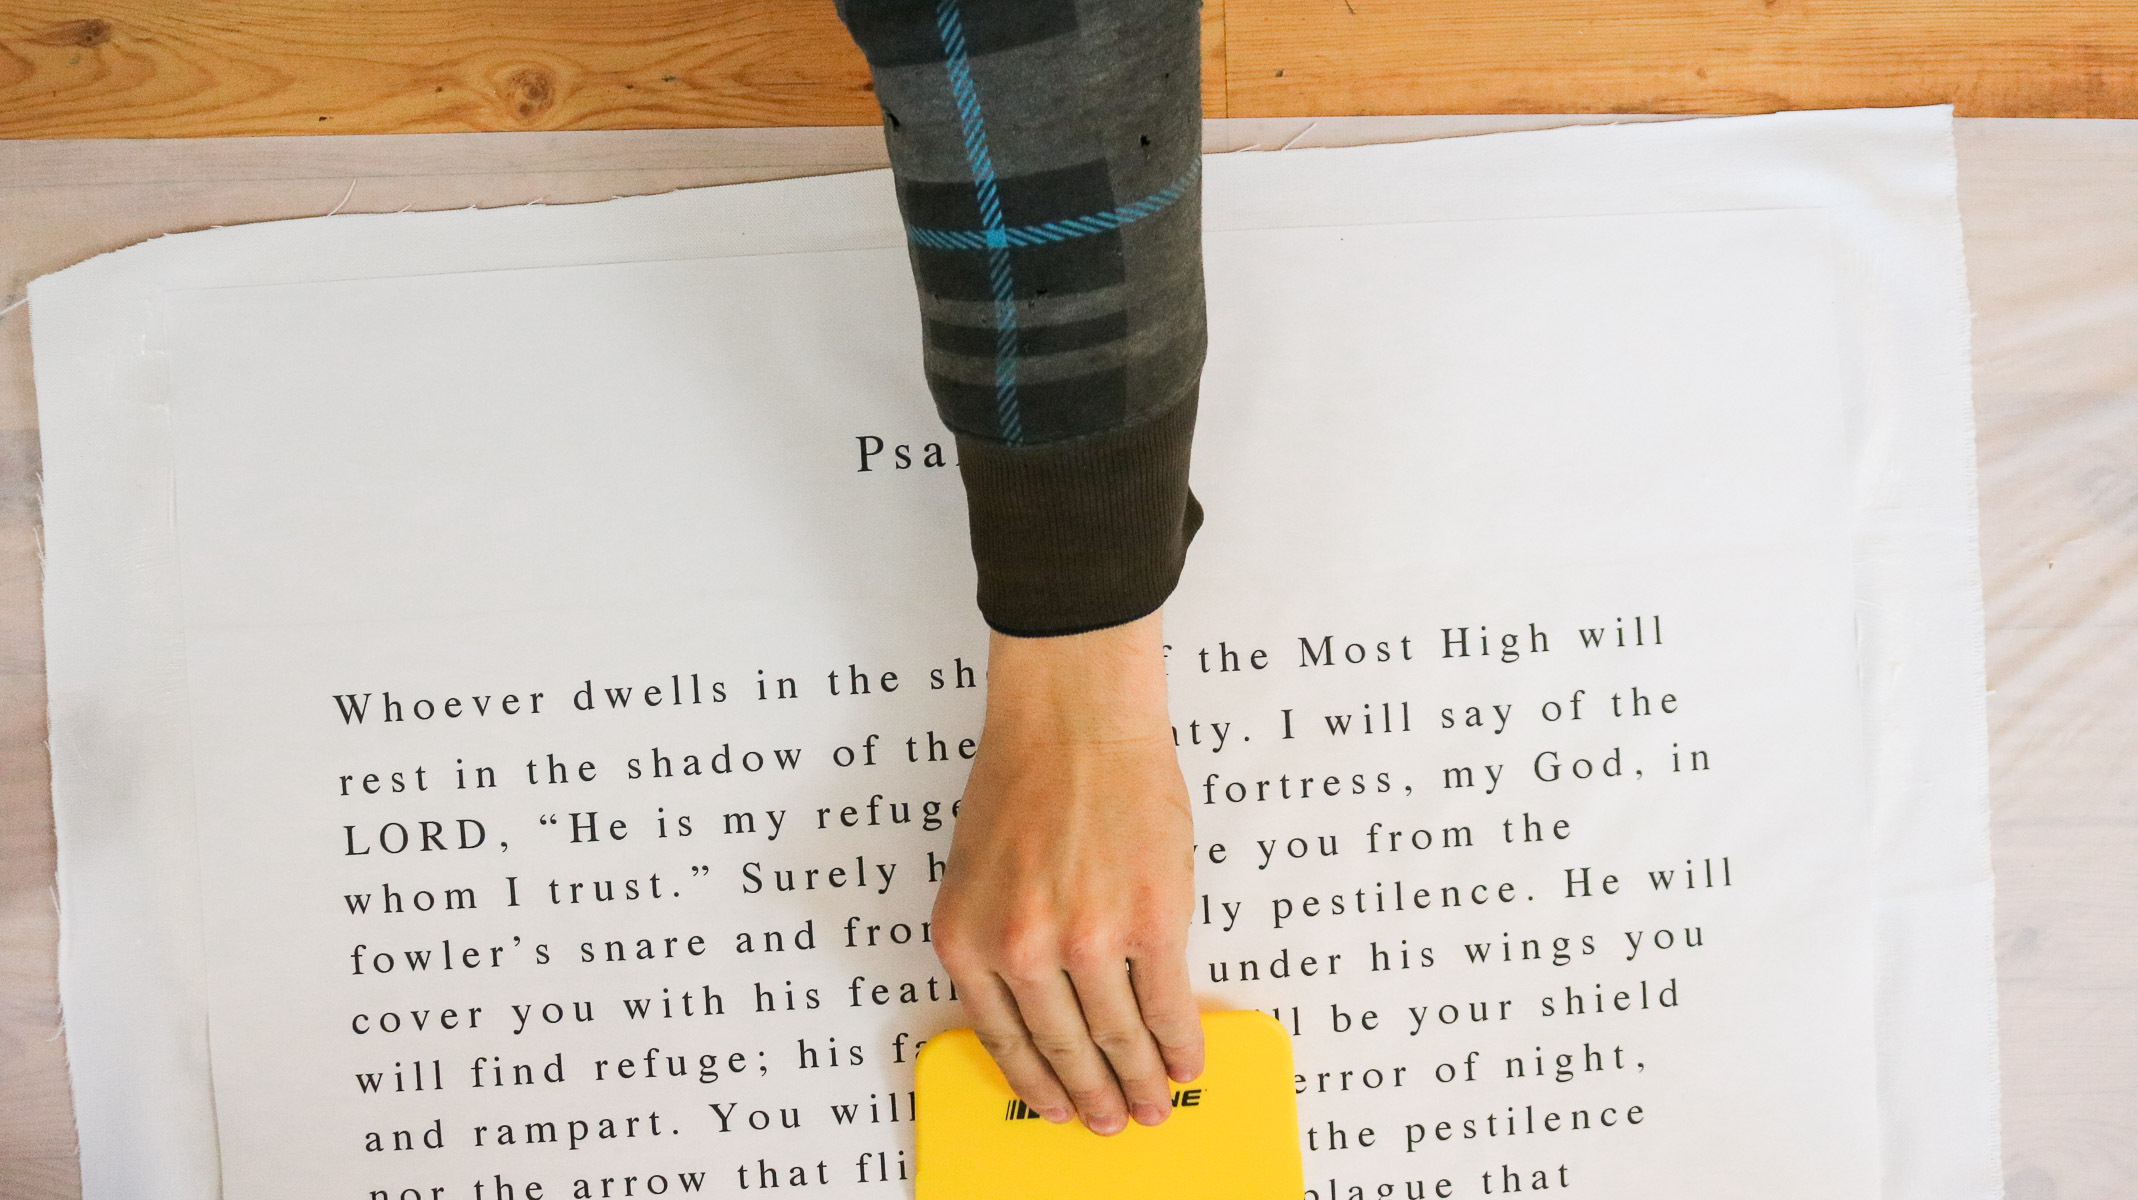
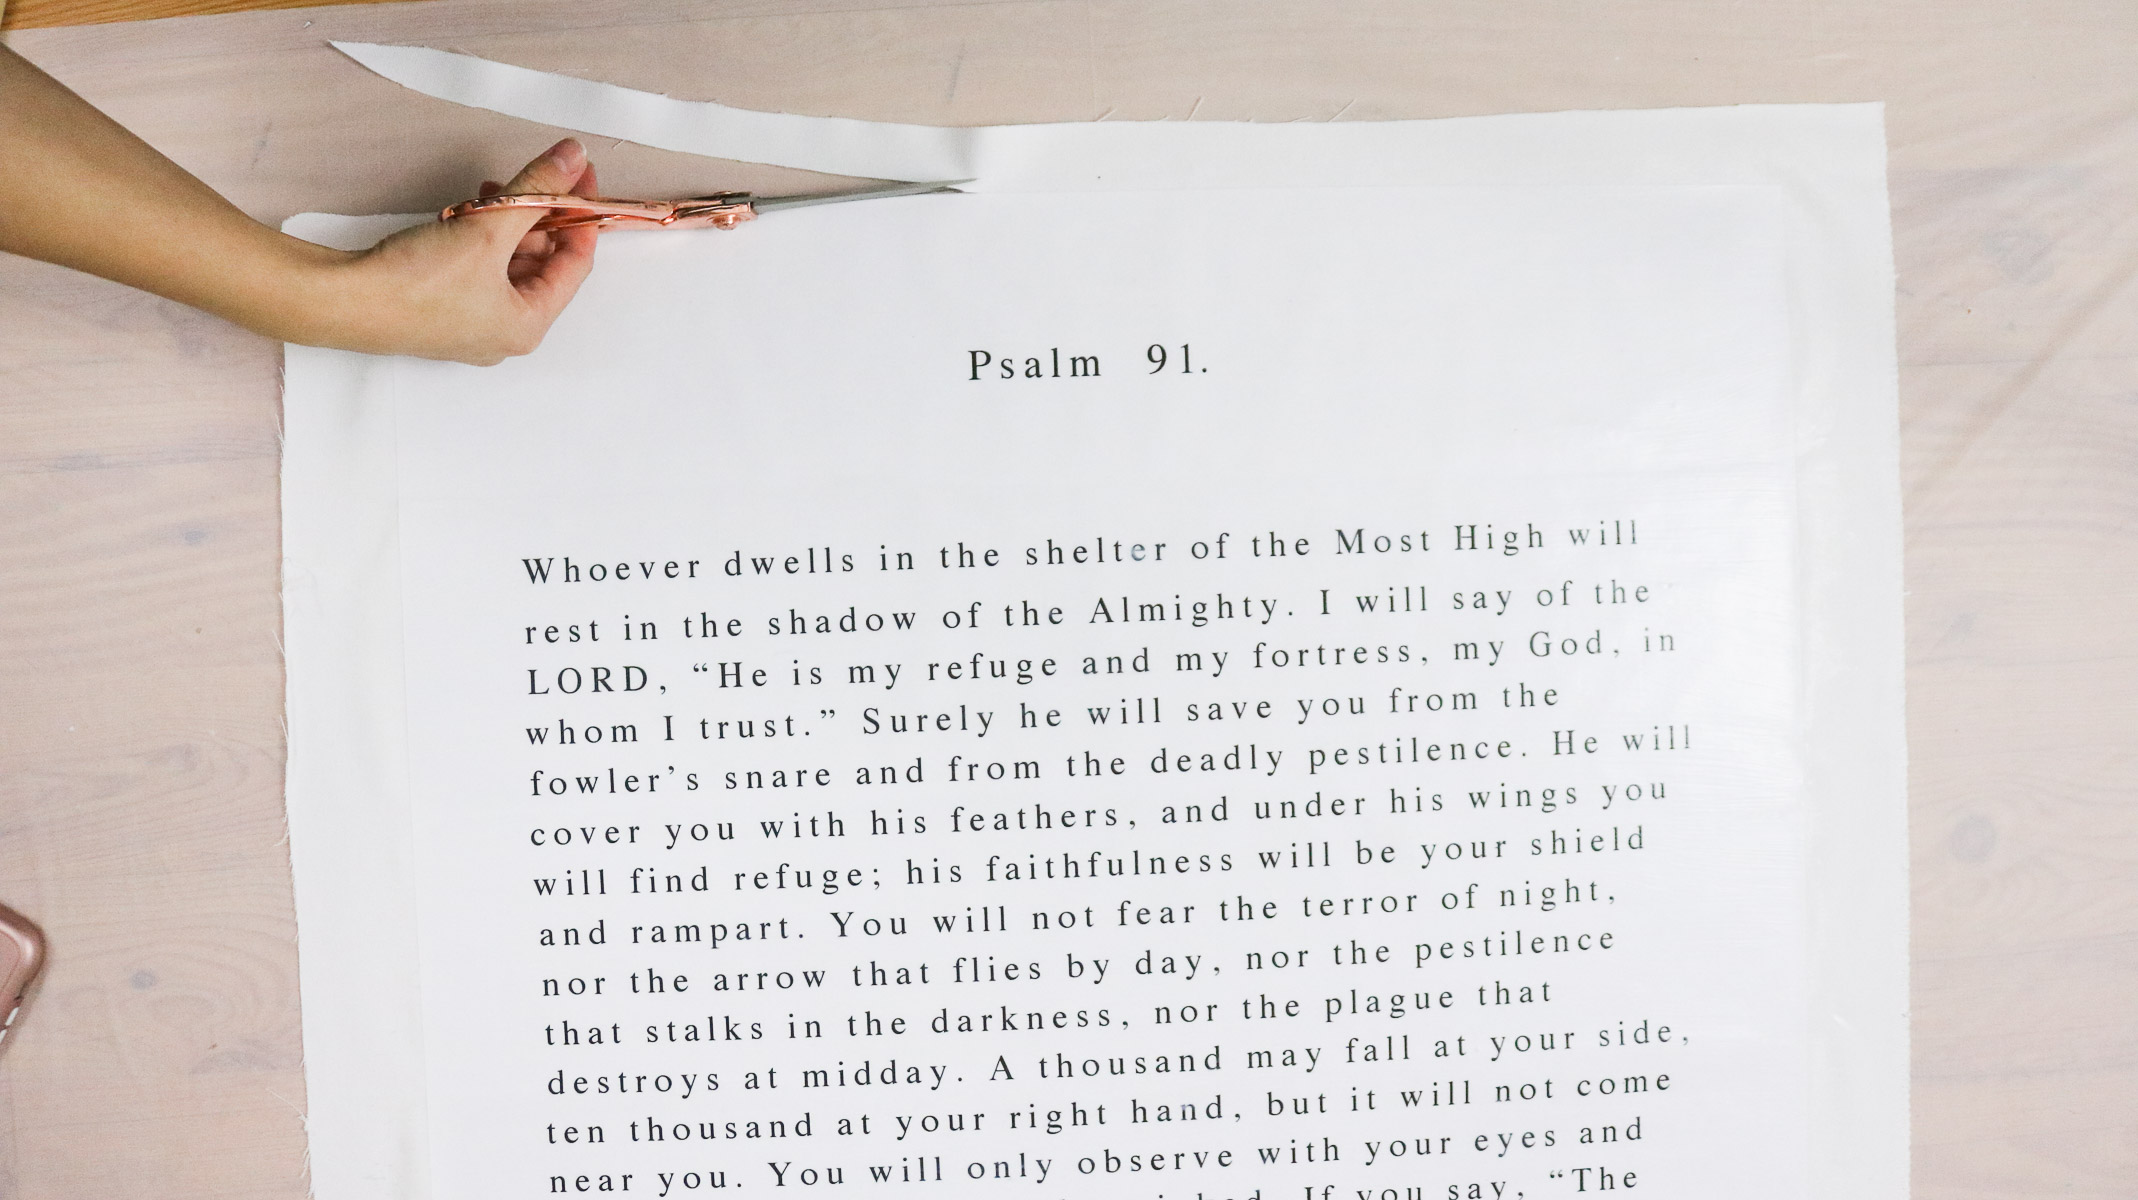
Step 3: Trimming the edges!
Okay once your tapestry is completely dry use some scissors to trim off all your fabric. It took about 30 minutes to dry.
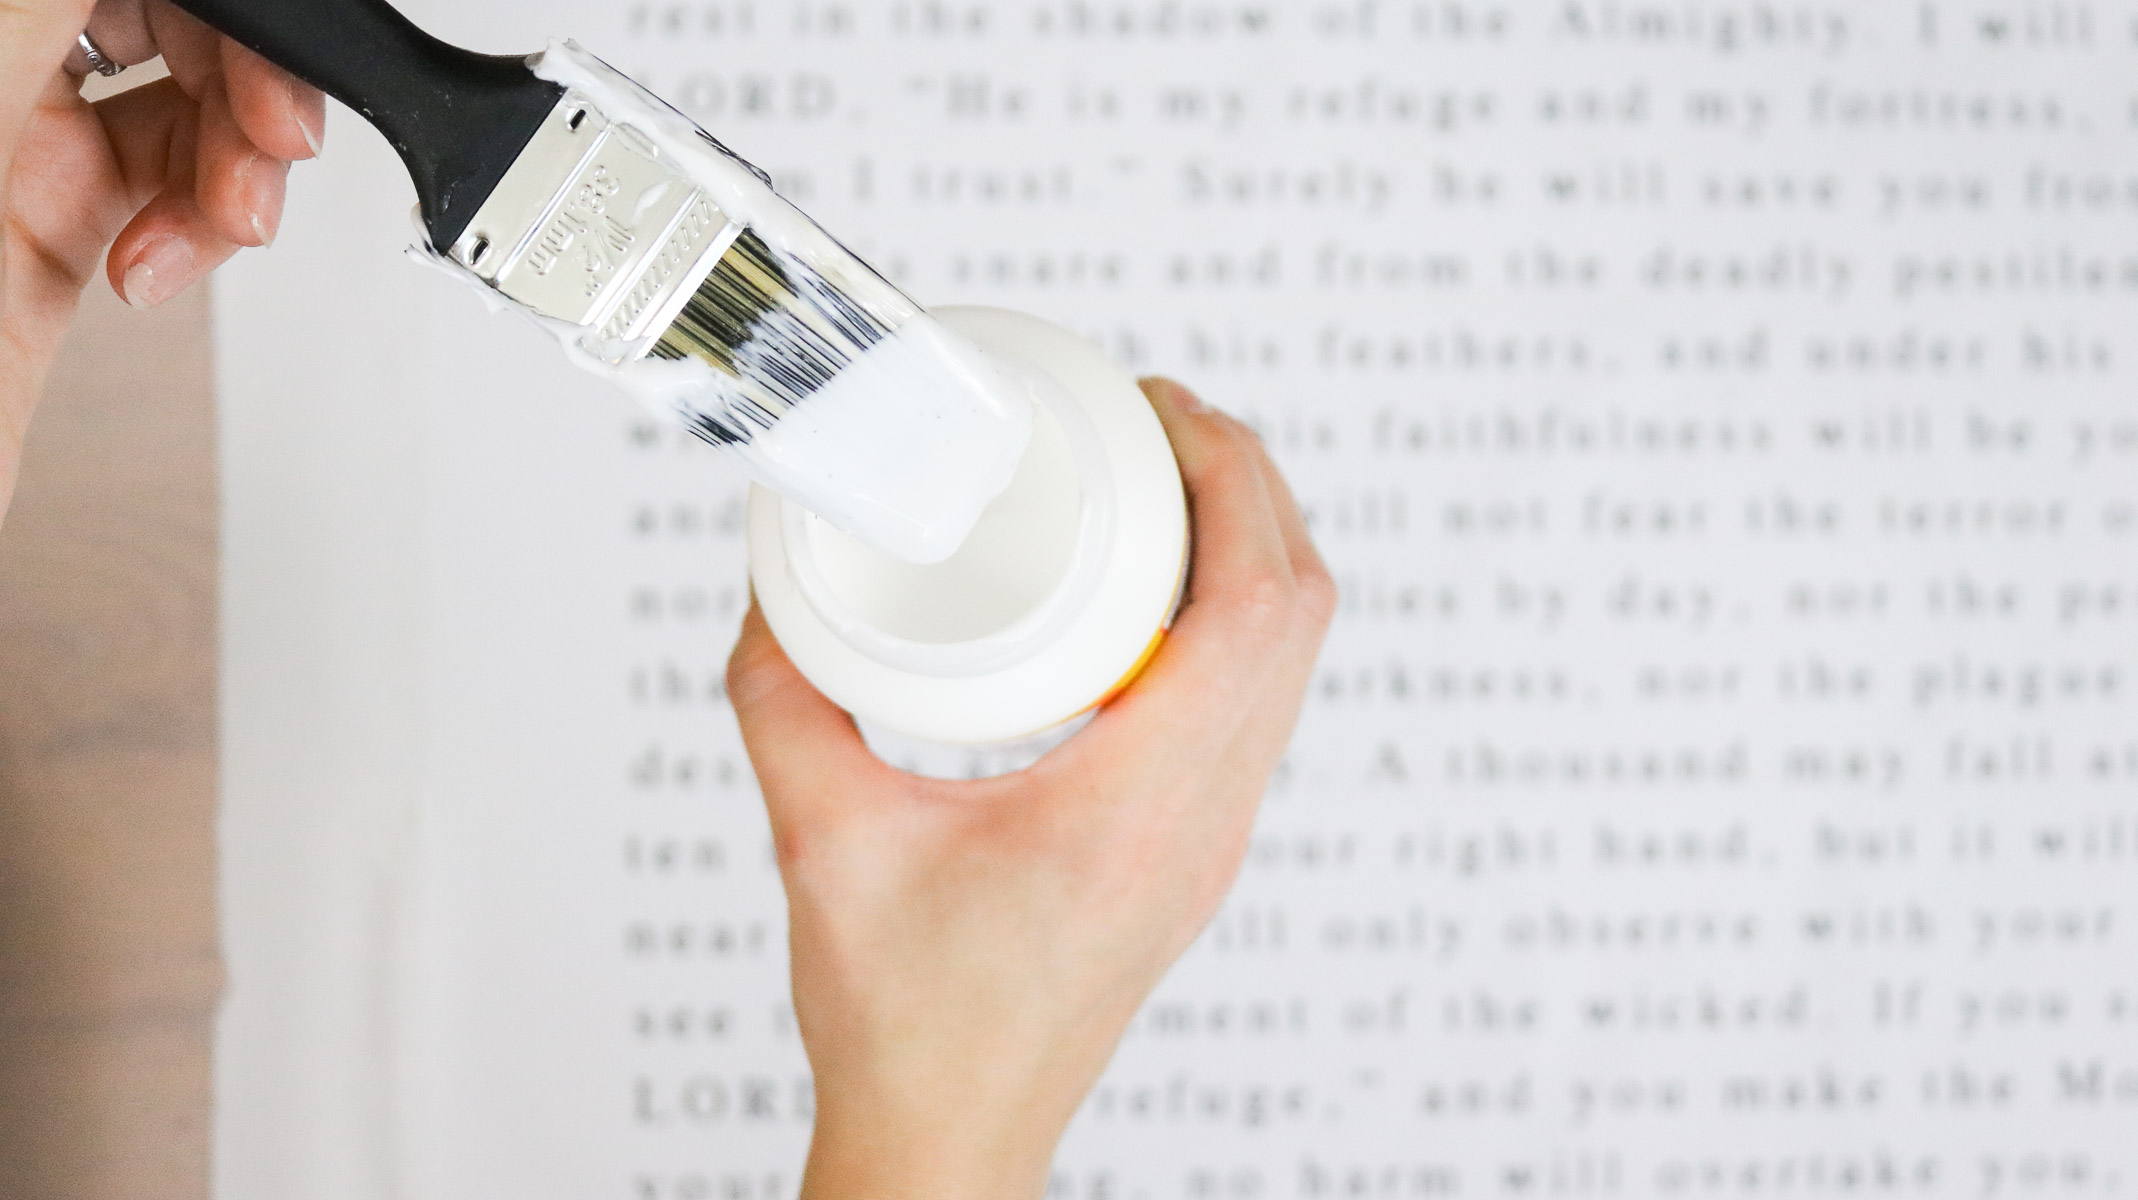
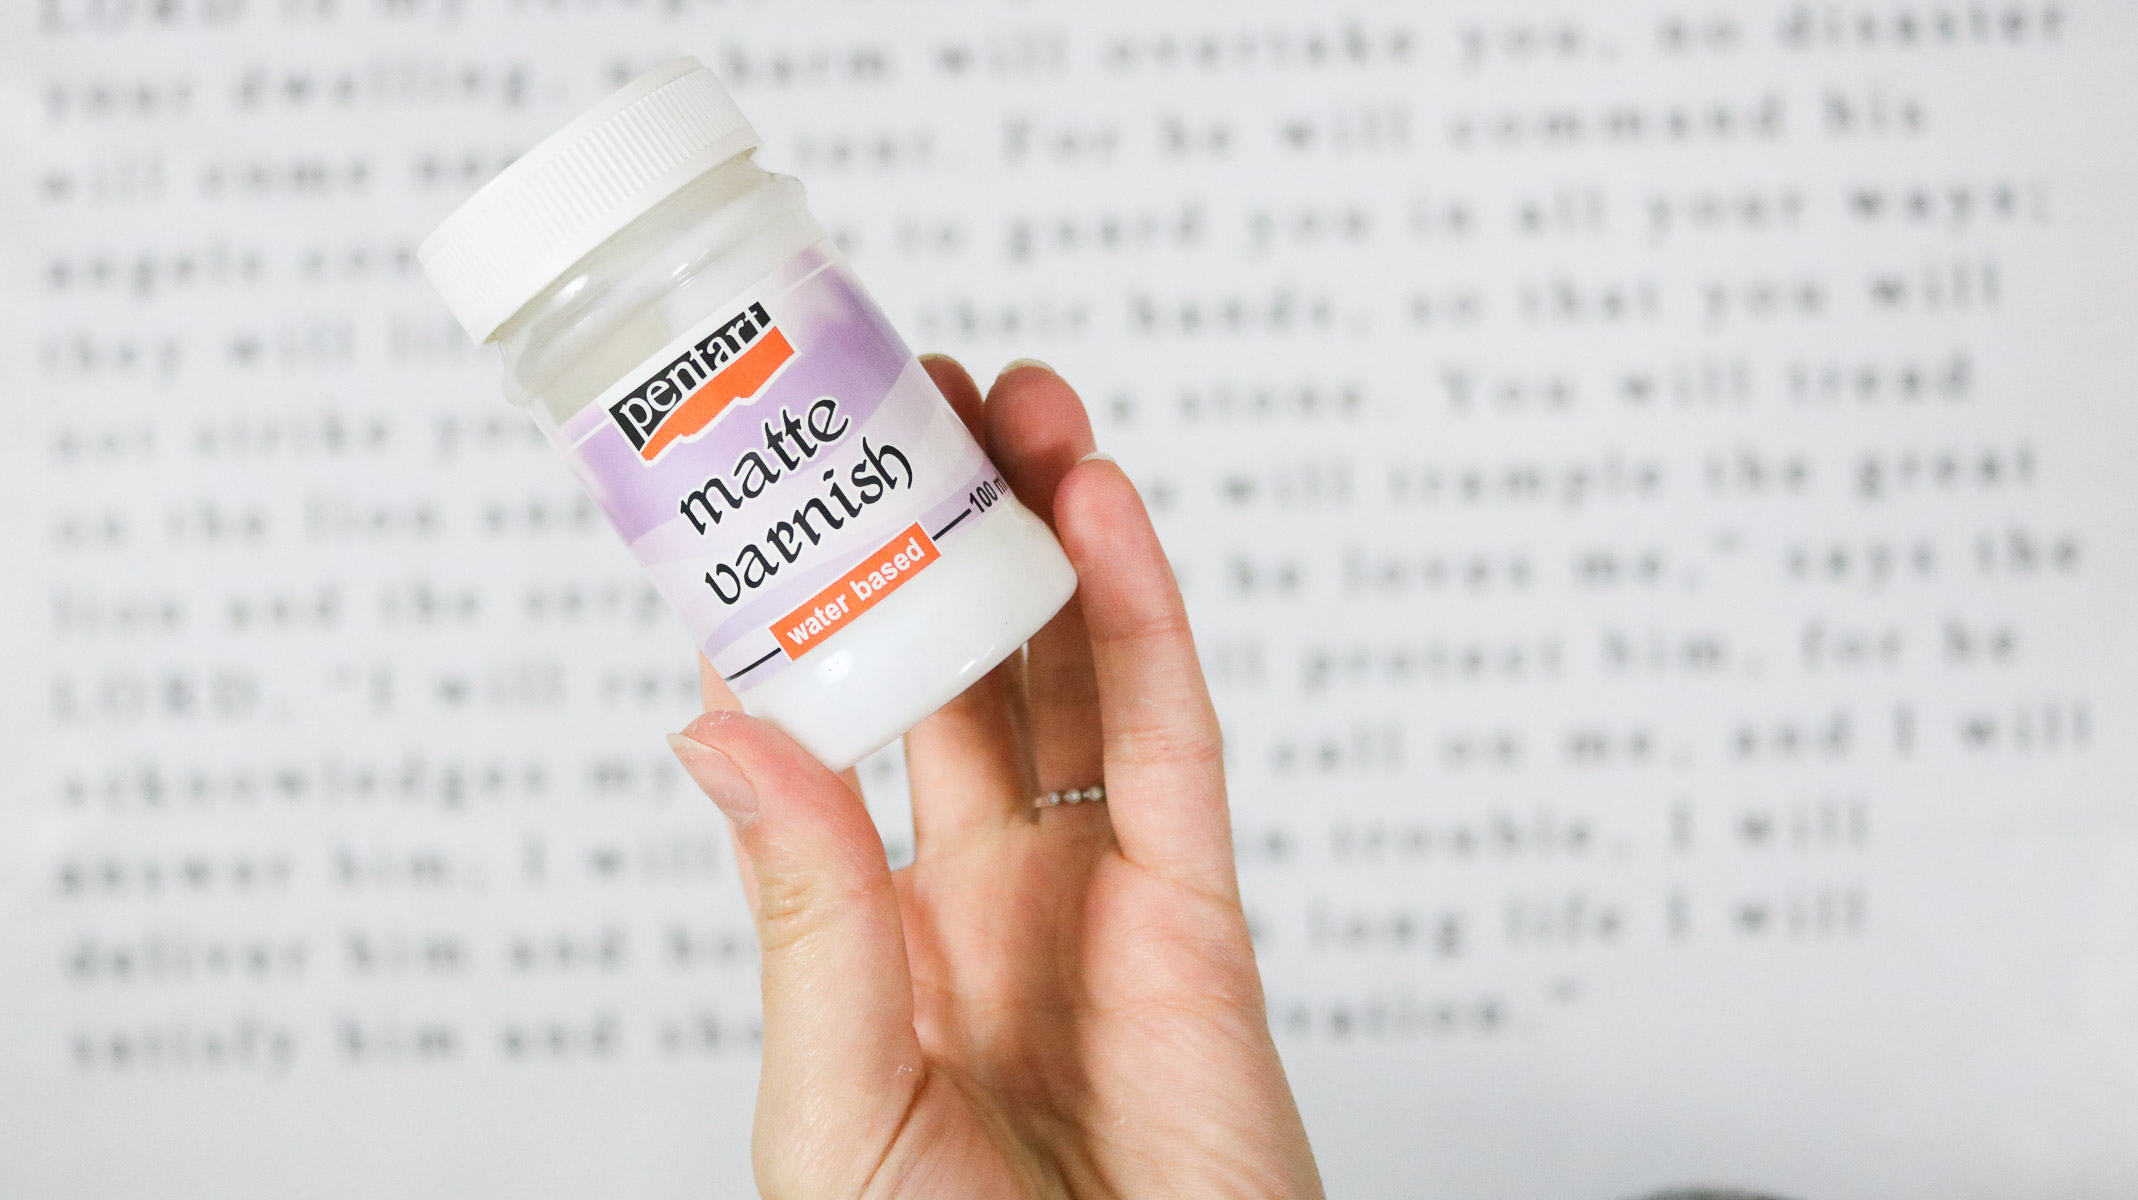
Optional: Additional Matte Finish!
I wasn’t a big fan of the finish I got with the matte mod podge. It definitely didn’t look matte. More of a satin finish I would say. So, I ended up giving it another light coat of this matte varnish to get that matte look. (photo below)
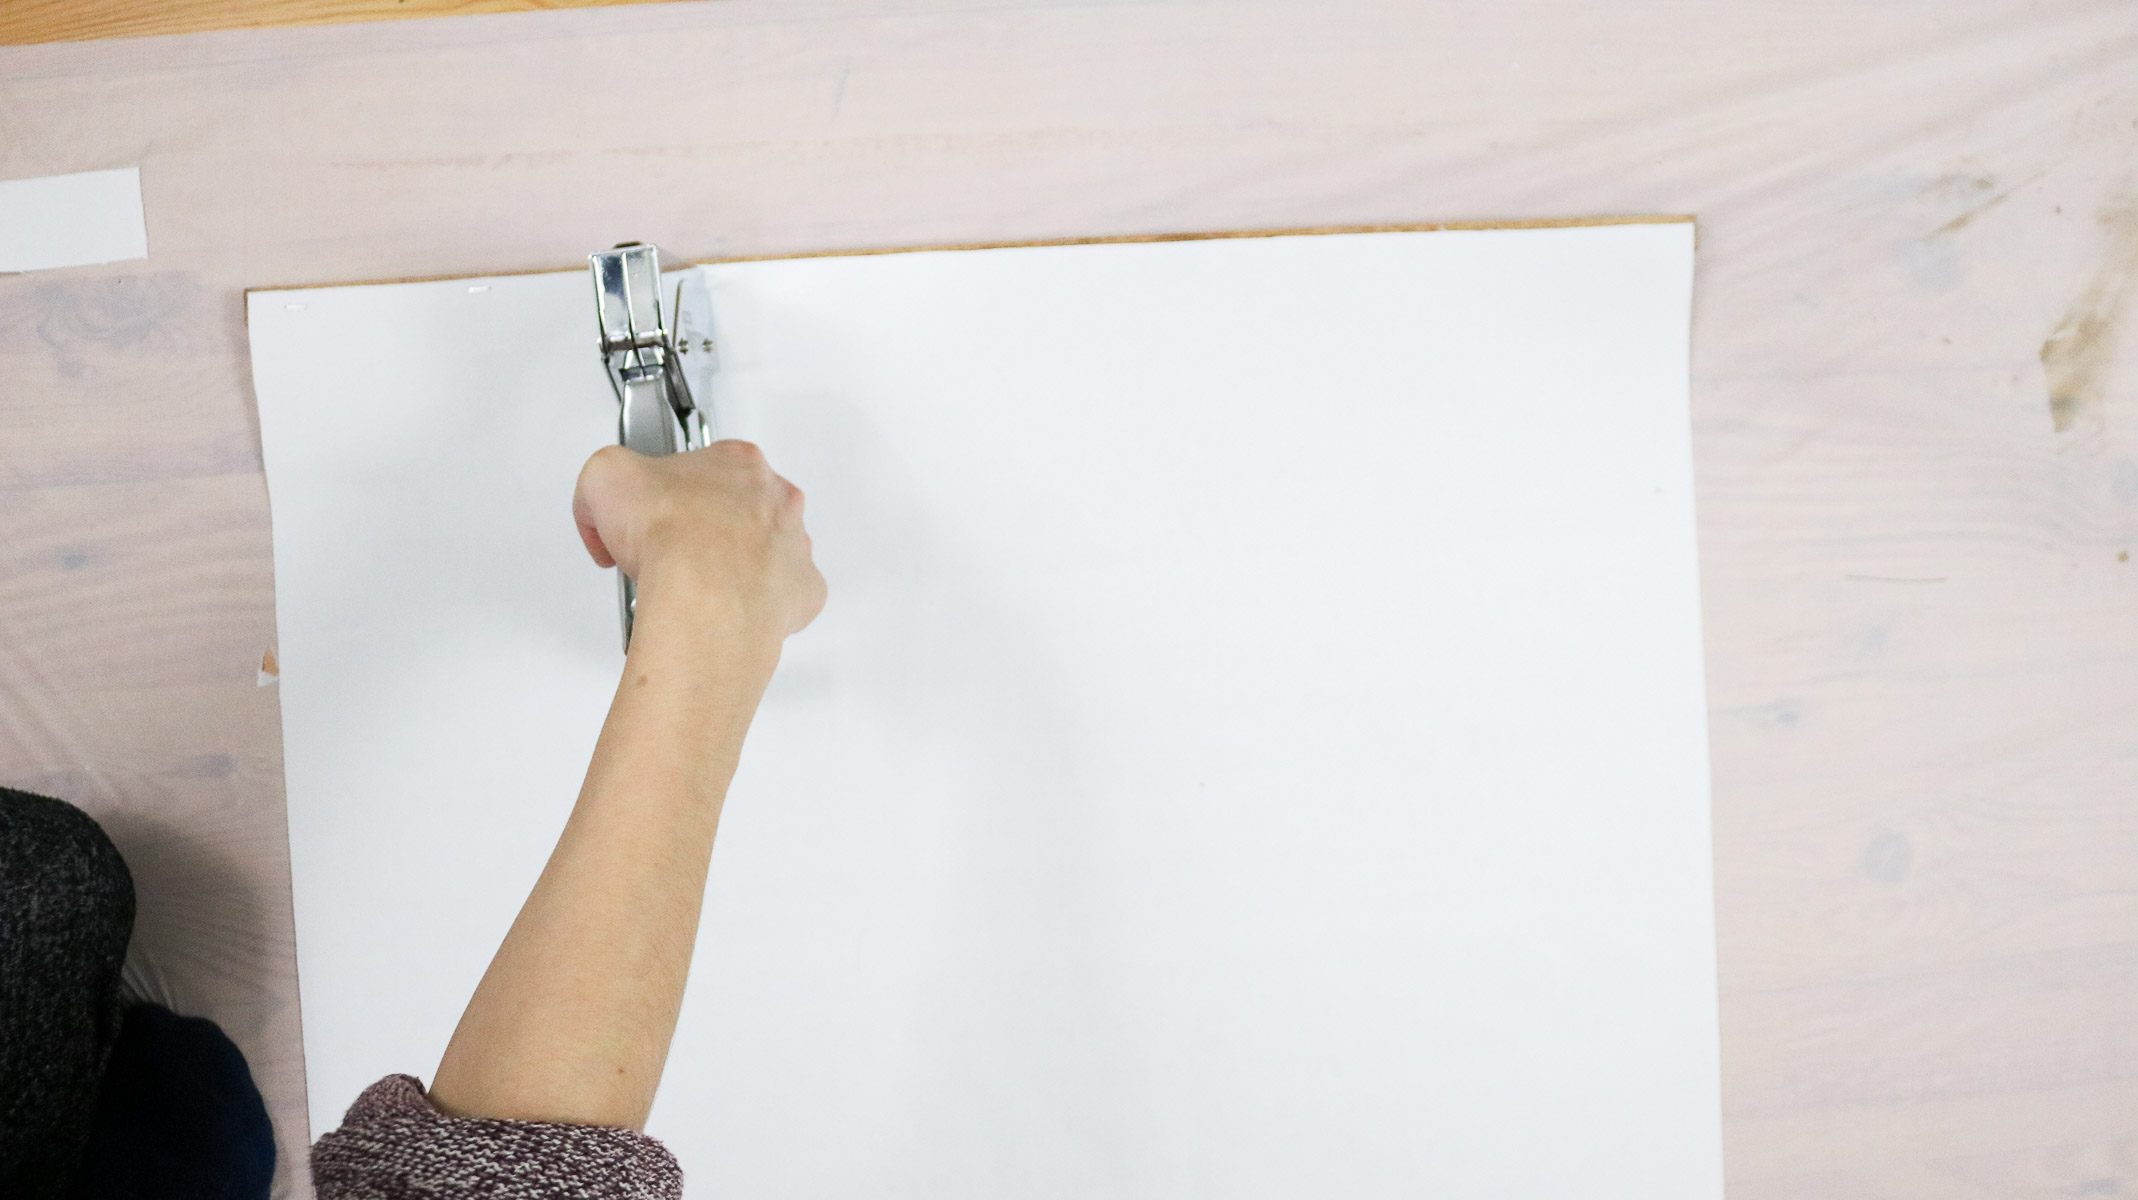
Step 4: How to attach your tapestry to your dowels!
If your making a smaller tapestry you could probably get away with using some hot glue to attach it to the dowel. We used some heavy duty staples and worked out way from one end to the other. Flip your print face down and staple it to the dowel from the back.
That’s pretty much it! NO sharpie touch ups involved!! YAY! If you’re wondering what this tapestry feels like. The best way to explain it is a canvas print. The paper actually seeps into the texture of the fabric which makes it look that way.
It’s also super durable and thick. I shipped them in tubes and they didn’t bend,crease or warp. YAY!
Here’s a quick video version!
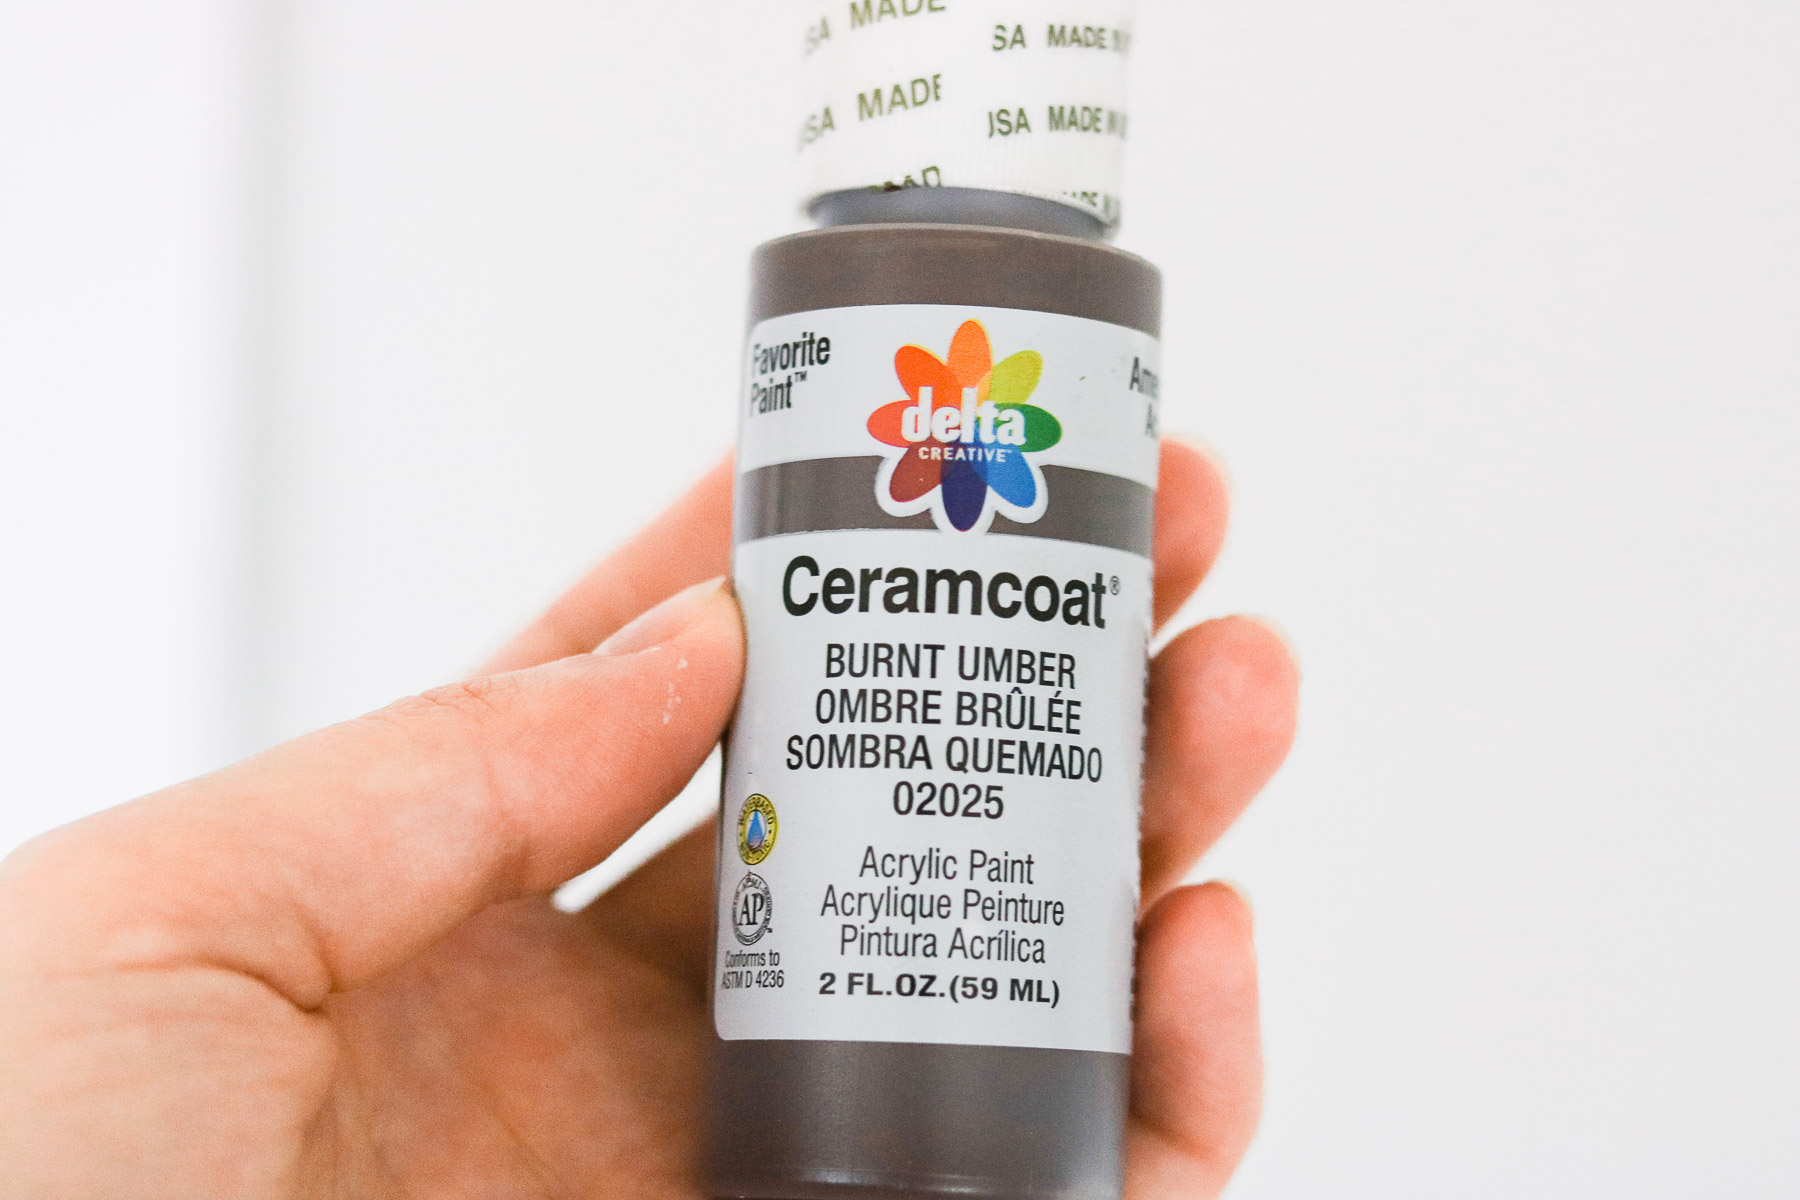
I wanted a very light wood stain. Since I didn’t have any light stain on hand I diluted this brown acrylic paint with water to stain my dowels.
Credit for this DIY goes to my hubby! If it wasn’t for him I would of probably given up. The first few attempts were a complete fail until we tried his method! Thanks hun~ You da best😘😘
Drop a line below. Let me know what you think?
Happy Crafting! I’ll see you next time!
love, love, love how this came out!!!
AWWWE Thanks girl! I’m so happy you LOved it!
Amazing work!!! Love it!
Will try it for sure. Thanks for sharing.
Thank you Ruth! Awesome let me know how it goes! Your very welcome 😀
Wow! Took a day just to make this my project and it turned out beautiful! One question, how did you hang yours?
YAY! I’m so happy to hear it went well Katie 🙂 Wow it’s been a while I don’t remember how it was hung. LOL I gifted my last one to my friend because she really wanted it. Hmm I’m pretty sure I used 3m sticky strips on the dowels to hang it. You can do some on the top and bottom of the dowels and stretch it when you hang it so it looks smoother. 🙂 LOL that’s what I should of done.
What a fantastic idea! Now I know how to transfer and display my favorite bible verses!❤👌👍👌👍❤
Glad you loved it 😀
I can’t wait to try this! I’m so excited I came across your Instagram! What a wonderful gift idea!
Hi Christina! Welcome to the blog 😀 😀 Happy to here you found me. YAY! let me know how it goes or if you have any questions 😀
thank you Angie, yes staples or fedex will print it. Whichever size you’d like but I would make sure the width of the paper isn’t wider than your fabric.
I love the Psalm 91 project but I wasn’t able to download it. Could you help me with that please?
sure no problem.
How beautiful! I already have several friends with their favorite scriptures in mind that would be perfect for this! This is so personal and thoughtful! Thank you for sharing this detailed tutorial on how to make it. So appreciated! (Miriam @butstillbreathing) ❤️🤩
I’m so happy to hear that Mariam 🙂 Happy crafting!
What a fantastic DIY Bible verse gift idea! I absolutely love how creative and meaningful it is. The step-by-step guide is incredibly helpful, making it so easy to create a personalized and heartfelt gift for loved ones. Thank you for sharing this wonderful project on your website. It’s truly inspiring! Keep up the amazing work!
Warm regards,
Gary Ford