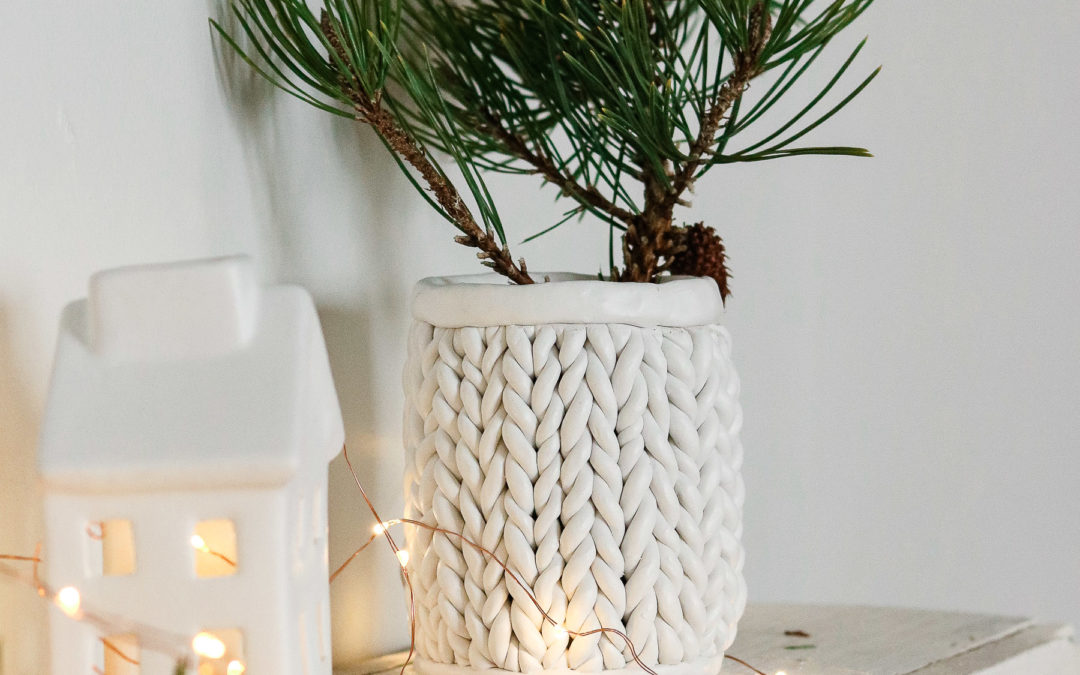
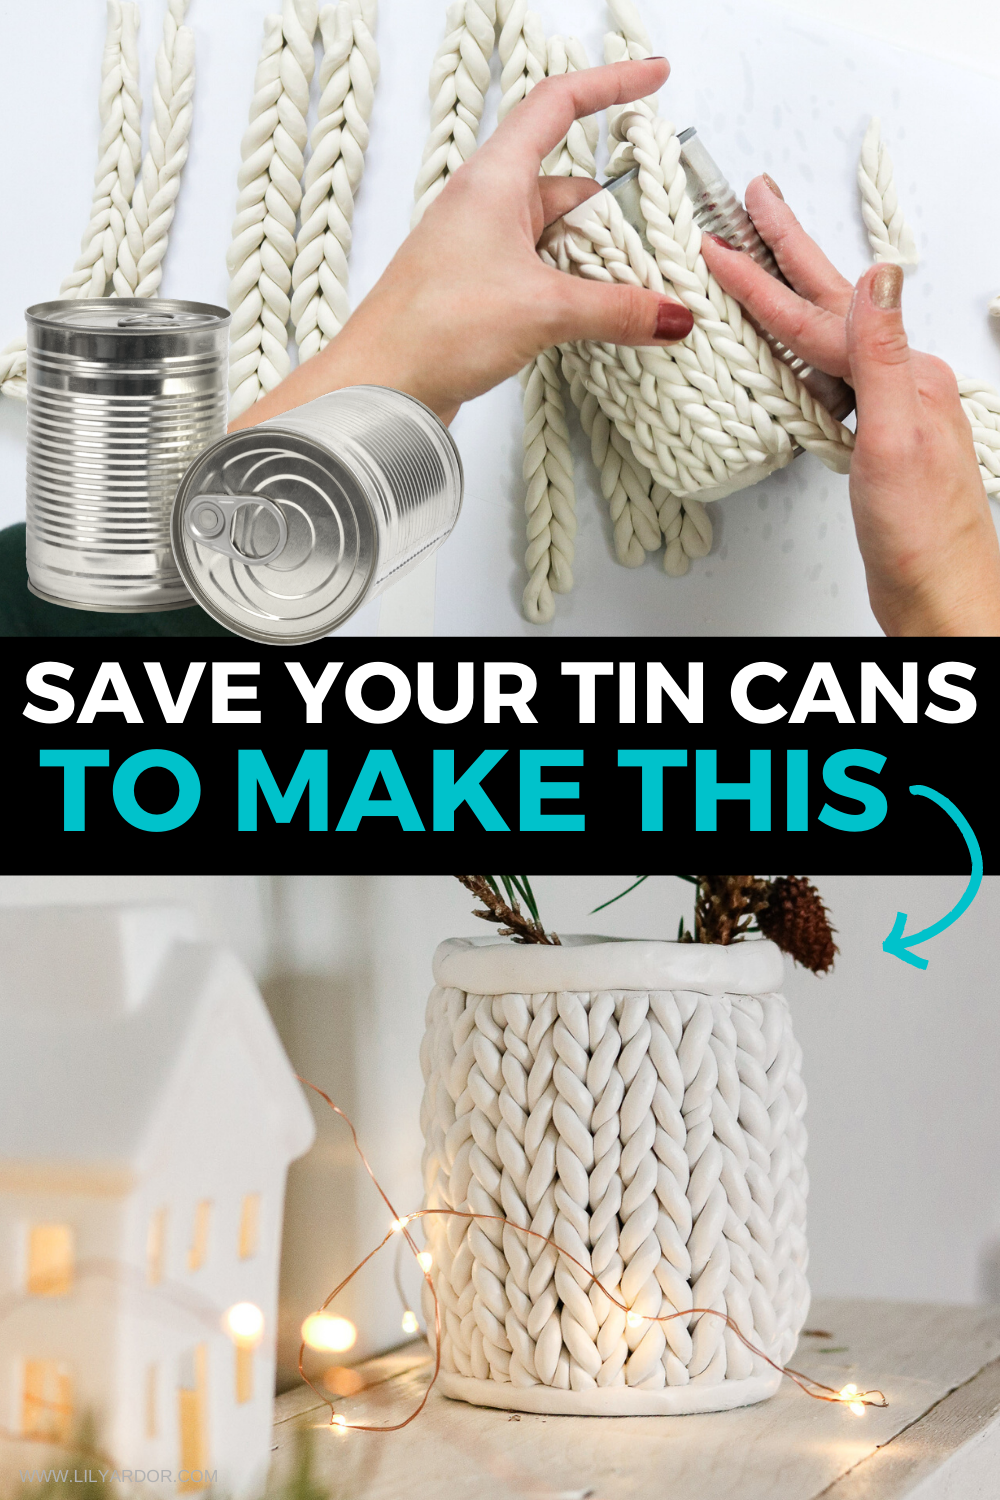
Chunky Knit Inspired Planter
So every time winter comes around pinterest is swarming with chunky knit which gives me knit fever! Since I’ve already gotten a chance to make a chunky knit blanket I wanted to try this with a different medium. In other words I guess you can say this is an unconventional approach to chunky knit. Although I I would of loved to use the previous technique I used to make my blanket this DIY knit planter was a pleasant surprise because, it’s way easier than my DIY blanket technique! YAY!
Quick video version
(This post contains affiliate links* for more info visit my disclosure policy)
TIME NEEDED: About 40 minutes
So this took me way over 40 minutes, not because I was trying to perfect it but, because I’ve tried 3 different clays before I ended up on this one. The first one was my homemade air clay recipe and apparently that didn’t work because it was way too soft which didn’t exactly help with creating even clay strands for the knit effect. After that I tried modeling clay that I purchased earlier and that was a total disaster. It kept tearing almost impossible to work with. I finally gave up made a trip to my nearest walmart and decided to give polymer clay a try and I’m ssso glad I did because it worked perfect!
TOTAL COST: $7
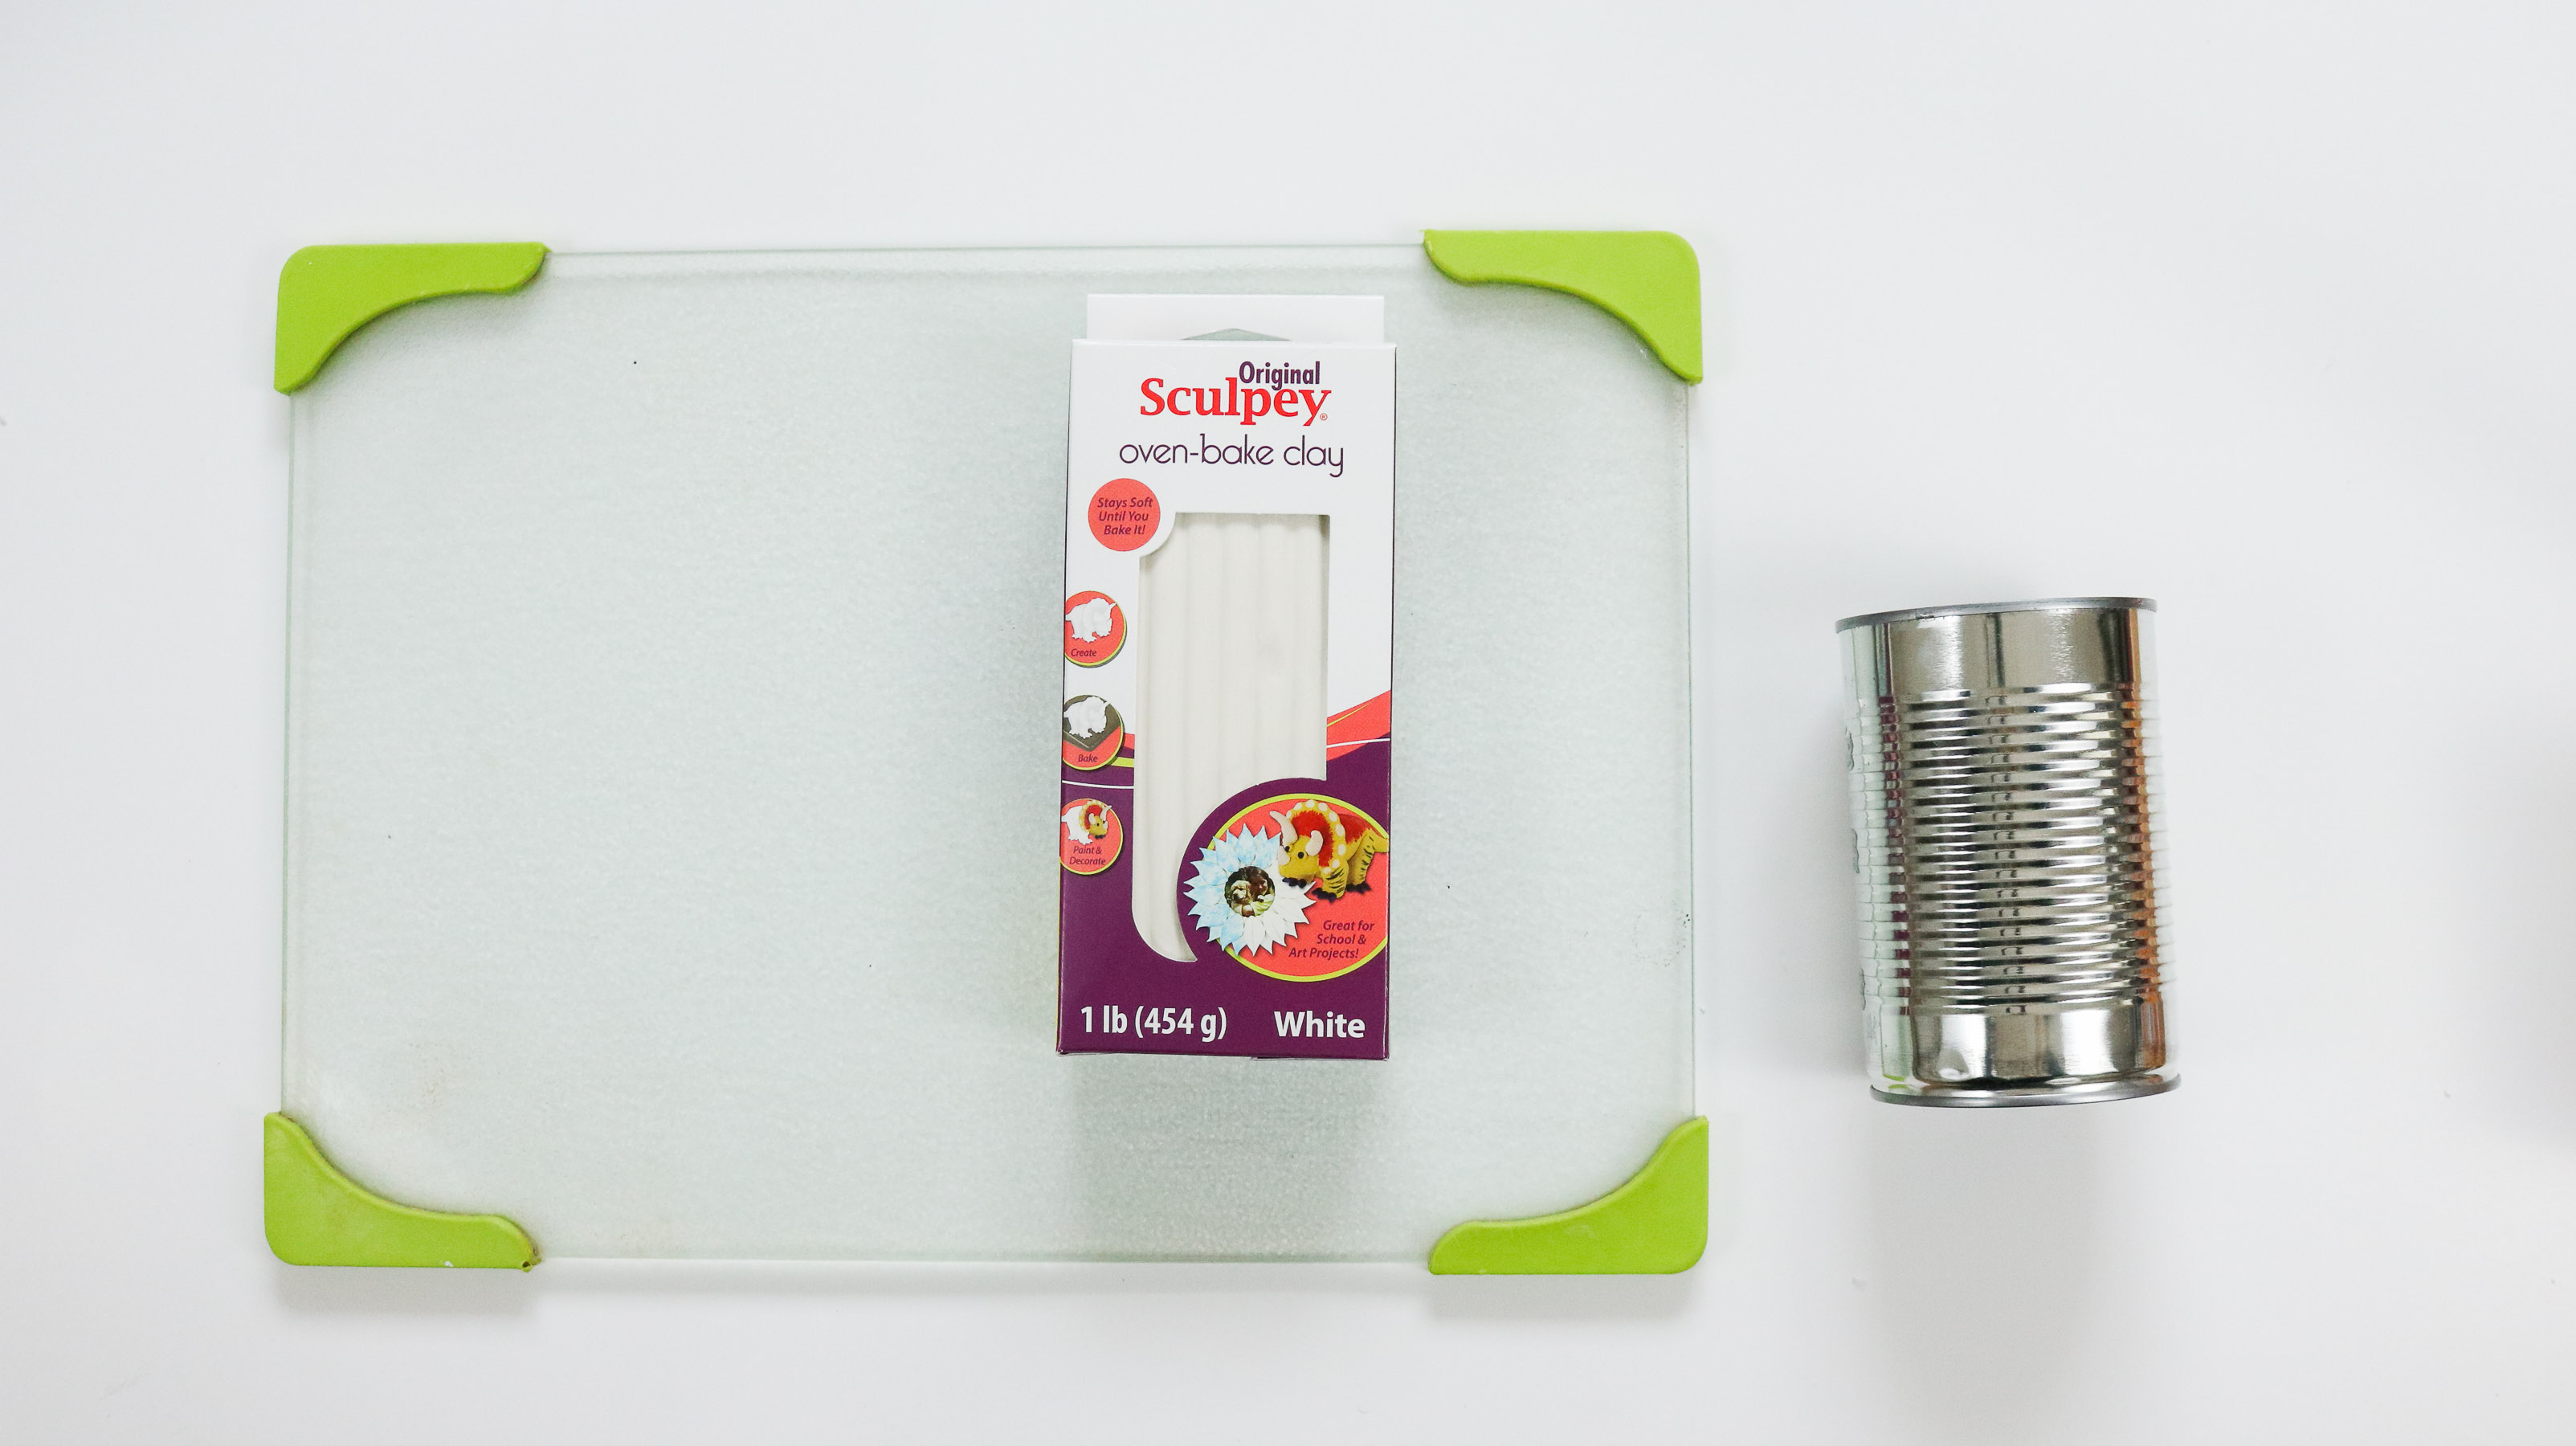
Supply List:
- 1 tin can ( or a similar container as long as it’s oven safe because you’ll need to cure the clay in the oven)
- 1 pound polymer clay. ( I had about a handful left over)
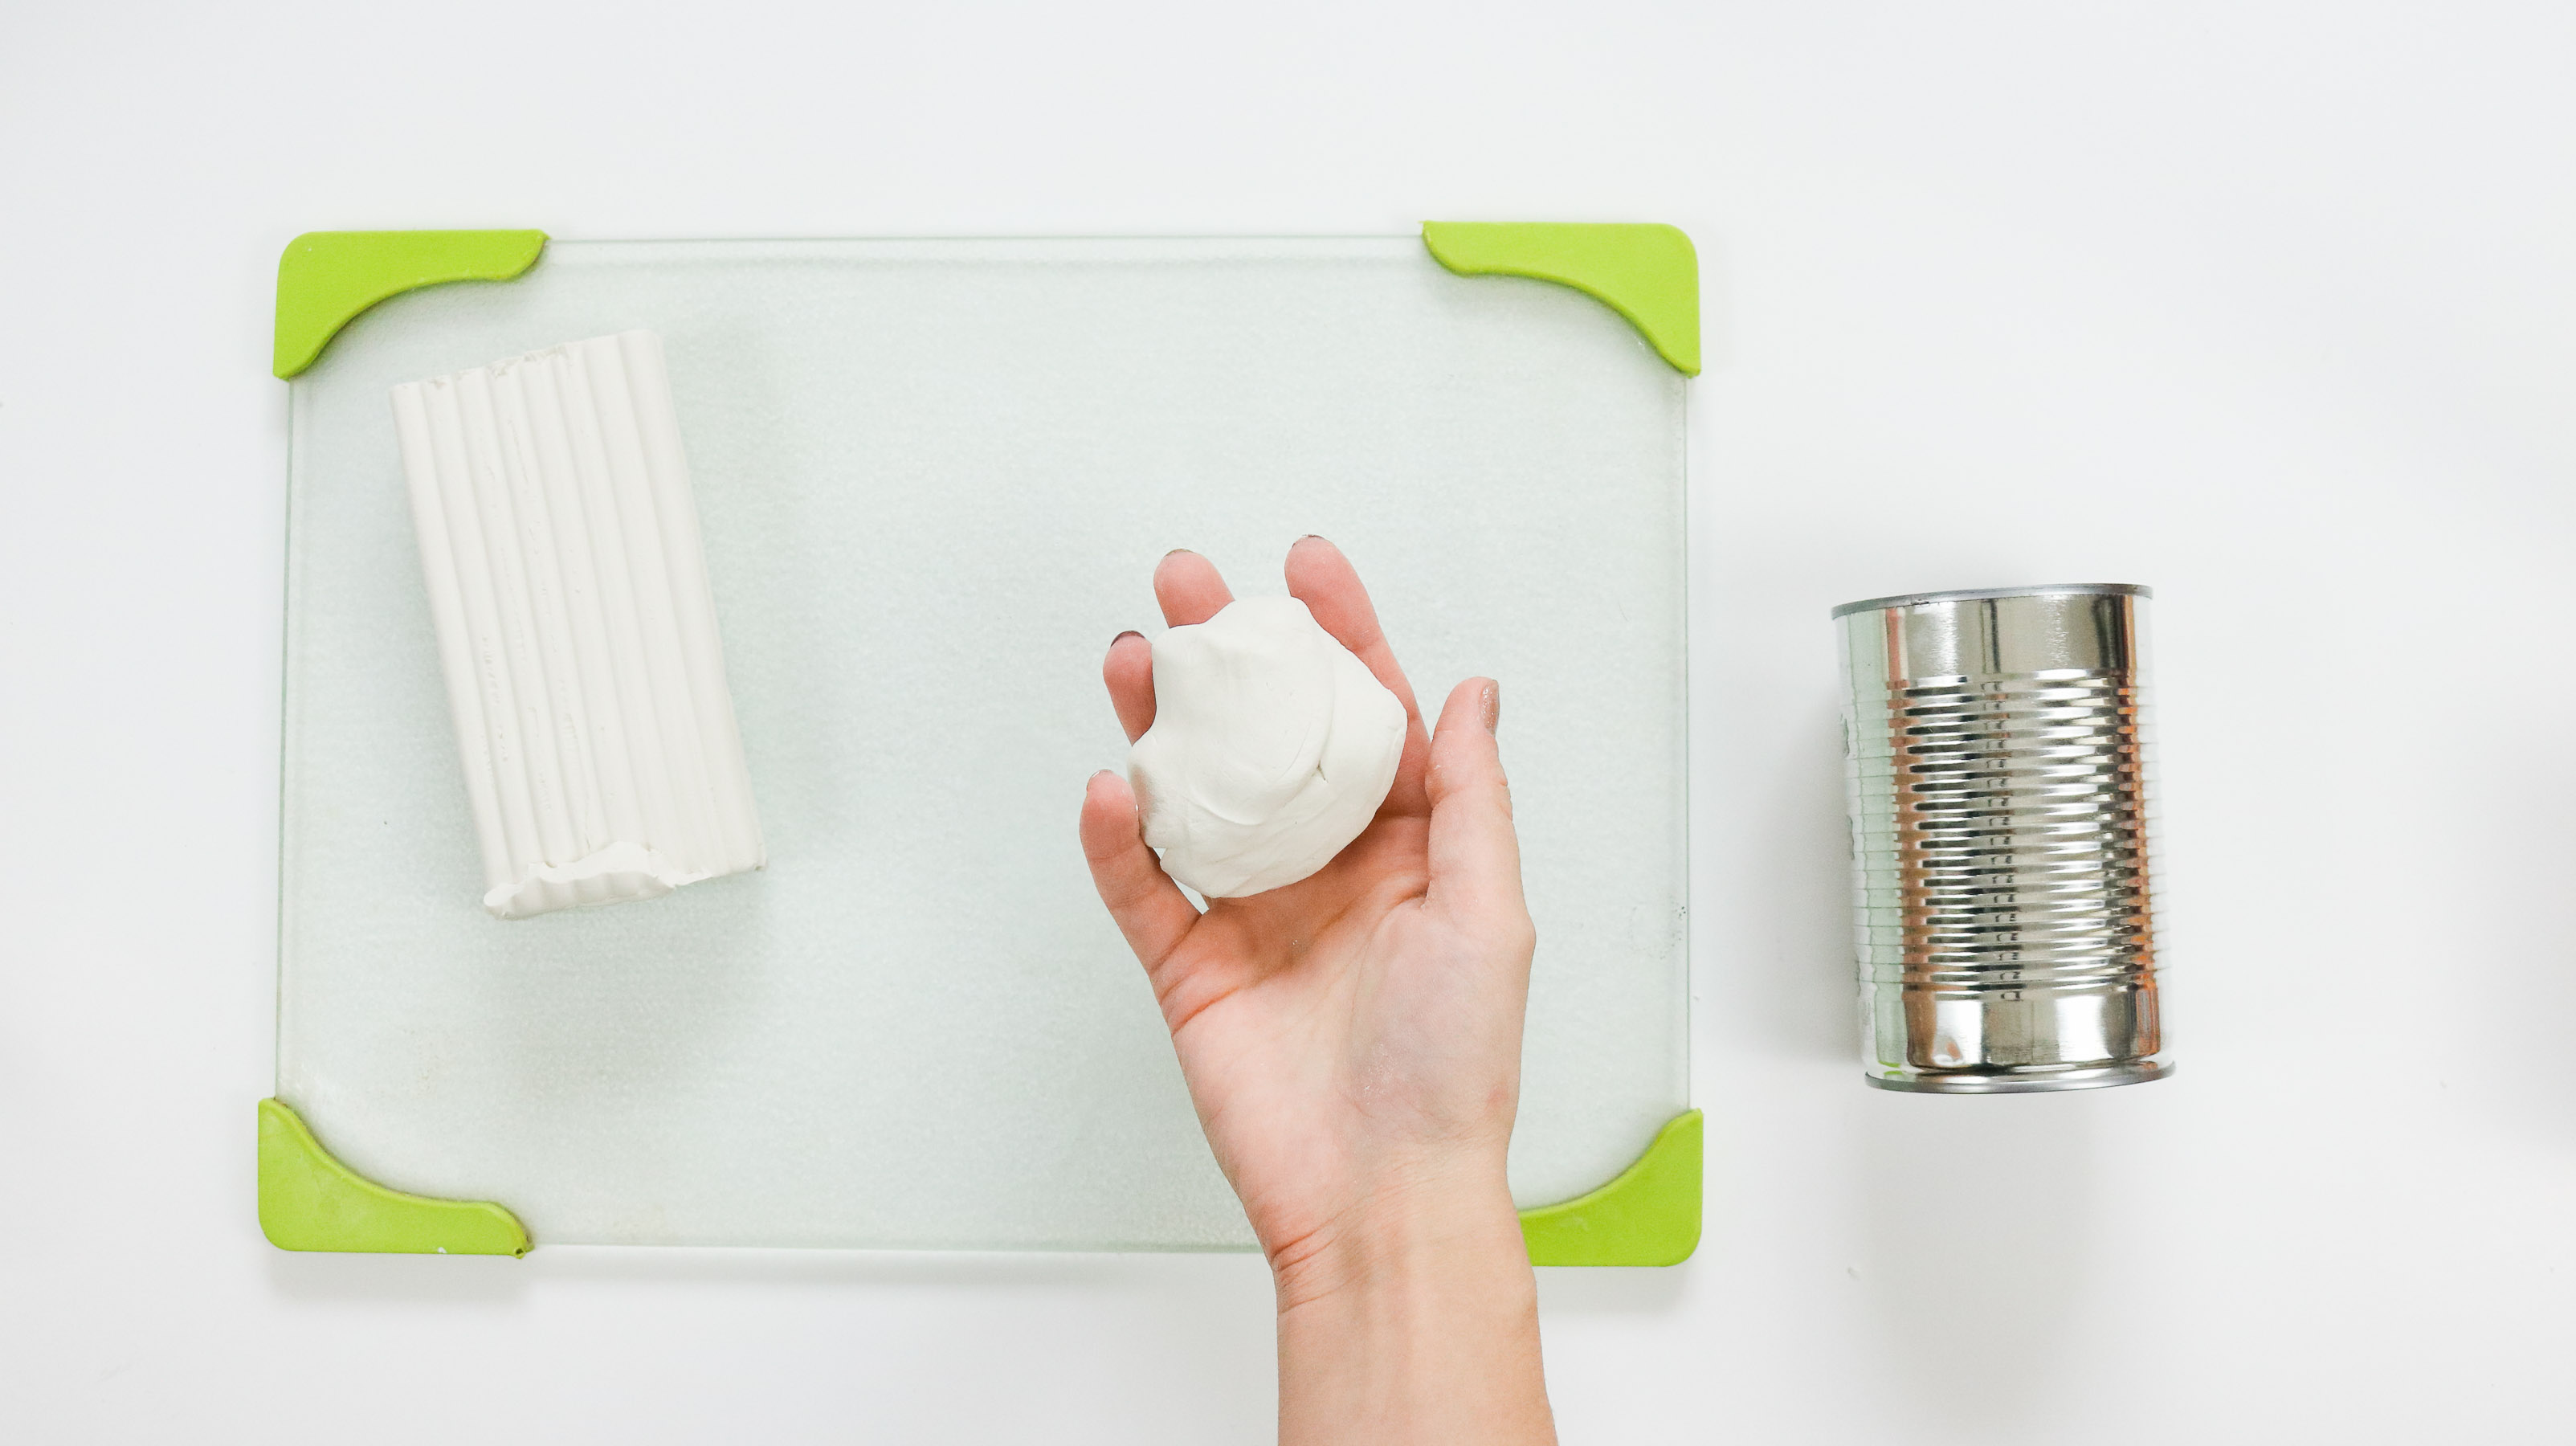
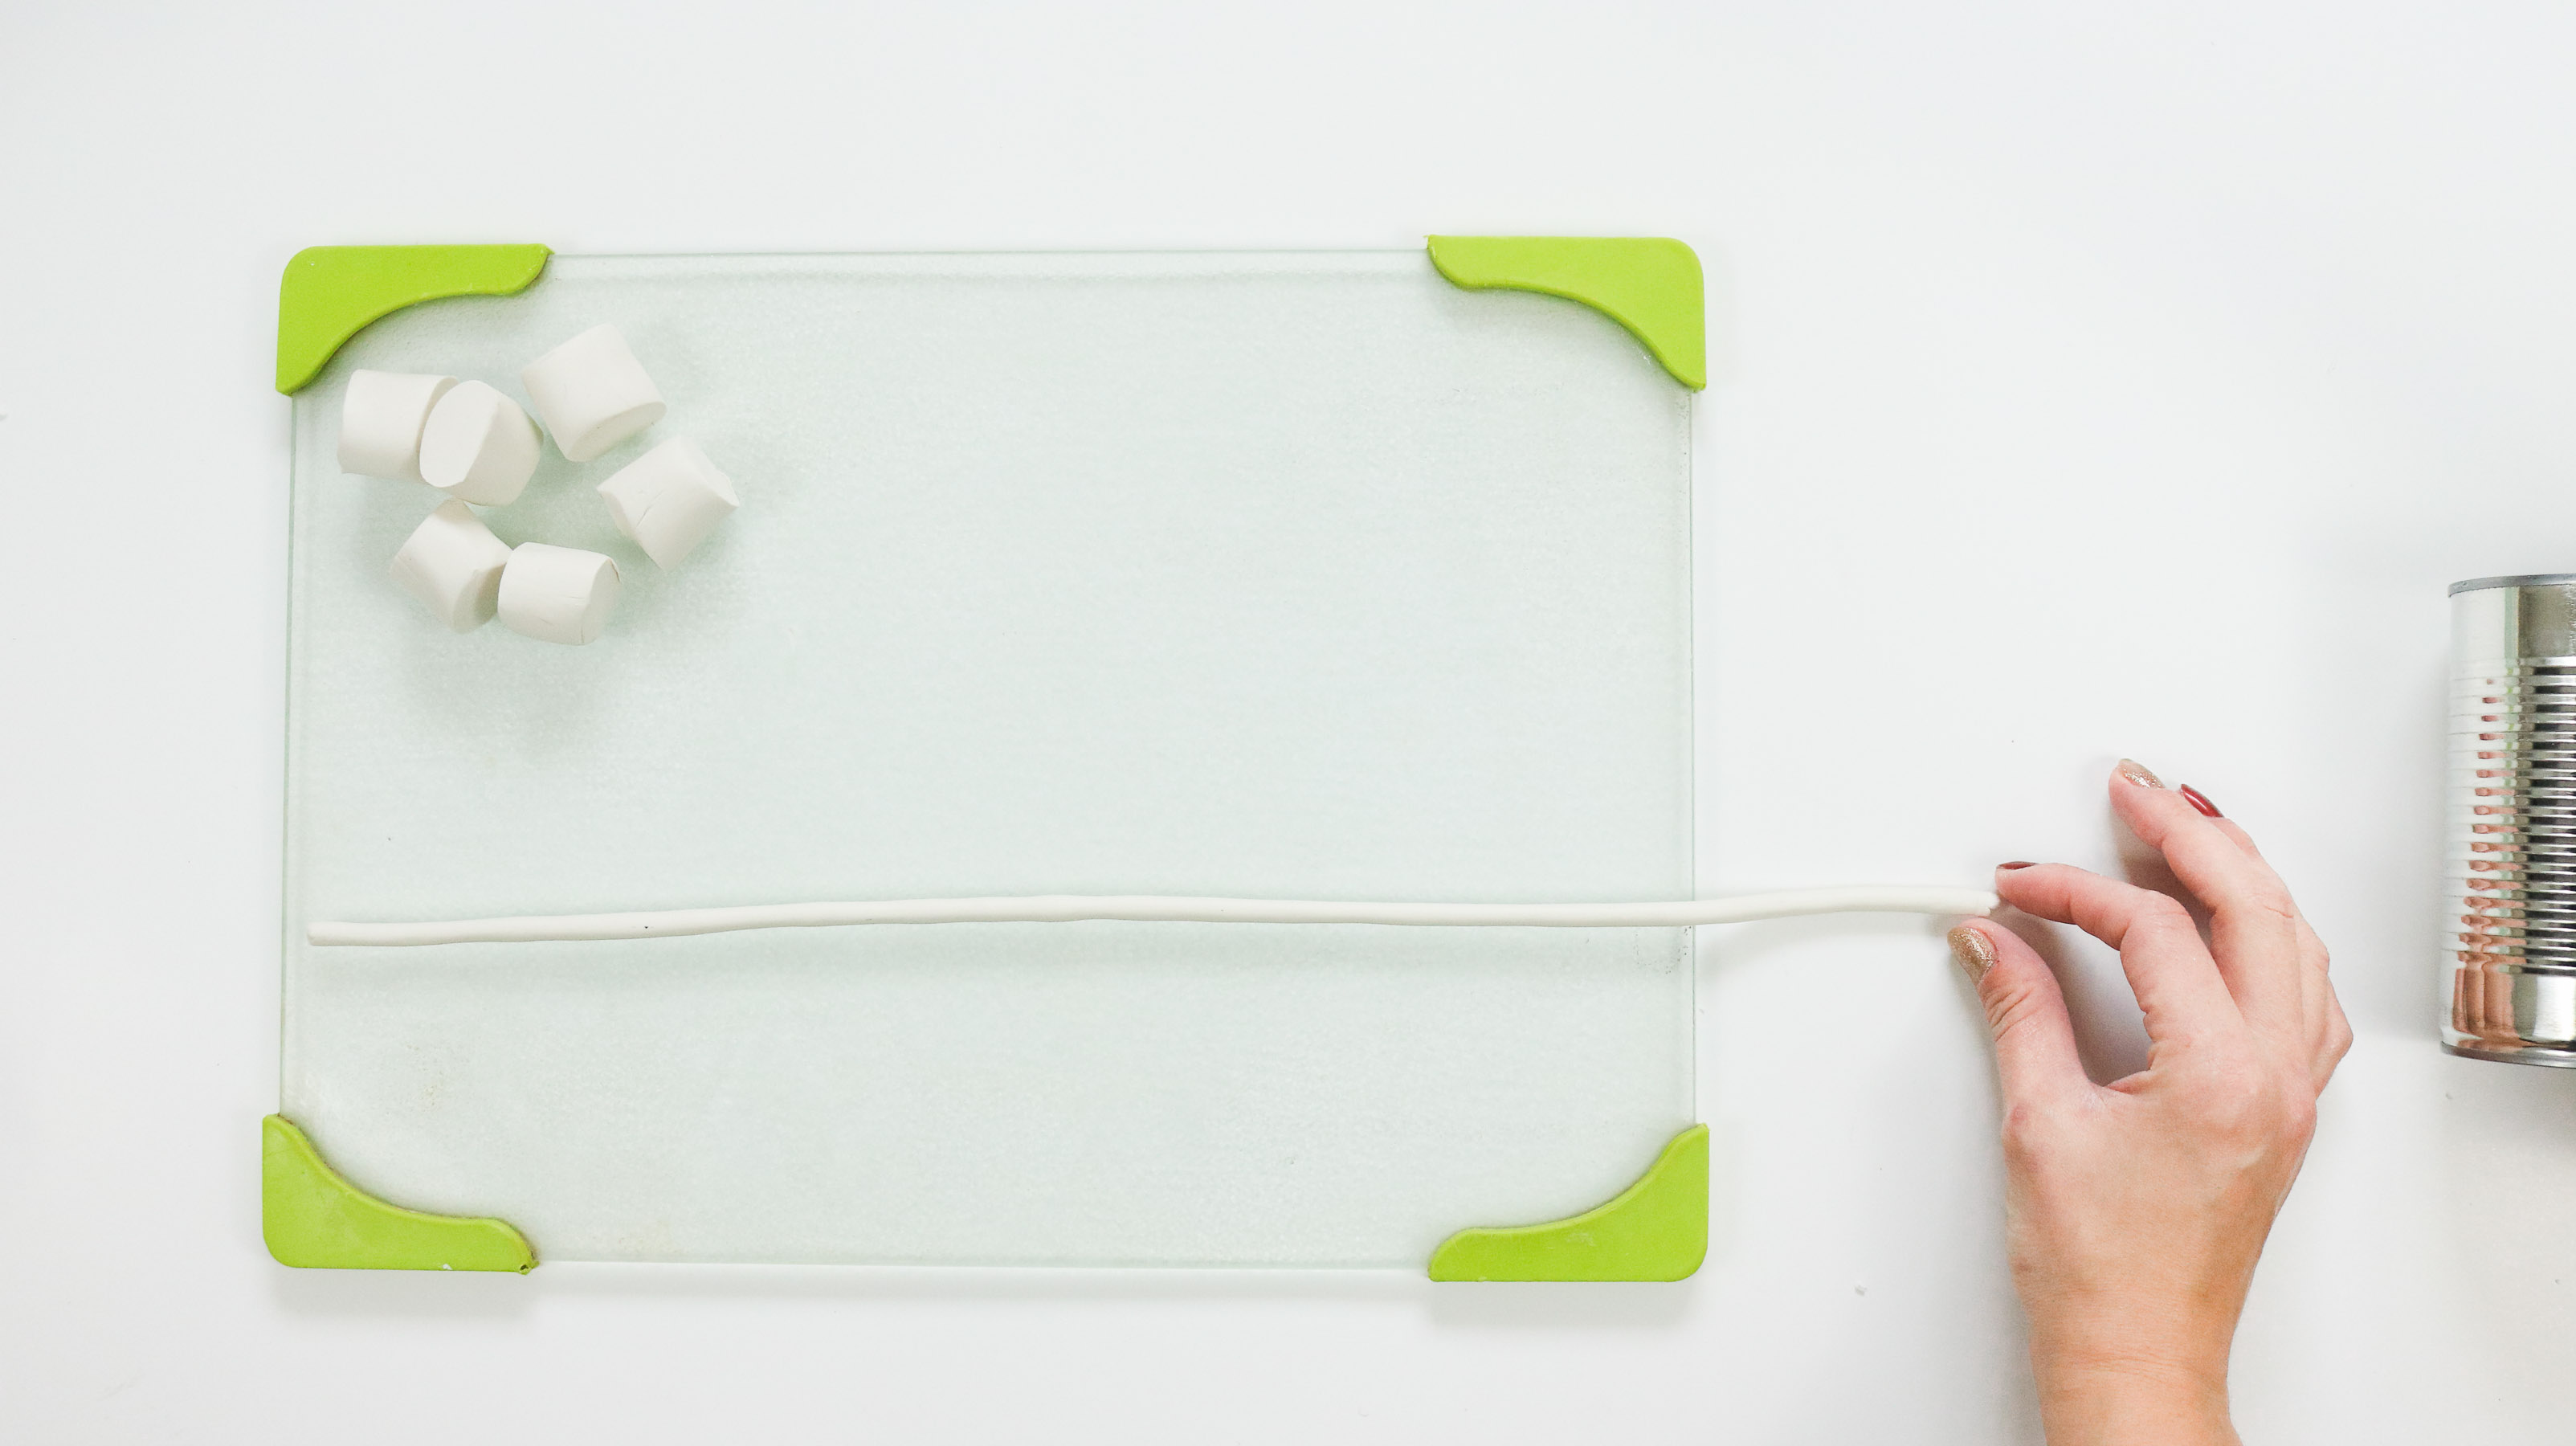
Step 1: Prepping your Clay!
Okay so the nice thing about working with polymer clay is it stays soft until you bake it which means if you mess up you can re-do it as many times as you want before you cure it in the oven. To begin take a piece of clay and knead it. Than roll it out a bit and divide it into equal sections. It doesn’t have to be perfect as long as they look the same your good to go.
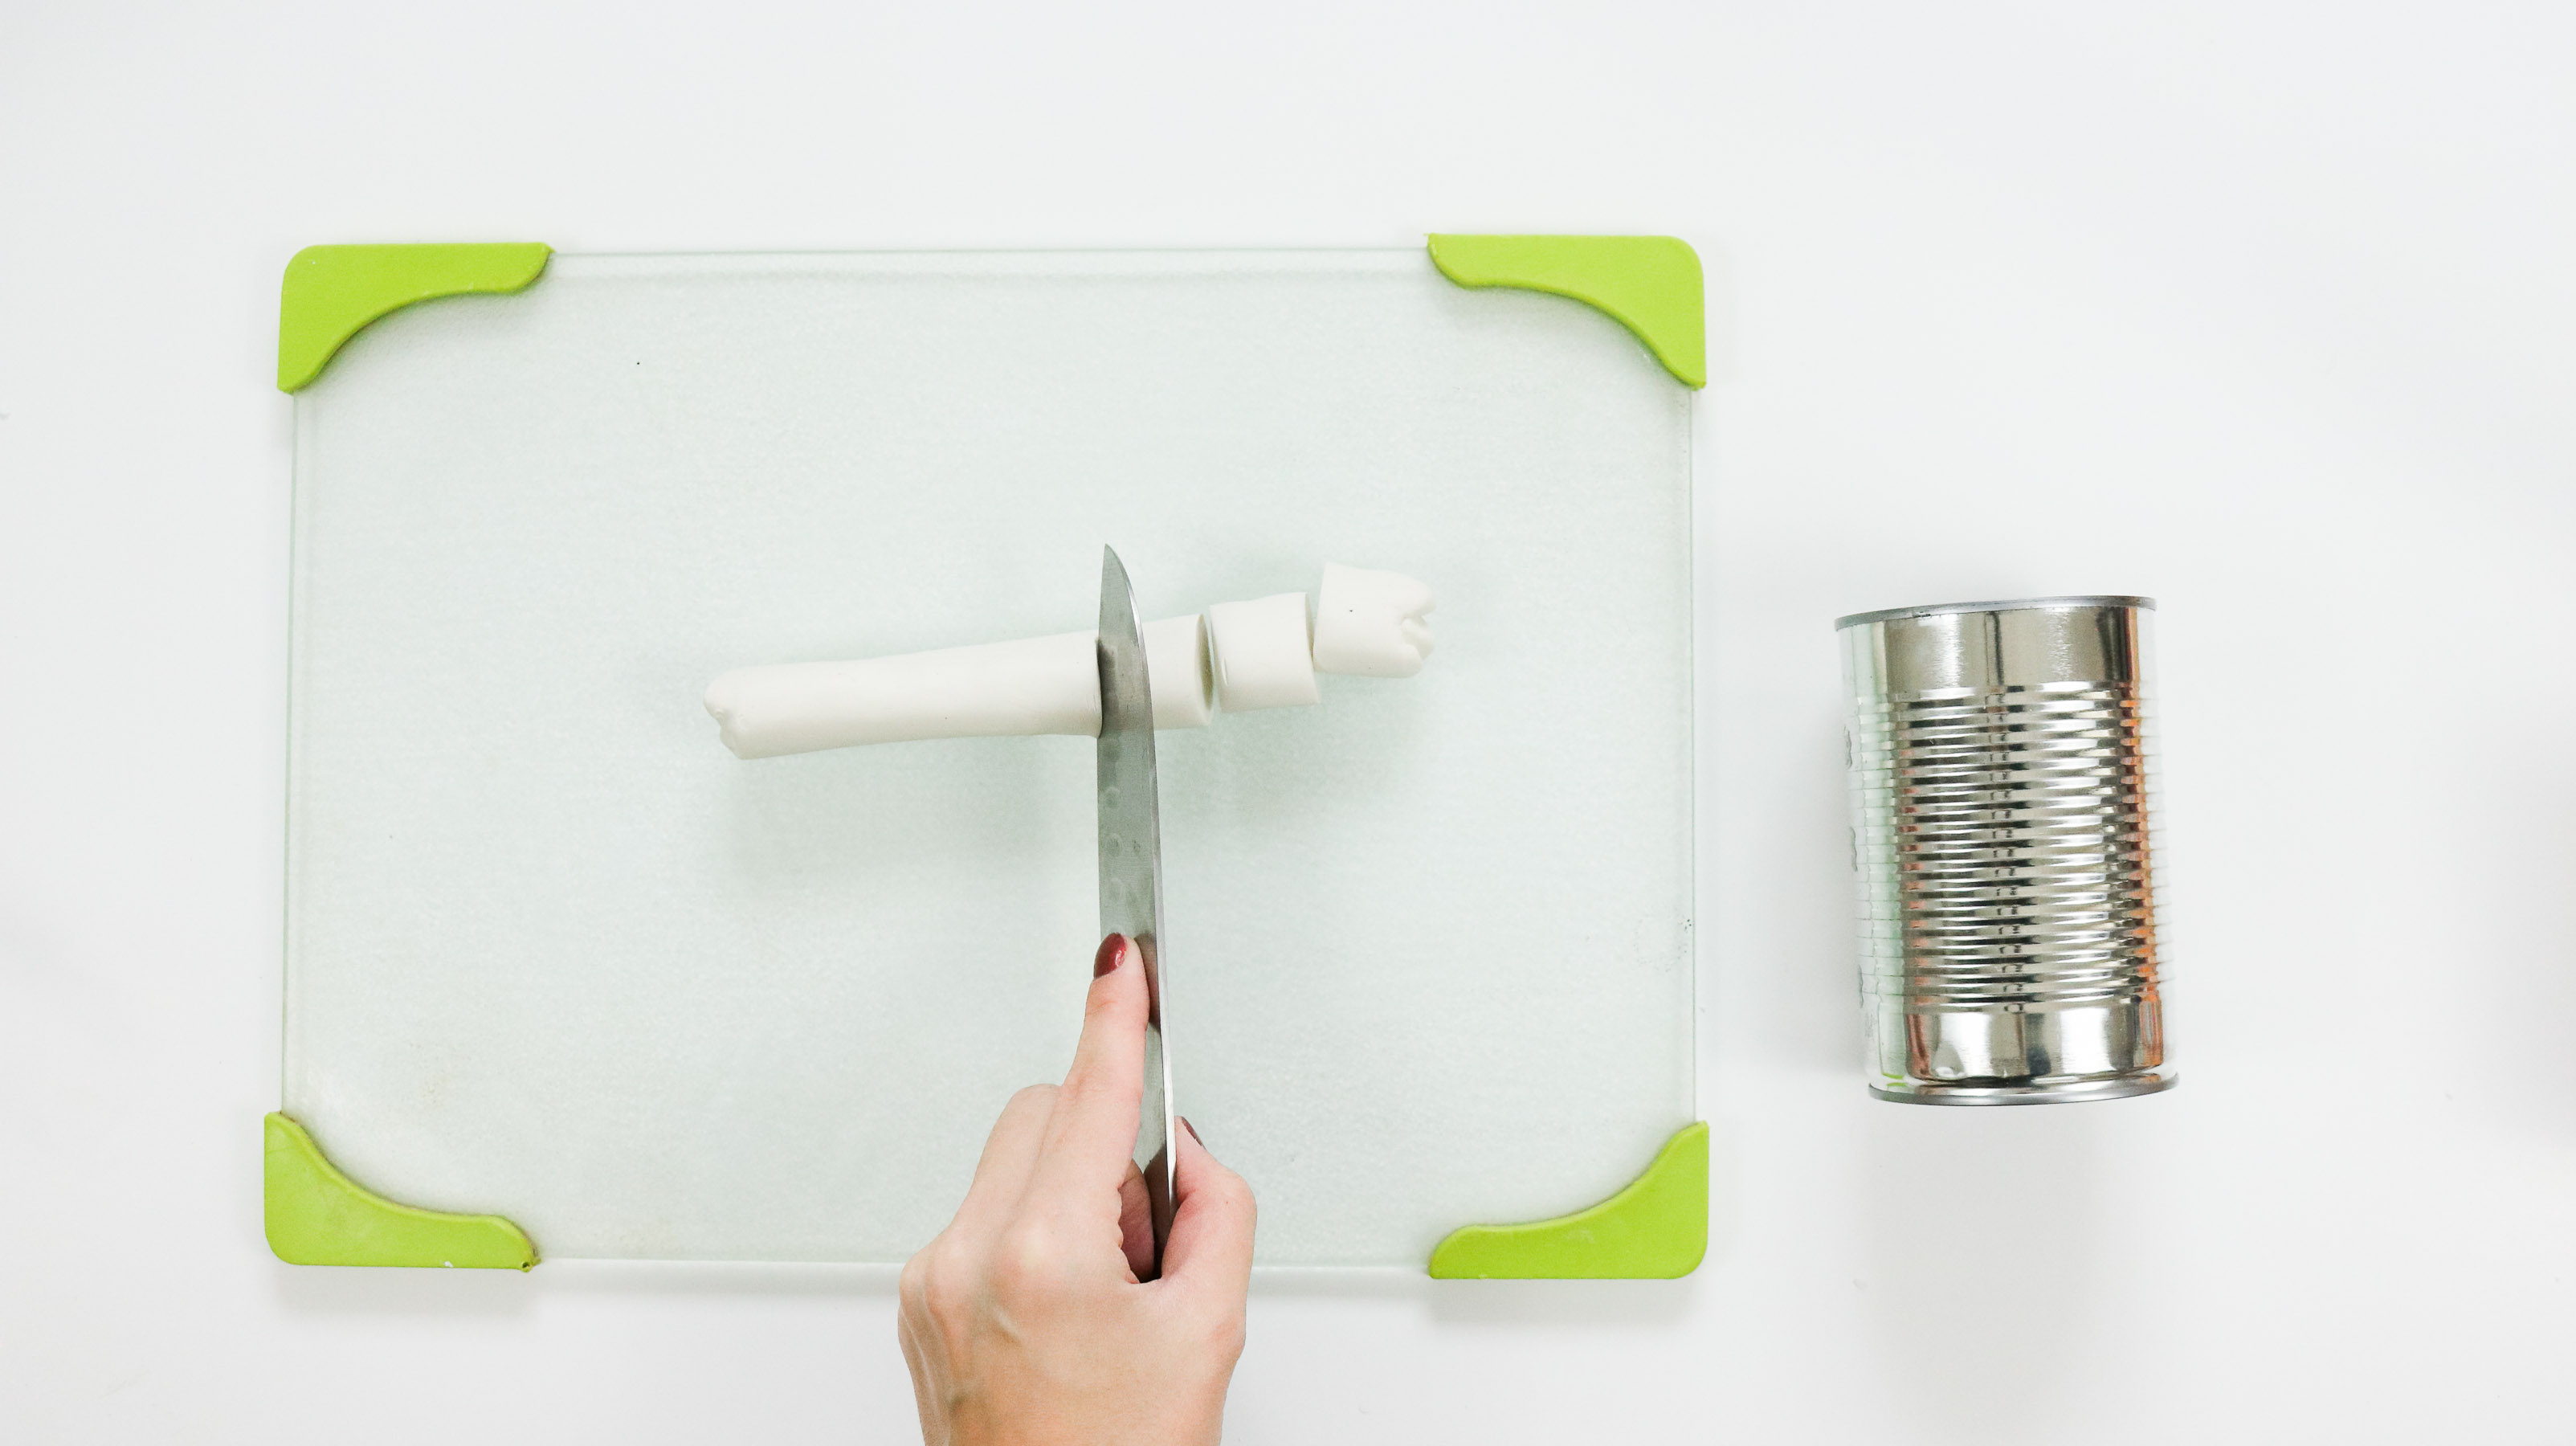
Step 2: Creating Your Braids
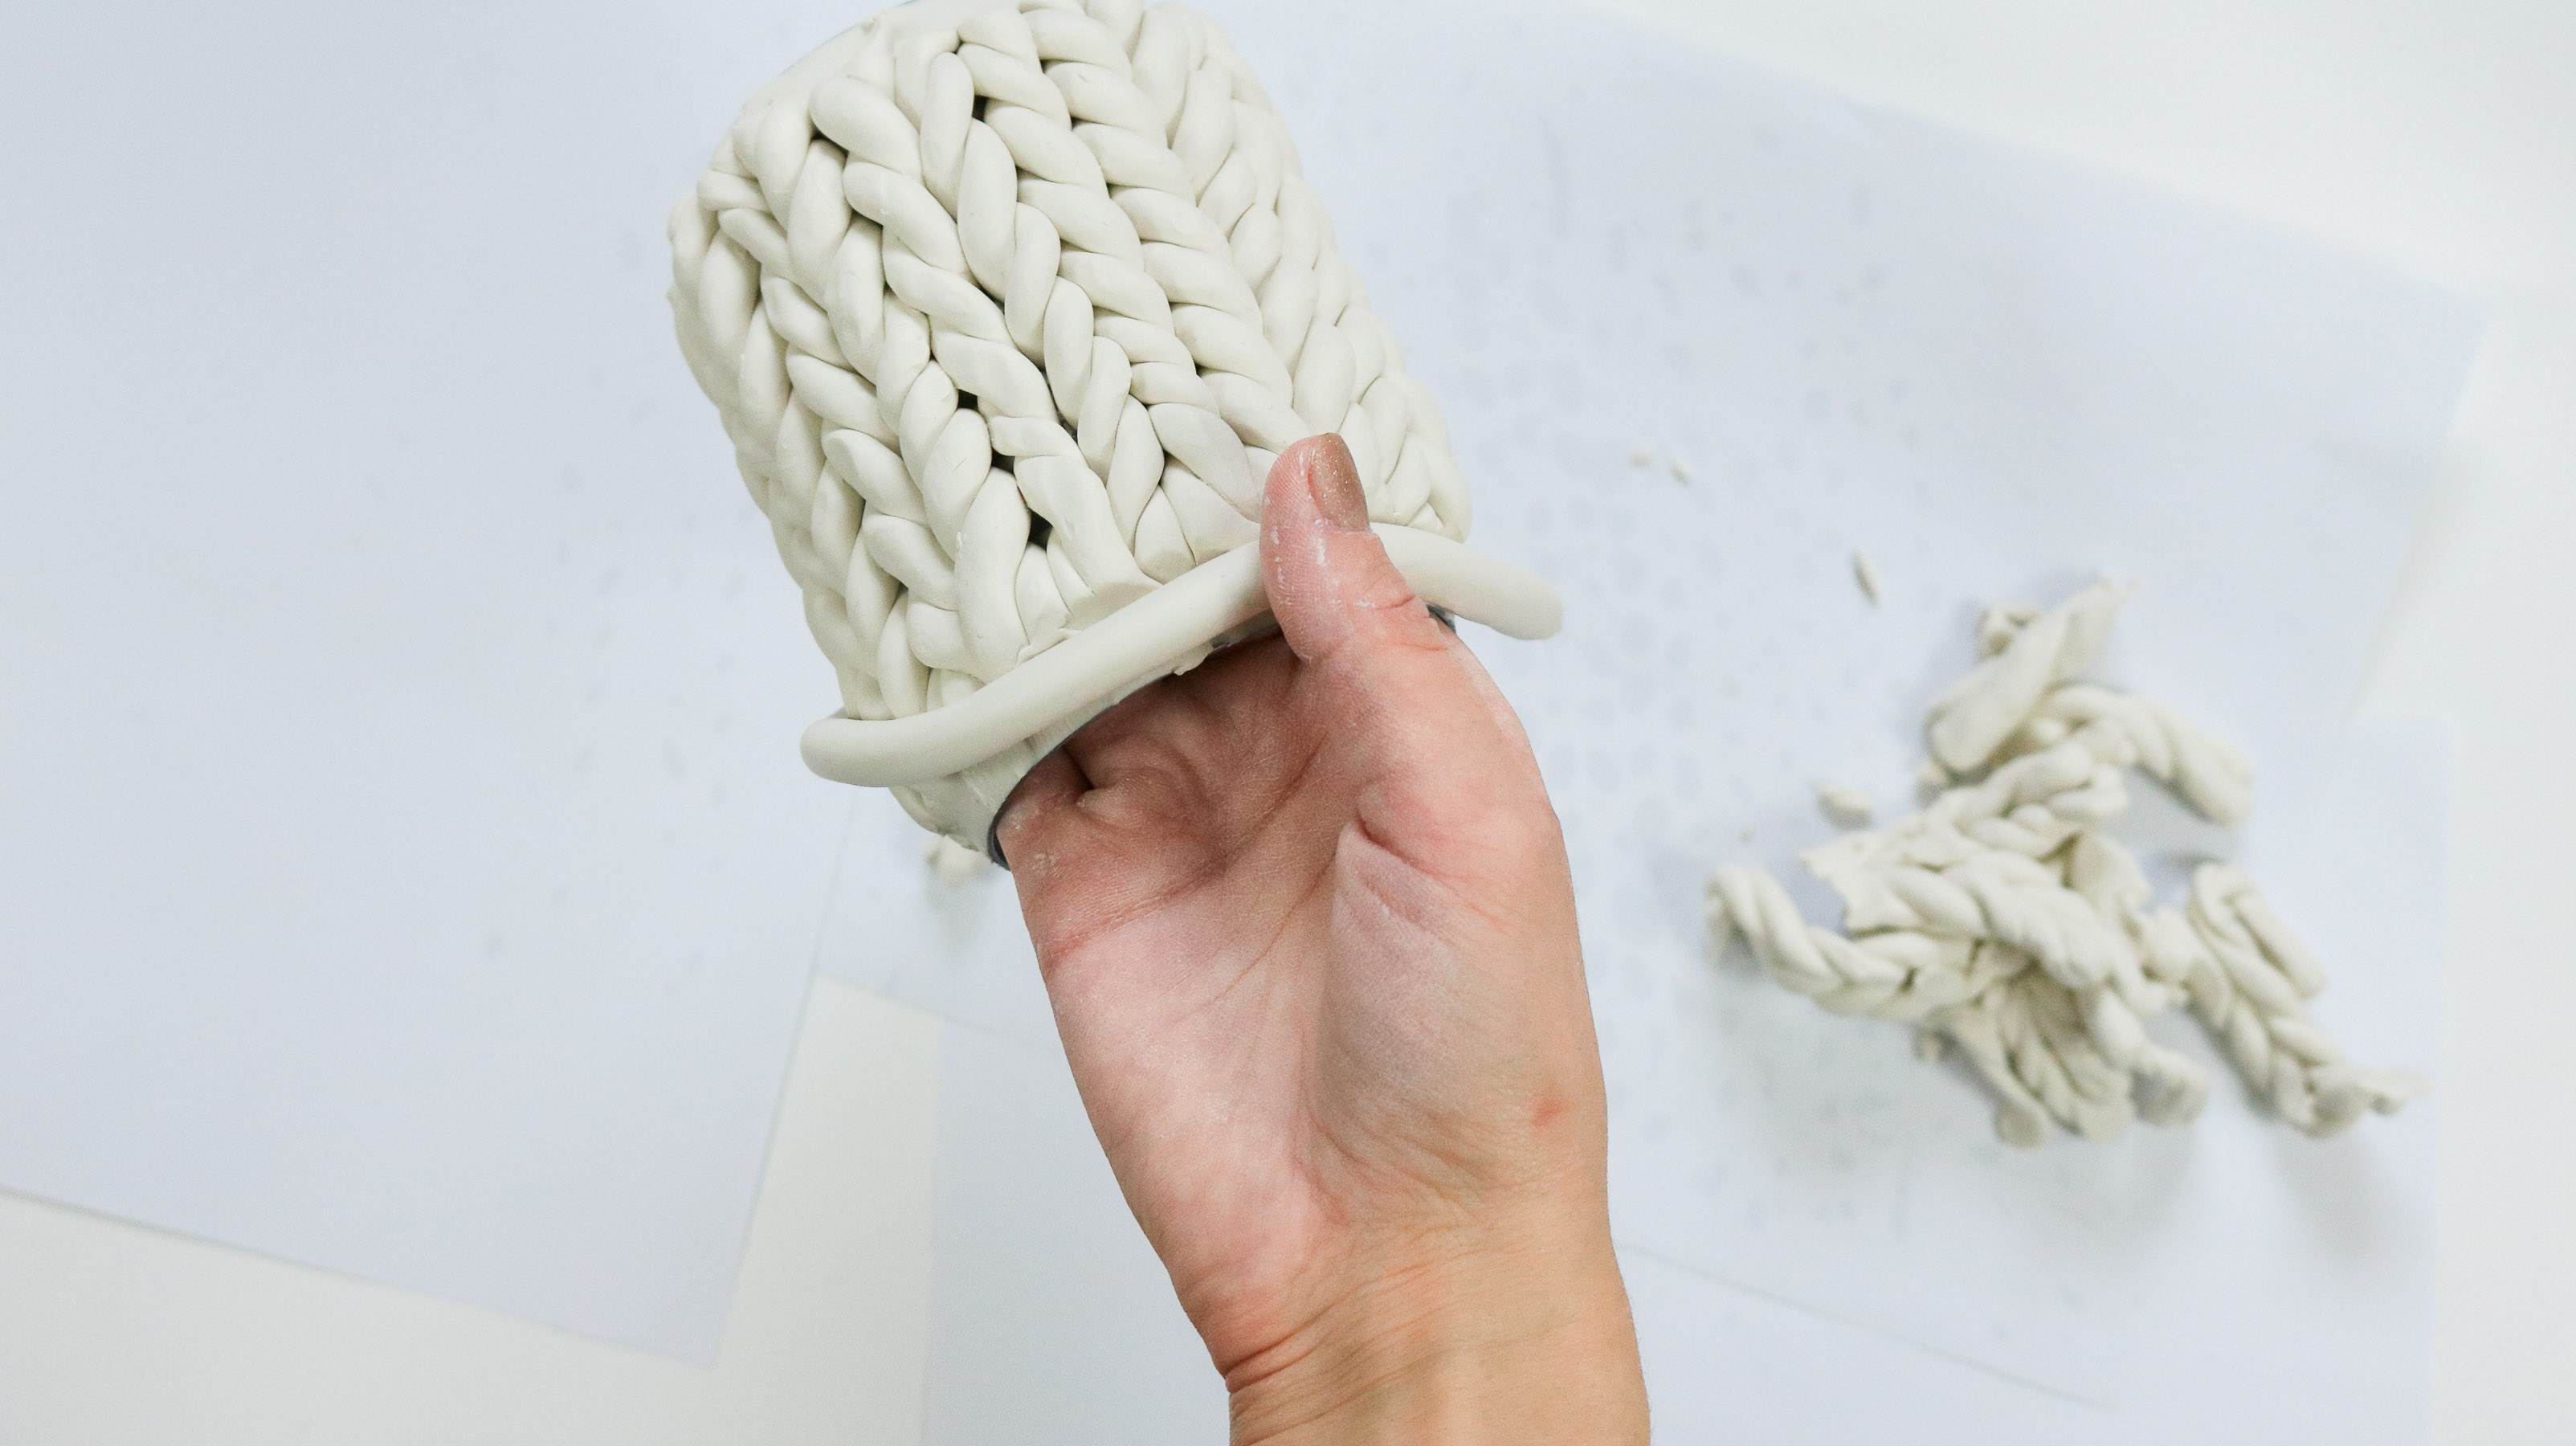
Now take each piece of clay and roll it out using your hands. Gently roll back and forth until you create long even strands of clay. This works best if you apply very light pressure and take your time. 😀 It’s best to work with two strands of clay at a time to create your braids. Once you have your strands fold them in half and twist them in opposite directions away from each other. (see photo for reference)
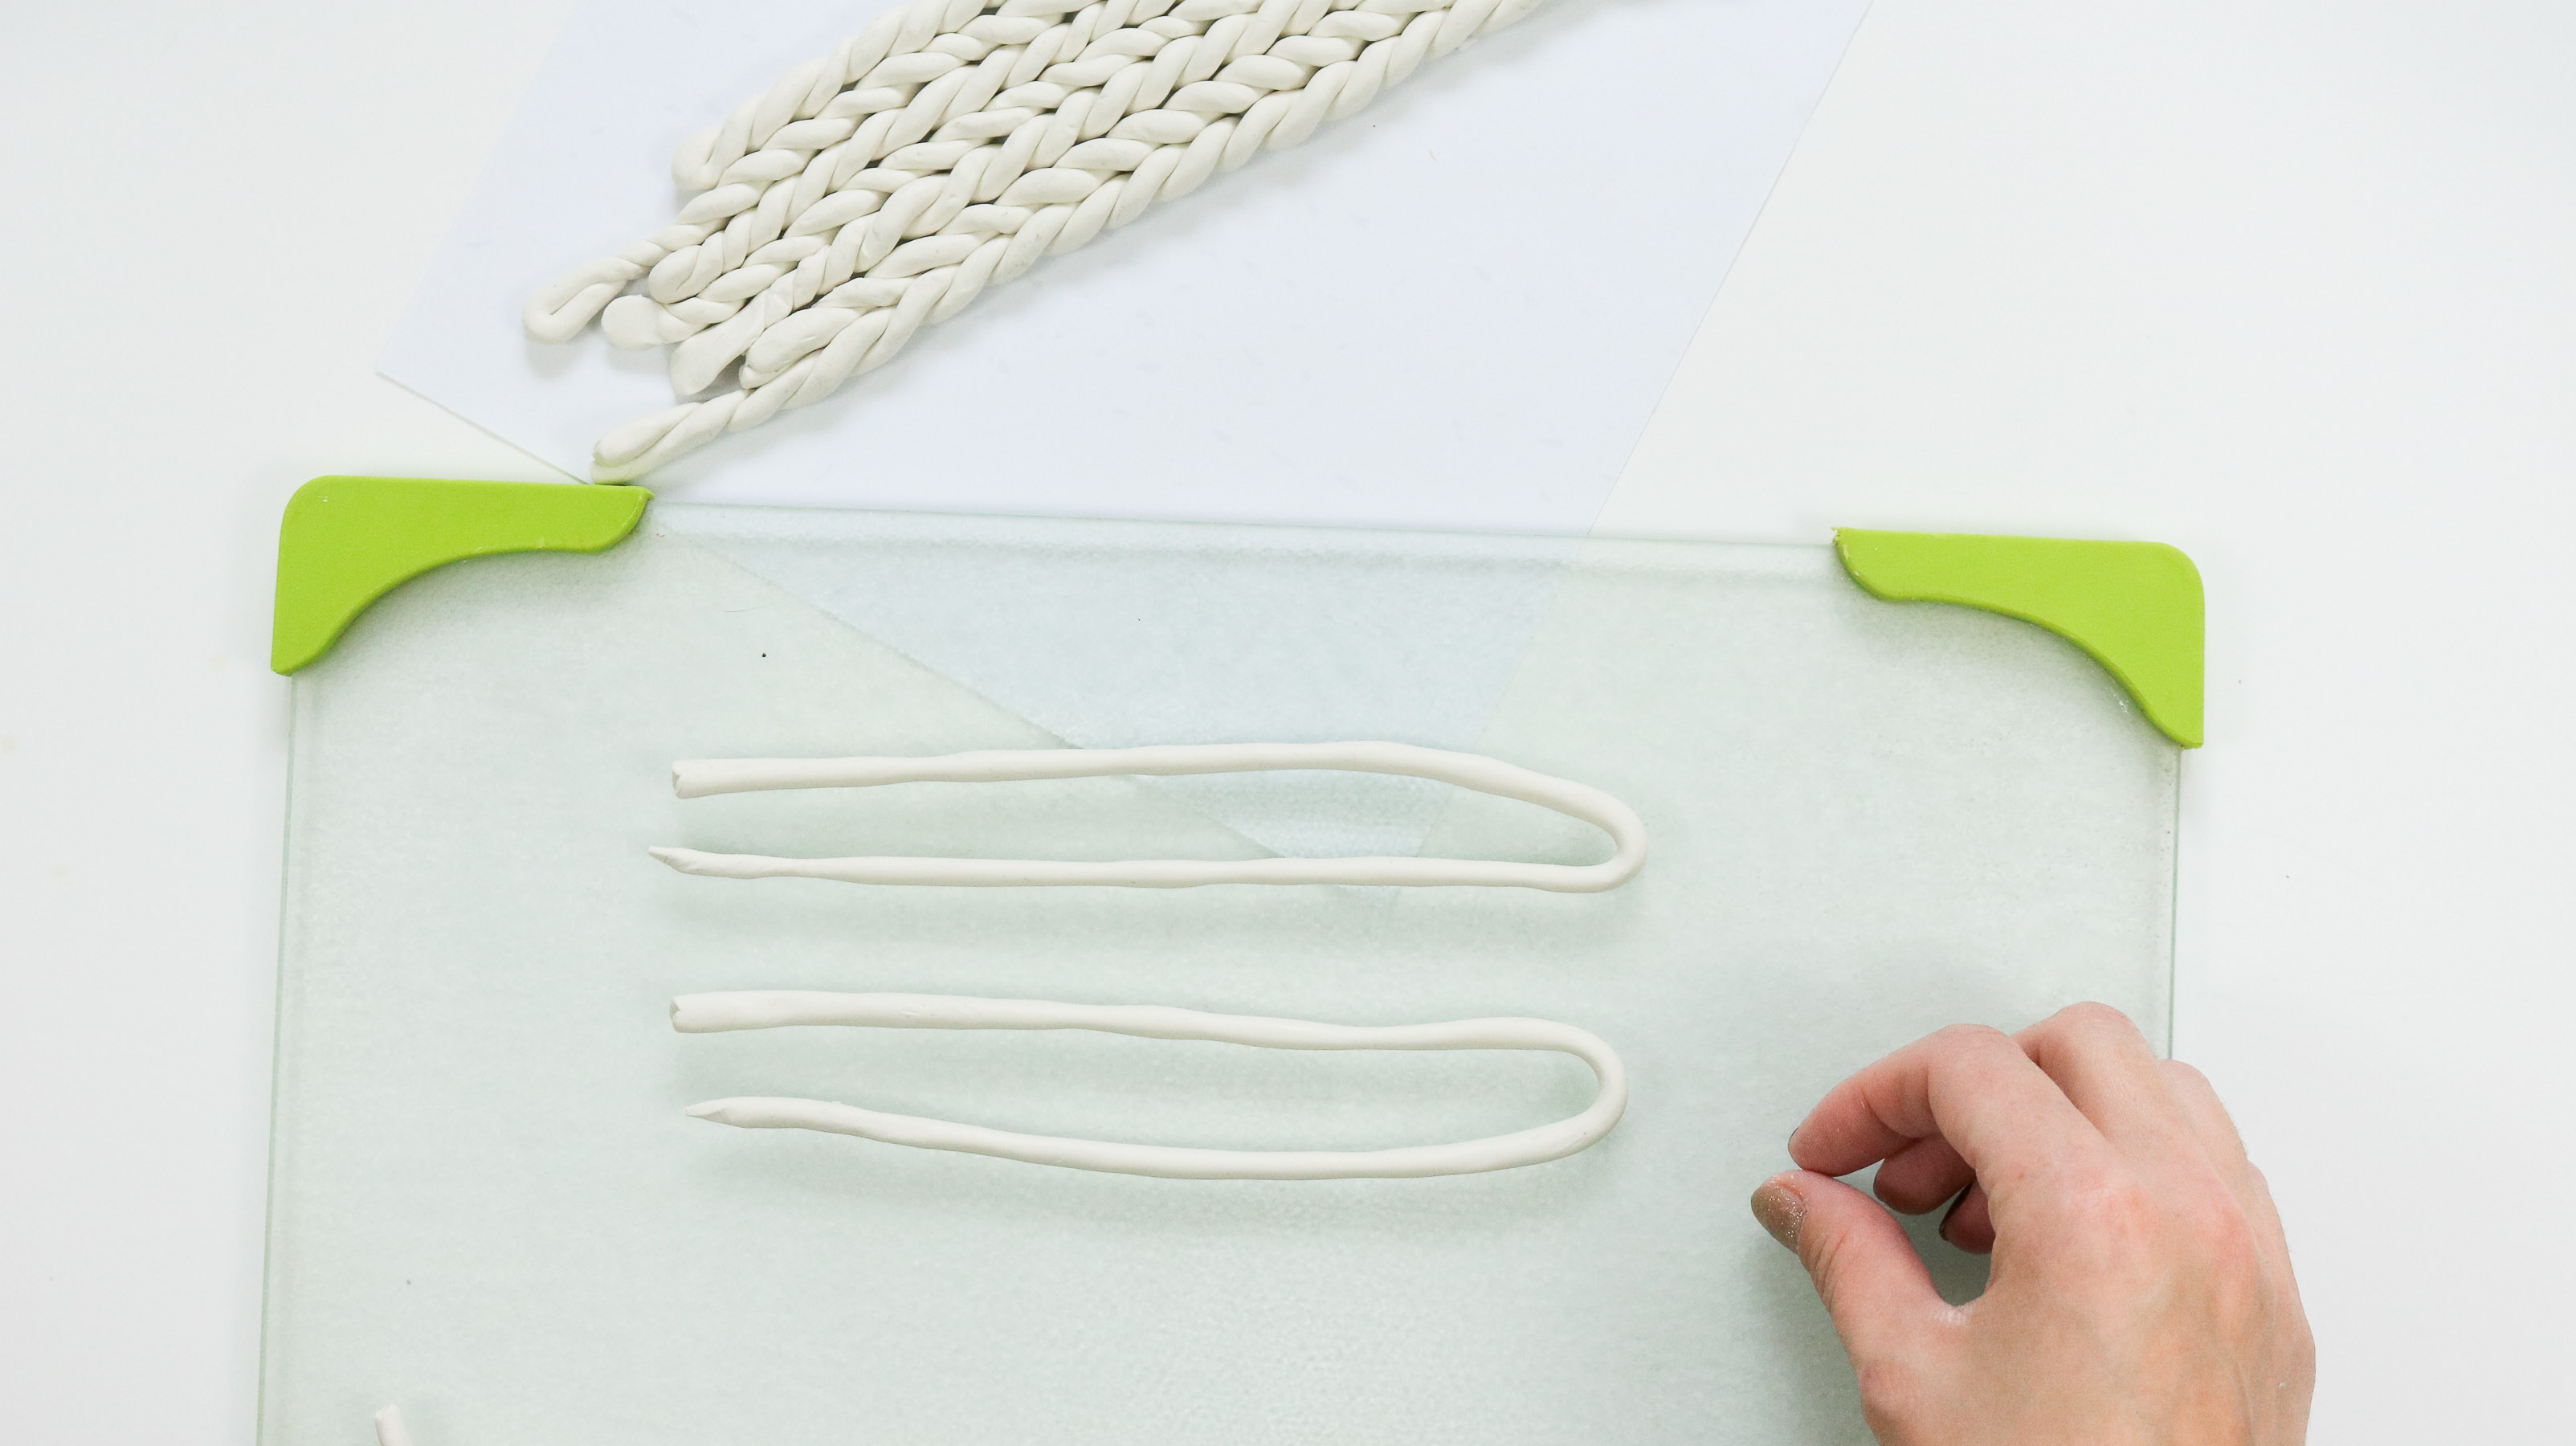
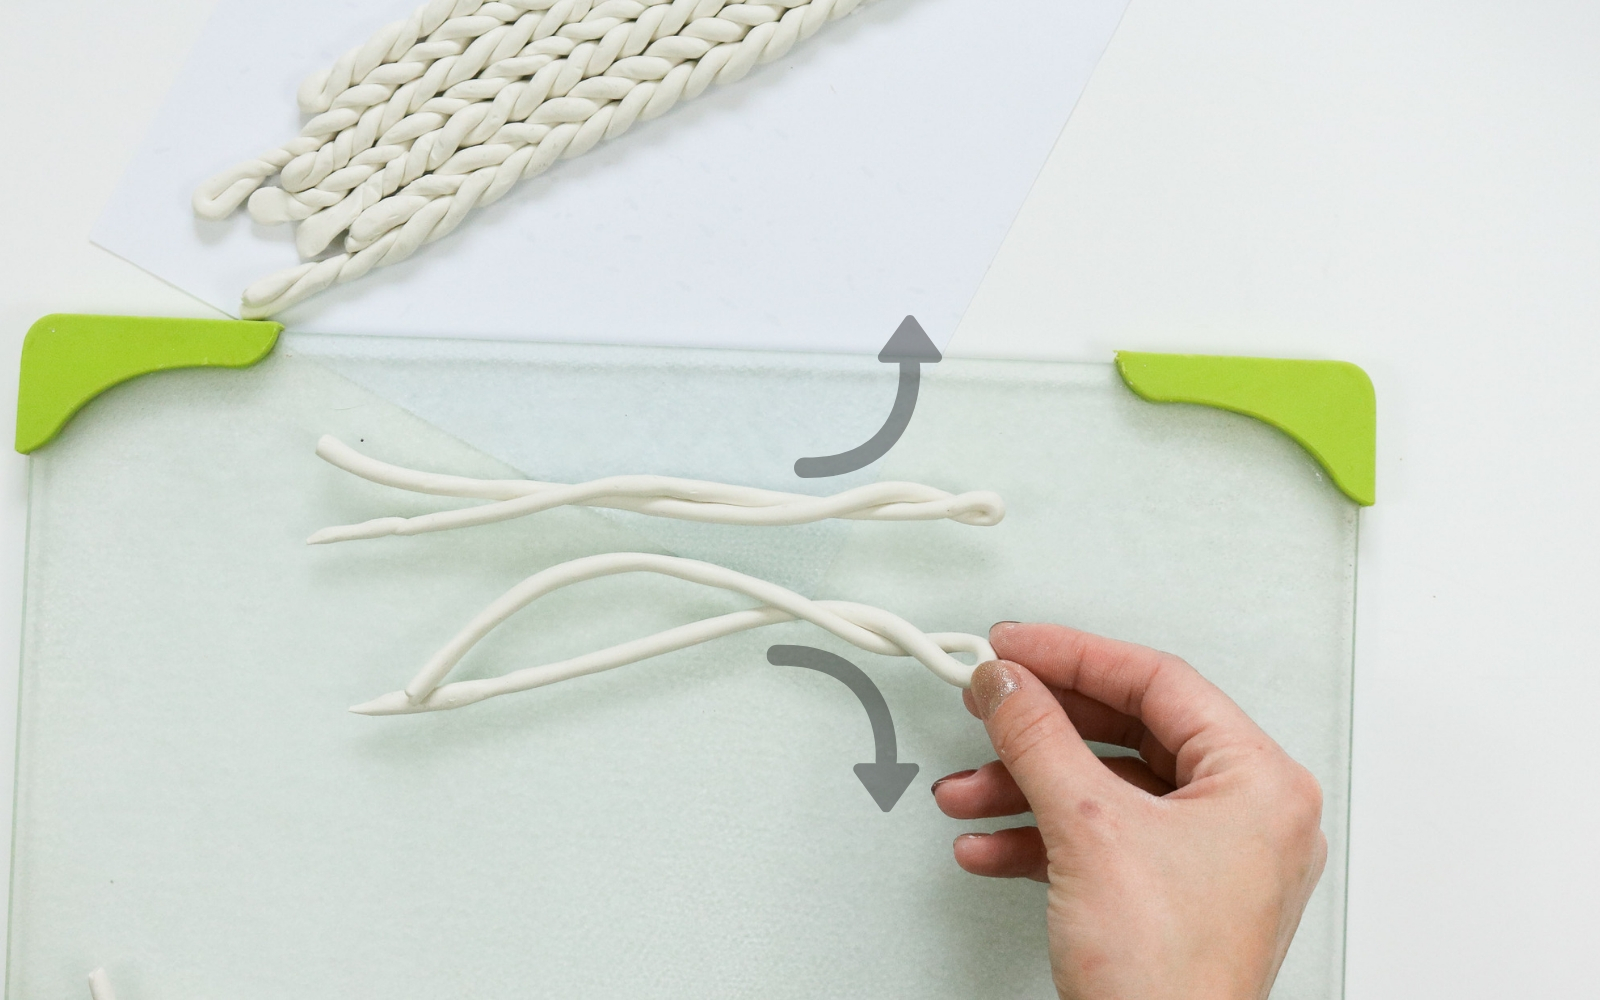
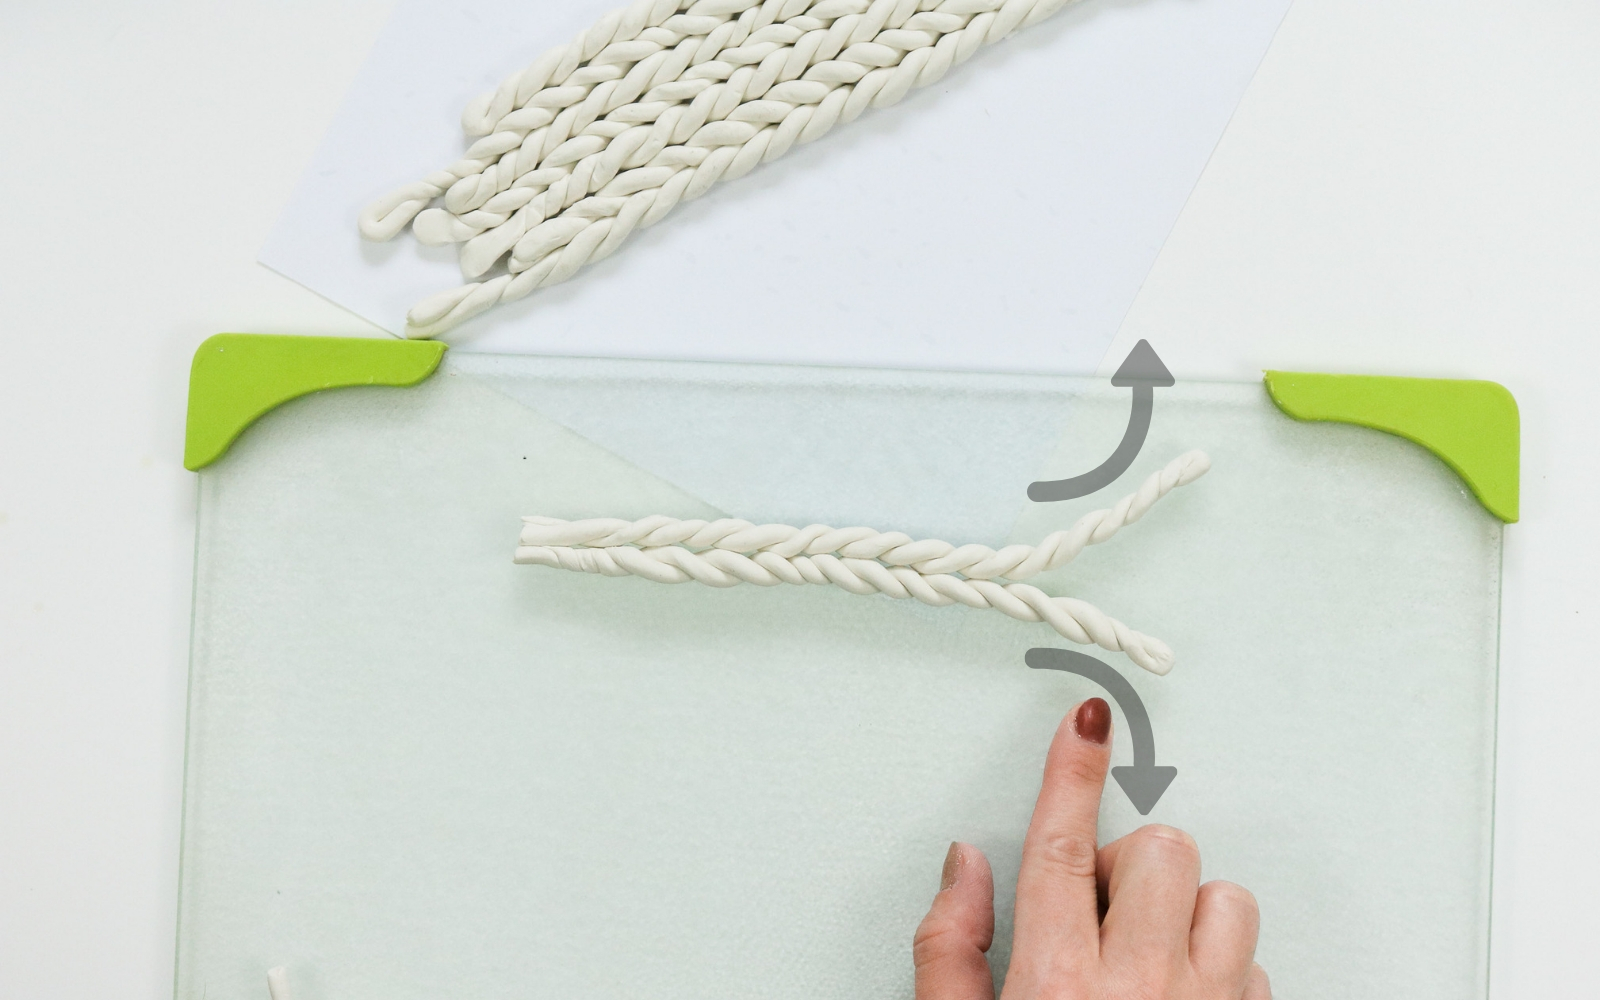
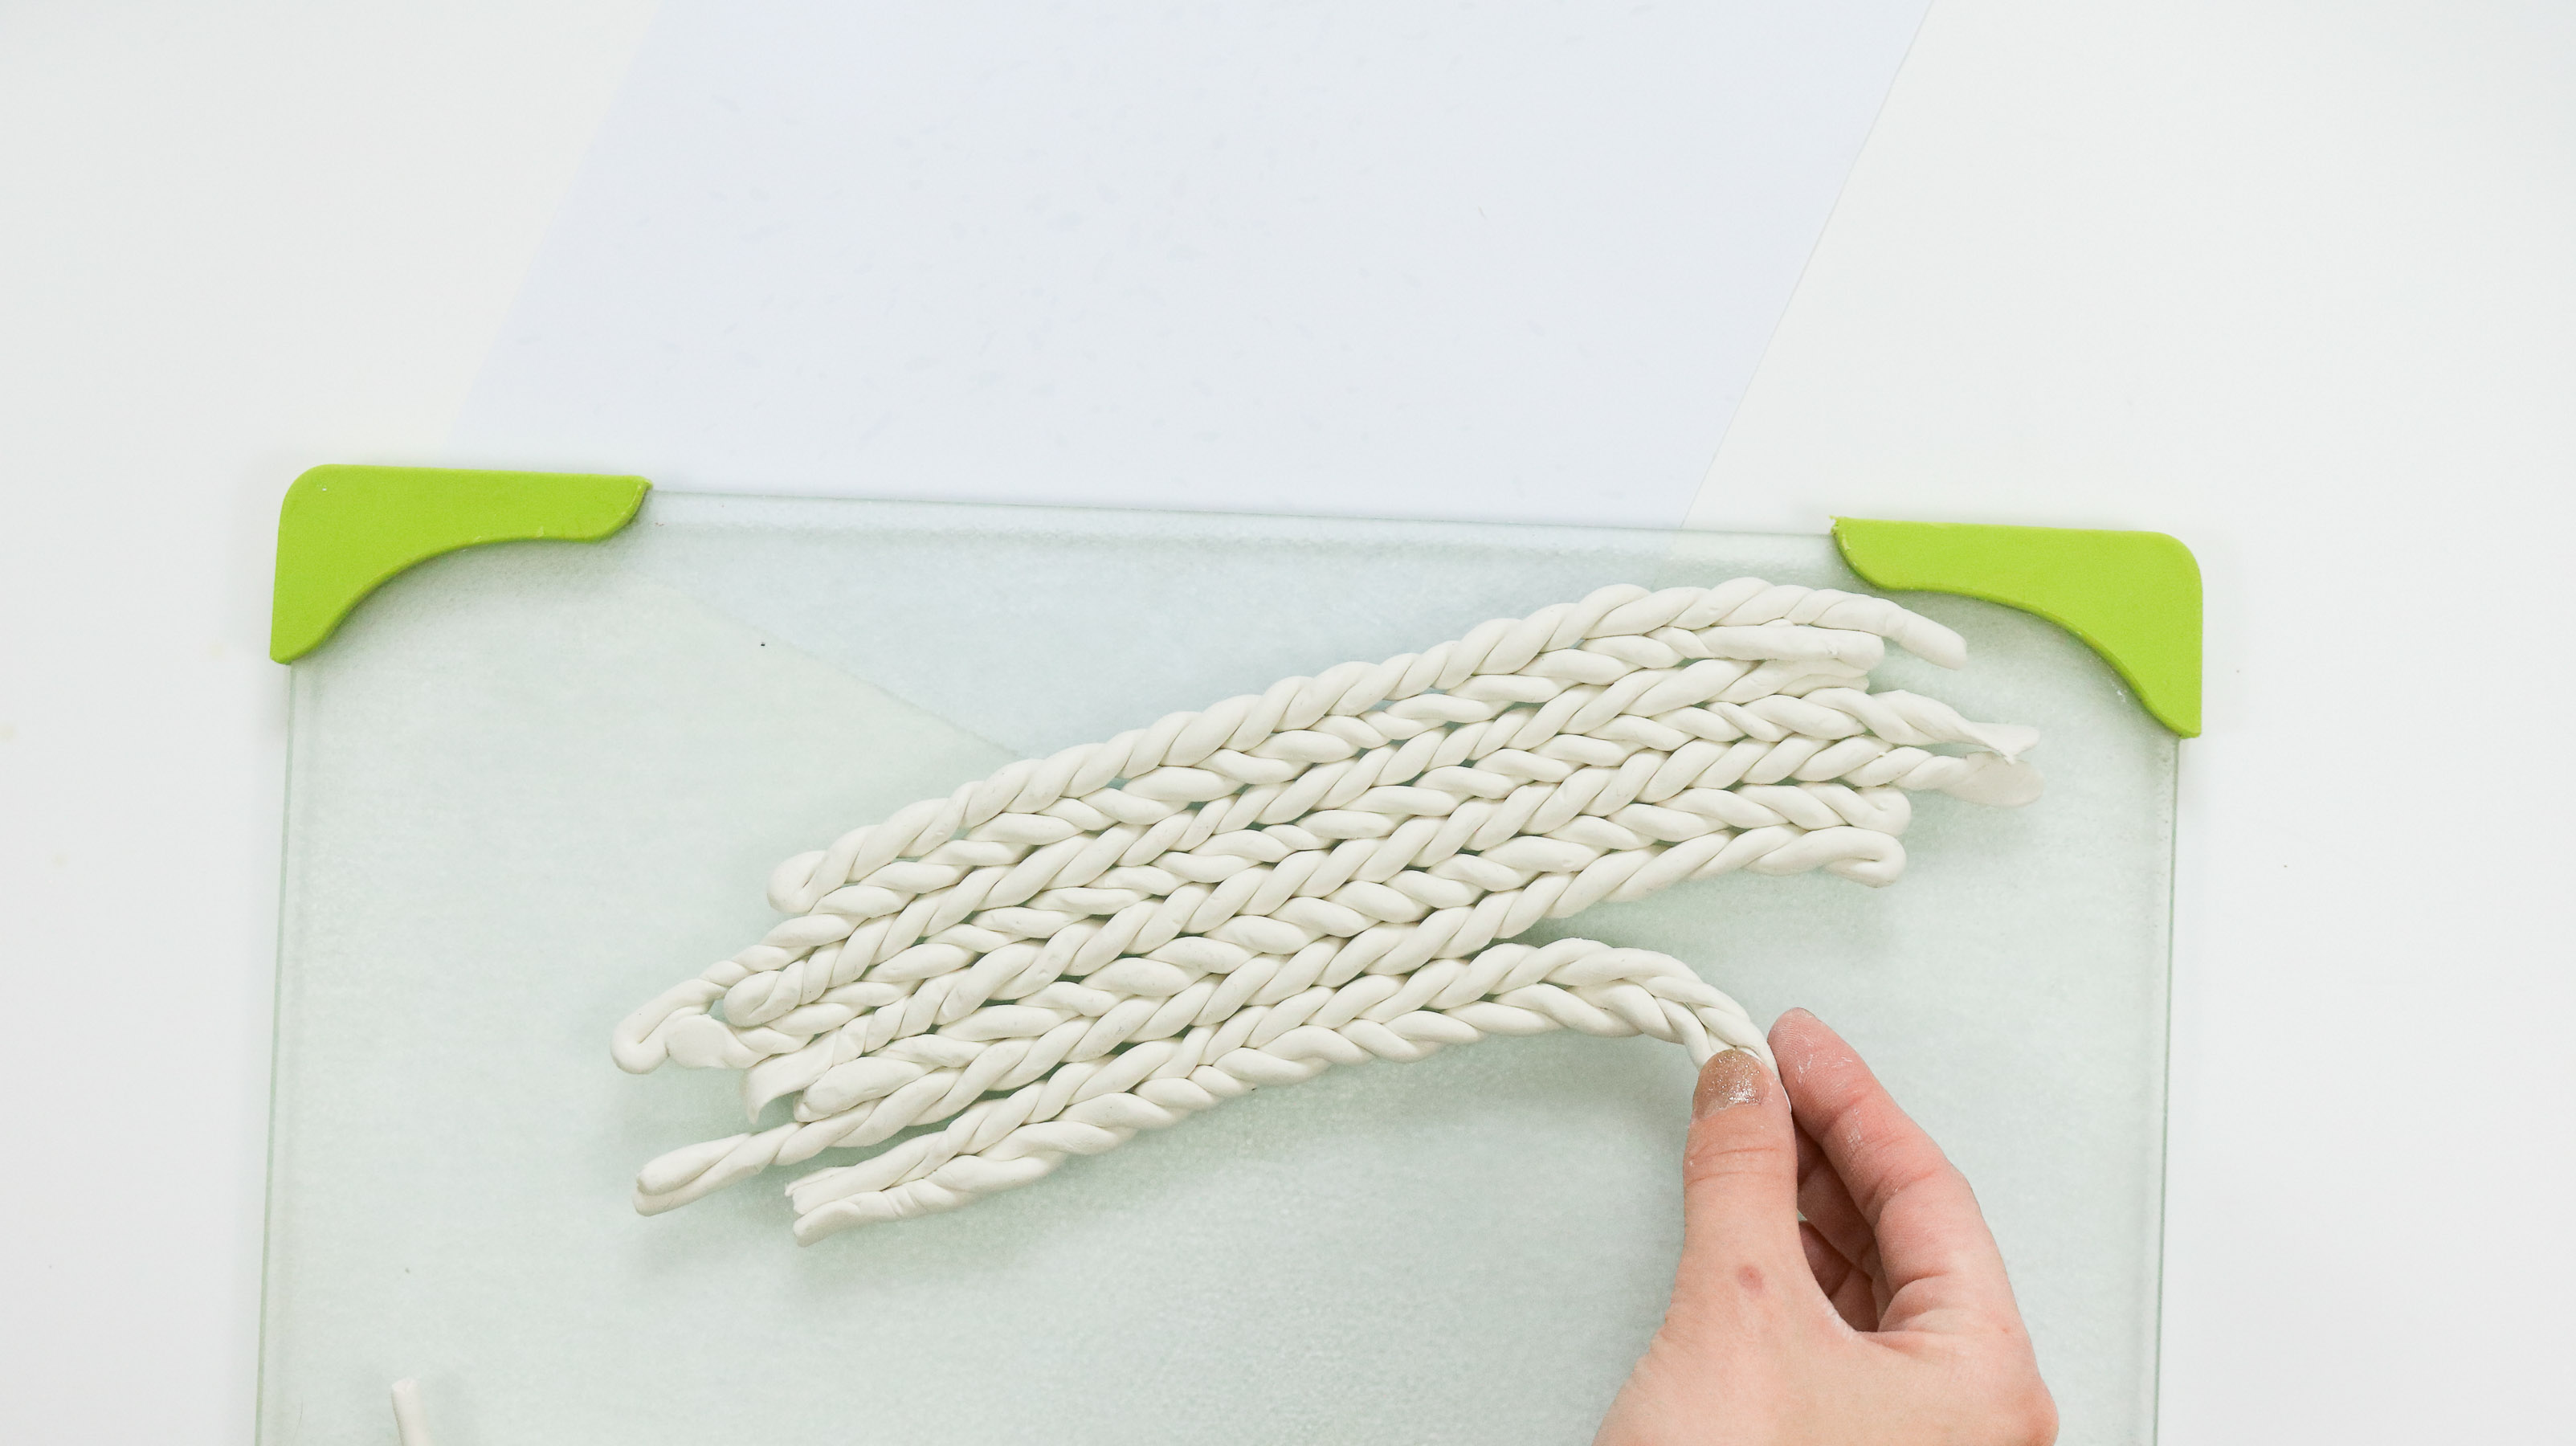
Than lay them next to each other and apply light pressure to lightly secure them together. Keep adding braids together but not fully securing the whole pattern together. This is just to keep track of your pattern. Once you feel you’ve made enough braids to cover your tin can you can secure one braid at at time or secure a few at a time to your tin can.
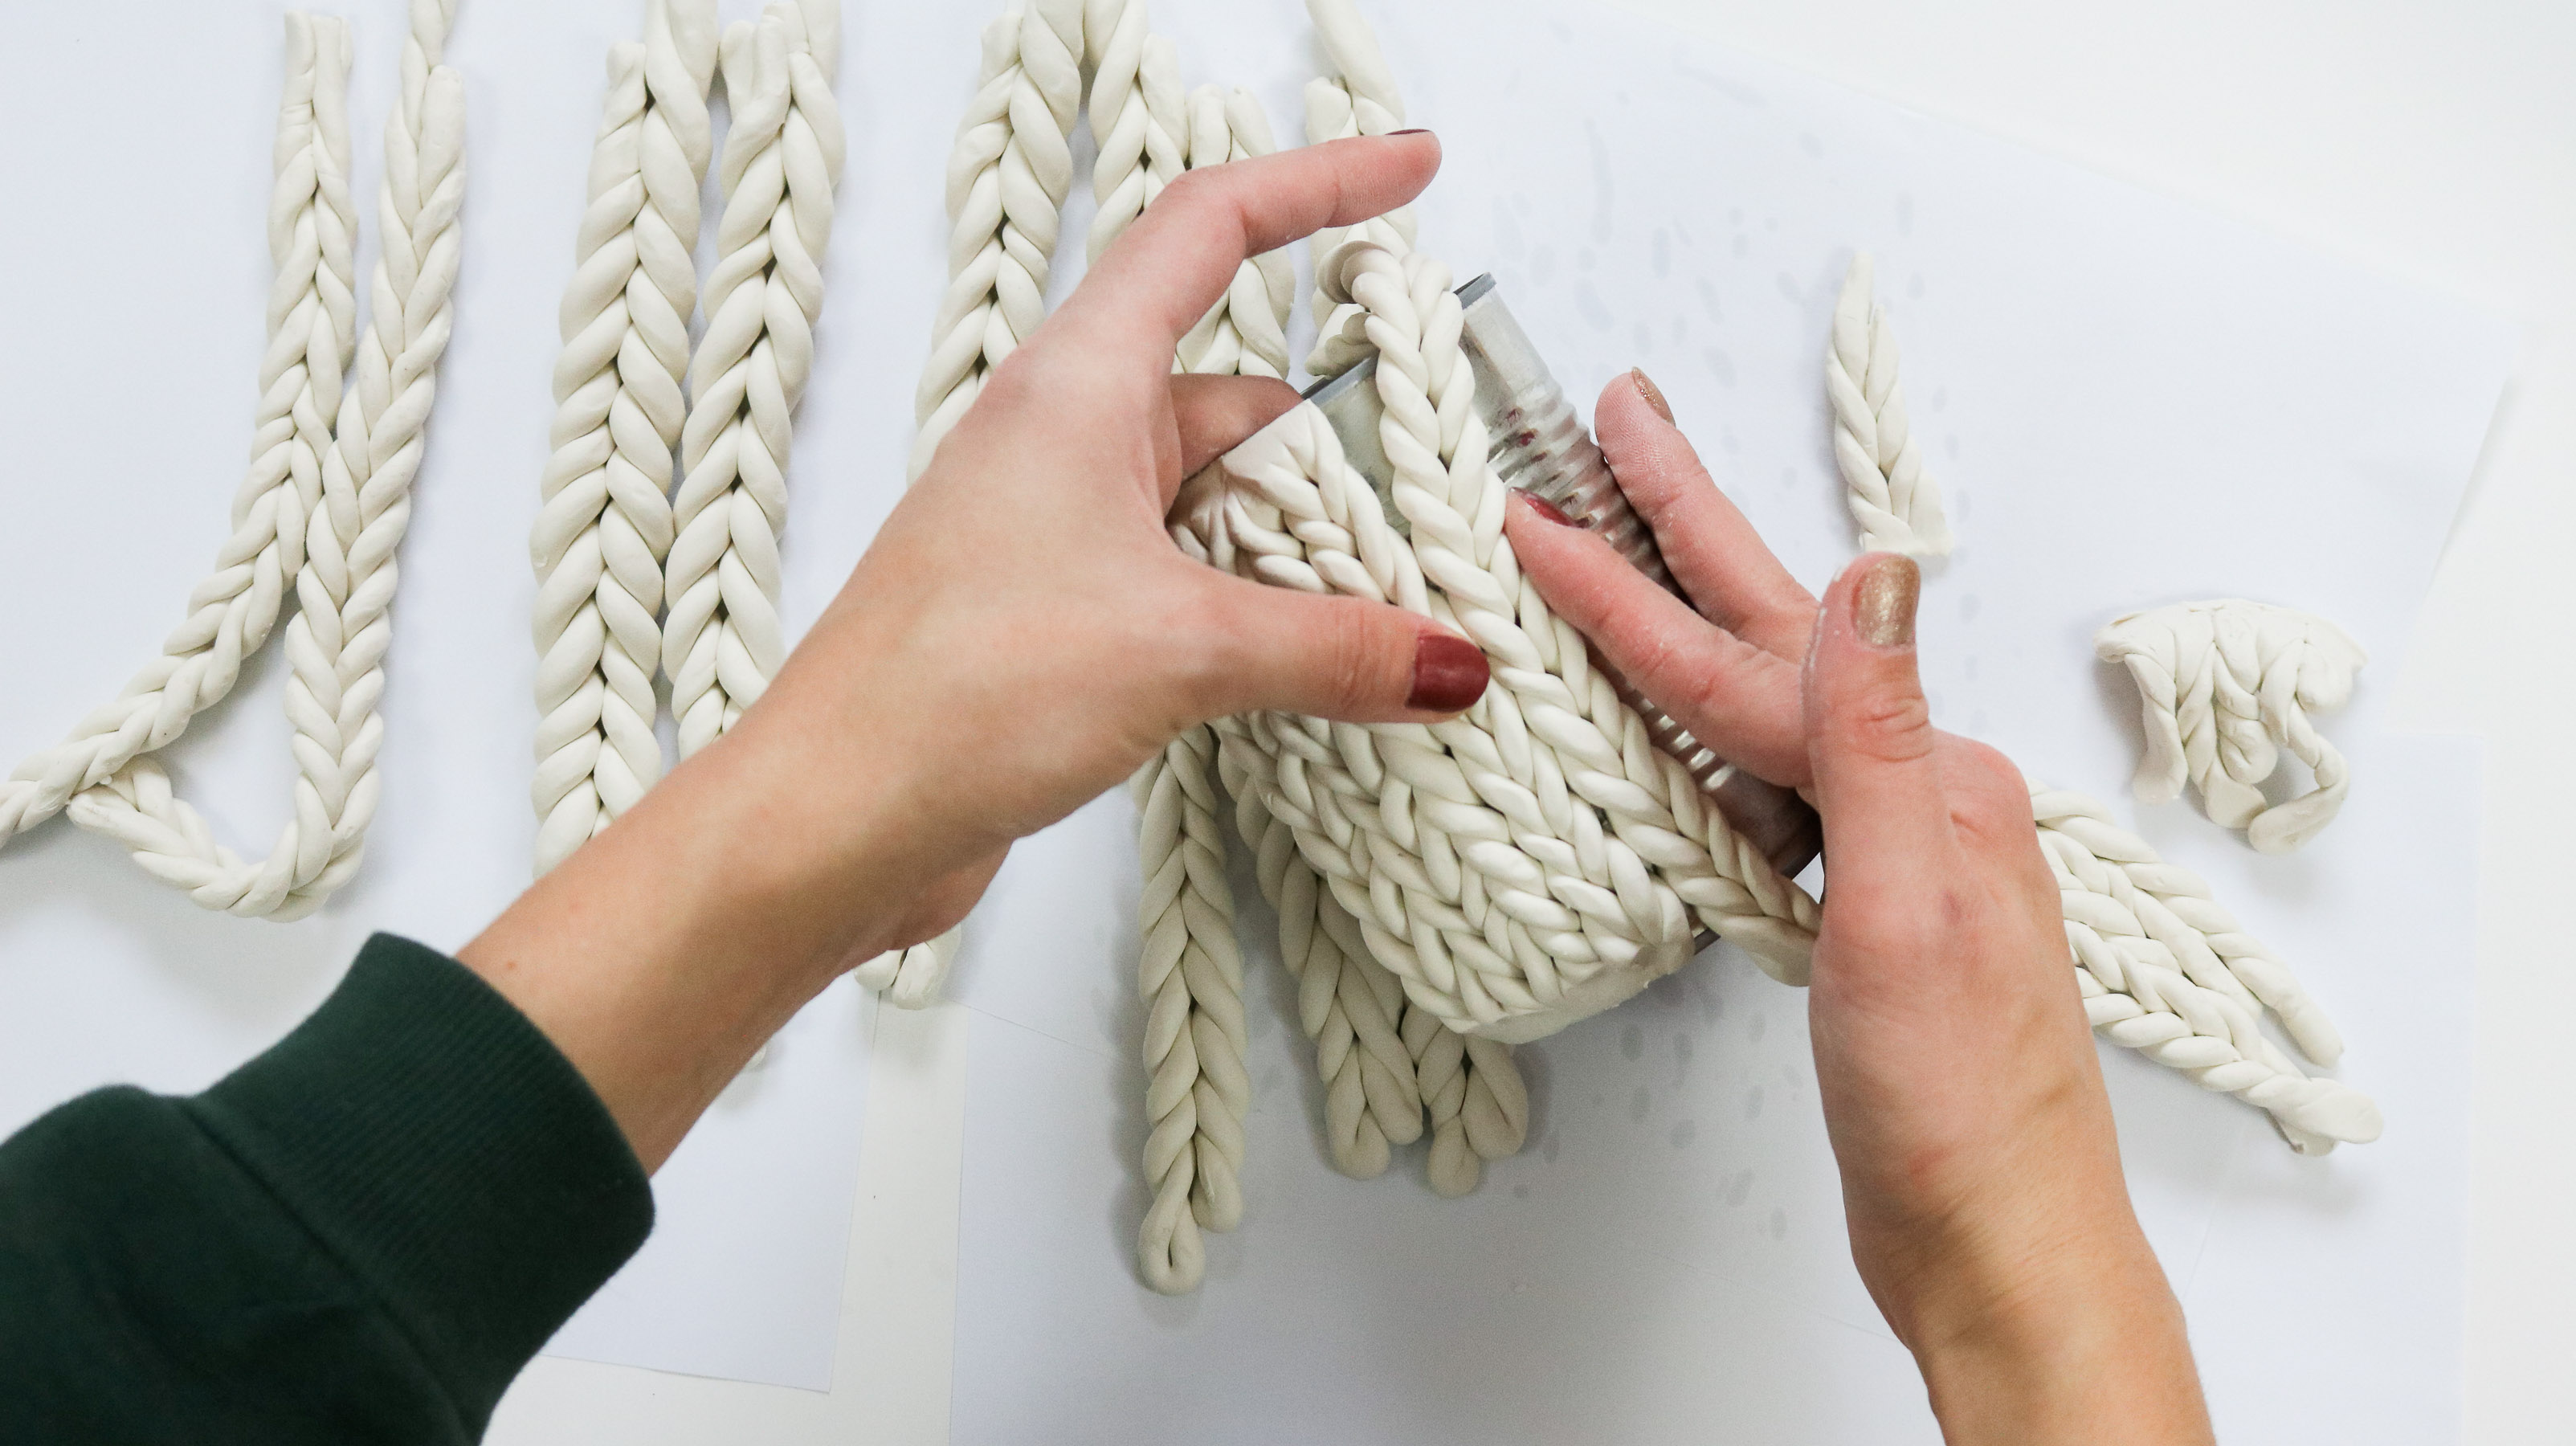
Step 3: Securing your Chunky Knit!
To secure each braid simply pinch of an excess braids on the top and bottom of the can. The clay should adhere to the tin can really well. No glue is needed for this step. Make sure your attaching your braids correctly. I totally forgot to keep track of the pattern and realized only after it had already cured in the oven! My OCD was driving me bonkers 😭!
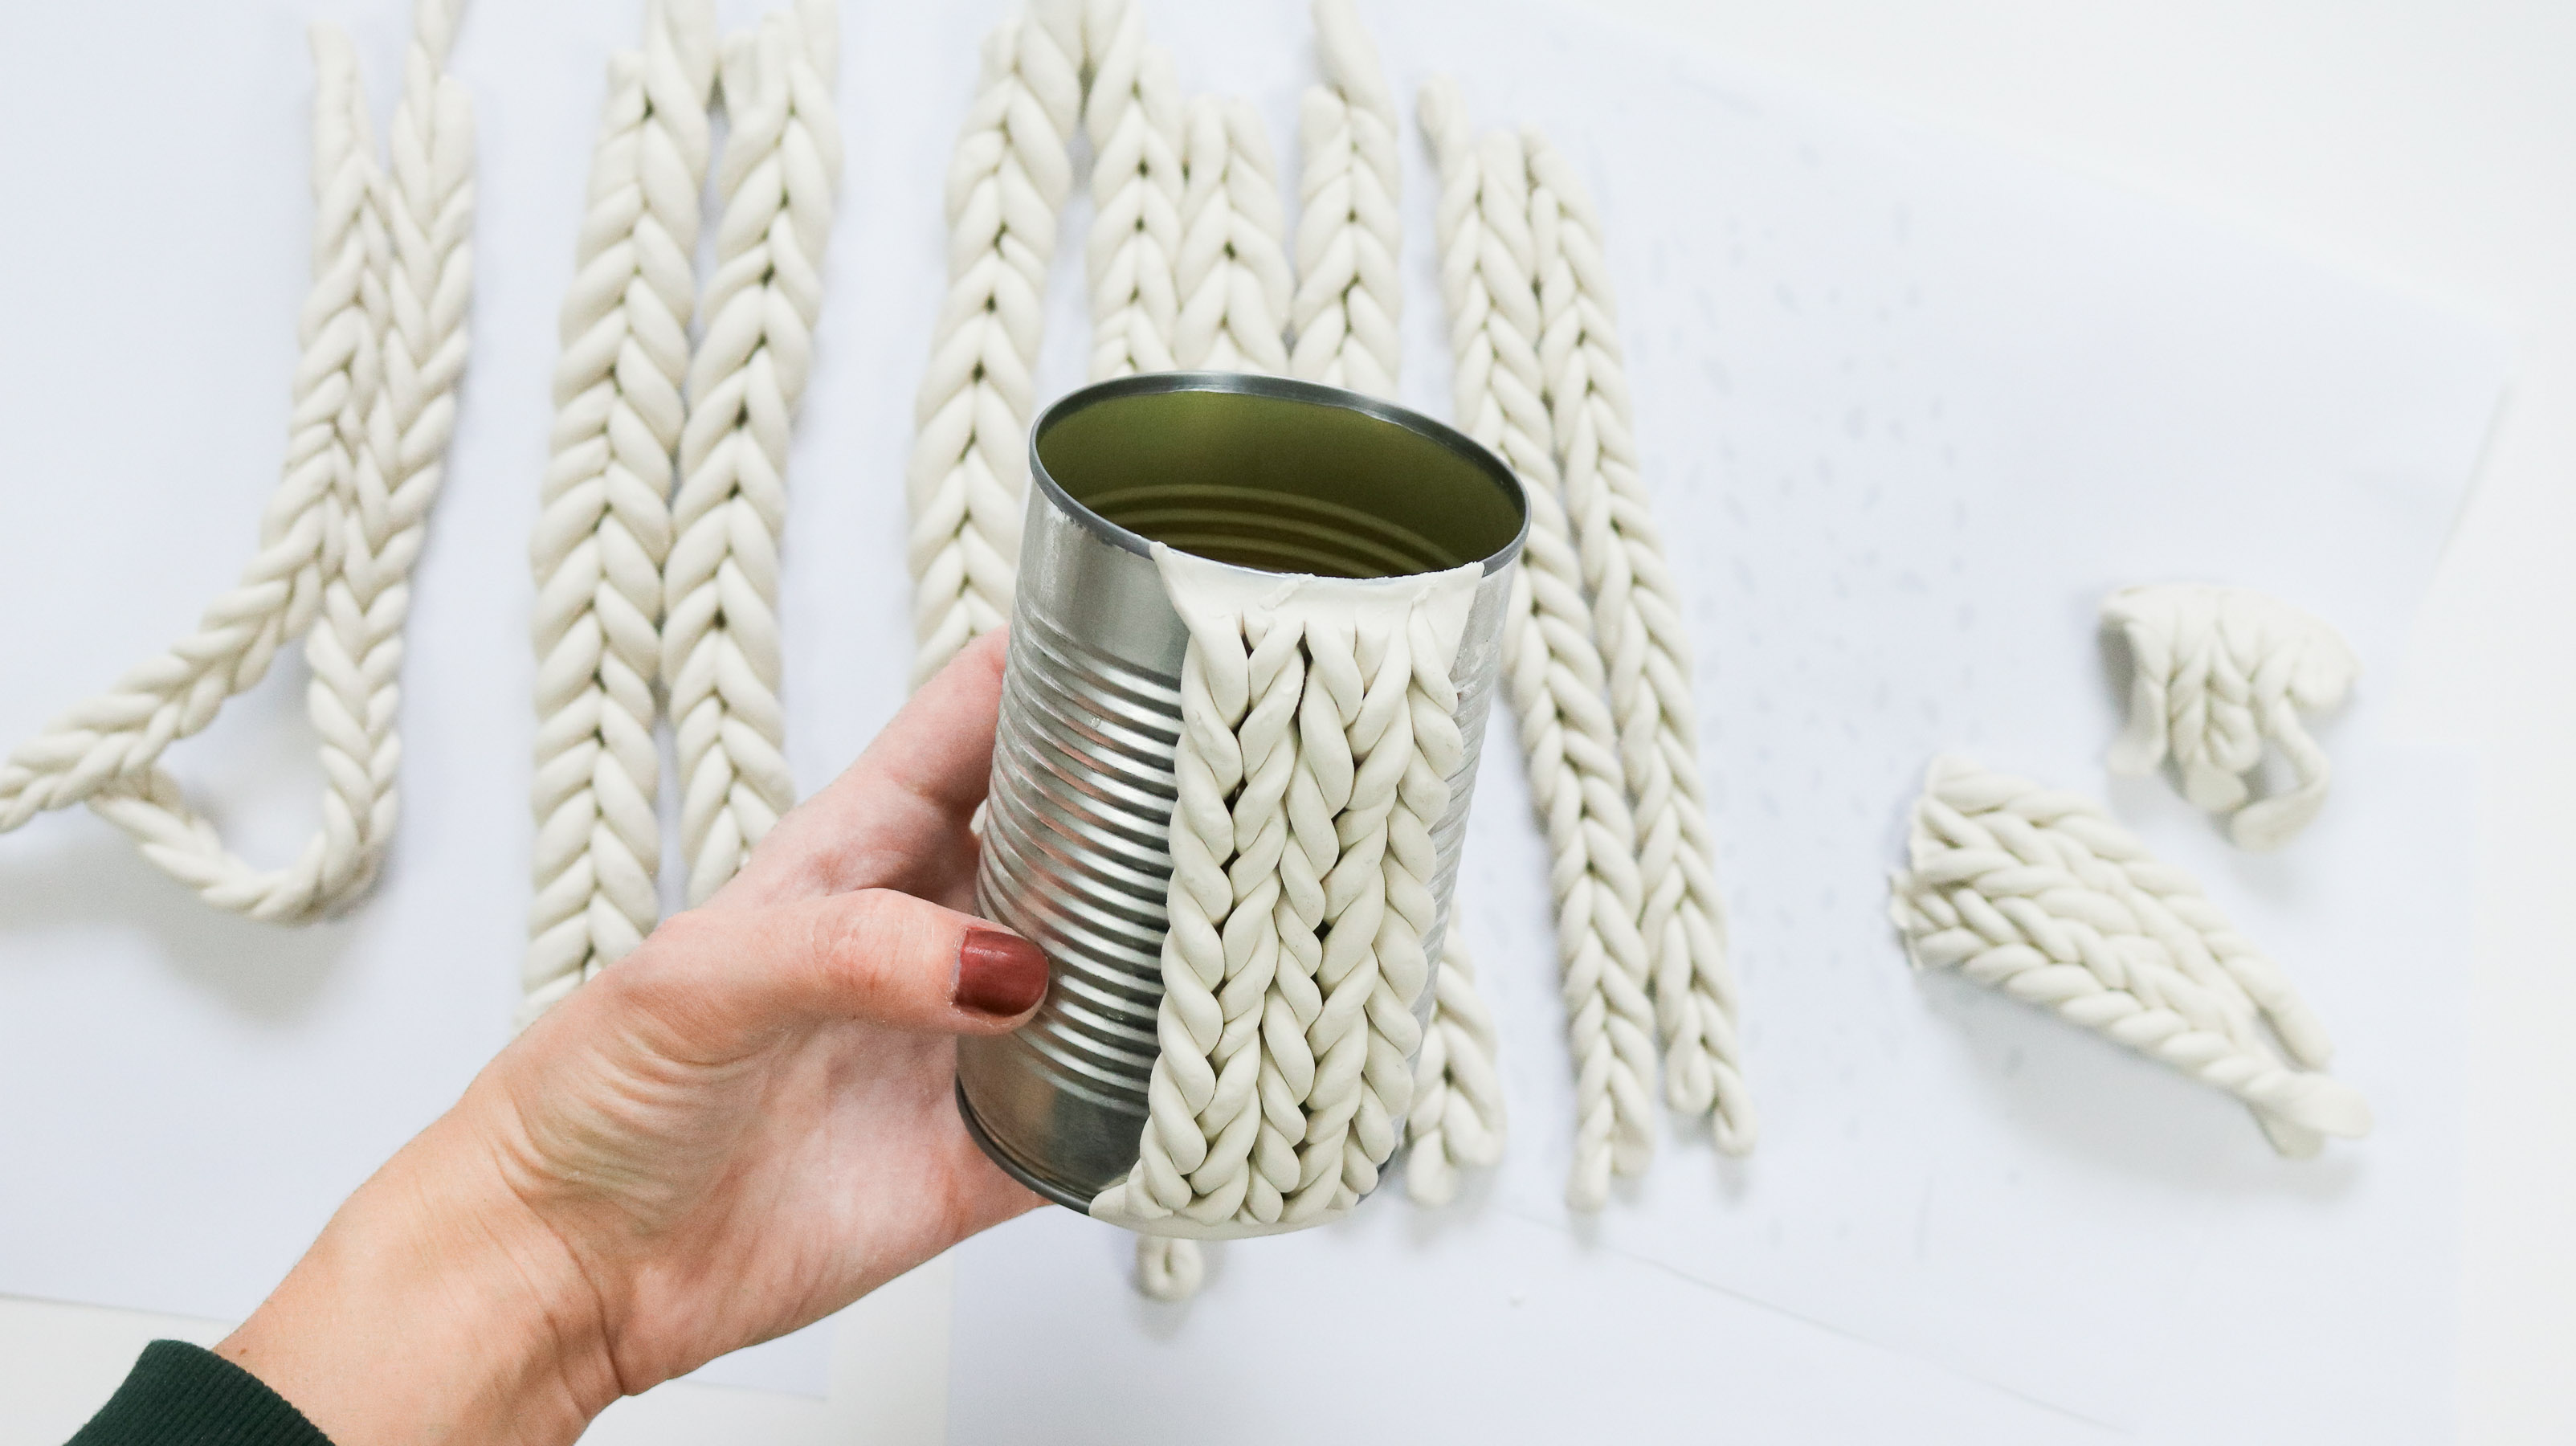
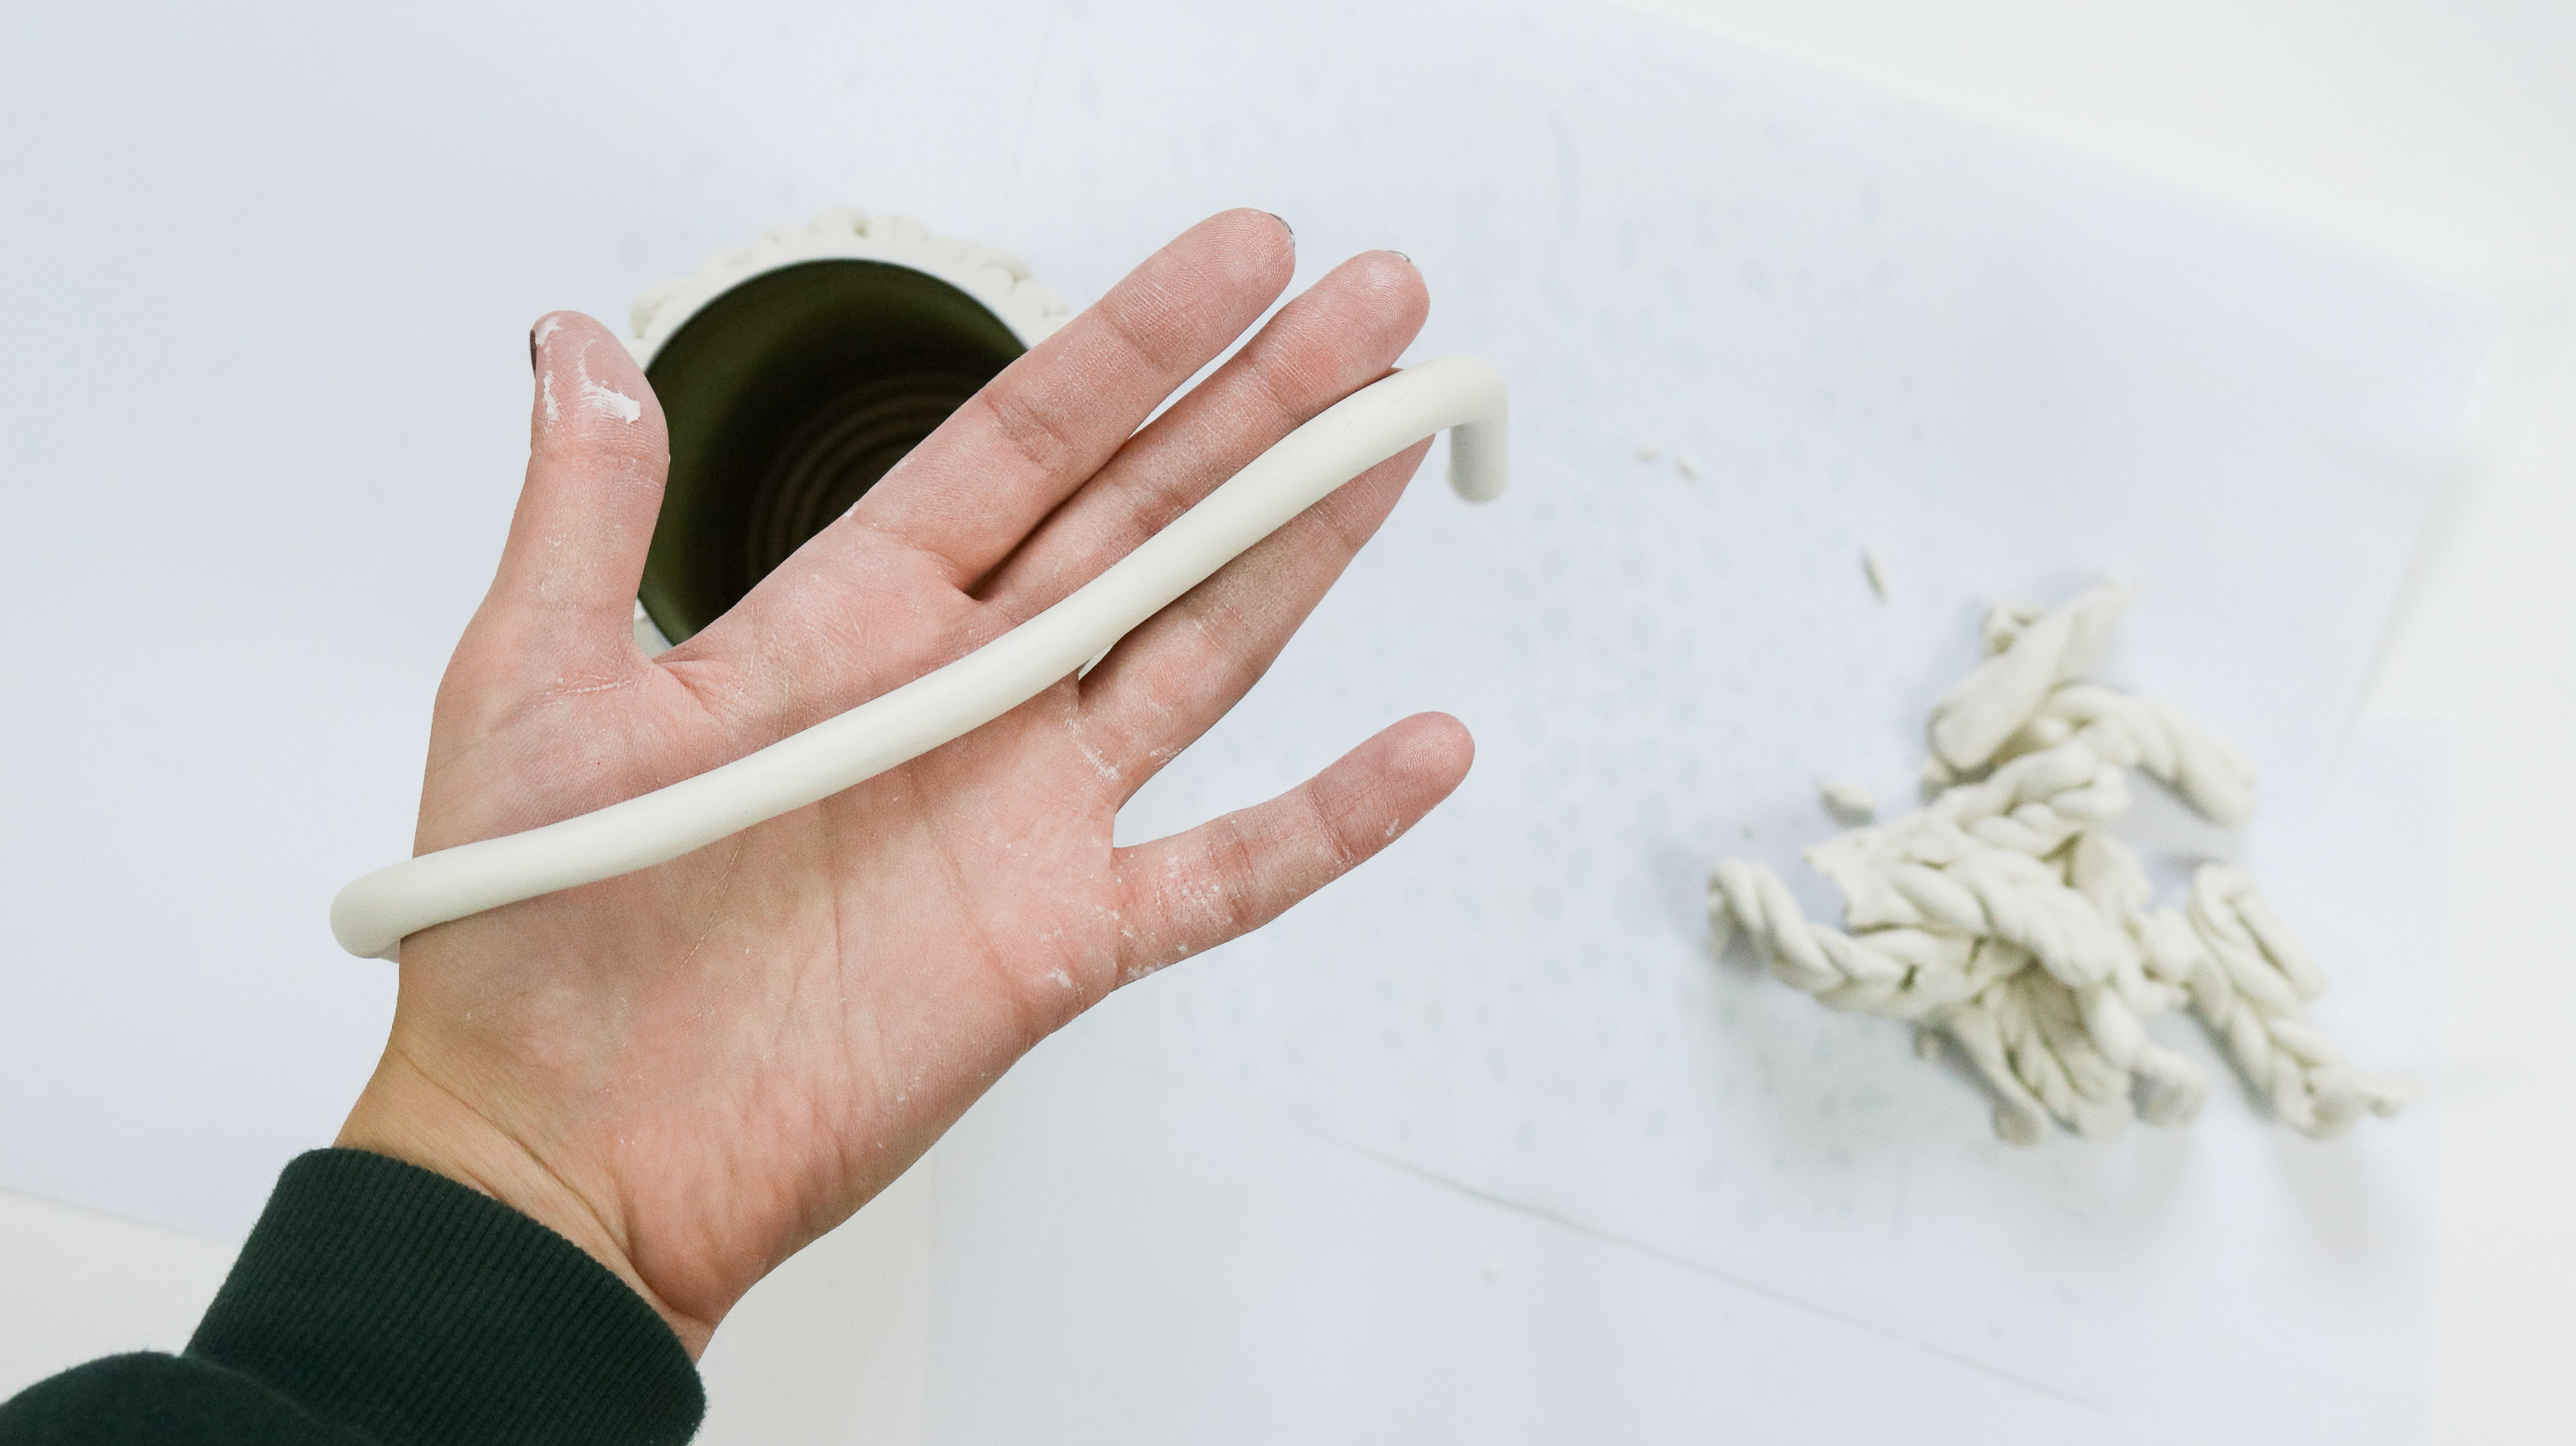
Step 4: Finishing off your Chunky Knit!
Okay once you’re done adding braids all around your tin-can roll out another even strand and secure it to the top and bottom. This will complete the look and cover where you pinched off the braids. Than to cure it bake it in the oven and that’s it! Pretty easy right? ( I followed the instructions on the box for baking it)
It’s such a cozy littler planter. I can’t want to plant a succulent in it. Oh by the way if you want drainage holes I would probably drill some prior to adding the knit effect. 😀 
I love how smooth the polymer clay turned out! I kid you not the modeling clay was terrible. Oh btw the way I totally forgot to mention that I spray painted it white after I cured it in the oven. Even though it looked pretty white already I wanted a crisp white look. I just used regular rustoleum flat white spray paint. 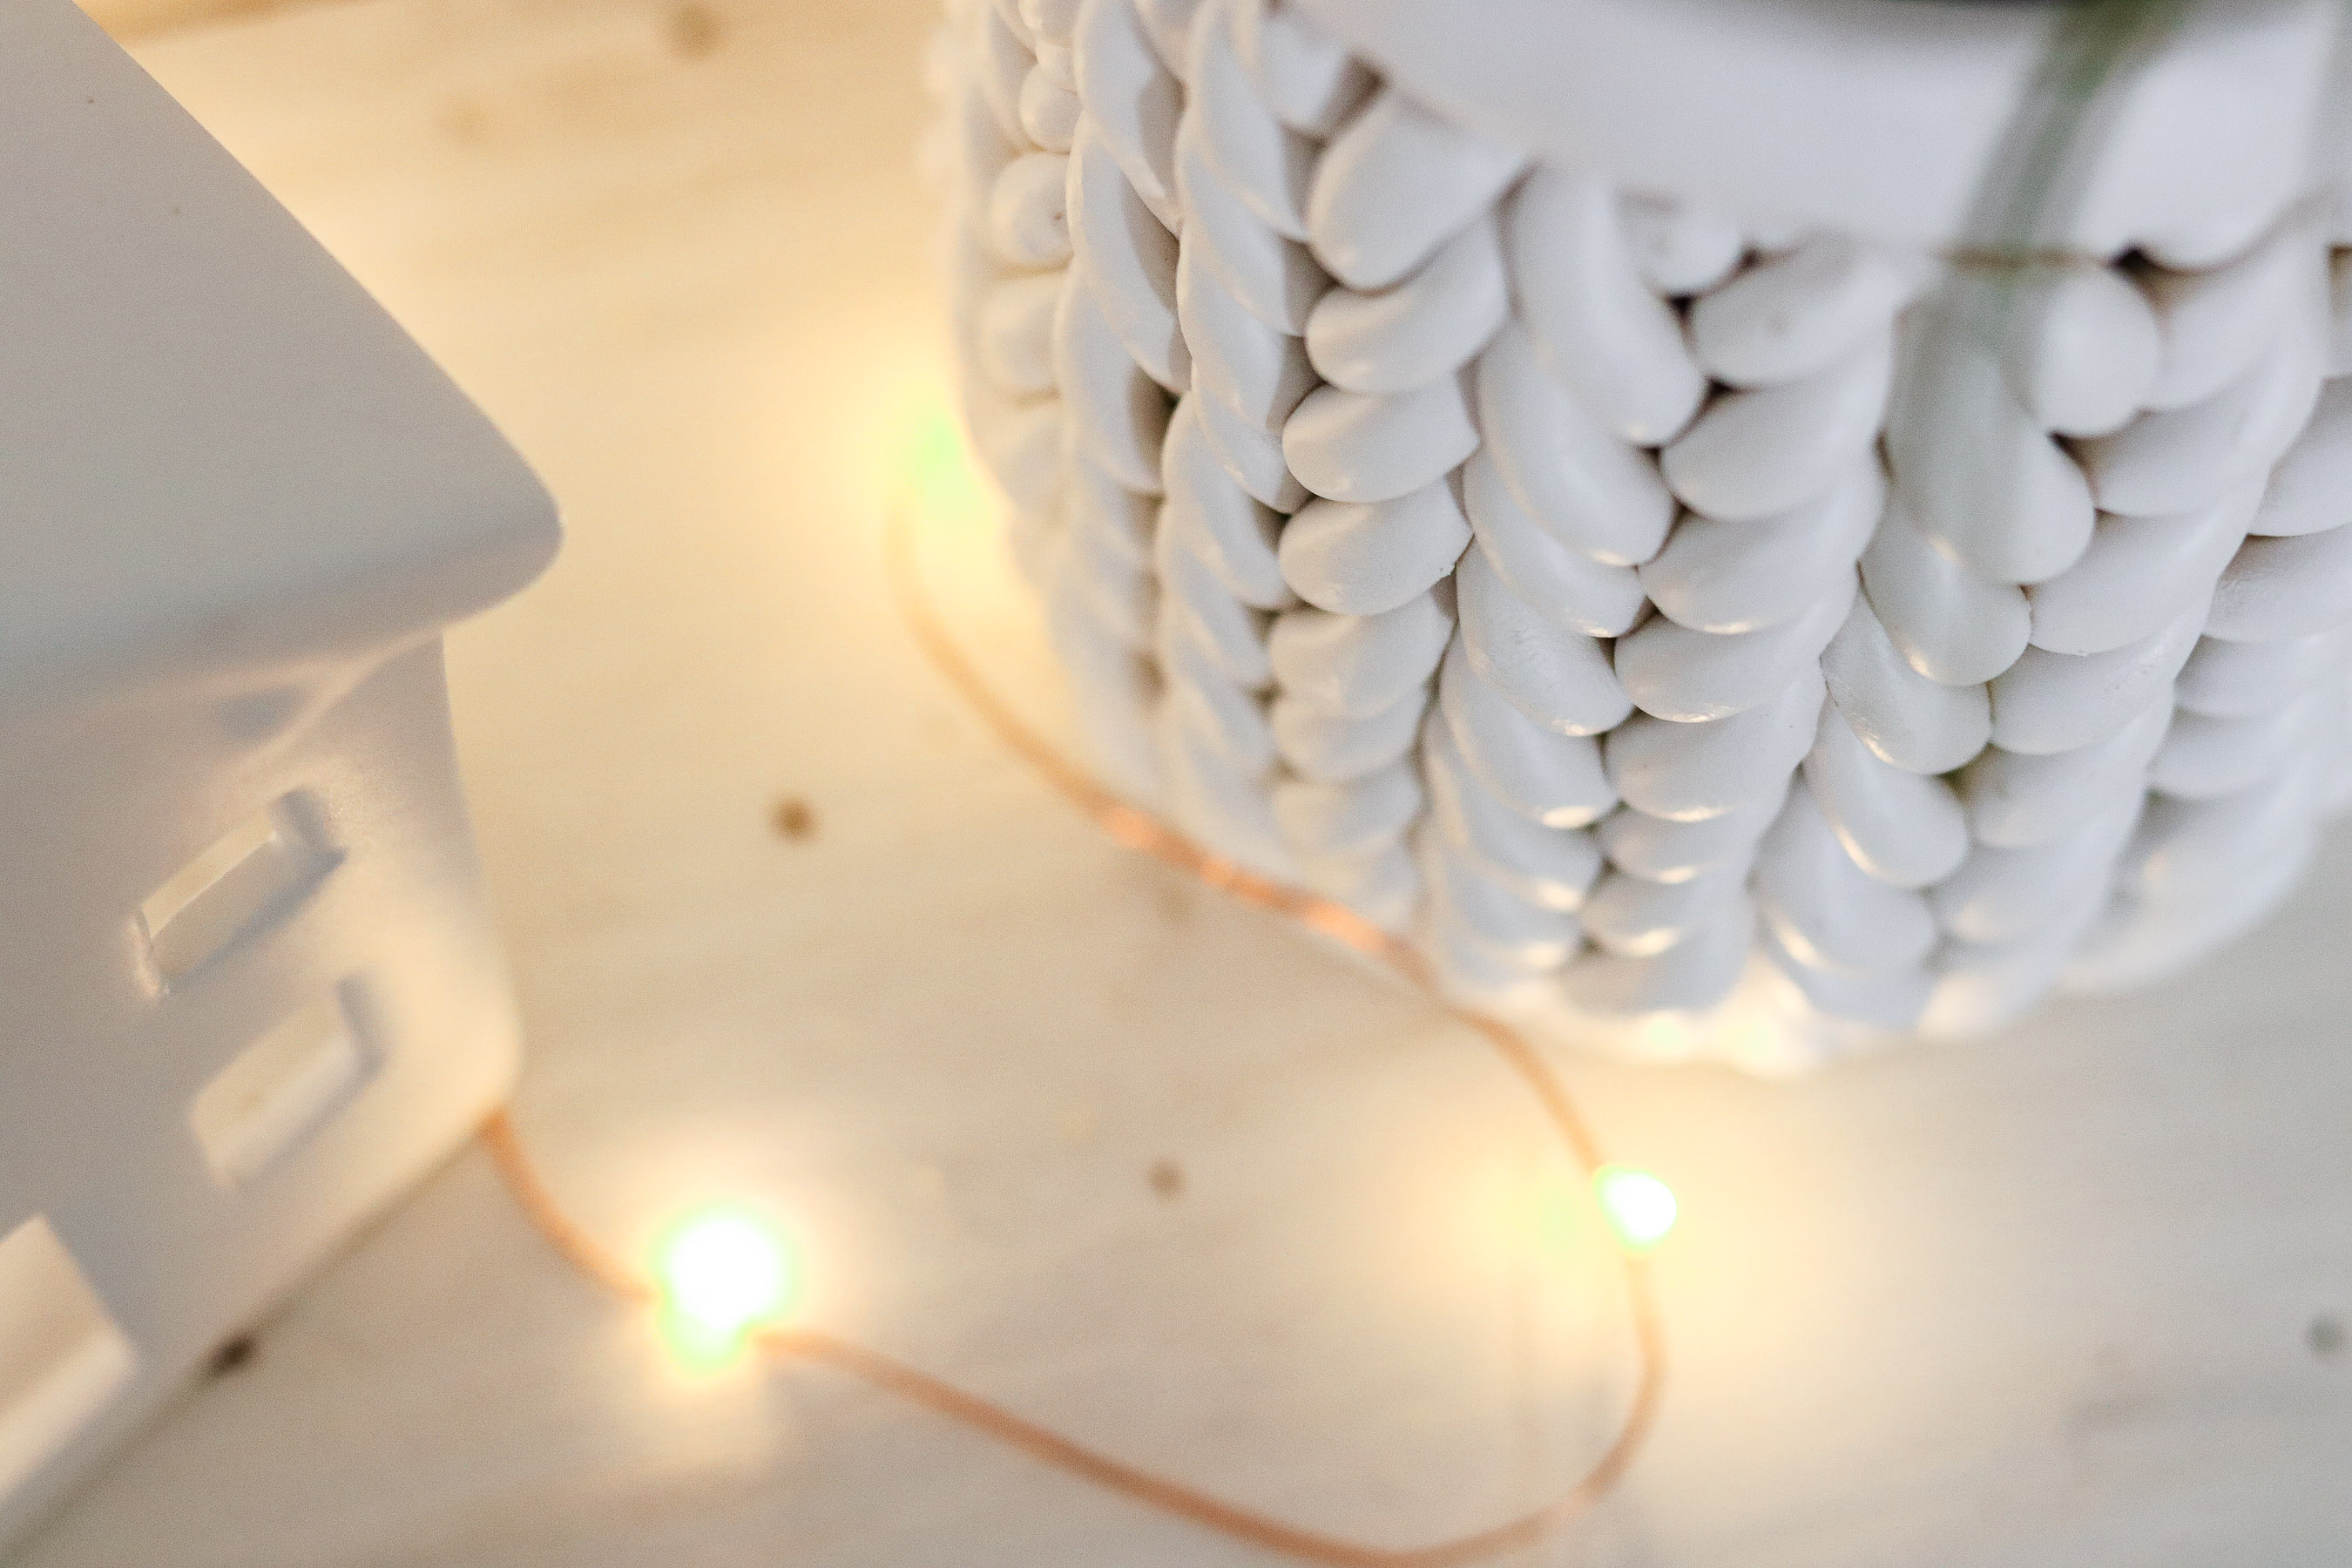

Makin my faux mantel look all cozy 😍😊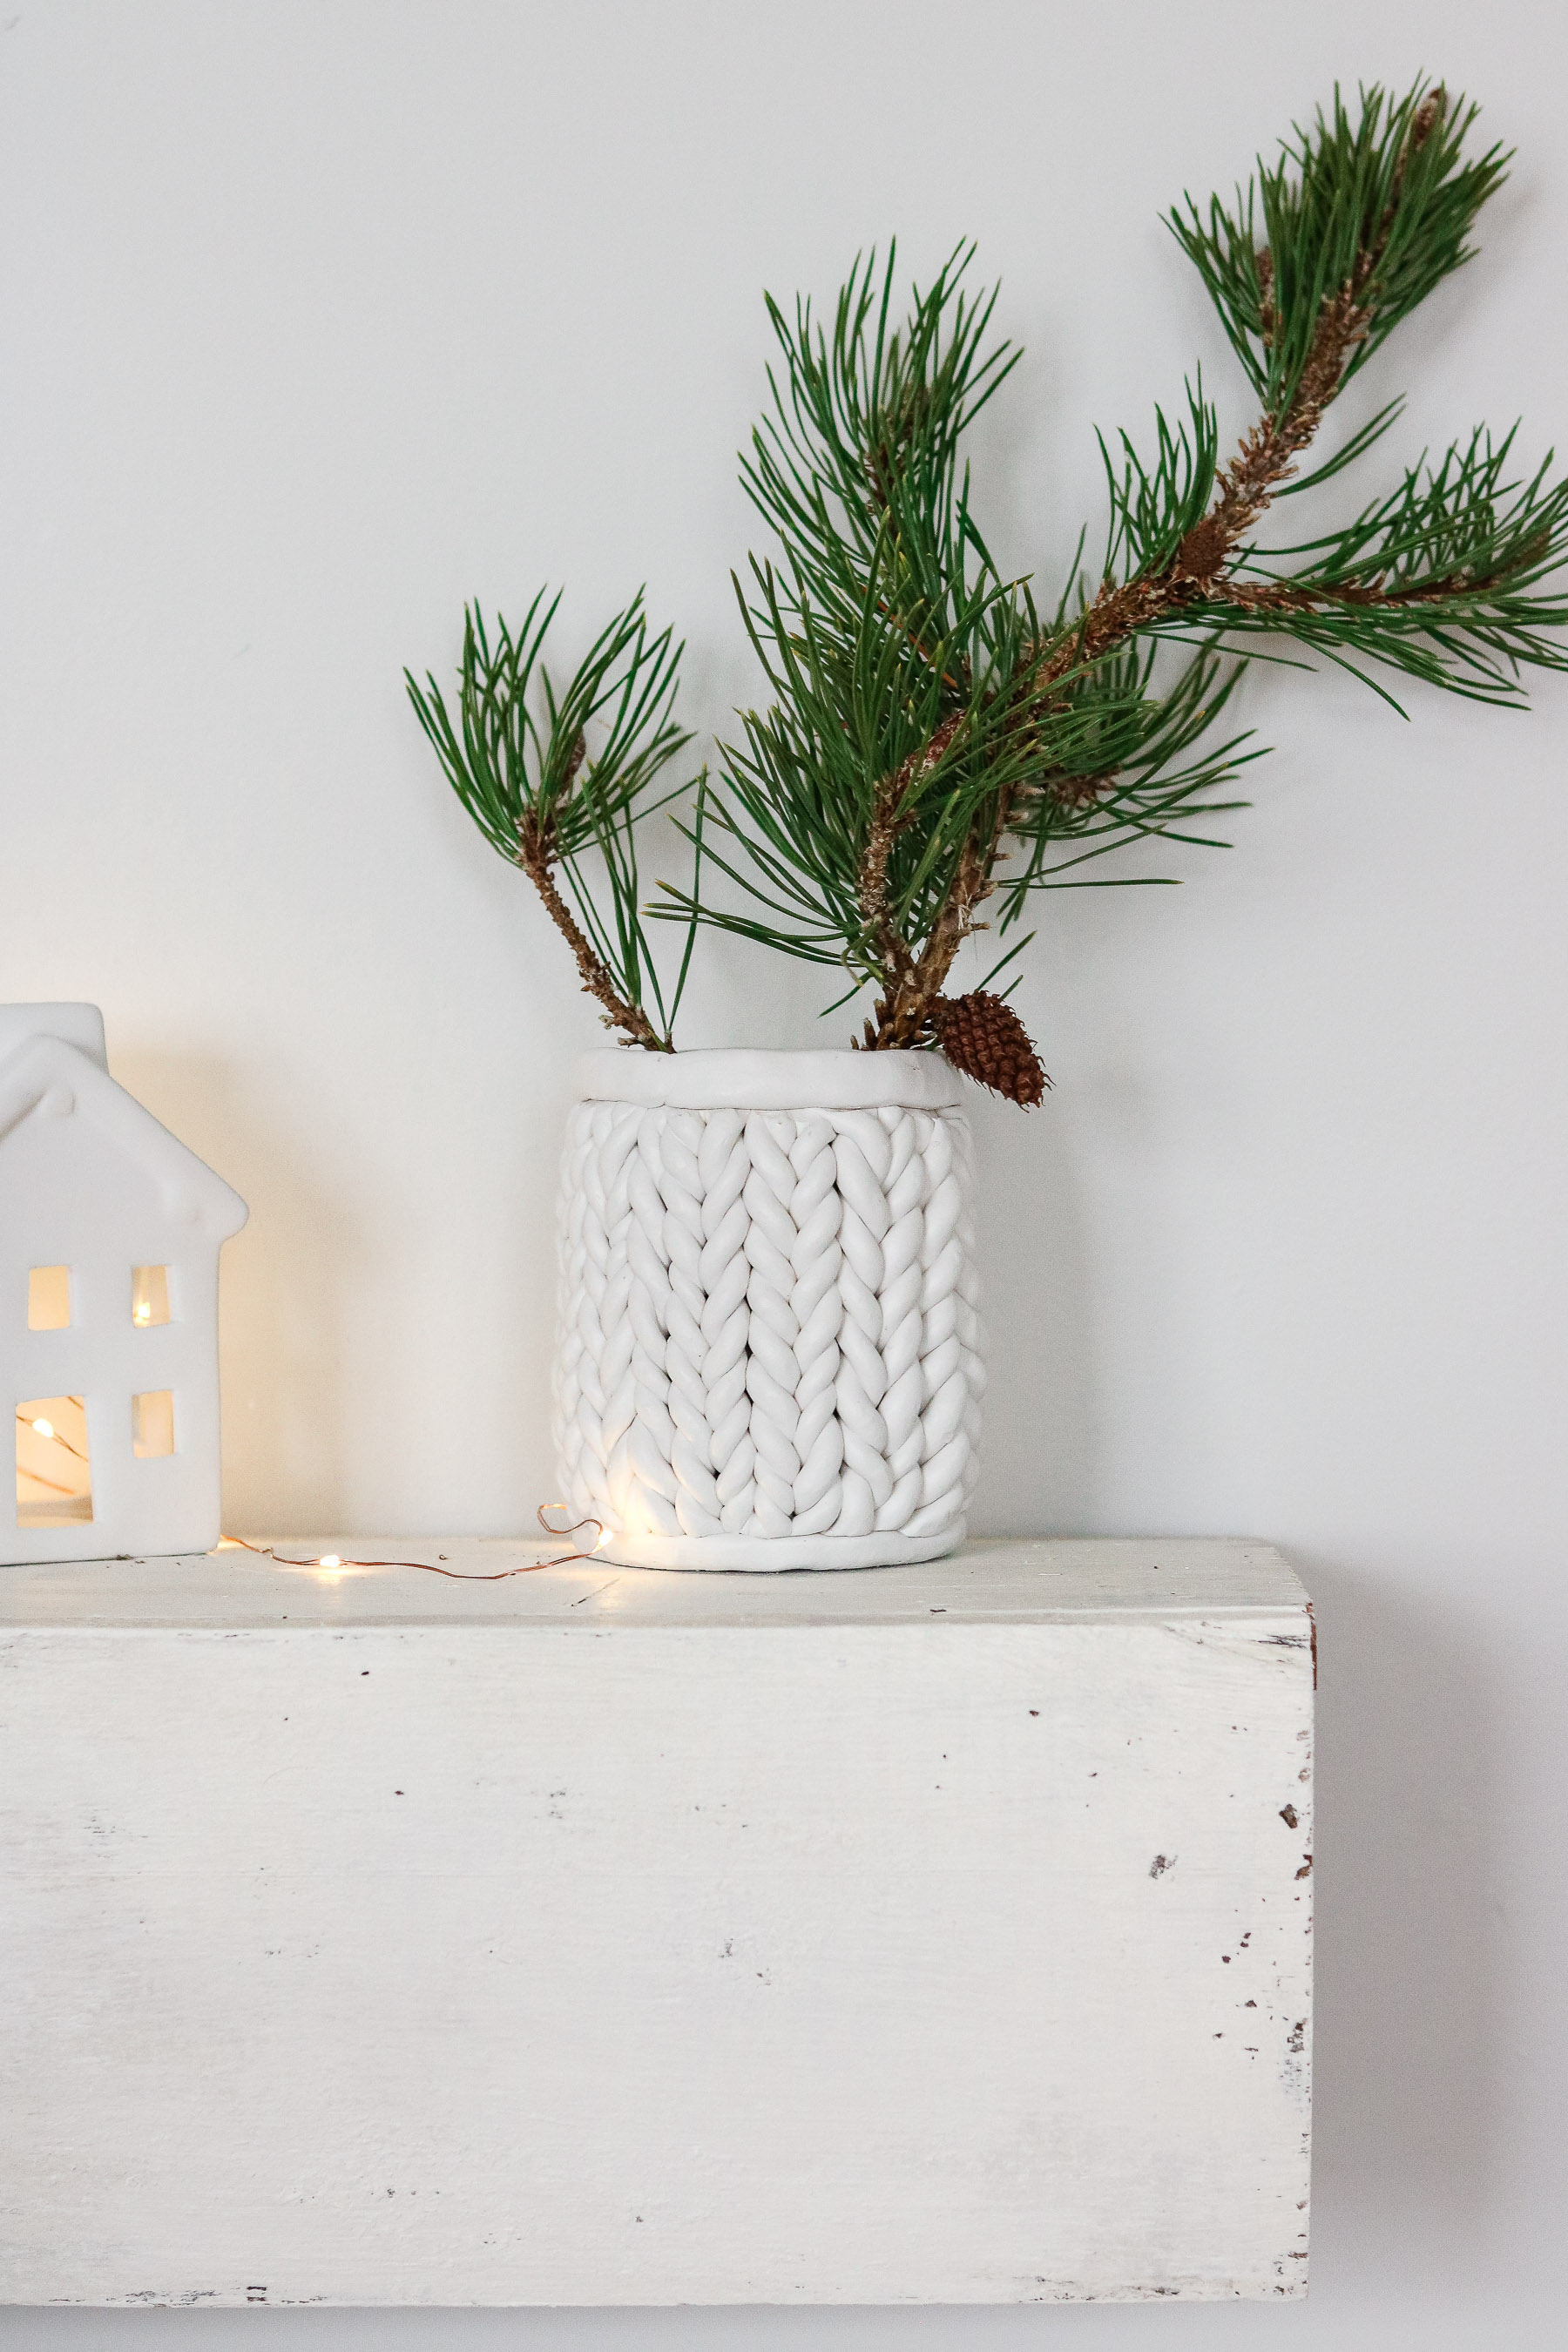
Okay than, I hope you liked this DIY. I have a few more Christmas tin-can up-cycles planned. Can’t wait to share them with ya! Let me know what you think about this one. 😀 Happy Crafting ! I’ll see you next time. 😀
Here’s a pin for you to add to your Pinterest board for later. You can add this to your 😃 diy decor board. Click on the photo to pin!
Magnificent! Love the video and the instructions are perfect. Love that you included commentary on products that did not work well for this particular project. Why? Because I bet others might have those products on hand and not be successful with no idea why. Looks just beautiful like a high end pottery piece for a fraction of the price. Would make a beautiful gift too, for any occasion. Now on my shopping list! Thanks so much. Happy Holidays to you and your family.
AWWWE thank you ssso much Naomie. I’m am so glad to hear you loved it. Feedback is something I’m always on the look out for so I figured it might help someone 😀 Glad you liked it. Oh yah didn’t think of it as a gift but that would be lovely. Happy Holidays to you as well! 😀
Can you please tell about the baking? Temperature, time, etc. & cooling.
I followed the instructions on the clay packaging. I think it was 275 F for 30 min. But I had to bake for longer since the clay was thicker. It cools off fairly quick I just left it in the oven
The baking instructions are on the clay box
What a clever idea! I love this planter, thanks for sharing <3
Thank you Amy 😀 😀
Love this project! Simple and elegant when it’s finished too. I can see doing this in an array of sizes and colors. Your video tutorial is well done and very helpful!
thank you ssso much Mary. I am so delighted to hear you loved it. 😀 OH yes I can’t wait to make some in different colors! 😀
Hi, I really like this diy. I was wondering if it could be done around a glass jar to be used as a candle holder. Or if you could put like wax paper around the can so after baking it would come off the can, would have to put a bottom on it too, I guess. Have you tried either of these suggestions? Would love to know if it would work.
It’s pretty sturdy on it’s own as long as you don’t plan on adding anything to heavy and I don’t think you would need a bottom if you plan on using it just to slip on a candle that’s in a container. This stuff sticks really well to any surface. I baked some little balls a few years ago on a metal pan (not greased) and couldn’t get it off at all. Not really sure how or if it would stick to wax paper. I would give it a try. It would make a cute little glove for candles 😀 What if you applied this effect to a glass jar baked it to set and than made a candle inside.
Thanks so much for this! It is beautiful! I just want to caution about spray paint! I had 3 done and I grabbed a can of paint/primer from the shed and sprayed them all…they did not dry and were sticky sticky sticky! I read that you can only paint polymer clay with acrylic paint. A little paint thinner and a lot of scrubbing and I was able to remove the sticky spray paint and then hand brushed acrylic paint on. So the next one I made i painted the can white with acrylic paint before I attached the braids and didn’t have to do anything after I took them out of the oven. Thanks again! I will fill with candy and give as gifts.
Oh no!! I’m sorry to hear that Mel. That’s a good tip and good to know. I wonder how it dried on mine. Maybe my coats were super thin. Wow sounds like you had to go through a lot of trouble to get them fixed 🙁 sorry! Love the idea of painting the tin can before applying the braids 😀 I bet they’ll love these gifts!
Can you plz how long do I have to cure this in oven and at what degree?
I followed the instructions on the clay packaging. I think it was 275 F for 30 min. But I had to bake for longer since the clay was thicker
Hi Mel. So you can paint the can, add the braids and place in the oven? I was wondeing abou the paint disappearing or bubbling up or somethng. Also, at what do you set your oven at and for how long? Thank you.
I wouldn’t paint the can with paint that’s not oven safe 🙂 They sell enamel paint at the store I think that one is oven safe. I followed the instructions on the clay packaging. I think it was 275 F for 30 min. But I had to bake for longer since the clay was thicker
Hi! This is a really cute idea. I am definitely going to make a few.
I have some constructive critisism on your spelling and grammar in the entirety of the post if you are open to suggestion. Some “you’re”s and “your”s have gotten mixed up. And an “f” from “off” was missing, along with some other letters/punctuation throughout.
Maybe you’d want to find a proofreader or editor. I love your content and I’d be happy to help! Just send a shout out.
The pictures look amazing. I can’t wait for more up-cycle ideas to try. Keep it up!
Paint it after it comes out if the oven and has cooled down.
Hey there! This looks SUPER cute! I’m wondering if it’s water proof after it’s cured on the can? Like if I could water plants in it, or keep it outside?
Yes I don’t see why not. I didn’t remove the tin can from mine so if you plant something it would sit in the tin can. You can drill holes on the bottom for drainage. I think it’ll be perfect! 😀
Where can I find that neat little work surface you were using?
Hi Joyce, I’ve had it for year now. As far as I remember I think I got it from marshalls. 🙂
thank you so much ,what a great tutorial
I will have to try it
I love all of the comments. So helpful!! Ty for sharing
I Love this! I think I will try this on a large pot with different colors!
I think this is beautiful. I have never worked with polymers clay. I think I might give it a whirl on this project.
Do you think I could put it on a terra-cotta clay pot and put a plant in it? They are porous. Do you think the clay braid would fall off?
I’m not sure I would do this over Terra-cotta. It might hold up… Once it bakes all together I’m not sure how clay holds up to water. Maybe give it a try
Gorgeous! I will try to make one ASAP.
YAY! I’m so happy to hear you liked this.
Thanks for the sharing of the great idea of crochet. it’s a pretty design.
I’m pleased you did a picture tutorial too, as your video isn’t working now. It just flashes. 😥😥
OH NO!! Thank you for letting me know I’ll look into it. Not sure why it’s doing that. I’m glad you found the photos helpful.
What an amazing transformation! This planter turned out so beautiful. I am setting a goal to do a couple home improvement projects this year. I think we are going to start out with some kitchen cabinet refacing. Thanks again for sharing your beautiful ideas! You are so inspiring!
I’m so happy to hear that. Thank you Jackie. Happy DIYing 😀