
Hi everyone, I hope you all had a great week.
It’s been a busy week for us. I was working on a video featuring 5 diys and had so much fun making them. Today I want to share one of 5 DIYS with you on the blog. I teamed with the folks from cricut.com to bring you these five DIYS. I’ll be sharing photo instructions on the rest of the DIYS soon. 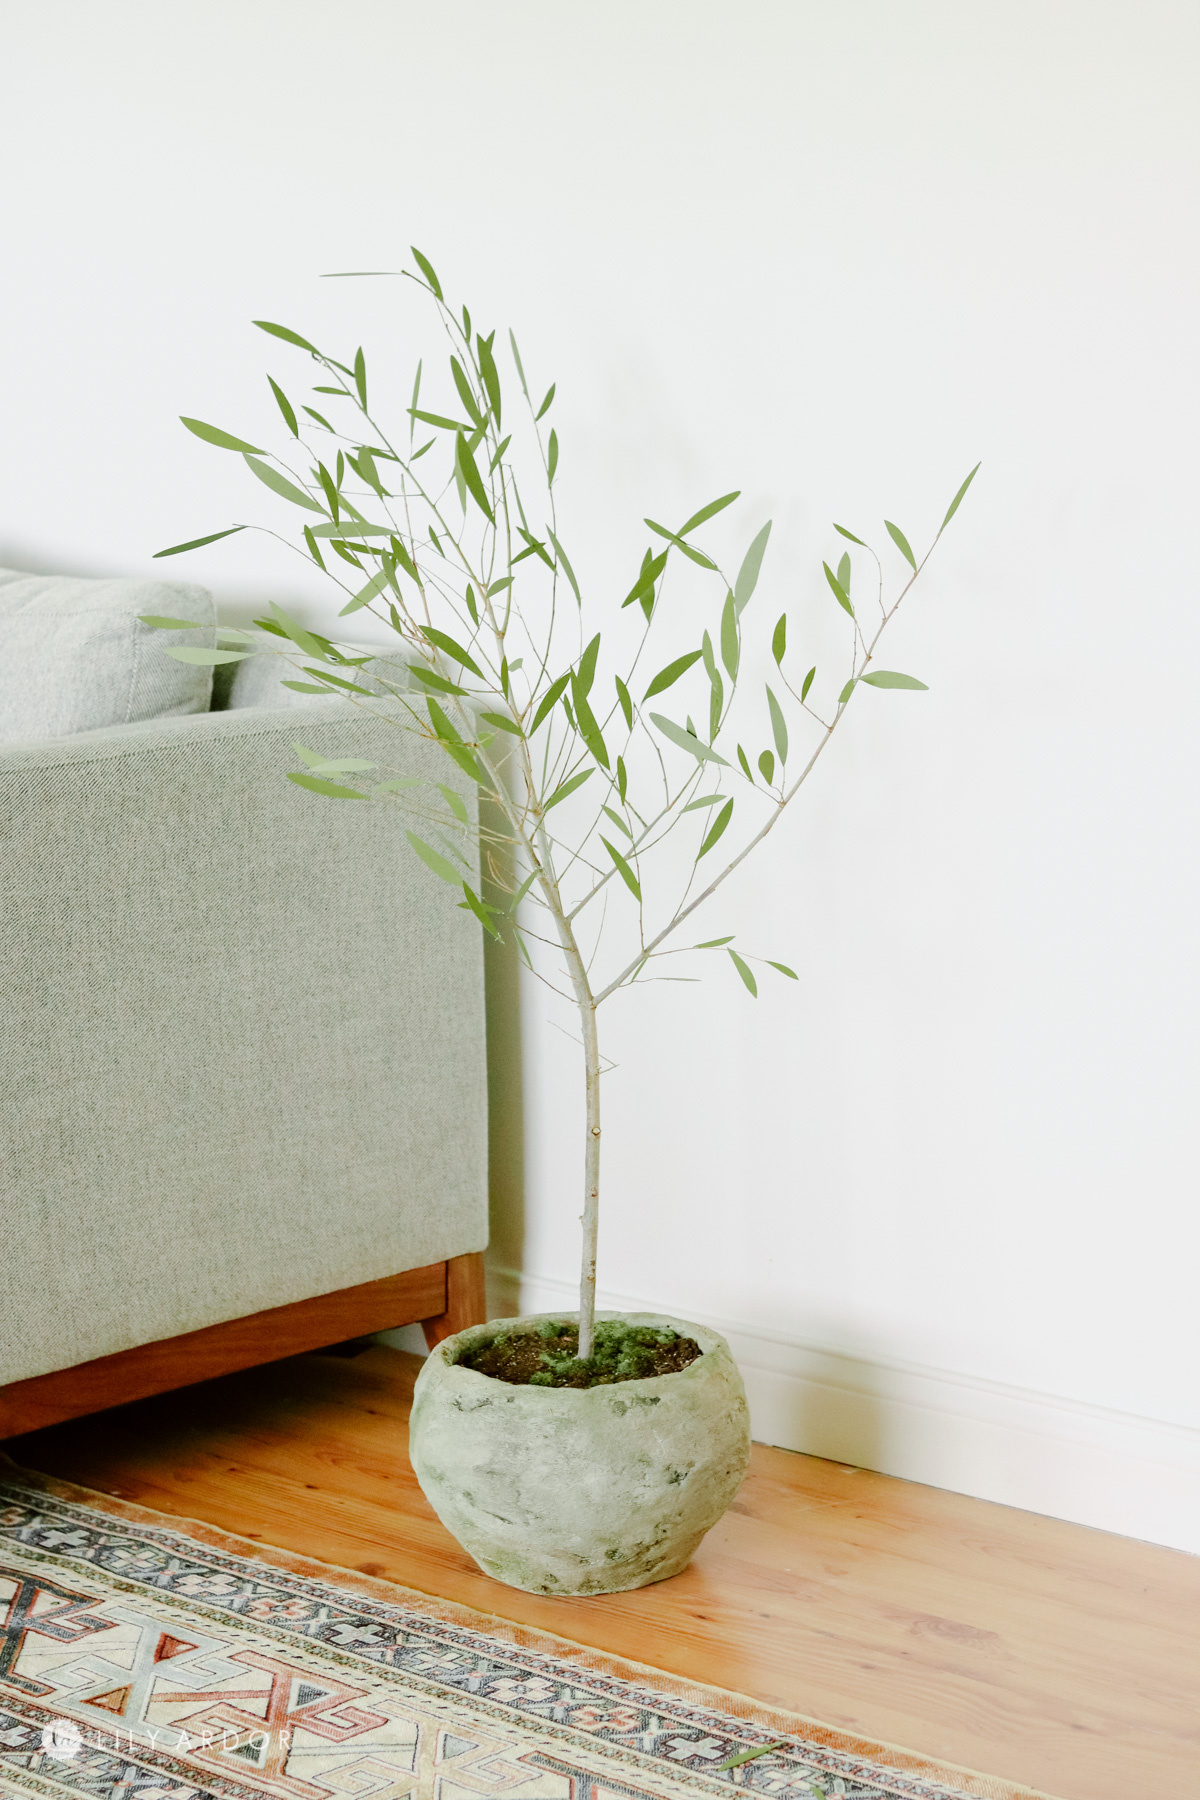 Today we’re talking about this faux olive tree that I made using green cardstock for the leaves and a branch I got from our back yard. This DIY has been on my to-do list for quite some time now.
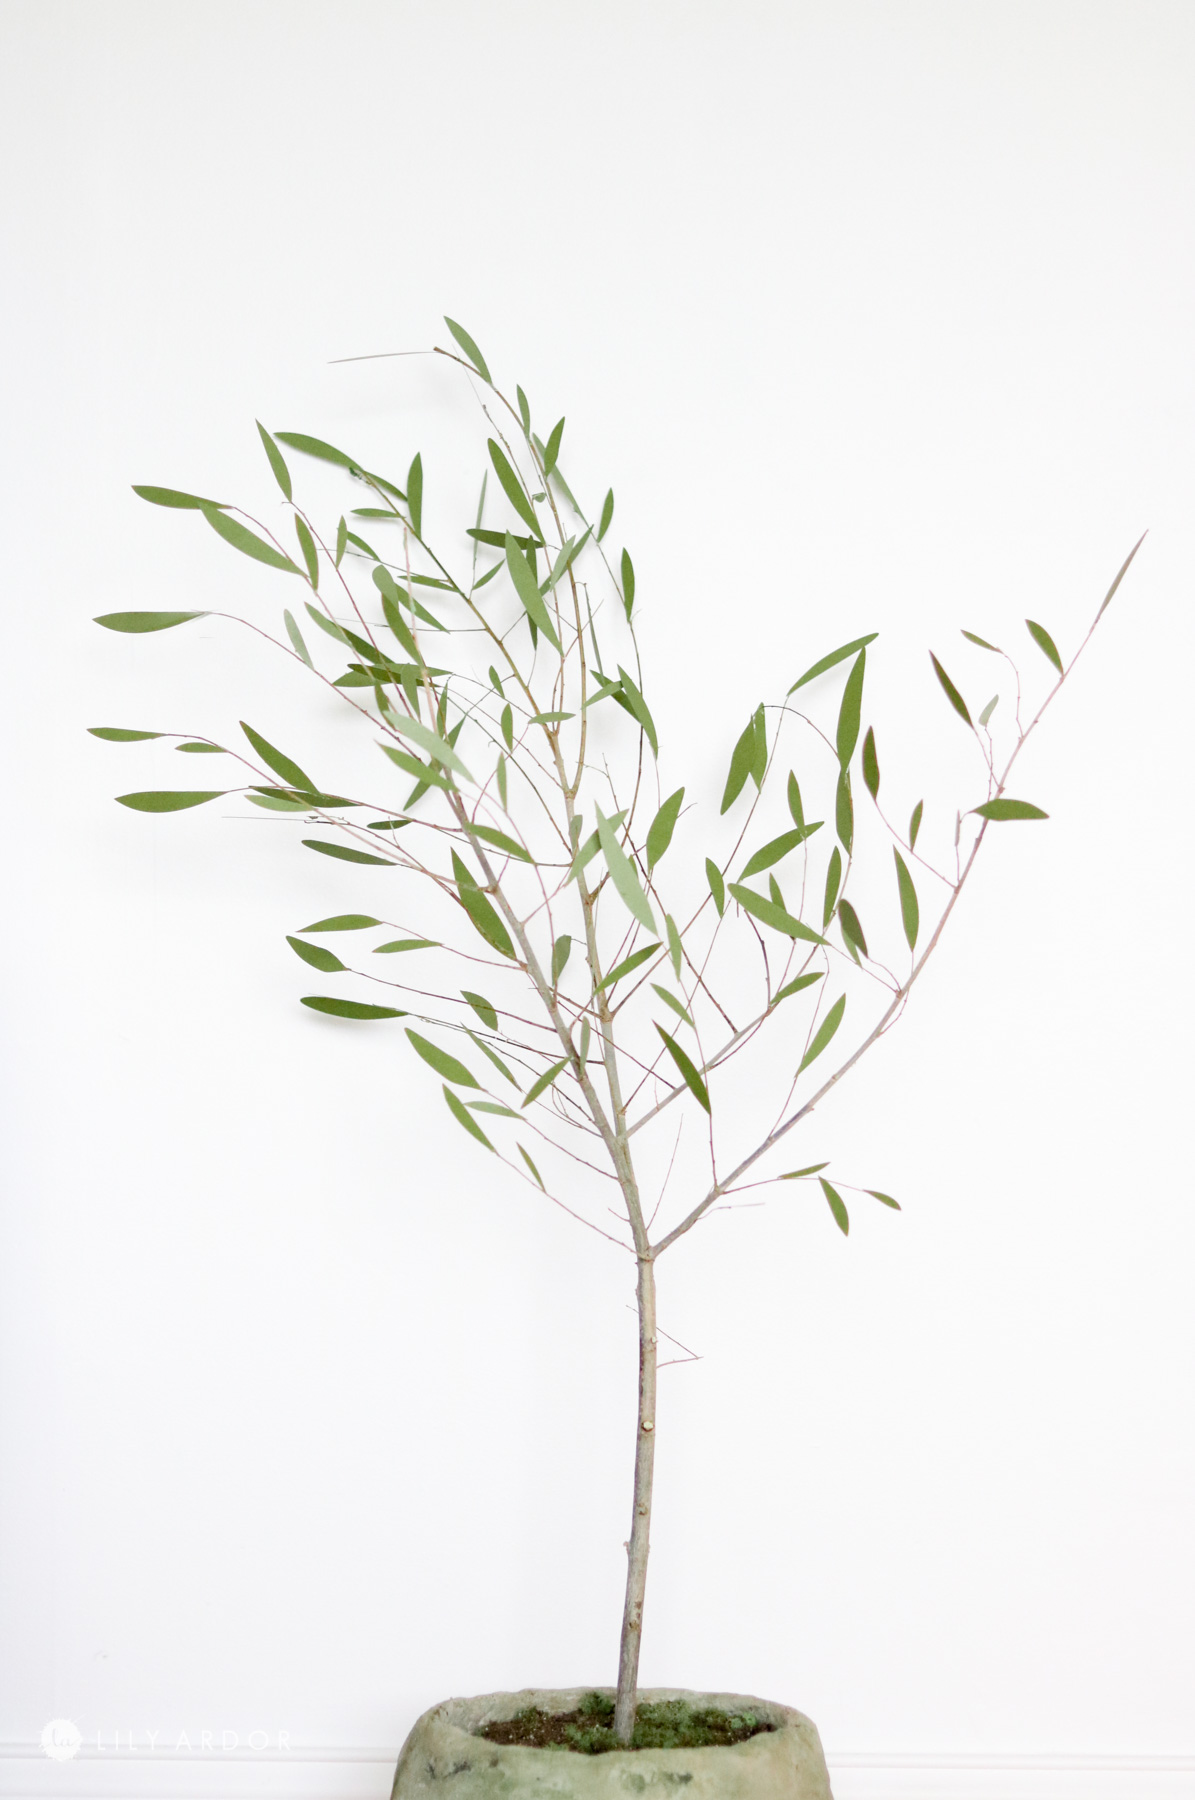
Total cost: $15-$17
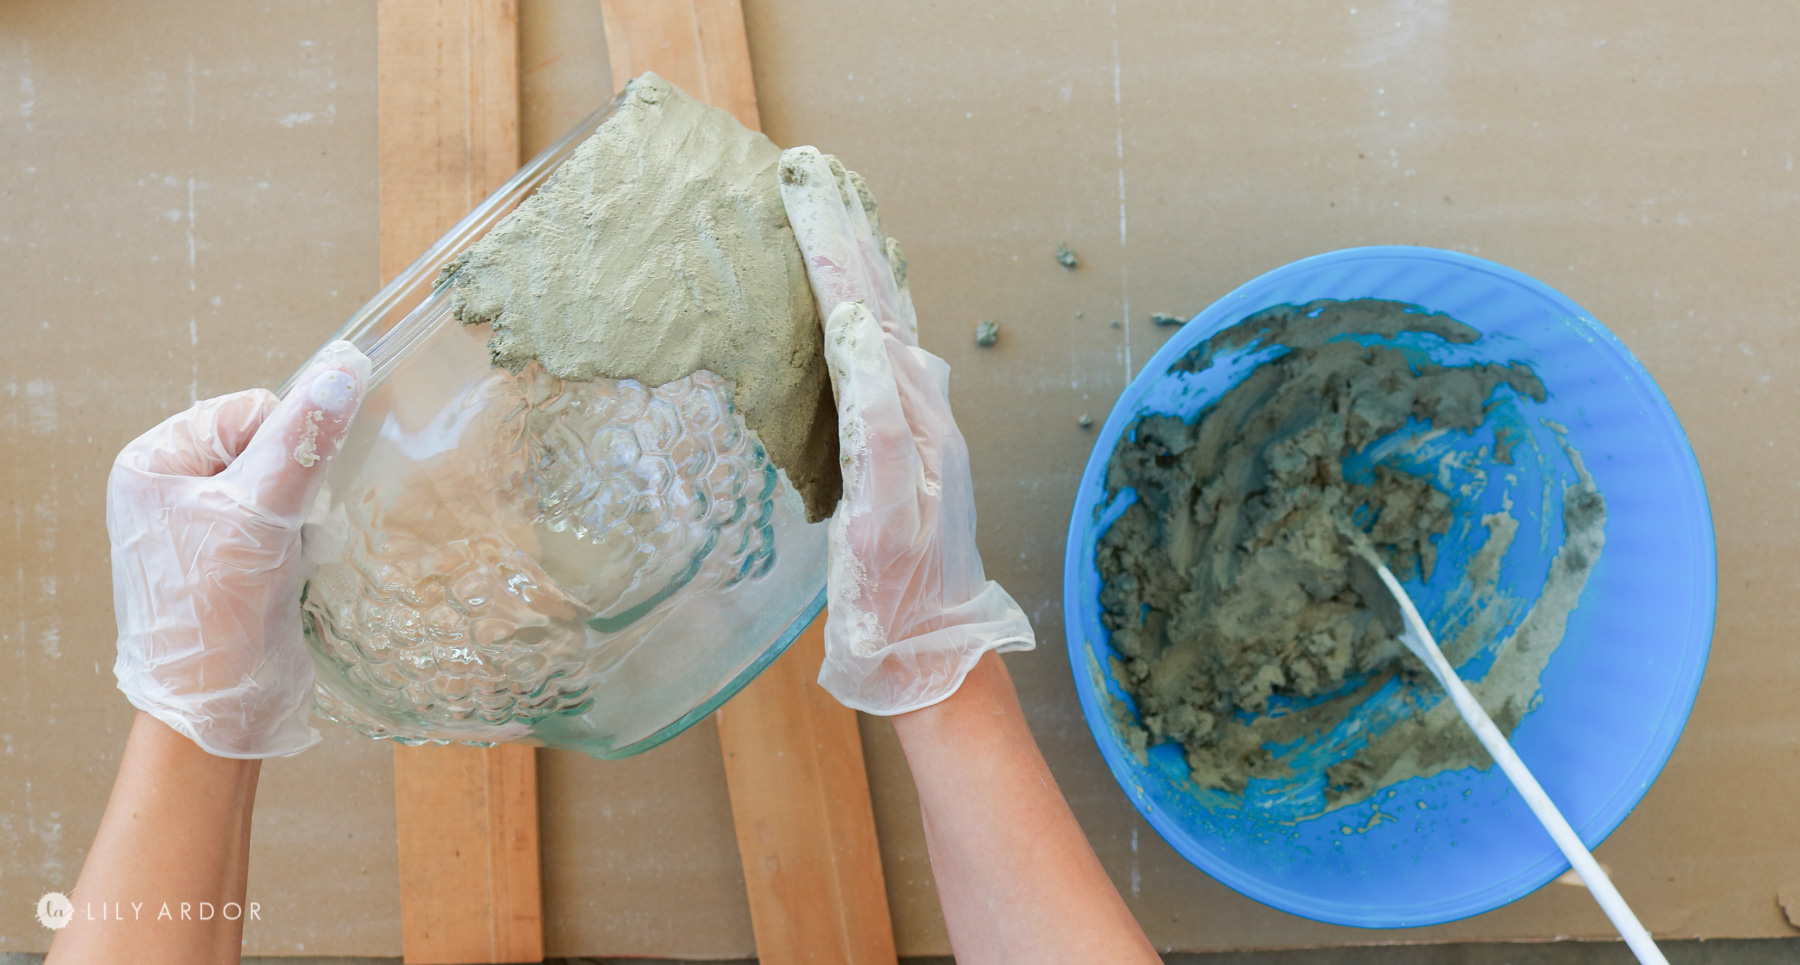
Because this tree consists mostly of cardstock and branches it’s pretty budget friendly. The paper was pretty cheap and the concrete pot I ended up making myself from a thrifted bowl that I got for under $2.
Time Needed:
This took me about 2-3 hours to make. Honestly my cricut did all the hard work for me. I can’t imagine having to cut out all those leaves by hand. This time also includes my DIY concrete planter I made for it.
I first noticed the indoors olive tree trend about two years ago. Of course I immediately fell in love 😍 and wanted one. After searching for one I realized it’s hard to find a real one that looked good. None of our locals stores sold any. They were too expensive at the nursery’s was over priced and the idea of getting one online didn’t hit home for me.
So I figured maybe a fake olive tree would be easier to find. Those too were way overpriced and not just that they looked fake. I couldn’t find one anywhere that had straighter leaves. All the fake olive trees had curled leaves which is probably accurate to the real tree they were just a tad too curly for my taste. LOL 😅 I definitely being super duper picky. I guess this is how DIYs come about.
This DIY requires a cricut machine. I’m a total newbie to the cricut world and I’m so excited to try all the things it can do. This is the third project I made using my cricut machine. Honestly couldn’t be happier with it. It saves me so much time and it’s way easier to use then I expected.

Cricut isn’t only good to make birthday cards come to find out after making a few projects with my cricut there’s a whole world of possibilities including home decor, gifts, DIY products to sell on etsy, DIY stencils, cut fabric, cut wood, cut leather and so much more. I wish I invested in one back when I had my etsy shop. It would pay for itself in no time. OOH here’s an idea maybe I should do a series of things to make for your esty shop with your cricut machine😃 ?? How many of you own an etsy shop?
*This post includes affiliate links. For more info visit my disclosure policy.
Supplies Needed:
- concrete planter
- square foam
- hot glue
- paper plate
- a handful of dirt
- school glue
- green cardstock
- tree branch
- brown craft paint
- paint brush
Tools Needed:
- standard grip mat
- cricut explore air 2
DIY Faux Olive Tree
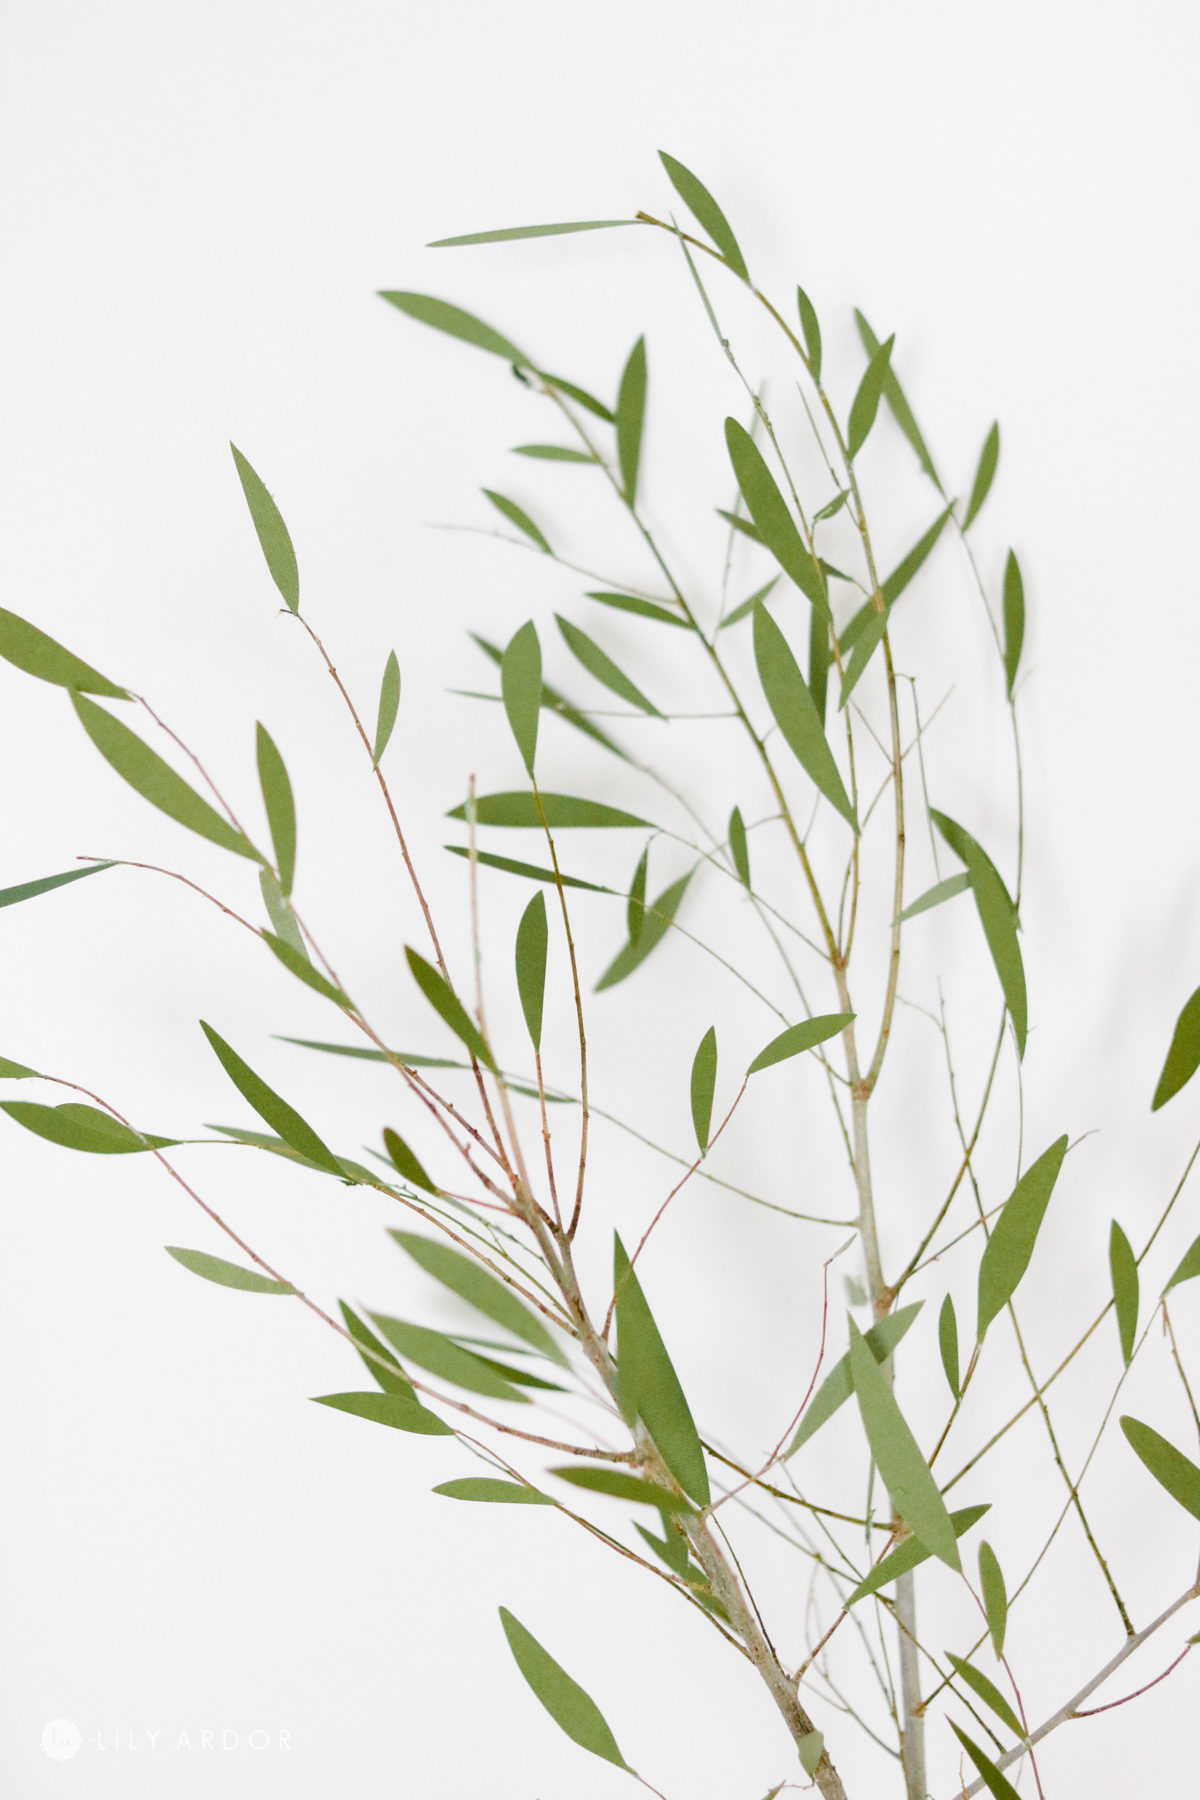
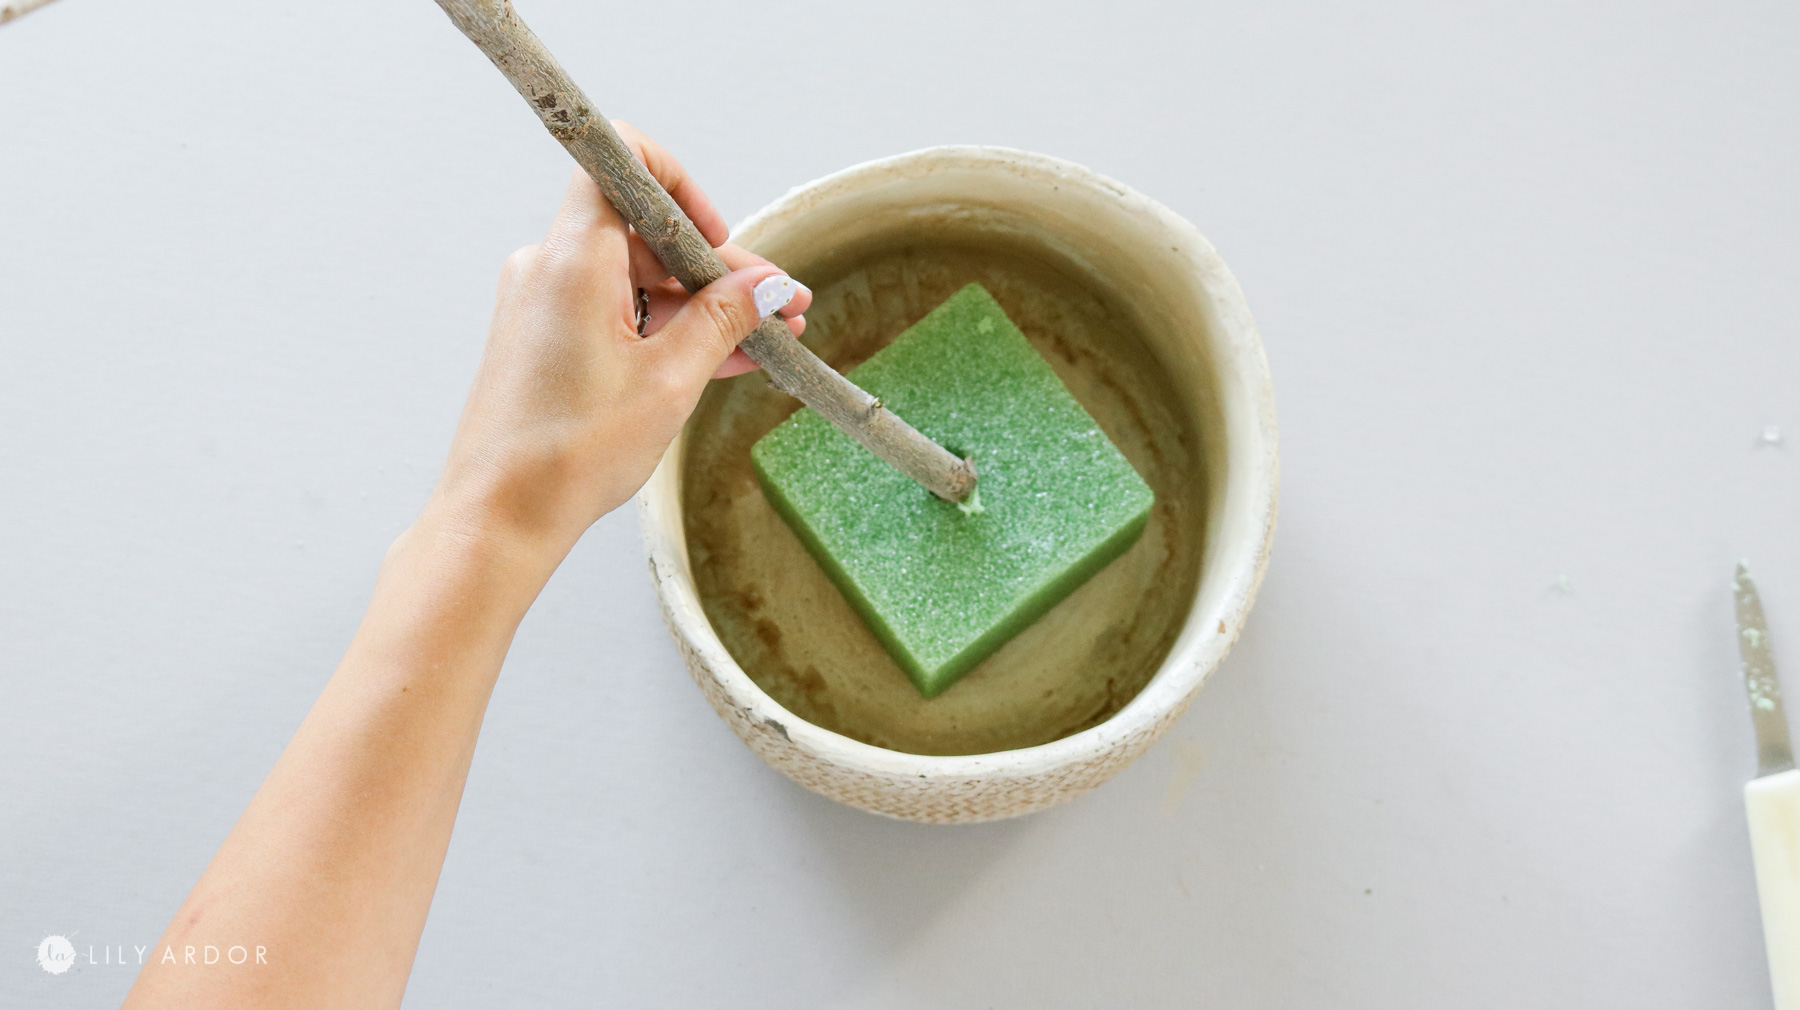
Okay let’s do this. I first found a branch outside in our backyard and removed all the leaves off of it.

I found this beautiful faux woven pot at hobby lobby and instantly fell in love. It was a little bit on the smaller side but, since I planned on making the tree smaller so I figured it would work.

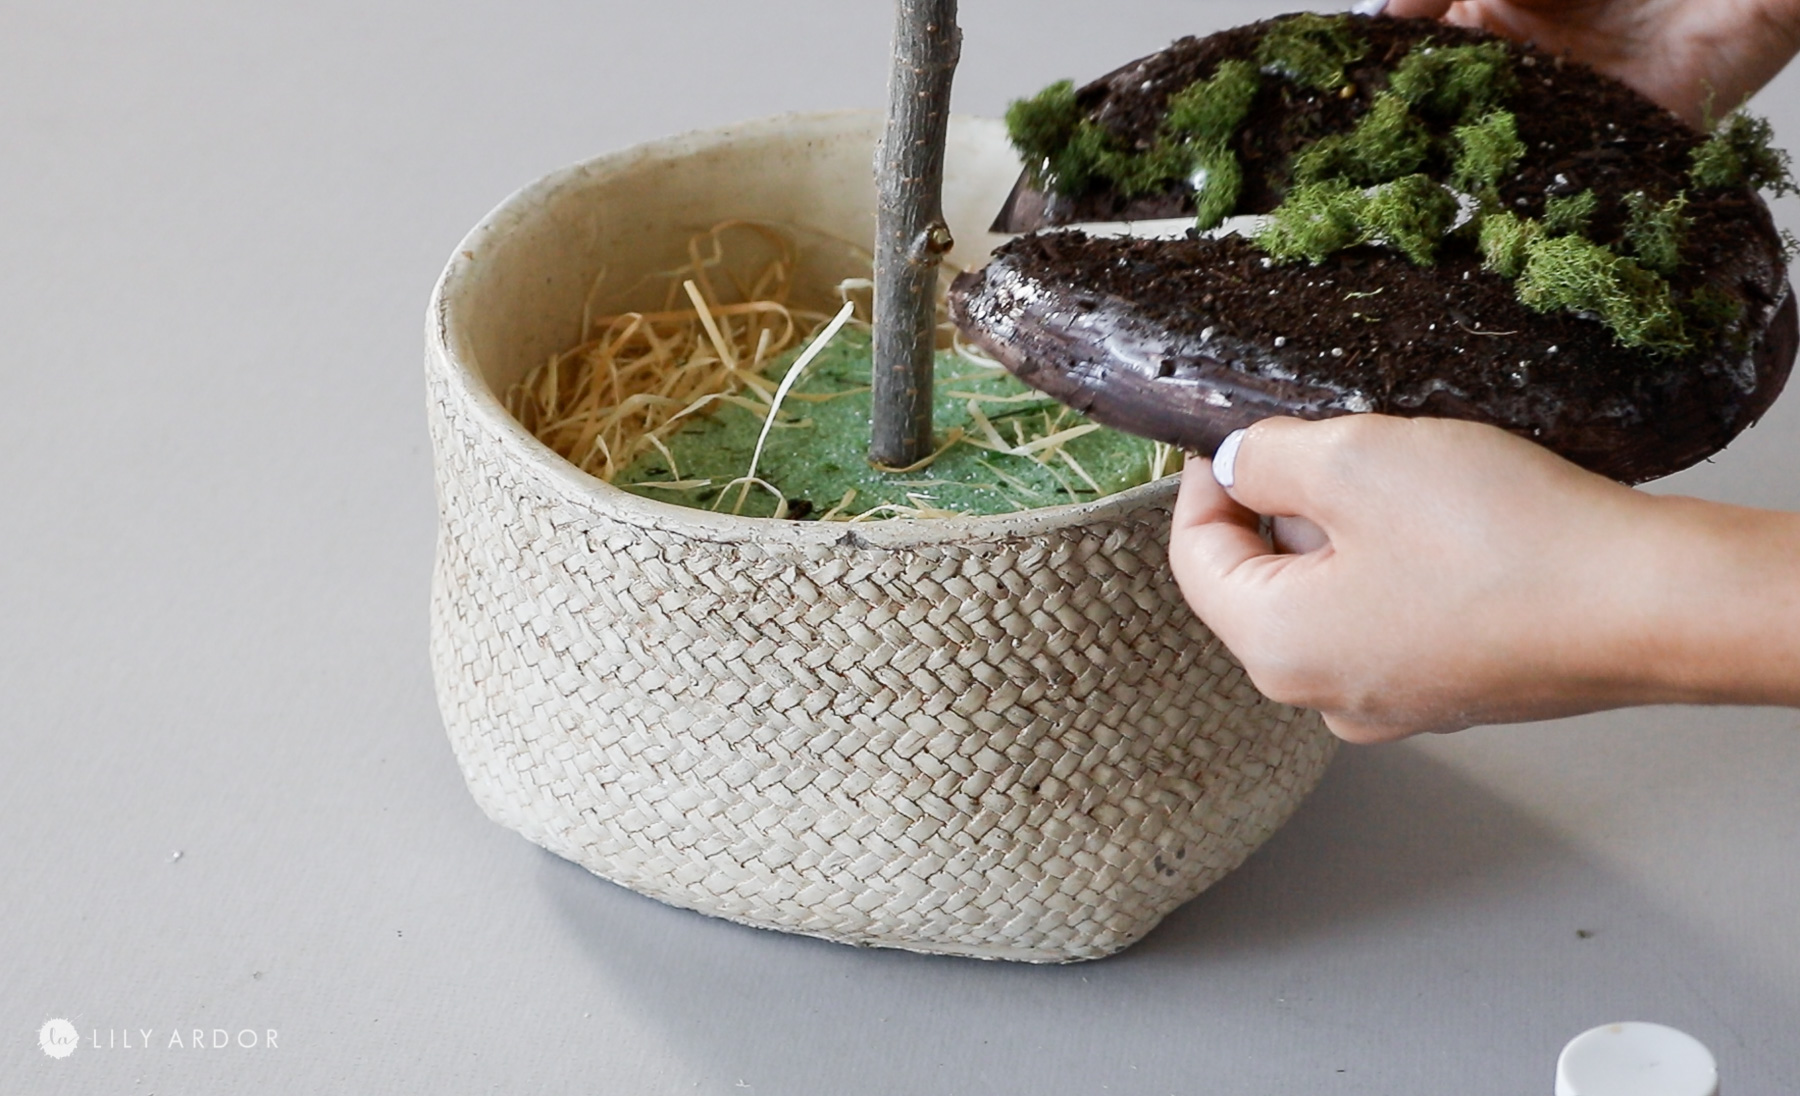
I applied a decent amount of hot glue to the bottom of the pot and secured the foam to the pot.
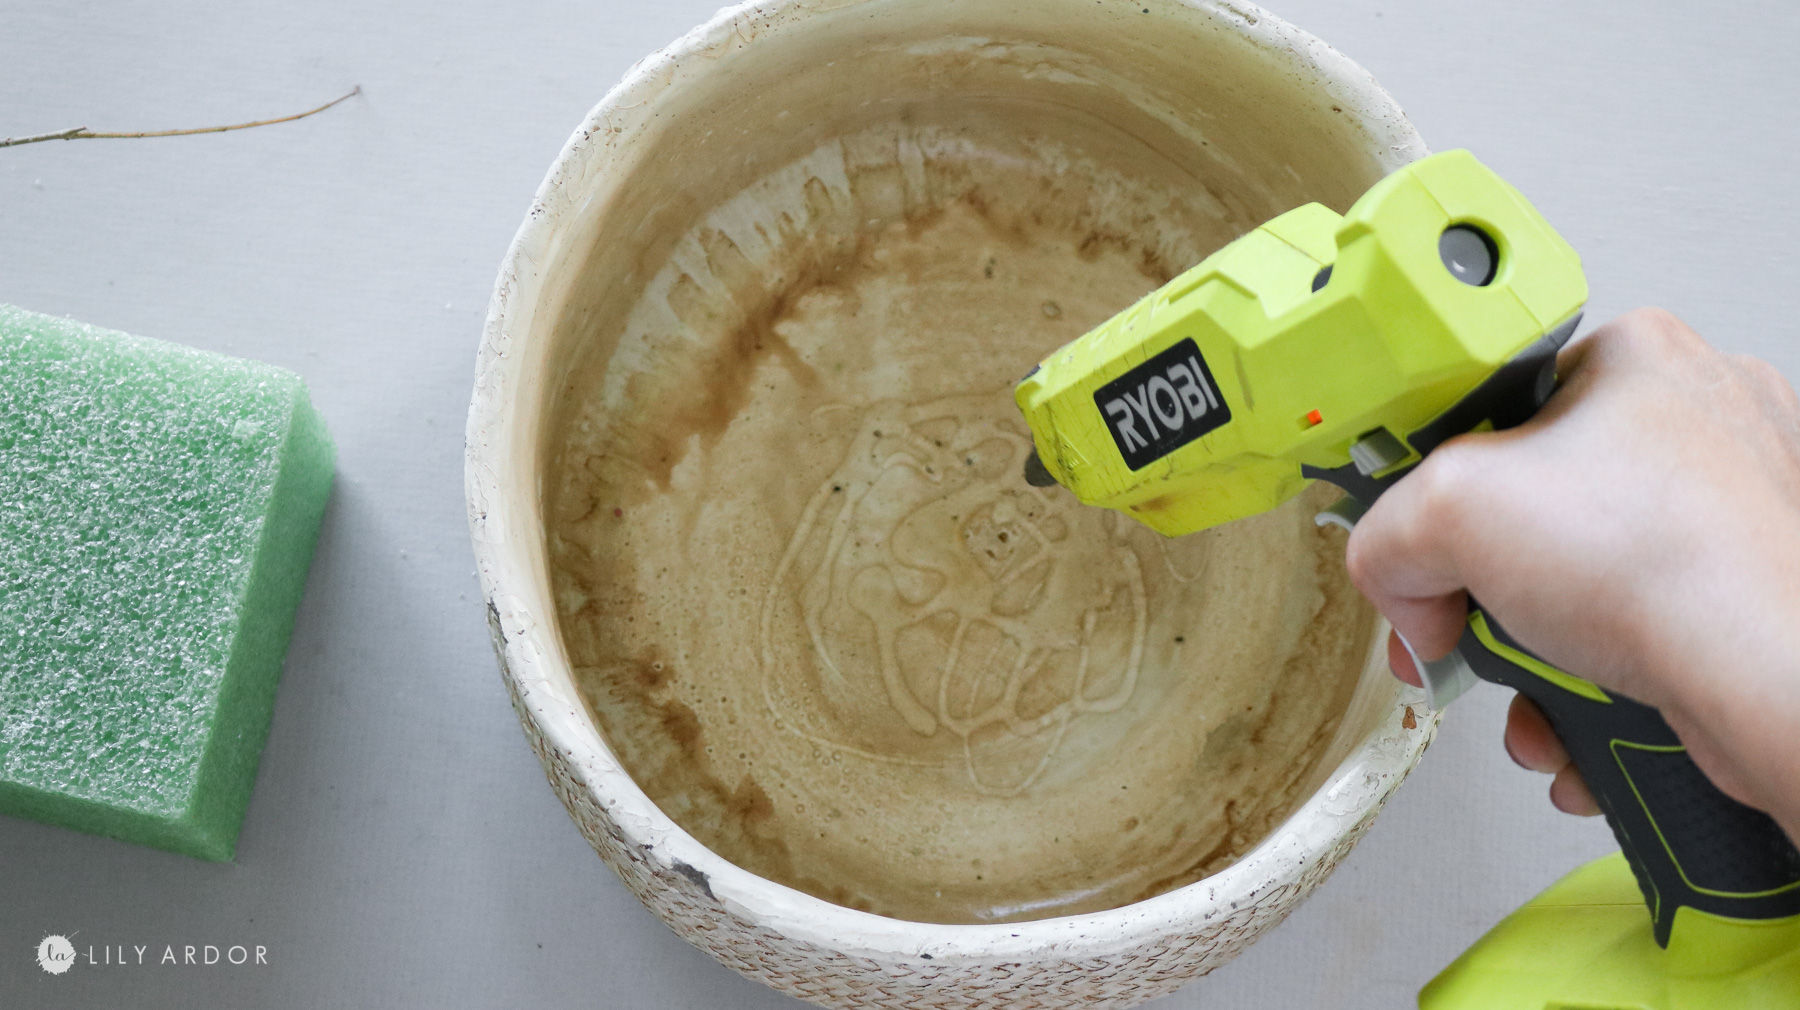
Than I stuck my tree branch into it.
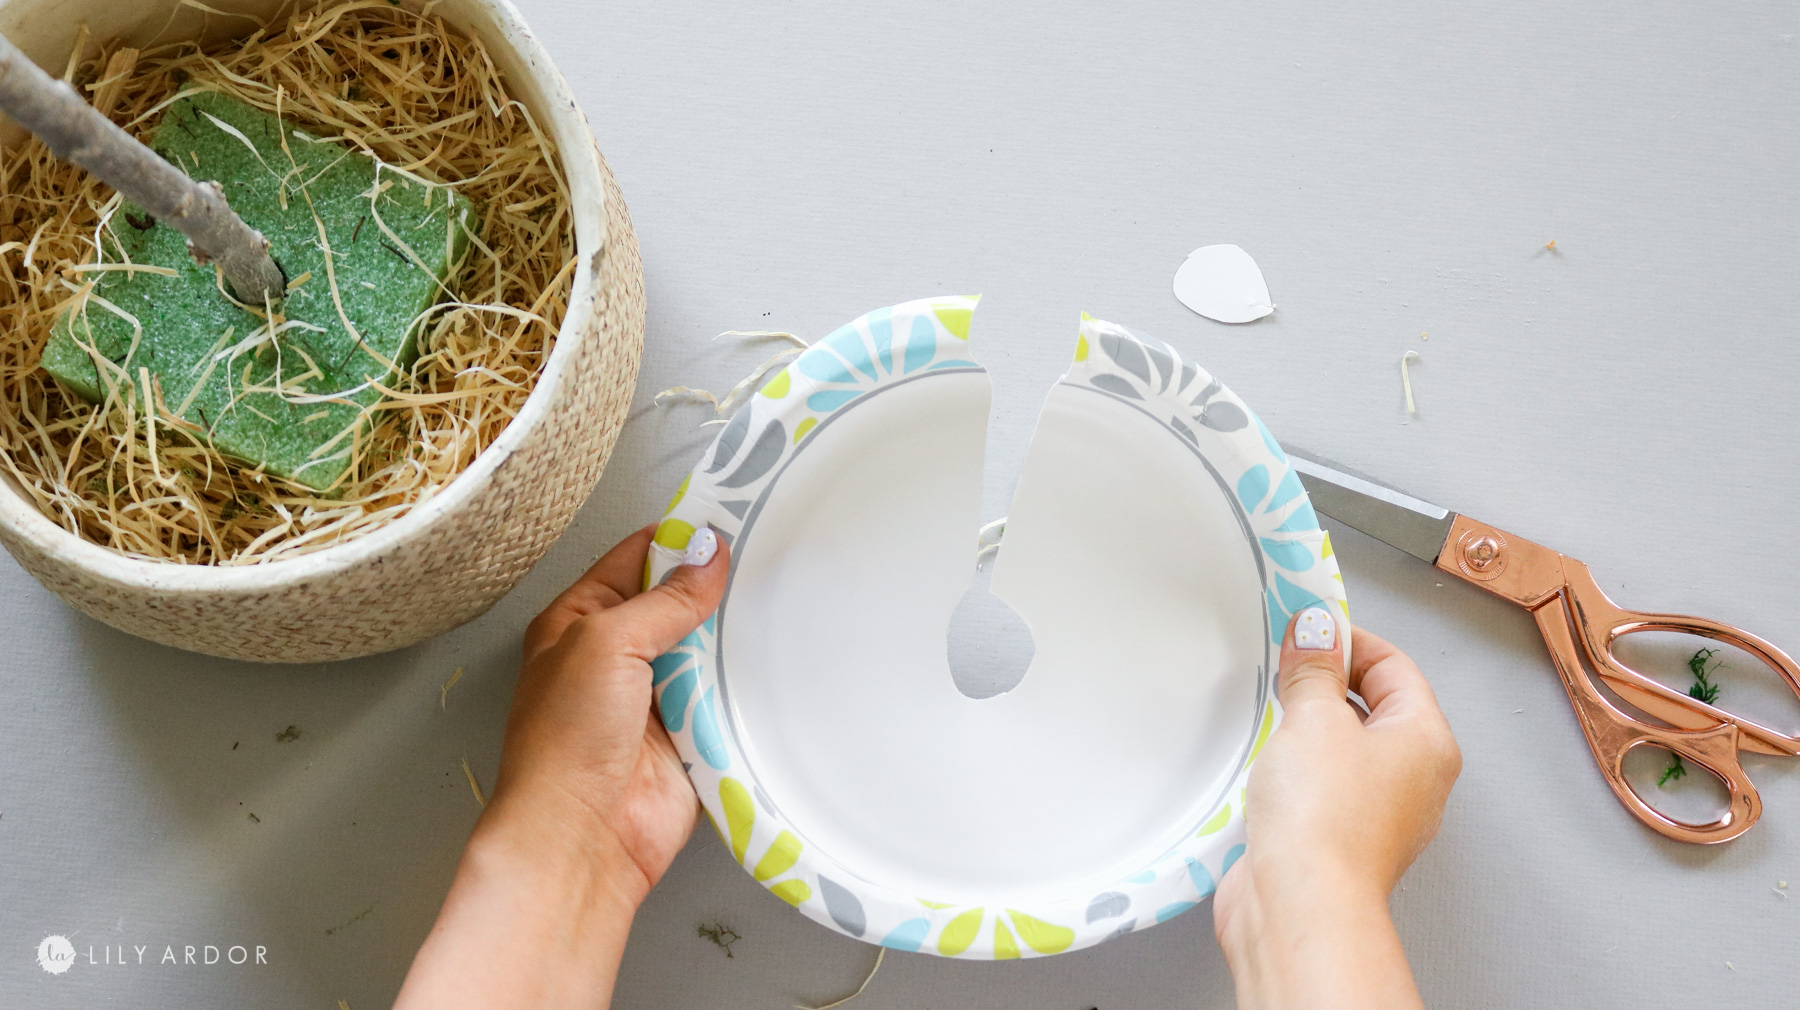
Making a fake dirt layer
I’m in love with this trick. This was random make it work moment. I usually fill even my fake plants with potting soil. This time I was out. The first thought I had was of course make a fake layer which will require way less dirt. I used a paper plant because it was sturdy yet flimsy enough to make it easy to work with.
I started off by cutting into the paper plate and cutting out a small circle in the center for the branch. This will let you slide it right into place.
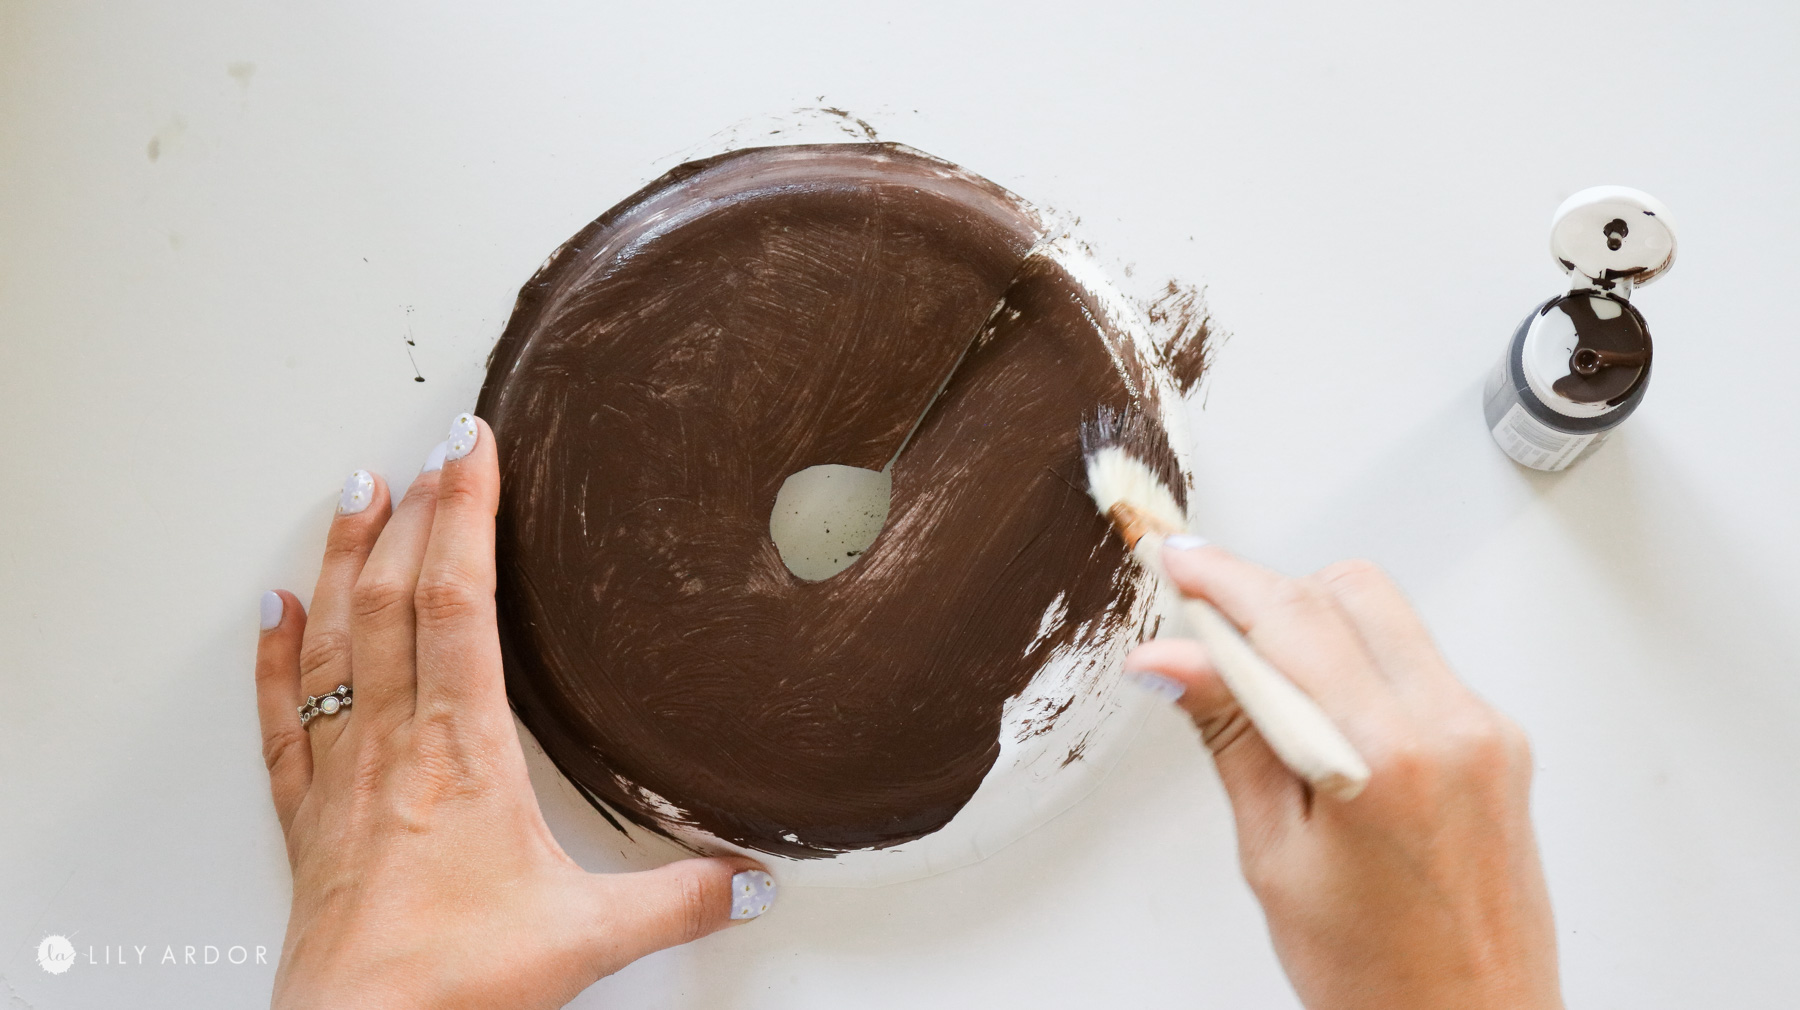
Thank I used so me brown craft paint and applied some glue over it. I sprinkled it with dirt and VOILA! It’s that easy.
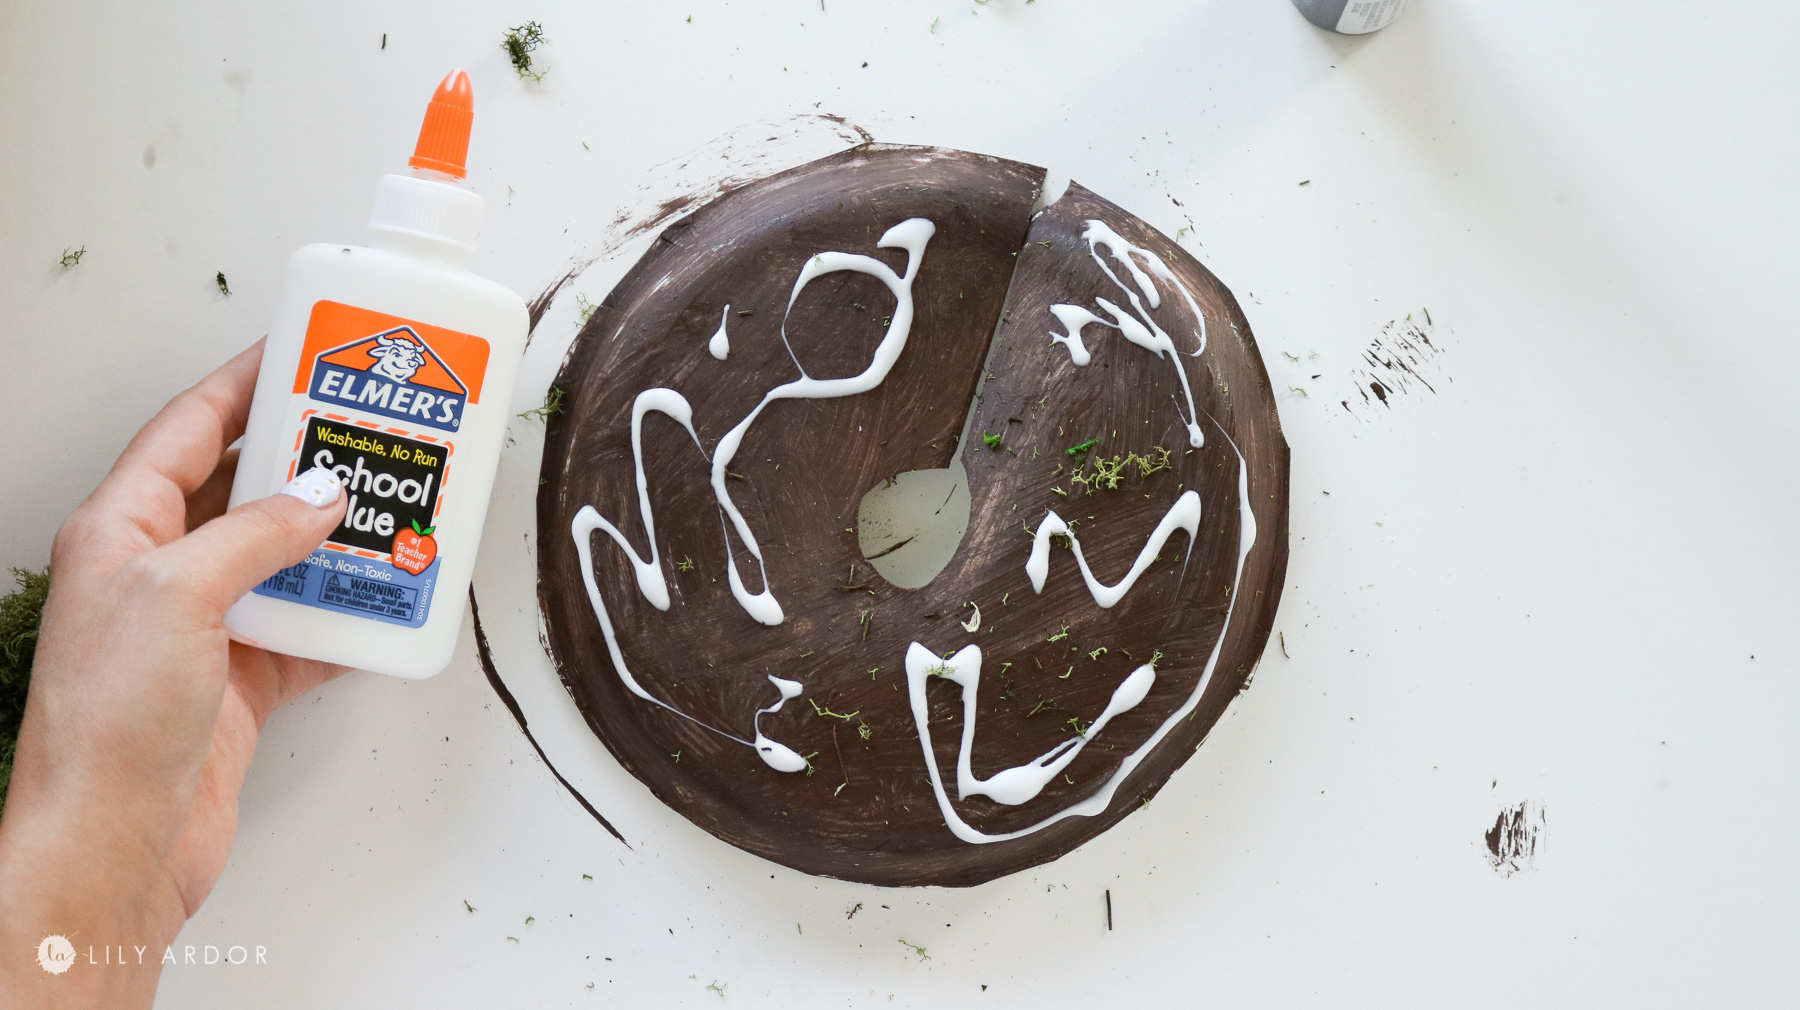
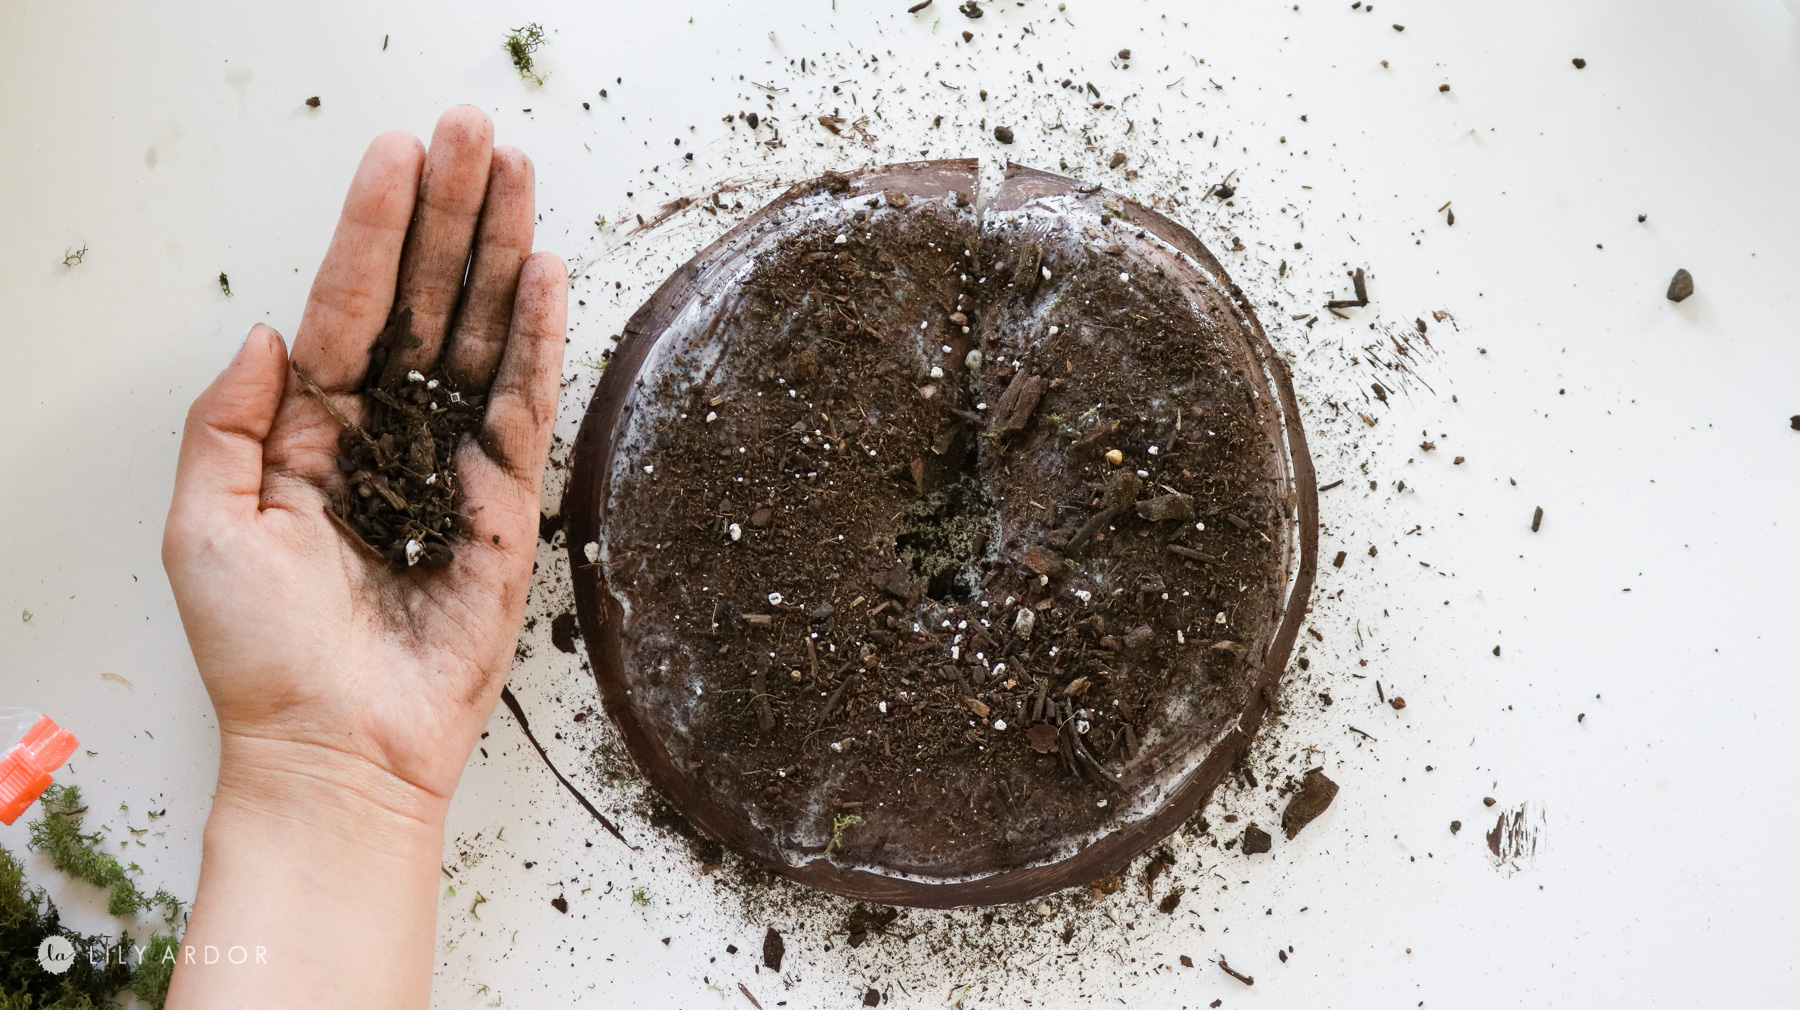
Now you can slide it right into place. I also added a few small pieces of moss and sprinkled a bit more dirt to hide the edges and the cuts in the plate.
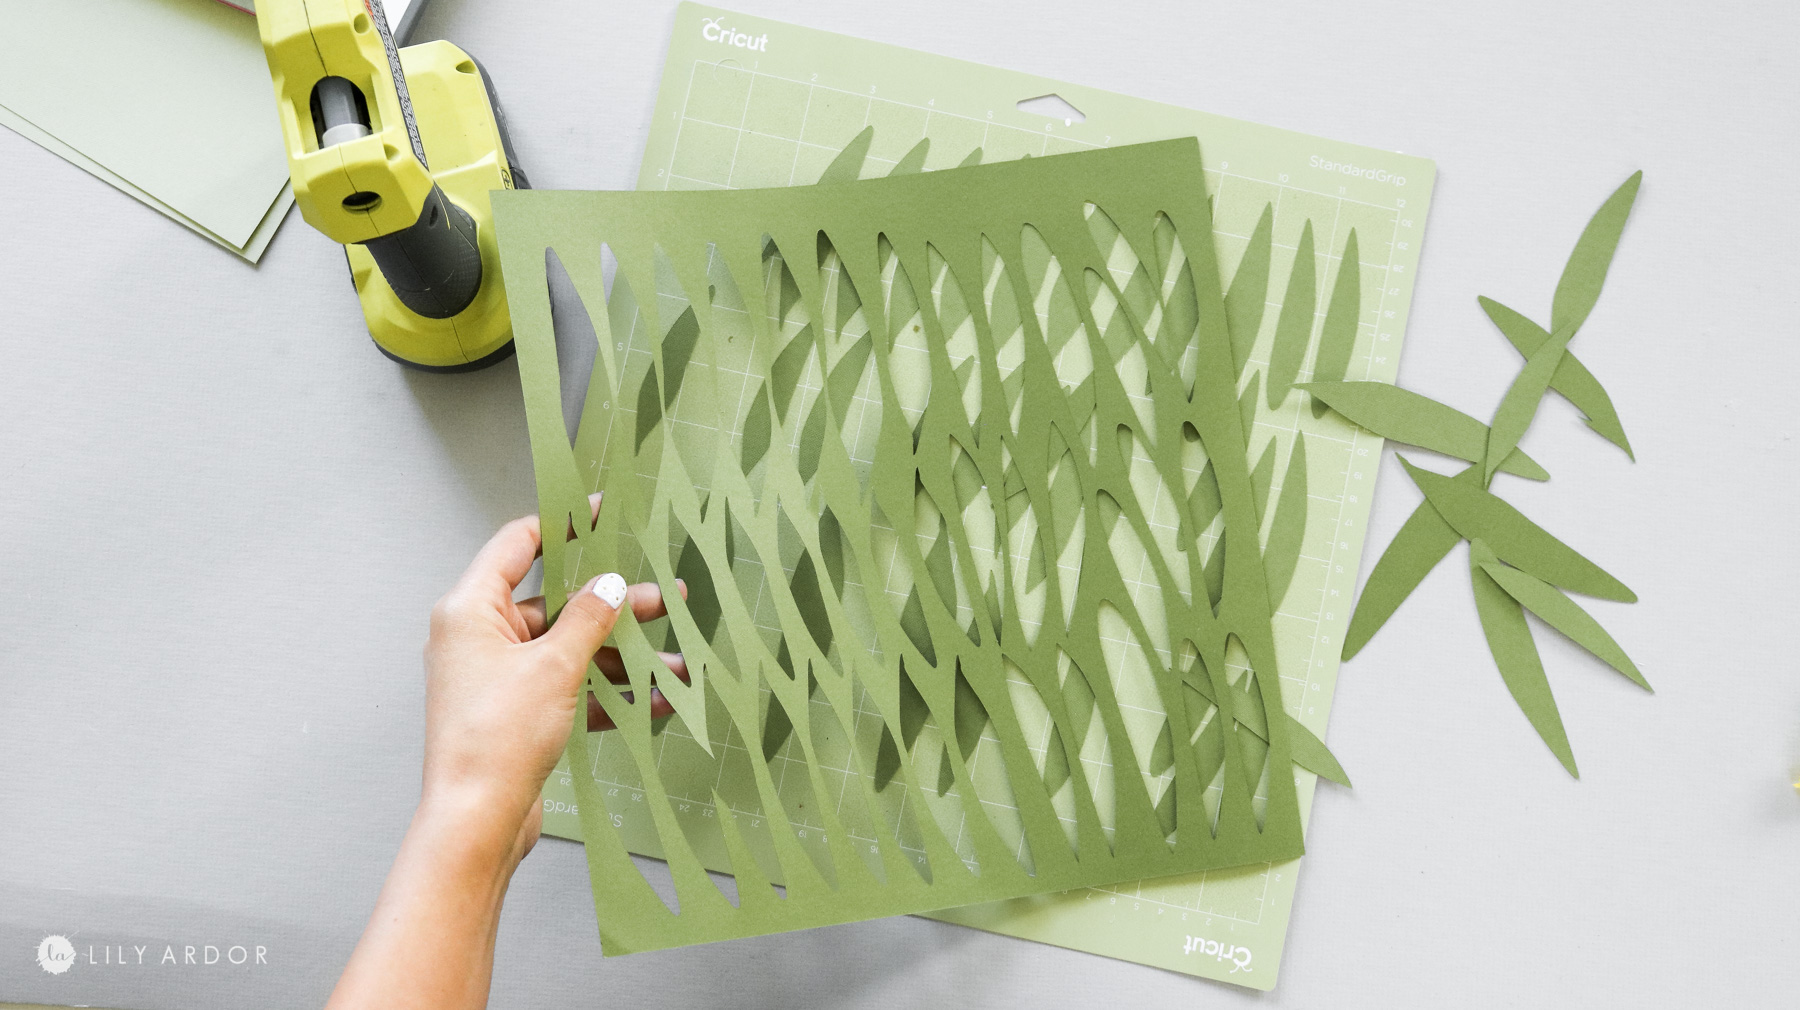
I cut out the leaves using my cricut explore air 2. Cricut has a huge image library. That’s where I got my leaf shape to create the leaves. I share how I made my leaves from start to finish using my circut in the video. You can check it out here – https://youtu.be/9MyUxCQvU2w
If you’re totally new to cricut like I was you should check out this ” Cricut basics for beginners video ” I answer all the questions I had jumping into creating with cricut.
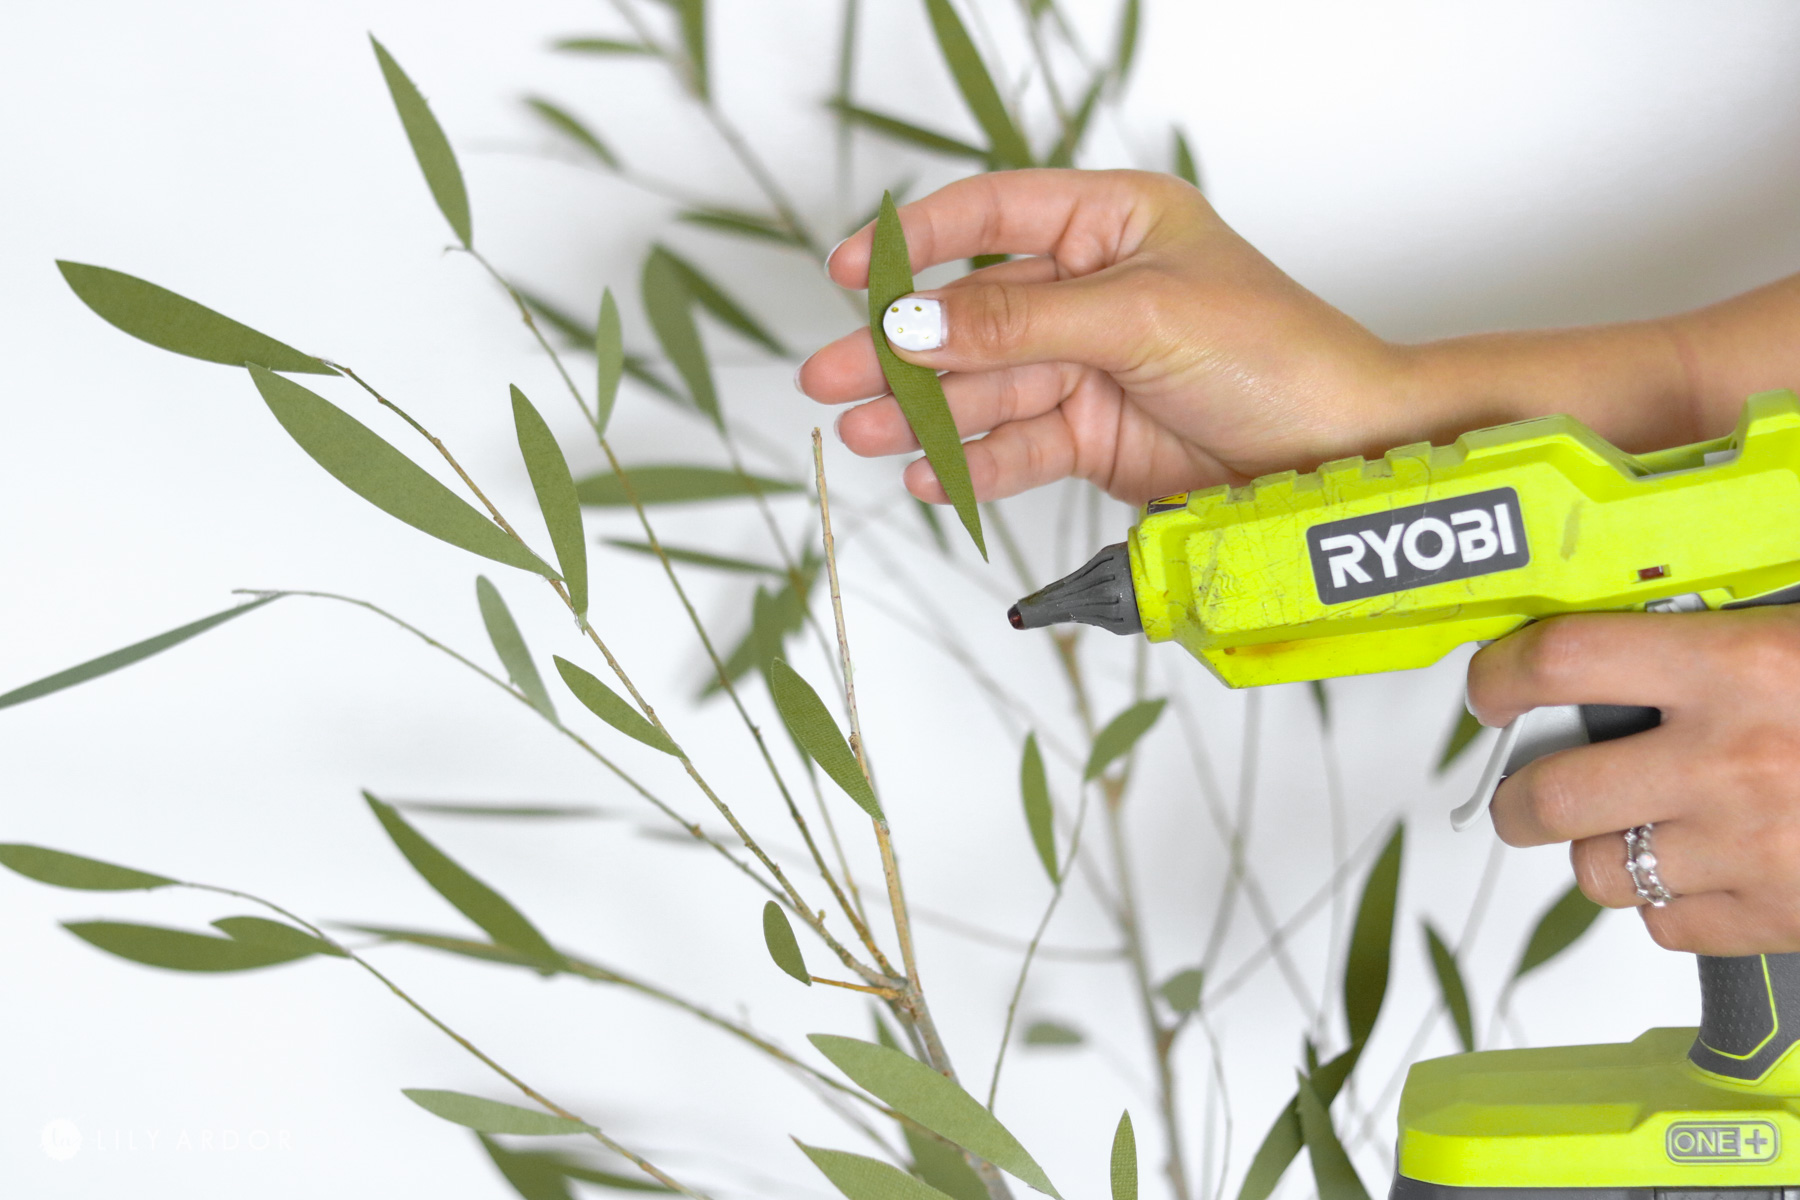
Attaching the faux leaves!
The last step is attaching your faux leaves. I simply used hot glue and attached the leave to all the stems. Make sure you apply enough hot glue. I also recommend letting your branch sit for a few days before attaching leaves as it let’s out all the moisture. My branch was pretty wet still and some of the leaves came off that I re-glued.
That’s it! I’m in love! It’s so cute and elegant. Now that I think about it I wish I would of made a bigger one. To be completely honest I wasn’t sure it would work in the first place which would explain why I kept it small. YOU GUYS IT WORKS! 😅LOL make yours big!
Oh btw did you notice my new rug😬. I just got it for my office. Can’t wait to set it all up and share more photos. It’s currently stationed in our living room patiently waiting on me 😬. Ps. I might just leave it here. I love it so much!

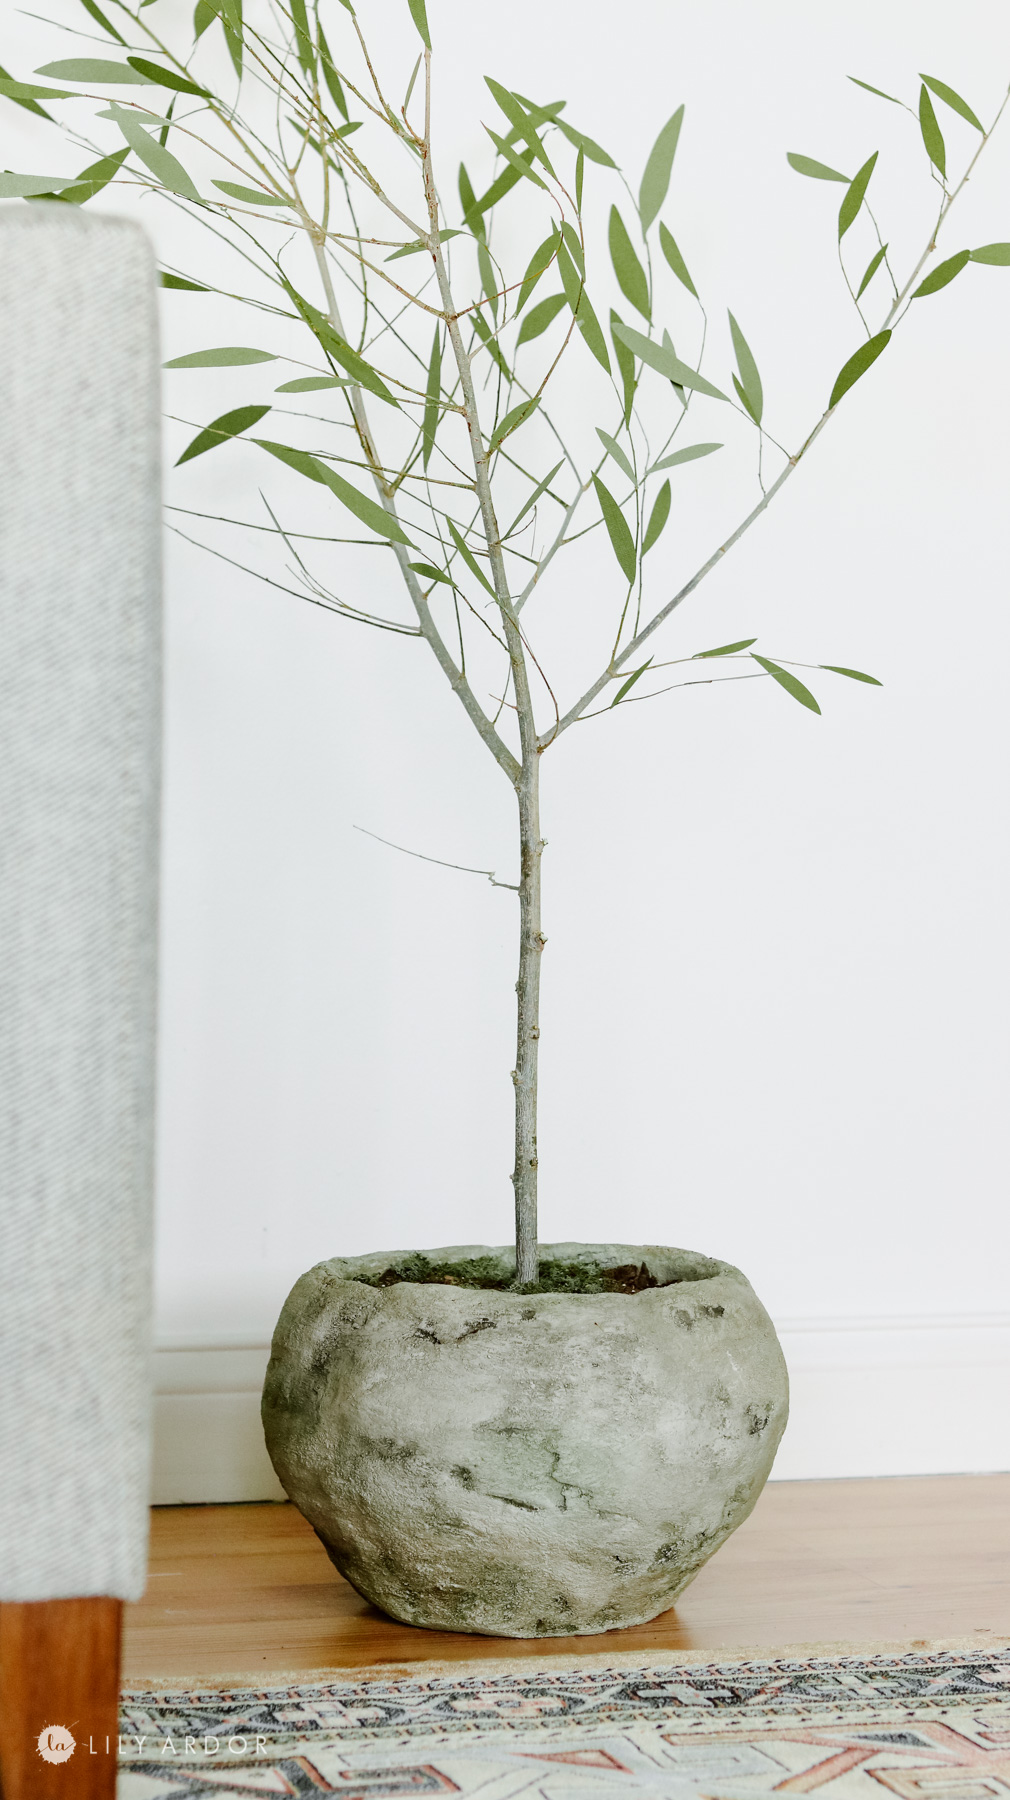
Here’s a close up on the concrete planter I made for it. I love the rustic look it has! It was so easy to make. Only took me about 20 minutes to make ( not including drying times) I’ll be sharing a DIY soon. Stay tuned 🙂 .

Okay that’s all for today. I’ll be adding links to the other 4 DIYs once I make posts for each one. I hope this faux olive tree inspires you to make something fun!
I’ll see you all next time 🙂
Best,
Lily