
First DIY of 2020! A DIY Wood Star!
It’s been a busy couple of months and to say I’m totally on track would be a fat lie! In fact I’m so behind I’m still thinking Christmas vibes. 😬Our Christmas tree is still beautiful as ever decorating a sweet little corner in my living room and guess what I haven’t even planned on taking it down yet. I’m hoping to give it another week since this year we put it up only a few days before Christmas. Have you taken yours down yet or am I the only one stretching this one?
Okay 😊 today’s post is dedicated to these wooden stars. Even though it was meant to be one star I ended up with 4 variations of this star because I couldn’t decide on one. I would like to also credit my friends from hometalk for this idea and wood and sawdust for helping me nail all those crazy wood angled cuts.
Cost
Depending on how you decide to style your star this DIY can cost between $15 – $30 for supplies ( not including the tools )
Time Needed
About 30 minutes to cut pieces and assemble the star. If you choose to add a backing it’ll take about another 40 minutes.
This post contains affiliate links* visit my disclosure policy for my info
Supplies
- 1″x2 ” ( usually sold in 6 and 8 foot lengths – I got mine at lowes )
- Gorilla Wood Glue ( here’s my favorite wood glue- https://amzn.to/35P0Tl4)
- A scrap piece of 2″x4″
- Measuring tape + Pencil
- clamp ( Here’s the clamp I used – https://amzn.to/30qjiDG )
- masking tape
- heavy duty stapler ( you can get a bostitch heavy duty stapler here – https://amzn.to/2QPNDbk )
Tools
- Miter saw ( we used our trusty dewalt miter saw. You can get it here on amazon –https://amzn.to/387NxSy)
Additional supplies
For Succulent Star –
- succulents ( amazon sells a cute variety of 14 succulents for super cheap here – https://amzn.to/2Tj7H7E )
- moss
- hot glue
- balsa wood for backing
- optional – wood stain
- sand paper
For Christmas Ornament Star –
- small Christmas ornaments
- hotglue
- balsa wood for backing
- optional- Wood Stain
For Moss Candle holder –
- 3 pillar candles
- moss ( Here’s some moss that looks pretty close to what I used – https://amzn.to/2tj9Zt1 )
- plywood + jigsaw ( to make the backing for the star )
For Star Lantern –
- light socket kit ( Here’s the type of light socket I used – https://amzn.to/35SbdbY )
- white spray paint
- plaster of paris (to seal holes)
- drill with hole saw
Okay Let’s do this! If you’re more into video tutorials you can check out the video version to this tutorial here.
Step 1: Measure an cut!
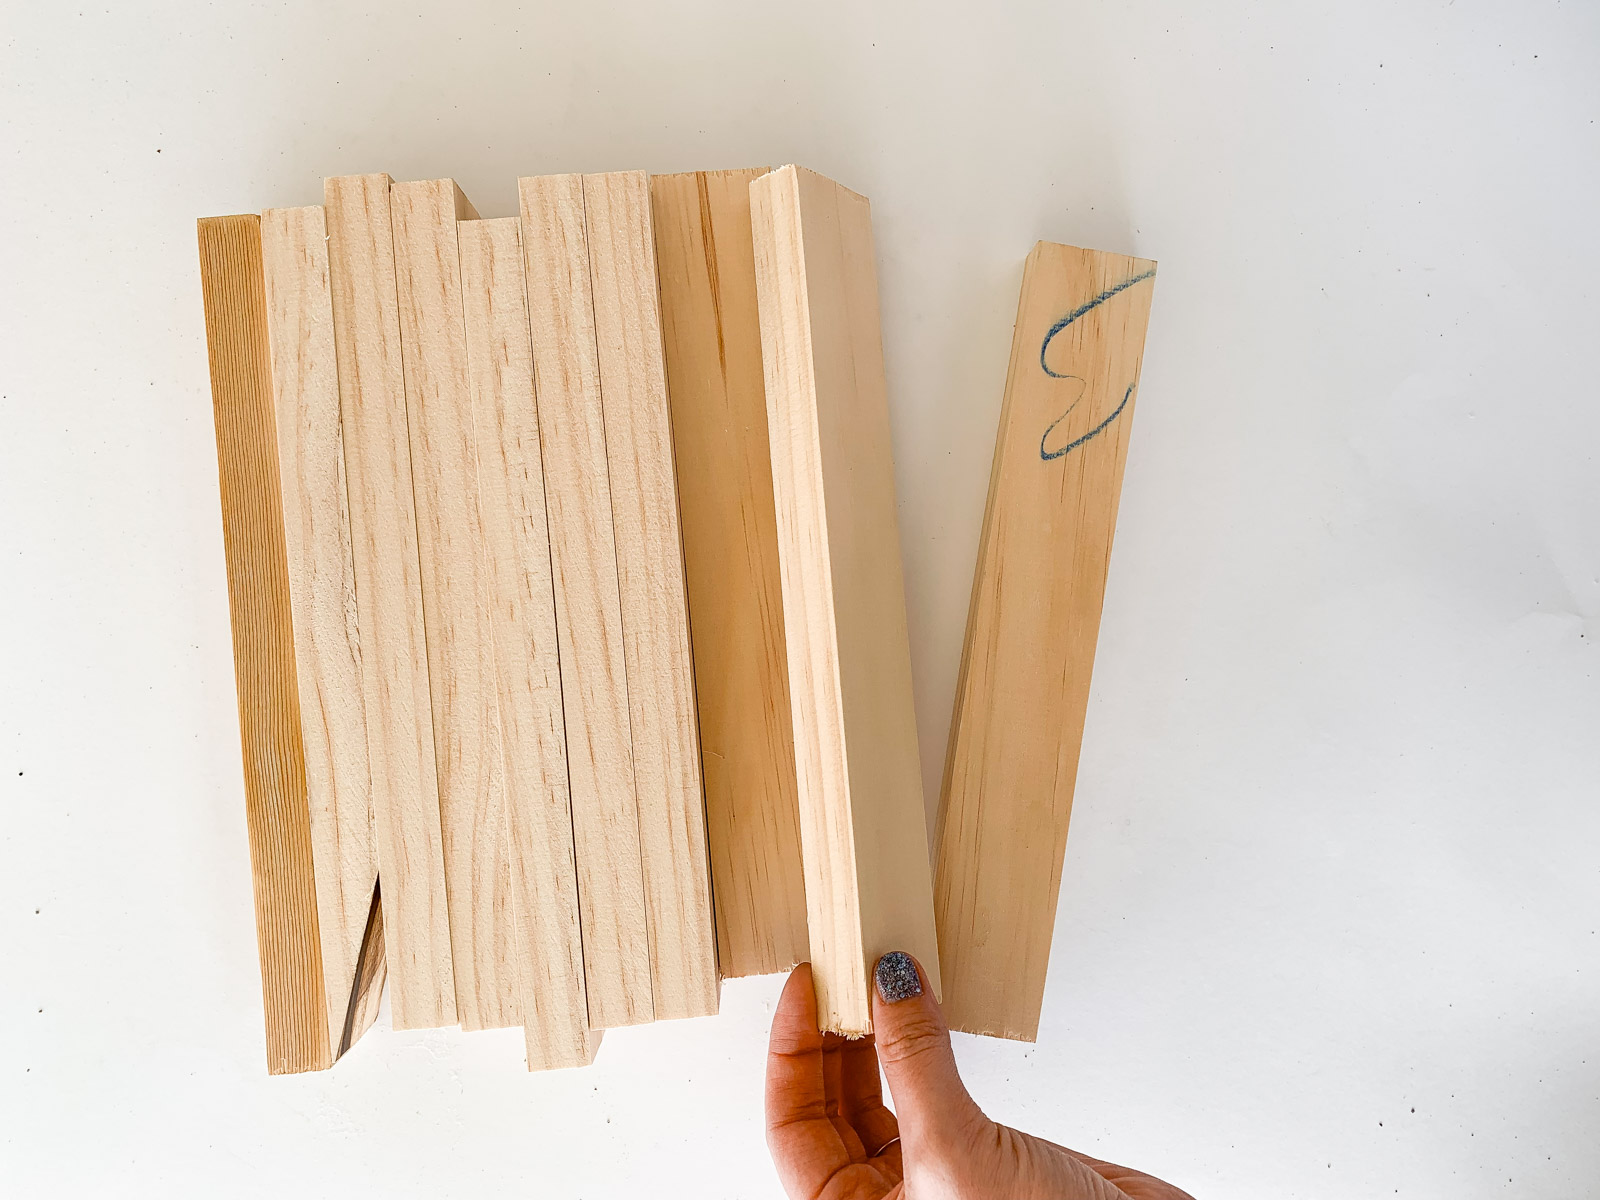
Start by marking and cutting your 1″x2″ into 10 inch pieces. You’ll need a total of 10 separate pieces to create a star.

Here’s what they should look like at this point.
Step 2: Creating a Jig! What’s a JIG??!
Okay for this next step you’ll need to make a jig. It’ll go on your miter saw to help get the right angled cut on your wood pieces.
Wikipedia says a jig is : A type of custom-made tool used to control the location and/or motion of parts or other tools.
This tool will help guide and hold your tiny wood pieces in place to get the right cut with your miter saw. It’s actually really easy to make a jig! All you’ll need for this is a 2″x4″ and a clamp.

Set your miter saw to 45 degrees. Then clamp your 2×4 into place before cutting it at a 45 degree angle. That’s it!! Don’t take the clamp off. You have now made your own jig. Congrats! 😬
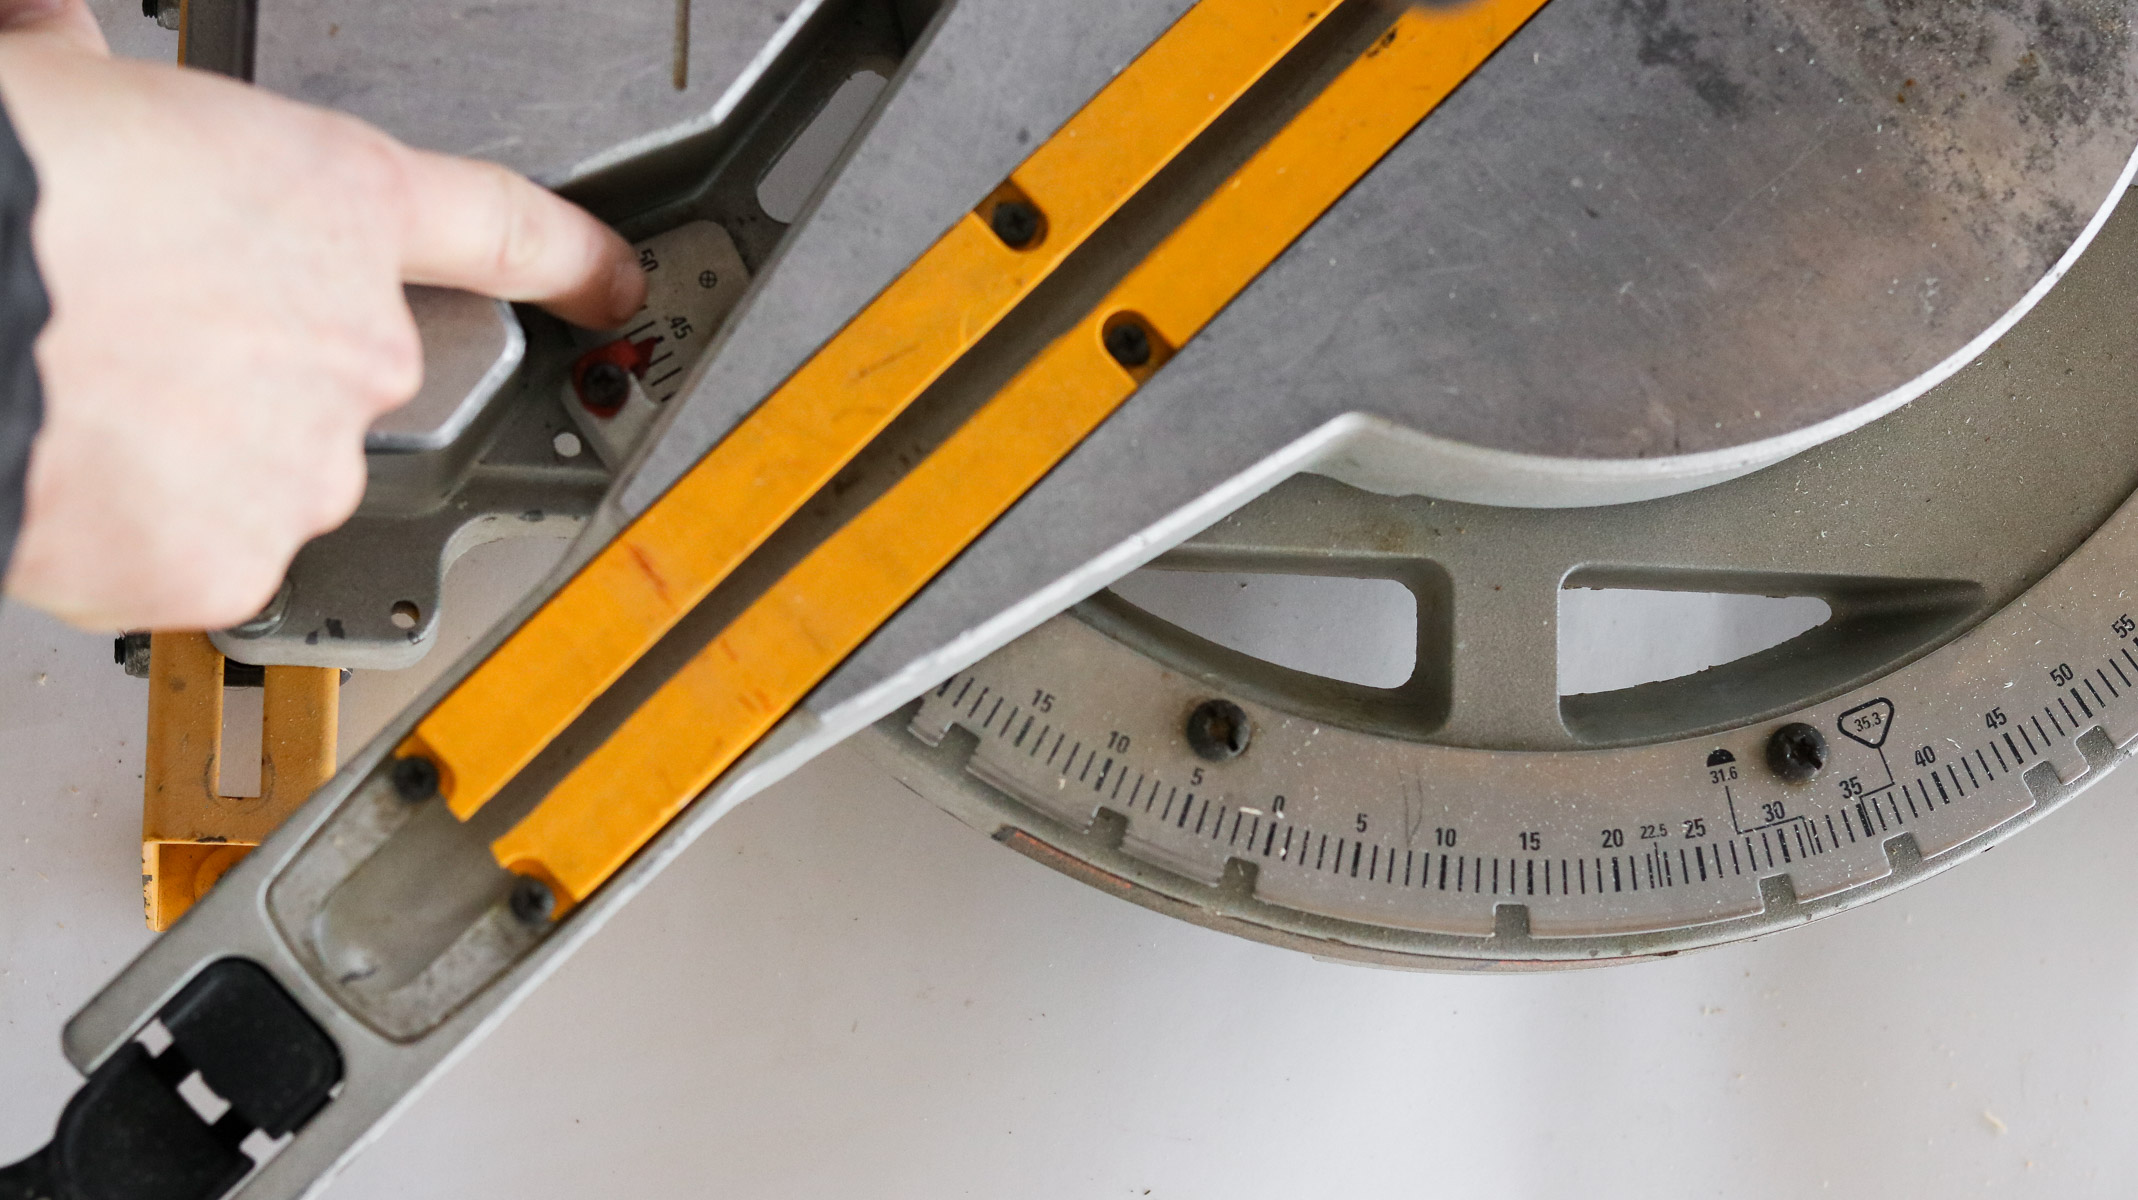

By leaving the 2″x4″ clamped to your miter saw you can now use it a as guide to cut your wood pieces.
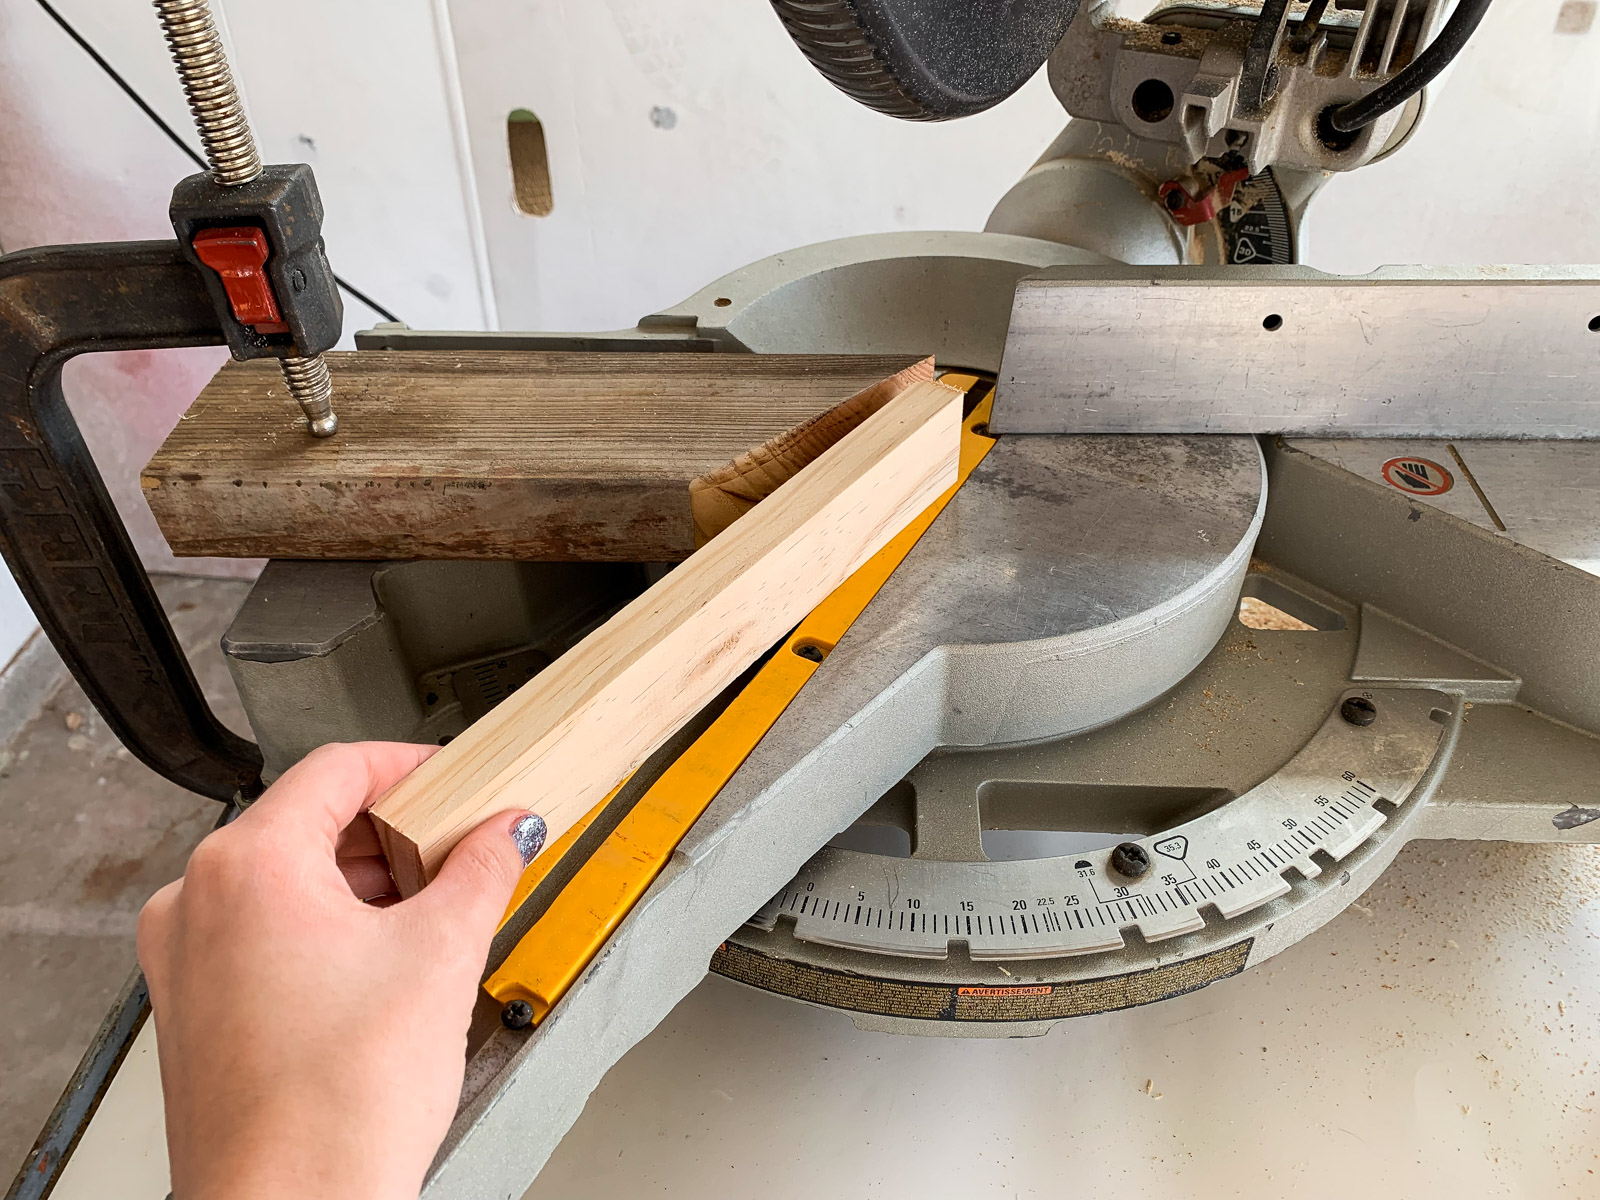
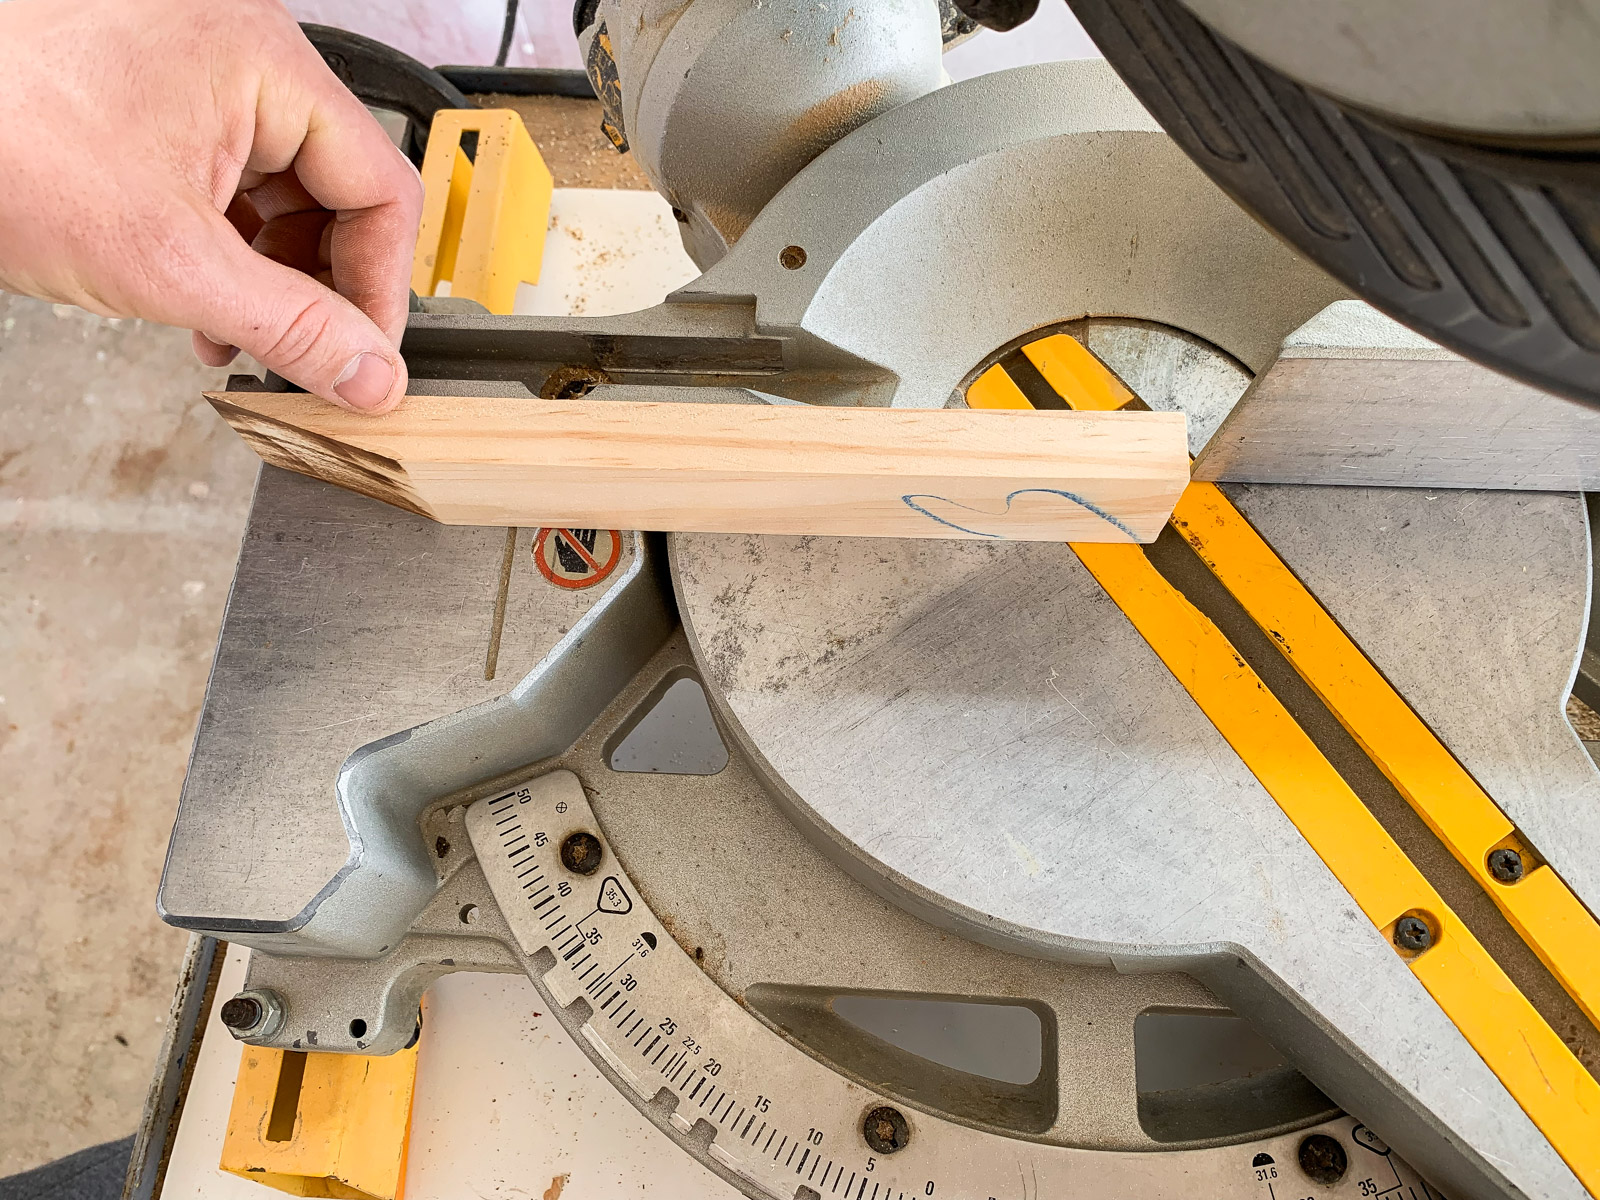
Step 3: Cutting Your Wood at 18 Degrees!
This next step is important. Set your miter saw to 27 degrees. ( on the left side of the zero) NOT 18. Lay your 1×2 against the 2×4 and be sure the ends at the top line up ( like photo below).
Hold your 1×2 snug against the 2×4 and cut it at this angle. Please be cautious it’s a pretty tight cut. If you’re not sure about using a miter saw please have someone experienced do it for you. I’m honestly to scared to use it especially with angled cuts so I had my hubby do these cuts for me.
In more detail about this angled cut… If you’re wondering why you can’t just set the dial to 18 degrees and cut your wood pieces it’s because it won’t actually give you an 18 degree cut. 😑 Confusing right? An 18 degree cut is actually impossible to do on a miter saw without a jig. That’s why we made a 45 degree jig. When you set your dial to 27 and use the 45 degree jig as a guide you’ll get an 18 degree cut because 45-27+18 . LOL! I wish I was this smart but, I learned all this from Chris on wood and sawdust. I love his channel! It teaches you everything you need to know about cutting angles in wood.

Do this to all the pieces on one end. Photo below shows how all the pieces look like after we cut them. This was literally the hardest part of the project. Now it’s all easy stuff!

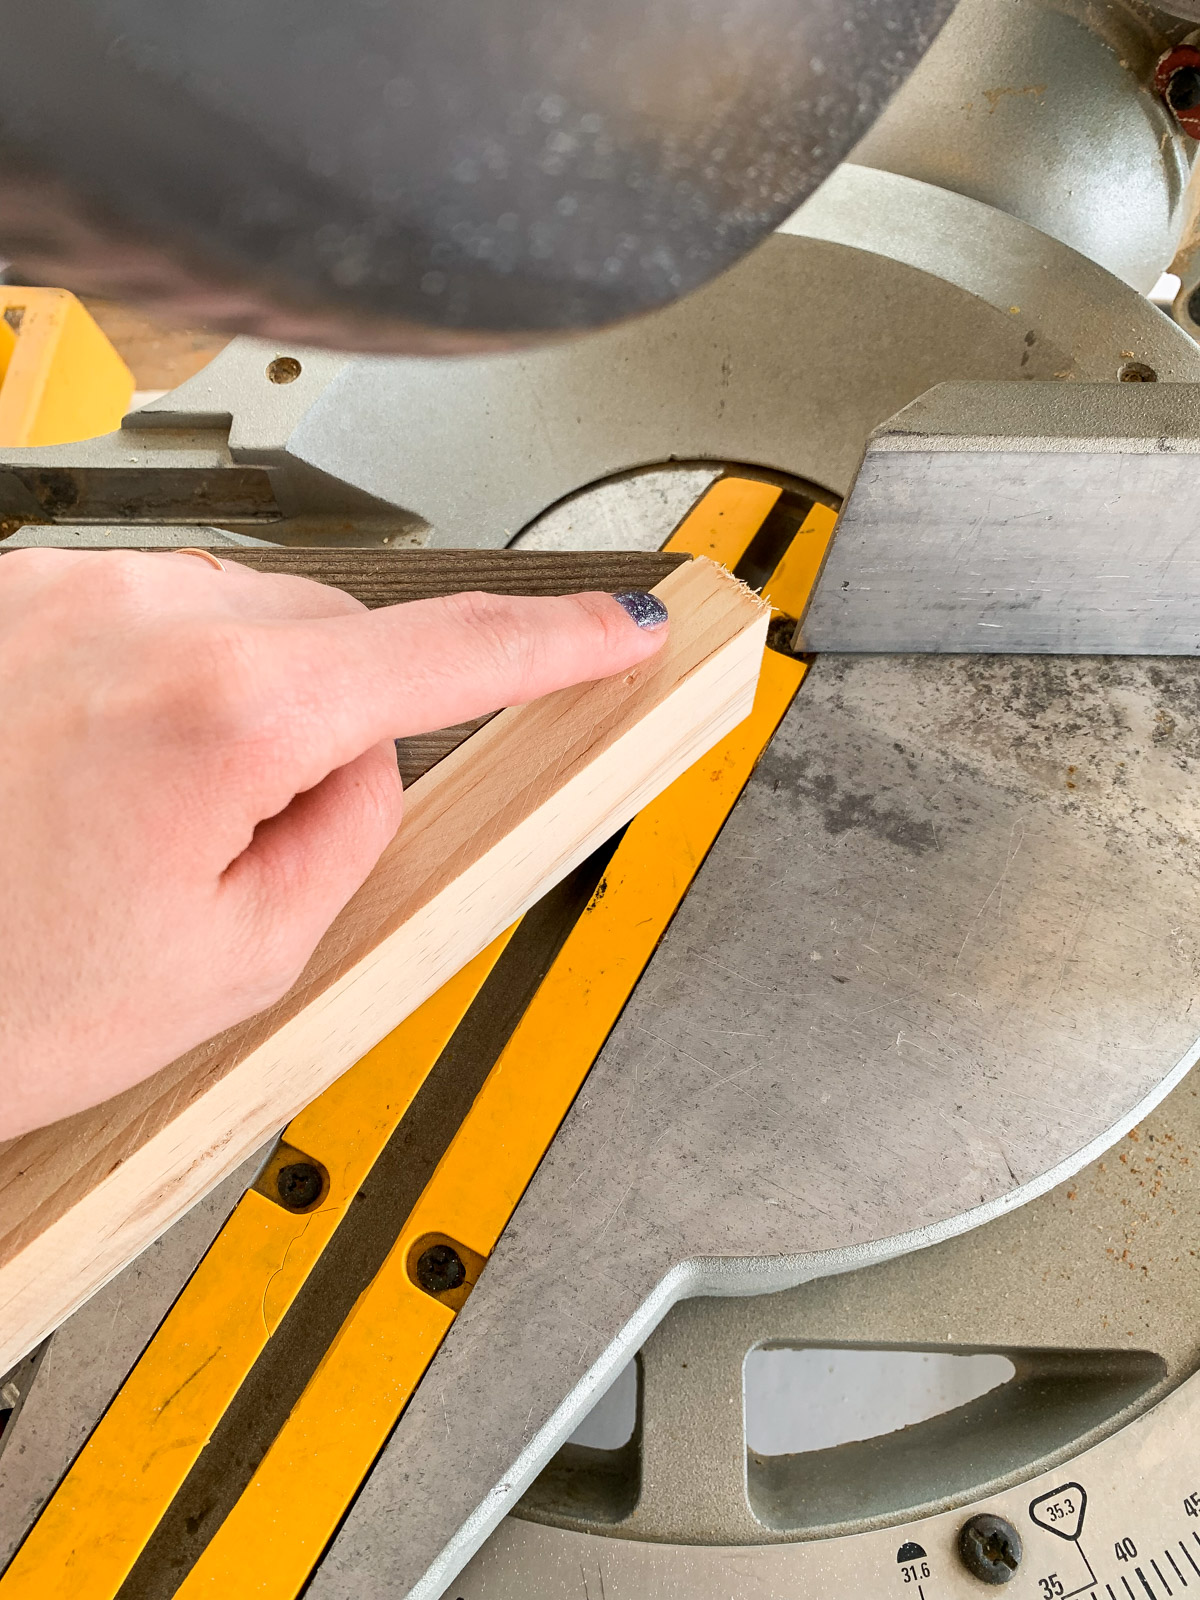
Step 4: Cutting a 36″ Degree angle!
Okay now set your miter saw to 36 degrees ( on the right side of the 0). Lay your wood pieces against the fence of the miter saw and cut the flat end of your wood pieces at 36 degrees. If you want to make your star smaller this is when your would shorten them ( while cutting the 36 degree angle).
Unfortunately it’s really hard to get the 18 degree cut with really small pieces of wood because you come so close to the saw. That’s why you need your 1×2’s to be at least 10 -12 inches in length. I ended up cutting my wood pieces down an additional 2 inches while cutting the other end at 36 degrees making them a total length of 8 inches. Feel free to ask questions in the comments if you’re confused. 🙂
Here’s what each piece of wood looks like once cut. The 18 degree cut is on the left and 36 degree is on the right.

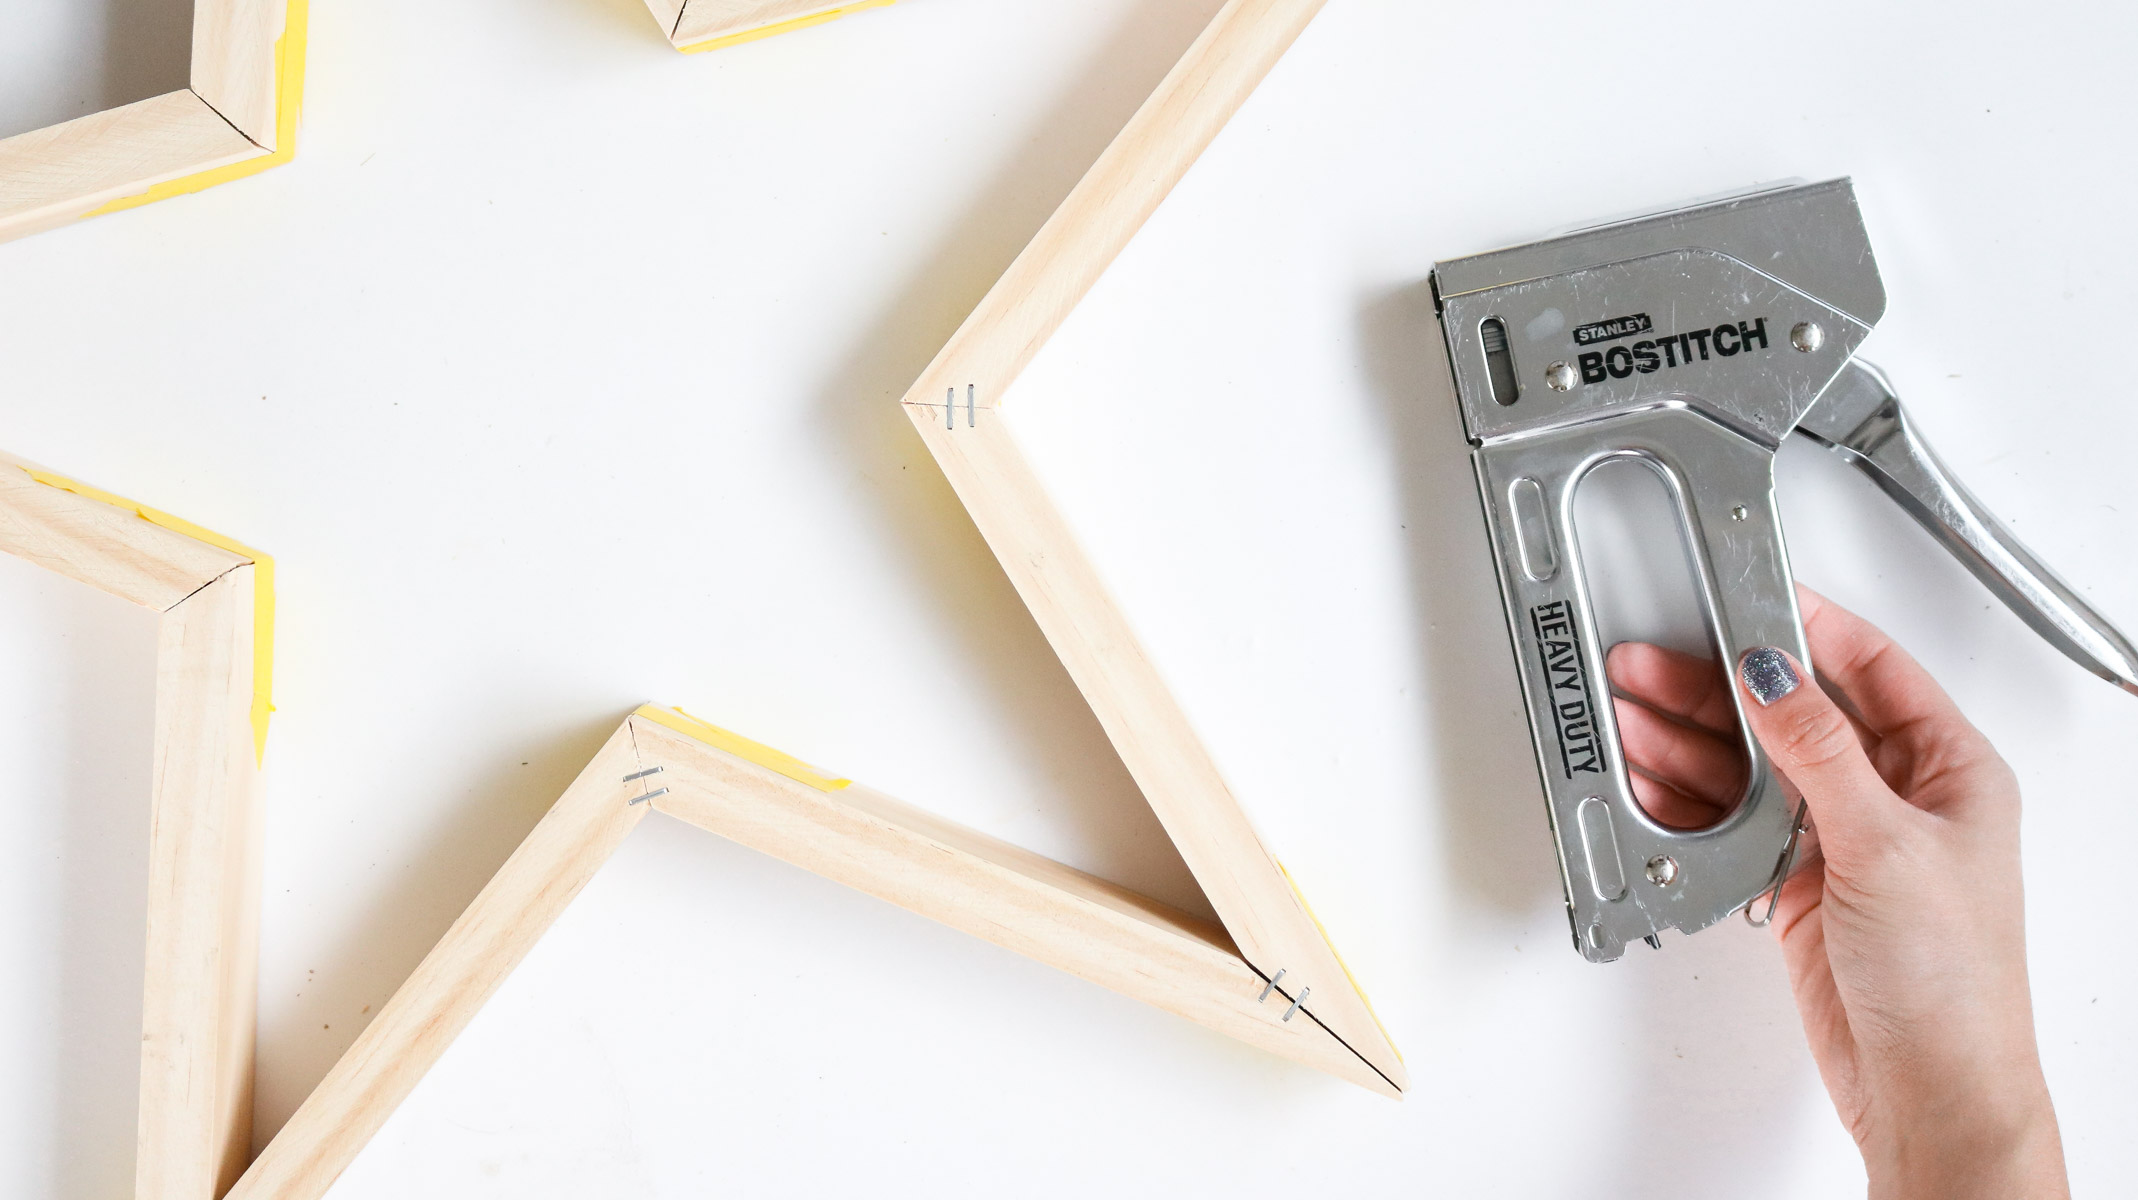
Step 5 : Assembling your star!
Use some sand paper to clean up the edges on the cuts. This will give you a cleaner finish between the seams.
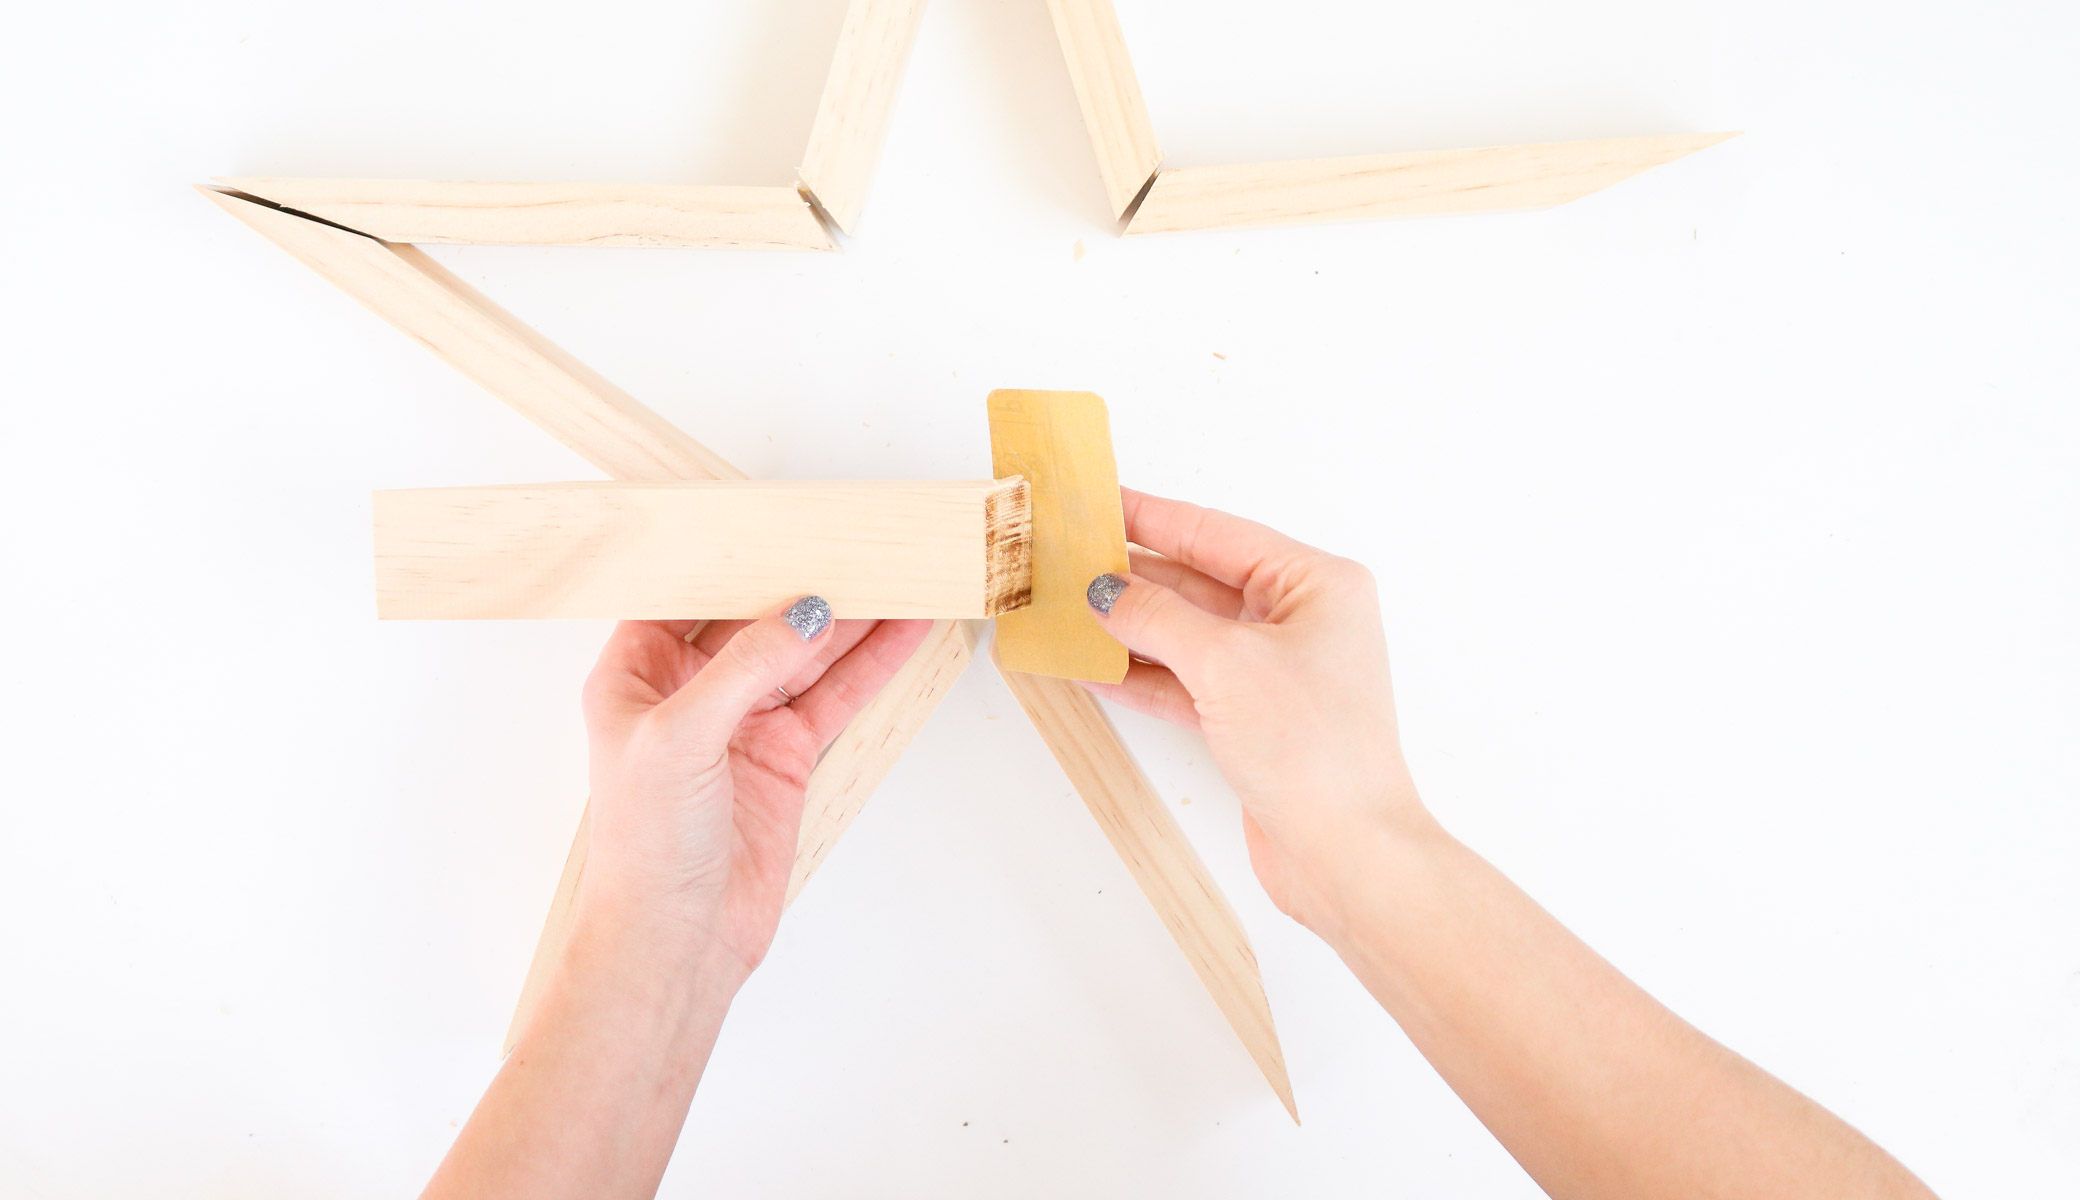
Than glue all the 36 degree angled cuts together and tape them with masking tape.
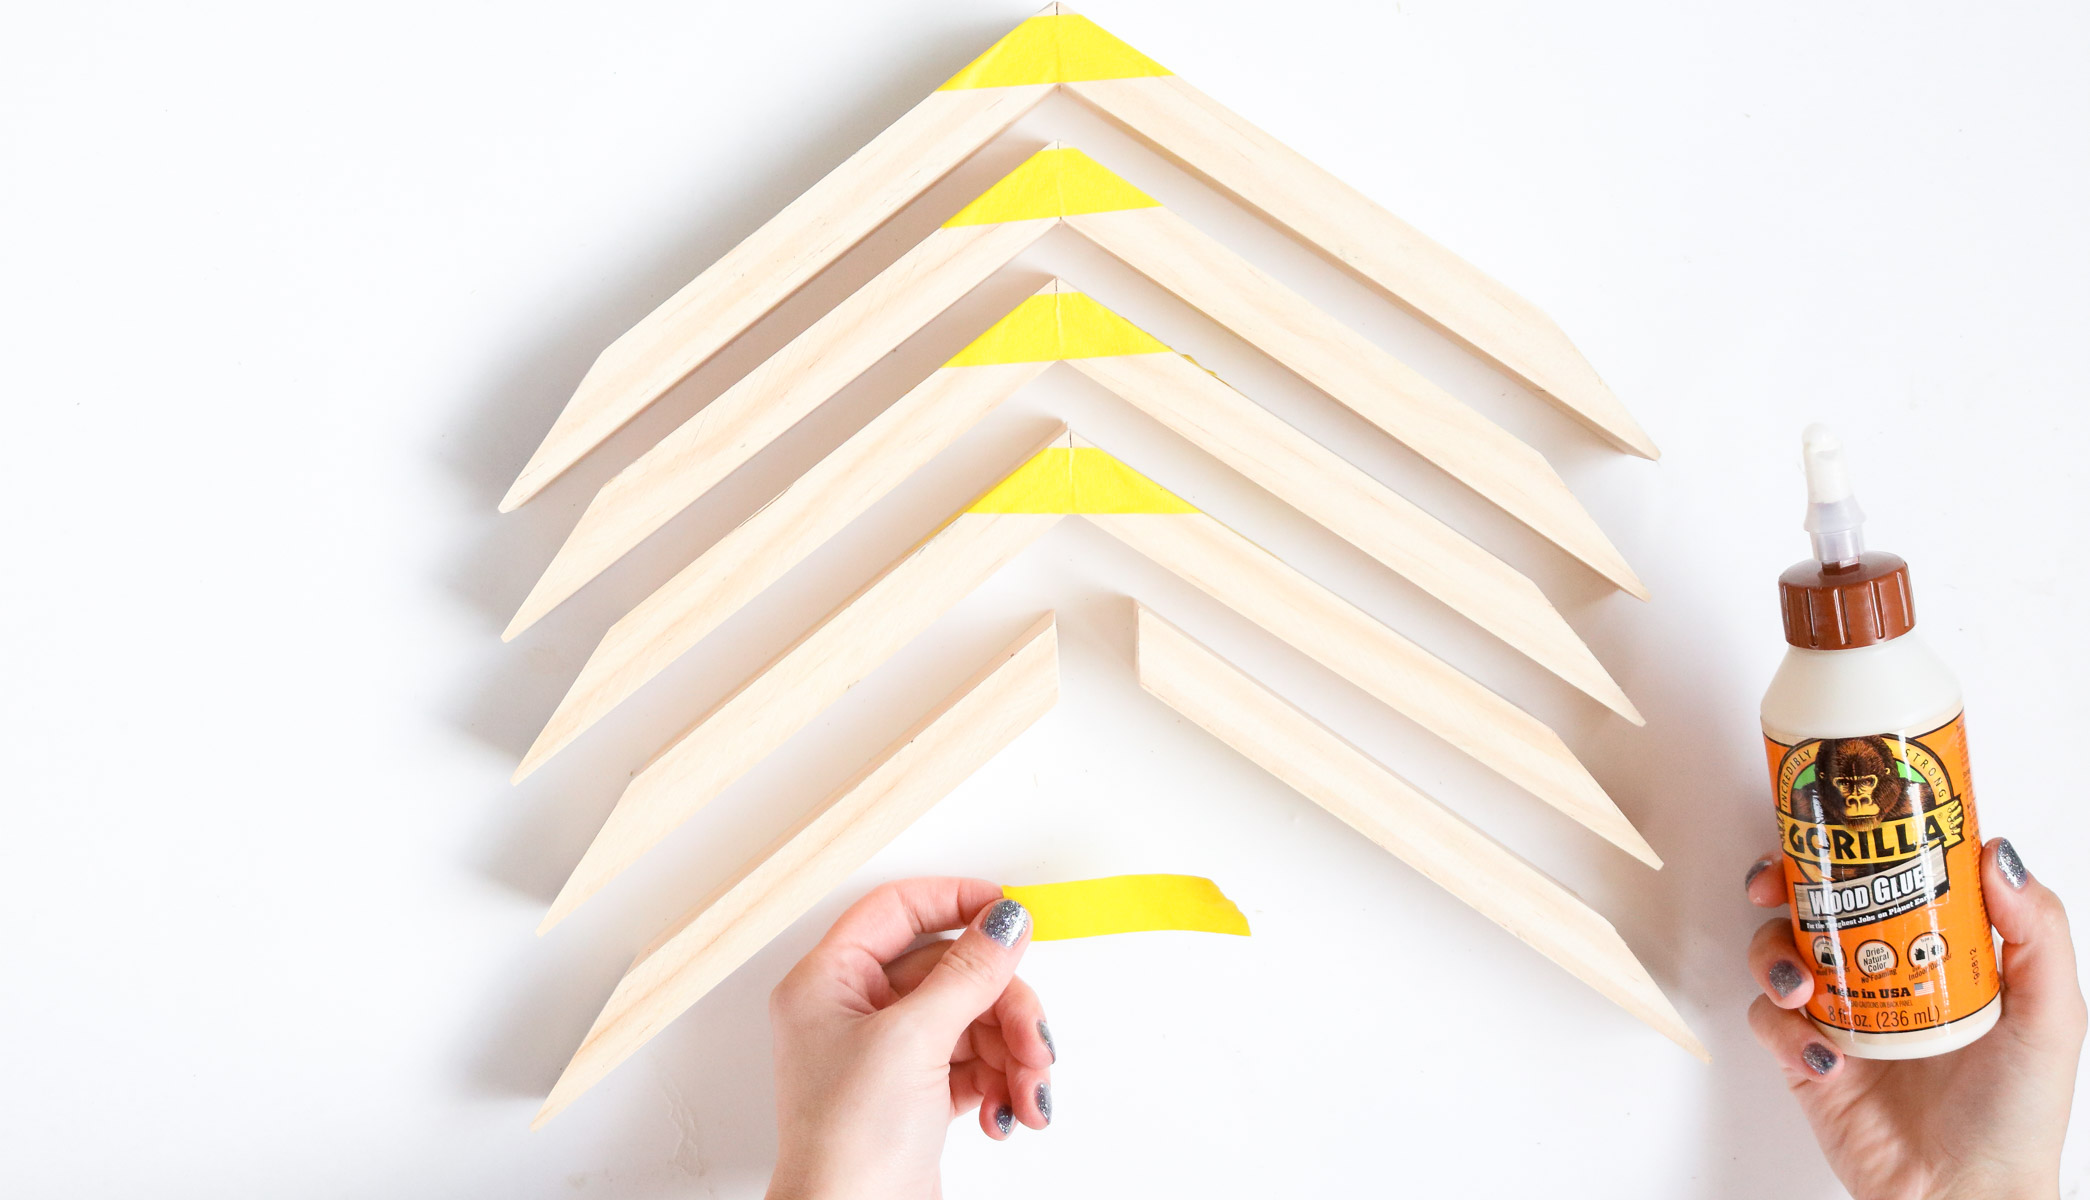
Next assemble the 18 degree cuts together. Glue and tape them as well.


Tape the sides of the star as well. In order to flip the star over while the glue hasn’t dried you need you’ll need the sides taped.
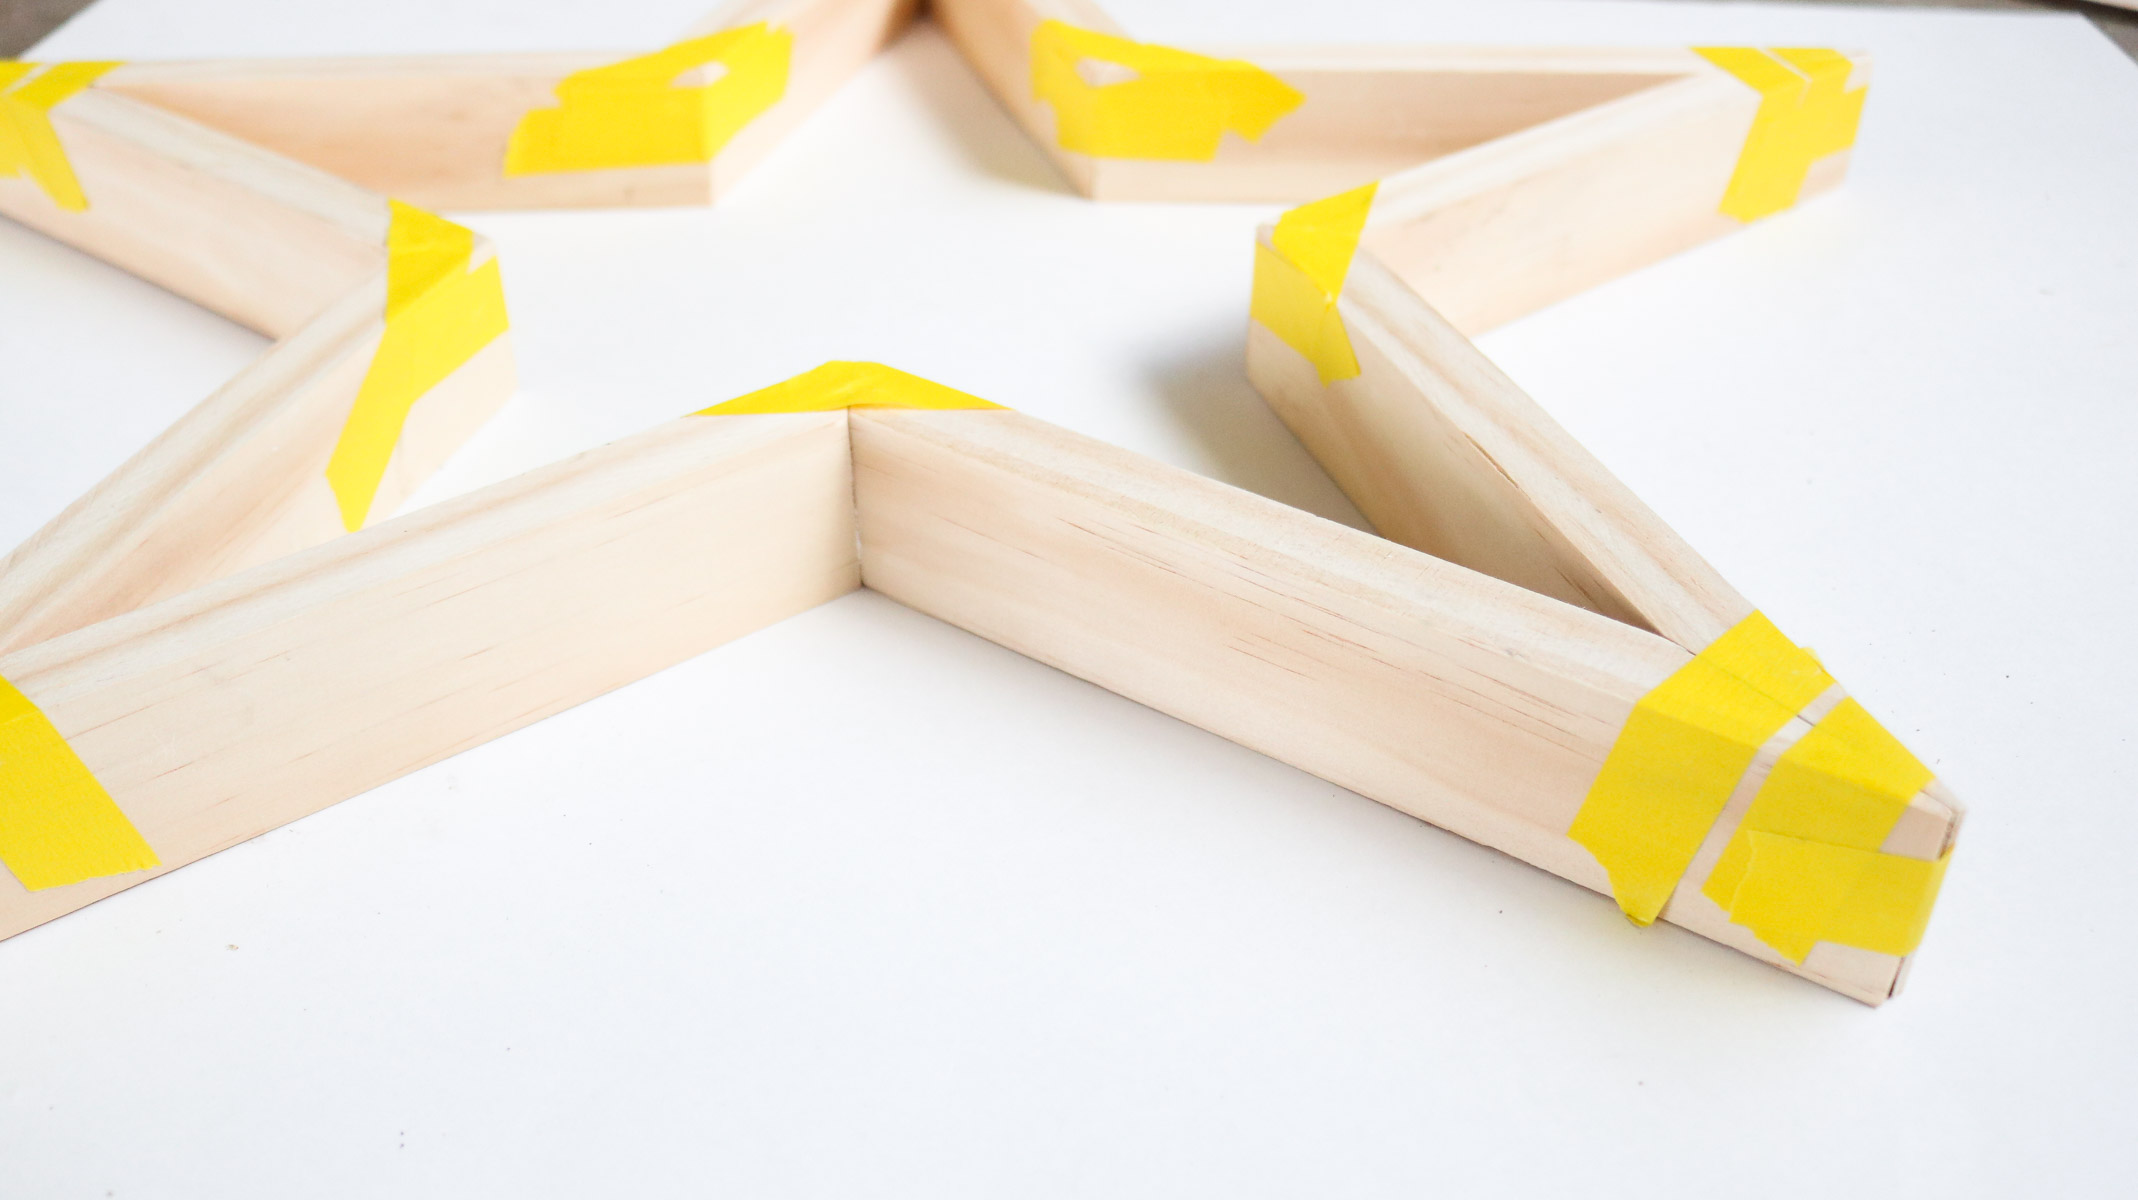
Now flip the star over and use a heavy duty stapler to staple all the seams on the back side. Let the glue dry and remove your tape! That’s it! 😀 Your star is done.
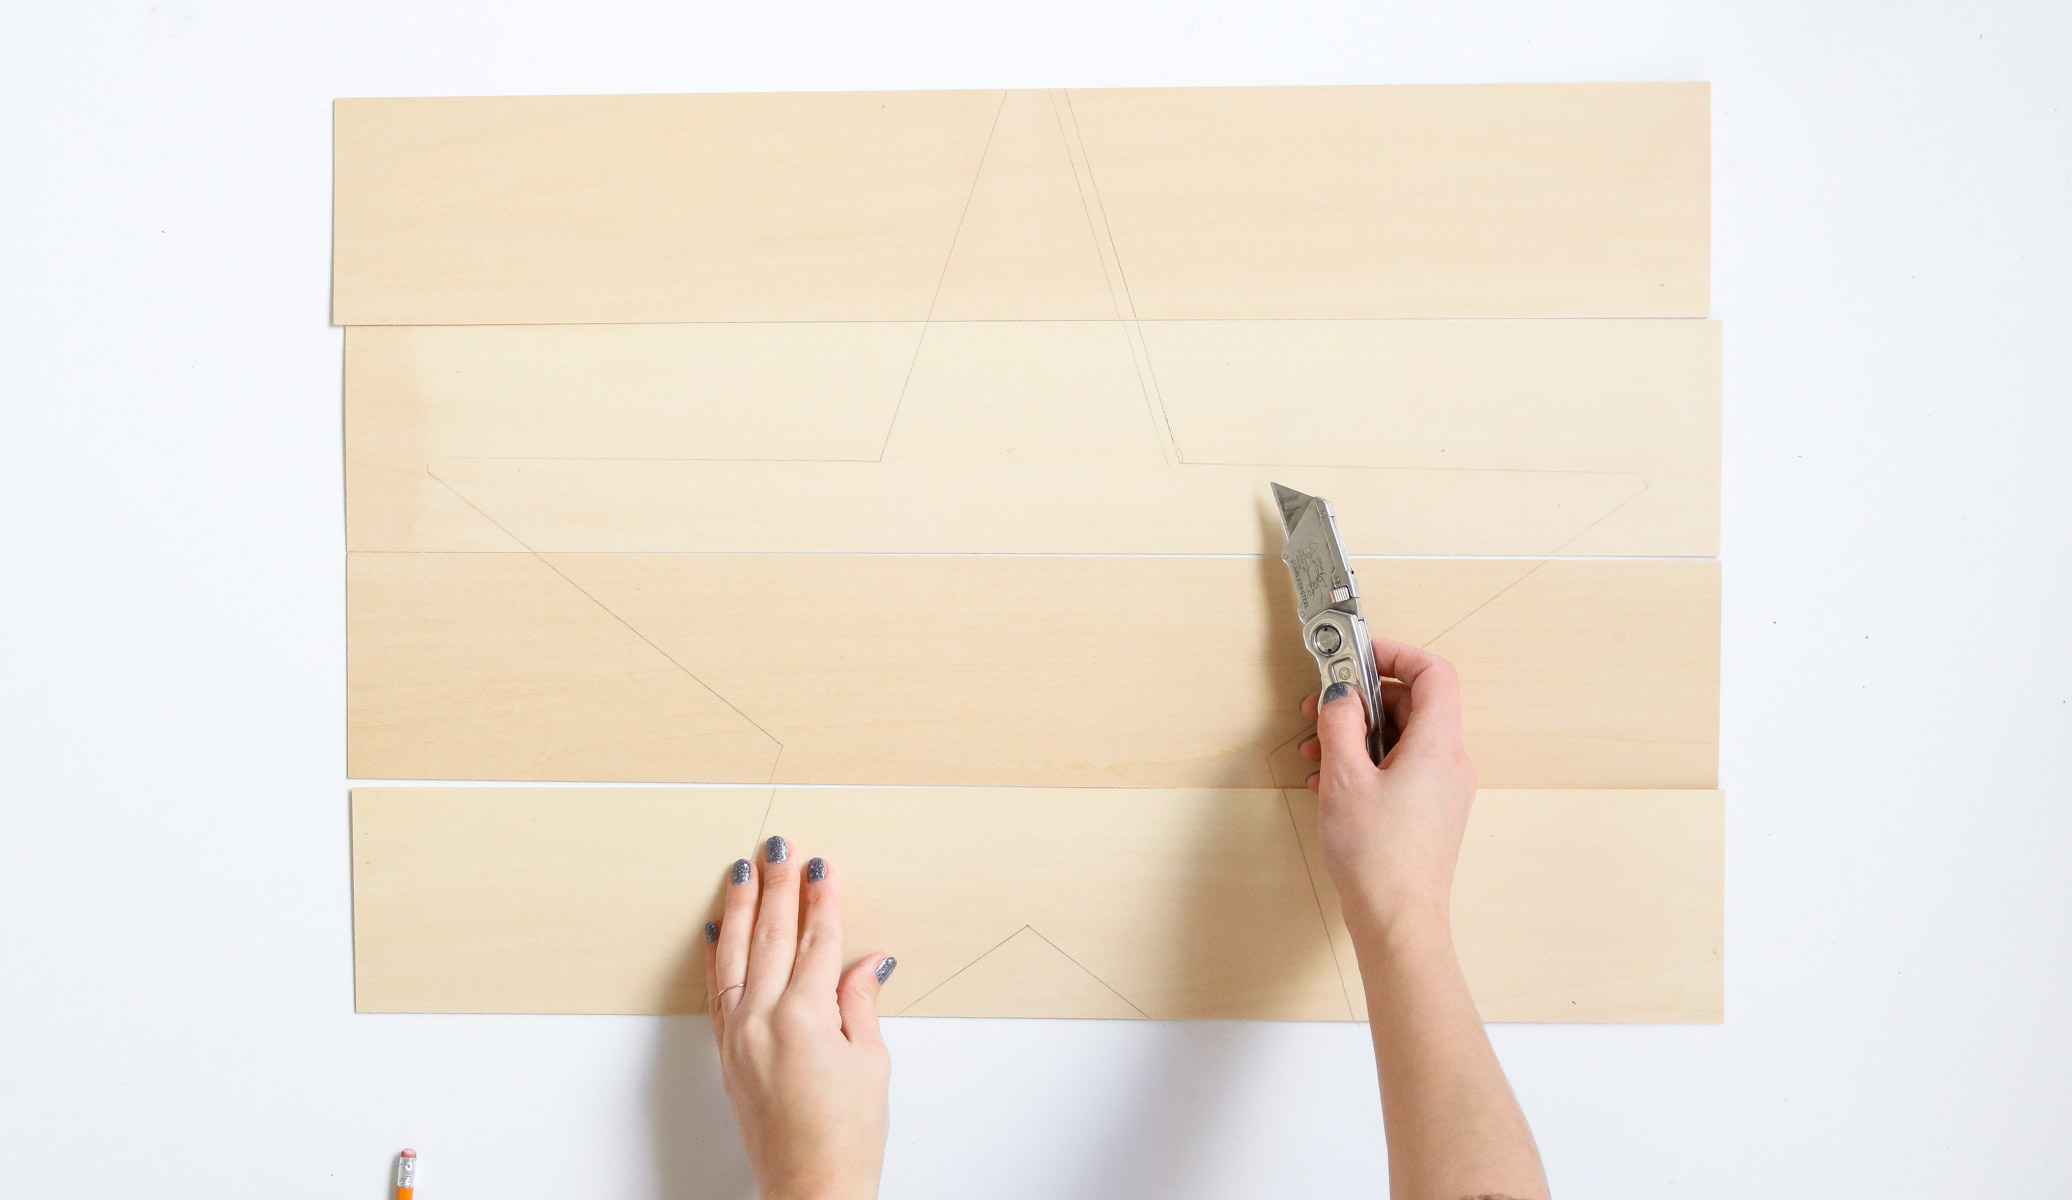
Optional : Adding Backing To Your Star!
You can choose to add backing to your star. There’s a few different options to pick from.
If you have the tools to cut plywood it’s a durable option. A jigsaw would work great for that.
I chose to use balsa wood for the backing. It’s super thin wood sold at craft stores. You can cut it with a utility knife or scissors.

I lined up all the balsa wood pieces and lay my star over it. Than I traced the star shape and cut it out with a utility knife. If it doesn’t cut through all the way the wood should snap easily once cut into. Keep in mind balsa wood is very fragile. It’s great if you plan on styling it with lightweight items. Heavier items would be better with plywood. You can also plant real succulents in soil if you want.


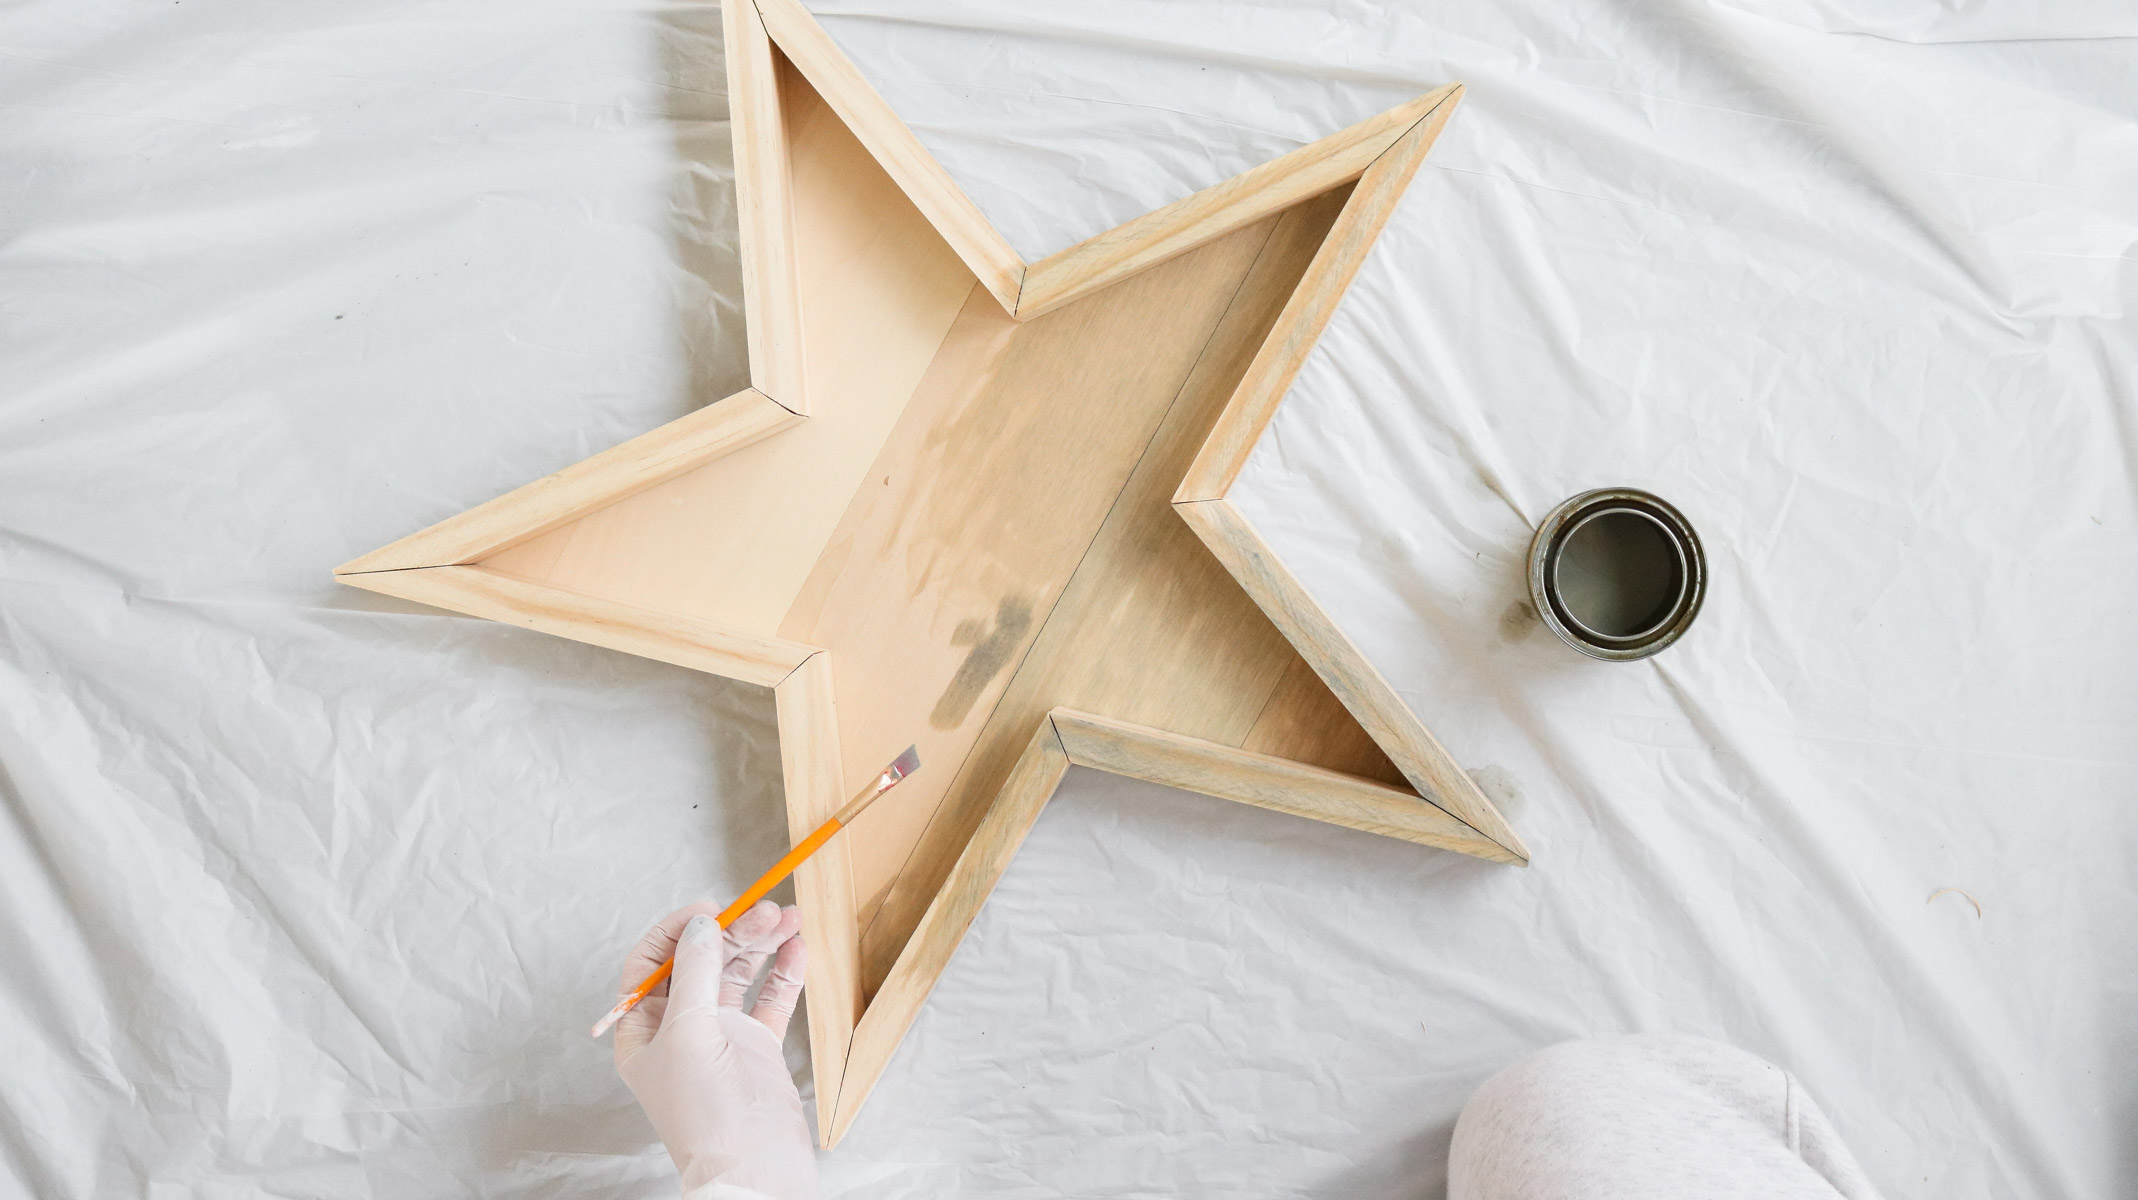
I flipped my star over and applied gorilla wood glue to the star. I glued each balsa wood piece until the back of the star was covered.

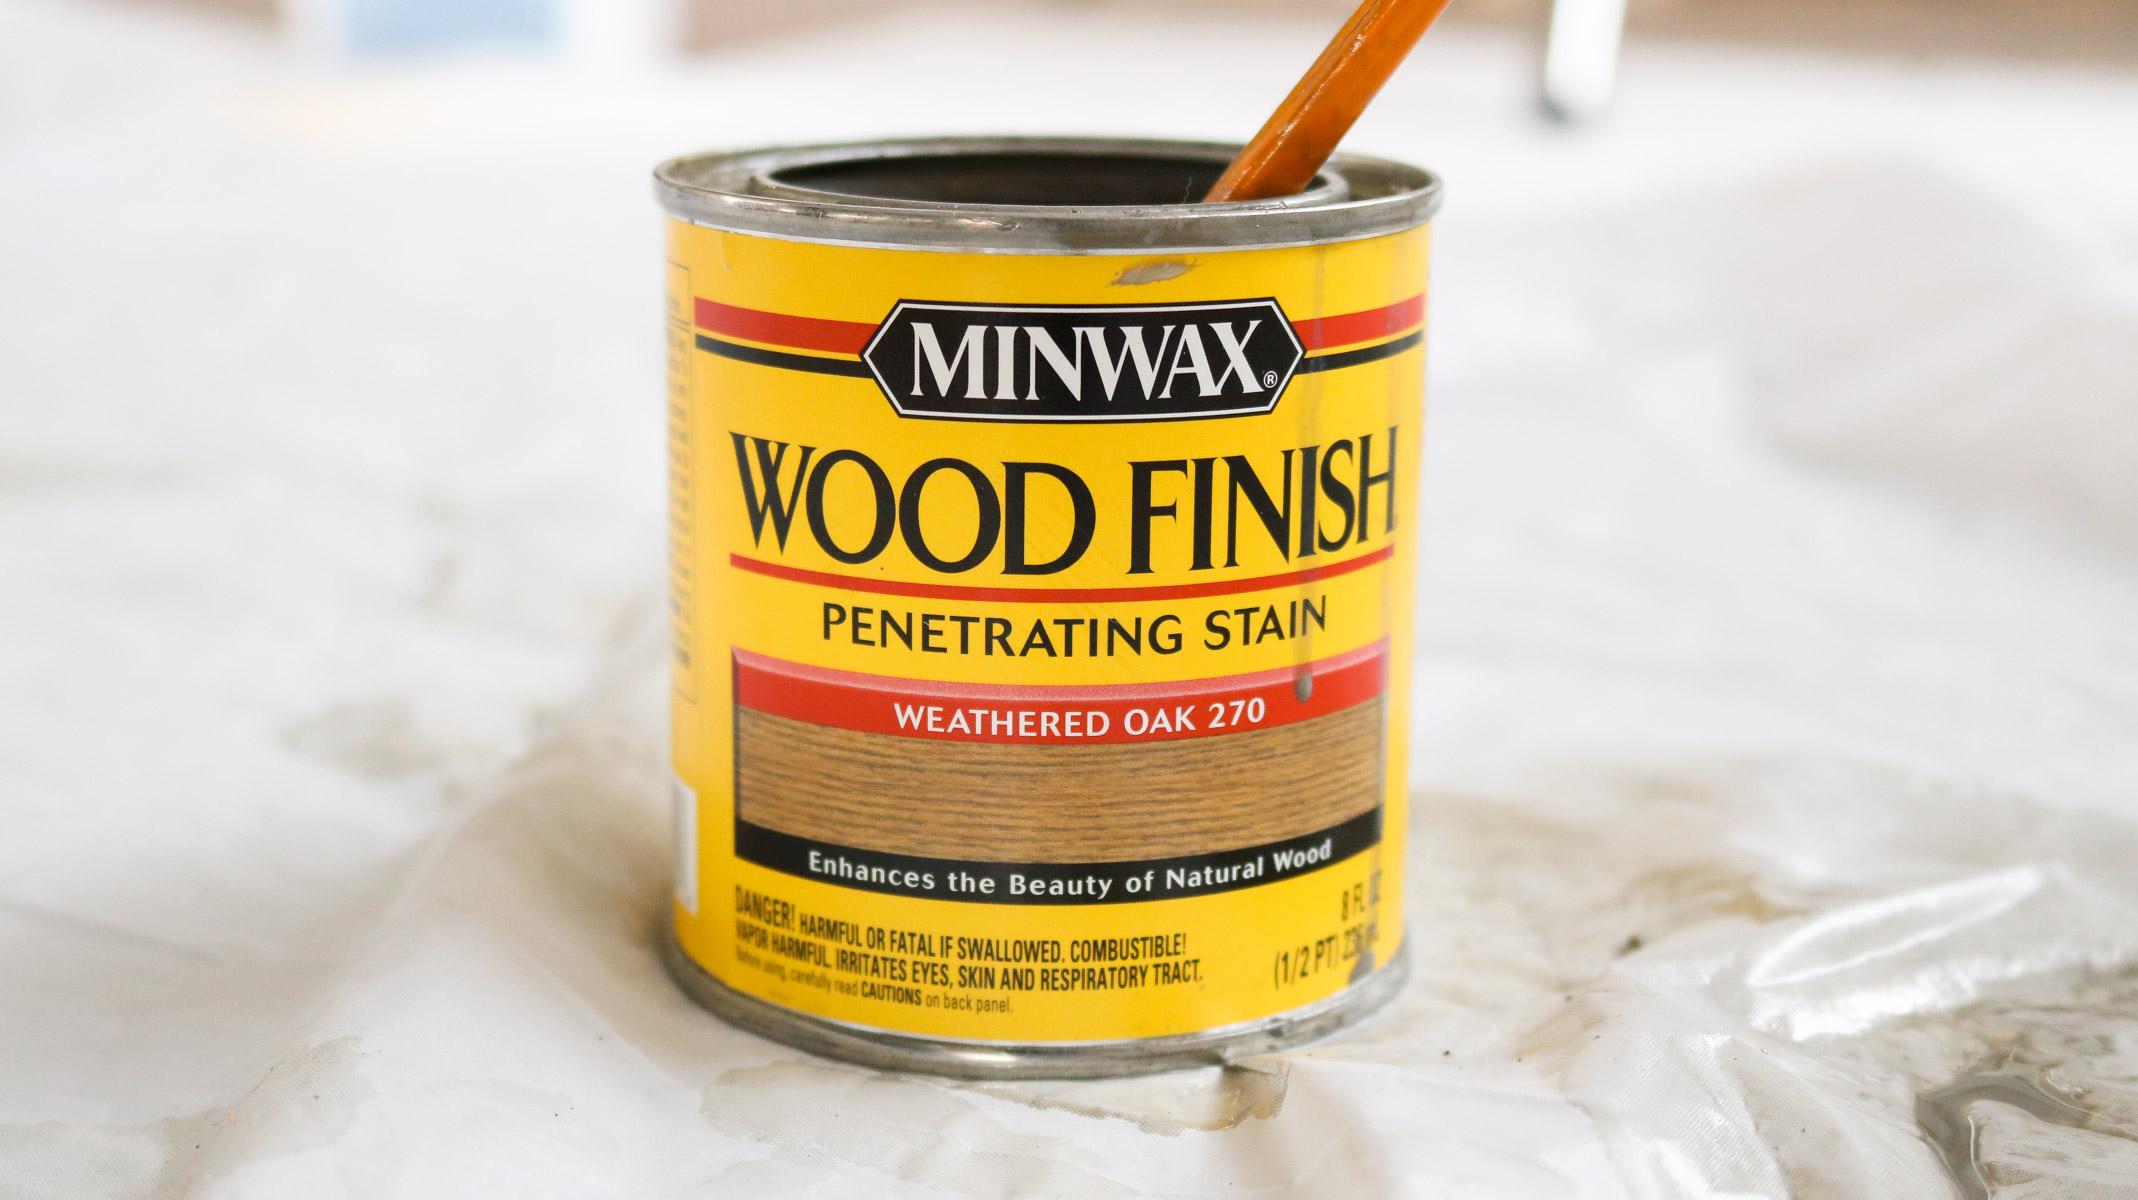
Staining the wood star
I chose to stain my star with this weathered oak minwax. I love this stain! It’s such a pretty rustic color!!
Here’s the video version!
Christmas Ornament Wood Star
This one is definitely perfect for the Christmas season unless you’re like me and love to stretch Christmas into January 😬 ! I used some glass rose gold ornaments that I got at michaels. To keep the ornament caps from showing too much I made sure they were facing down. I glue on the ornaments applying the hot glue onto the cap area and attaching them to the back of the star. I also used some white pom poms to add a bit more depth and wrapped some fairy lights around it.


Succulent Wood Star
To style my star with succulents I decided to fill it with moss first. I glued on chunks of moss onto the base of the star. Than I pulled the succulents off their stems and glued them onto the moss. If got all my succulents at hobby lobby. They have such a great variety and I got my moss at Michaels.


Moss Star Candle Holder
Here’s another option. This one is my favorite of all! I love the rustic simplicity! Instead of hanging the star on the wall I lay it on my table and filled it with only moss. Than I display three pillar candles in the center.

This moss though 😍😍😍!!! 
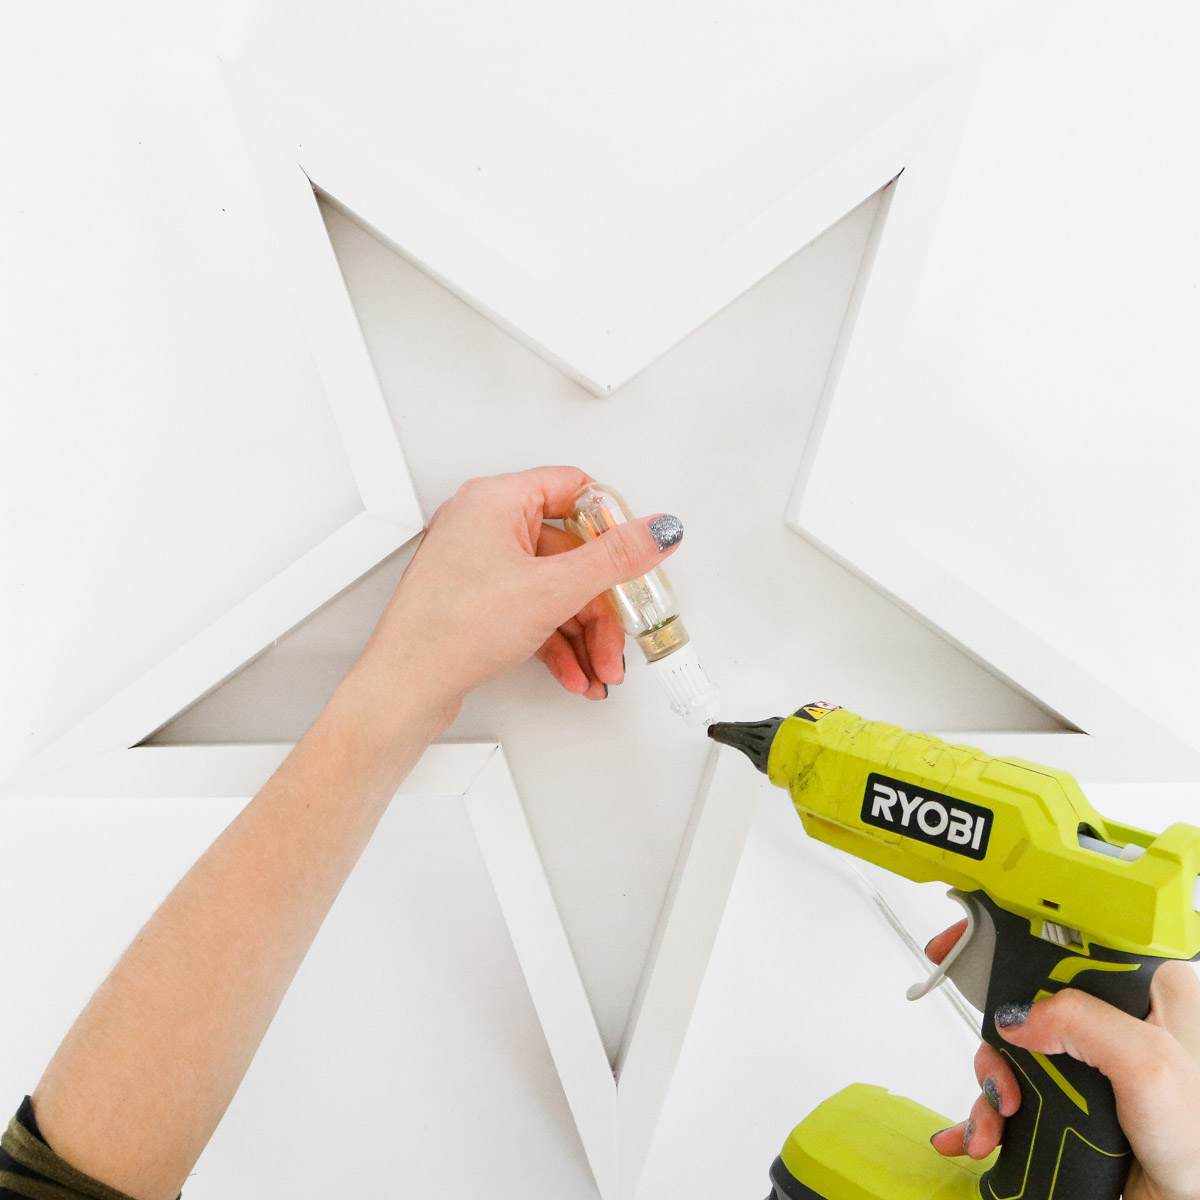
Wood Star Lamp
It’s really easy to transform this star into a lantern. I purchased my light socket kit from lowes. You’ll need to drill you’re hole for the socket light prior to assembling it. I used a hole saw and a drill to drill half a hole in two pieces of wood. Than I assembled the wood pieces to make a star like I normally would.
The white stuff you see on the star if just plaster of paris I used to seal all the seams because I decided to spray paint it white.
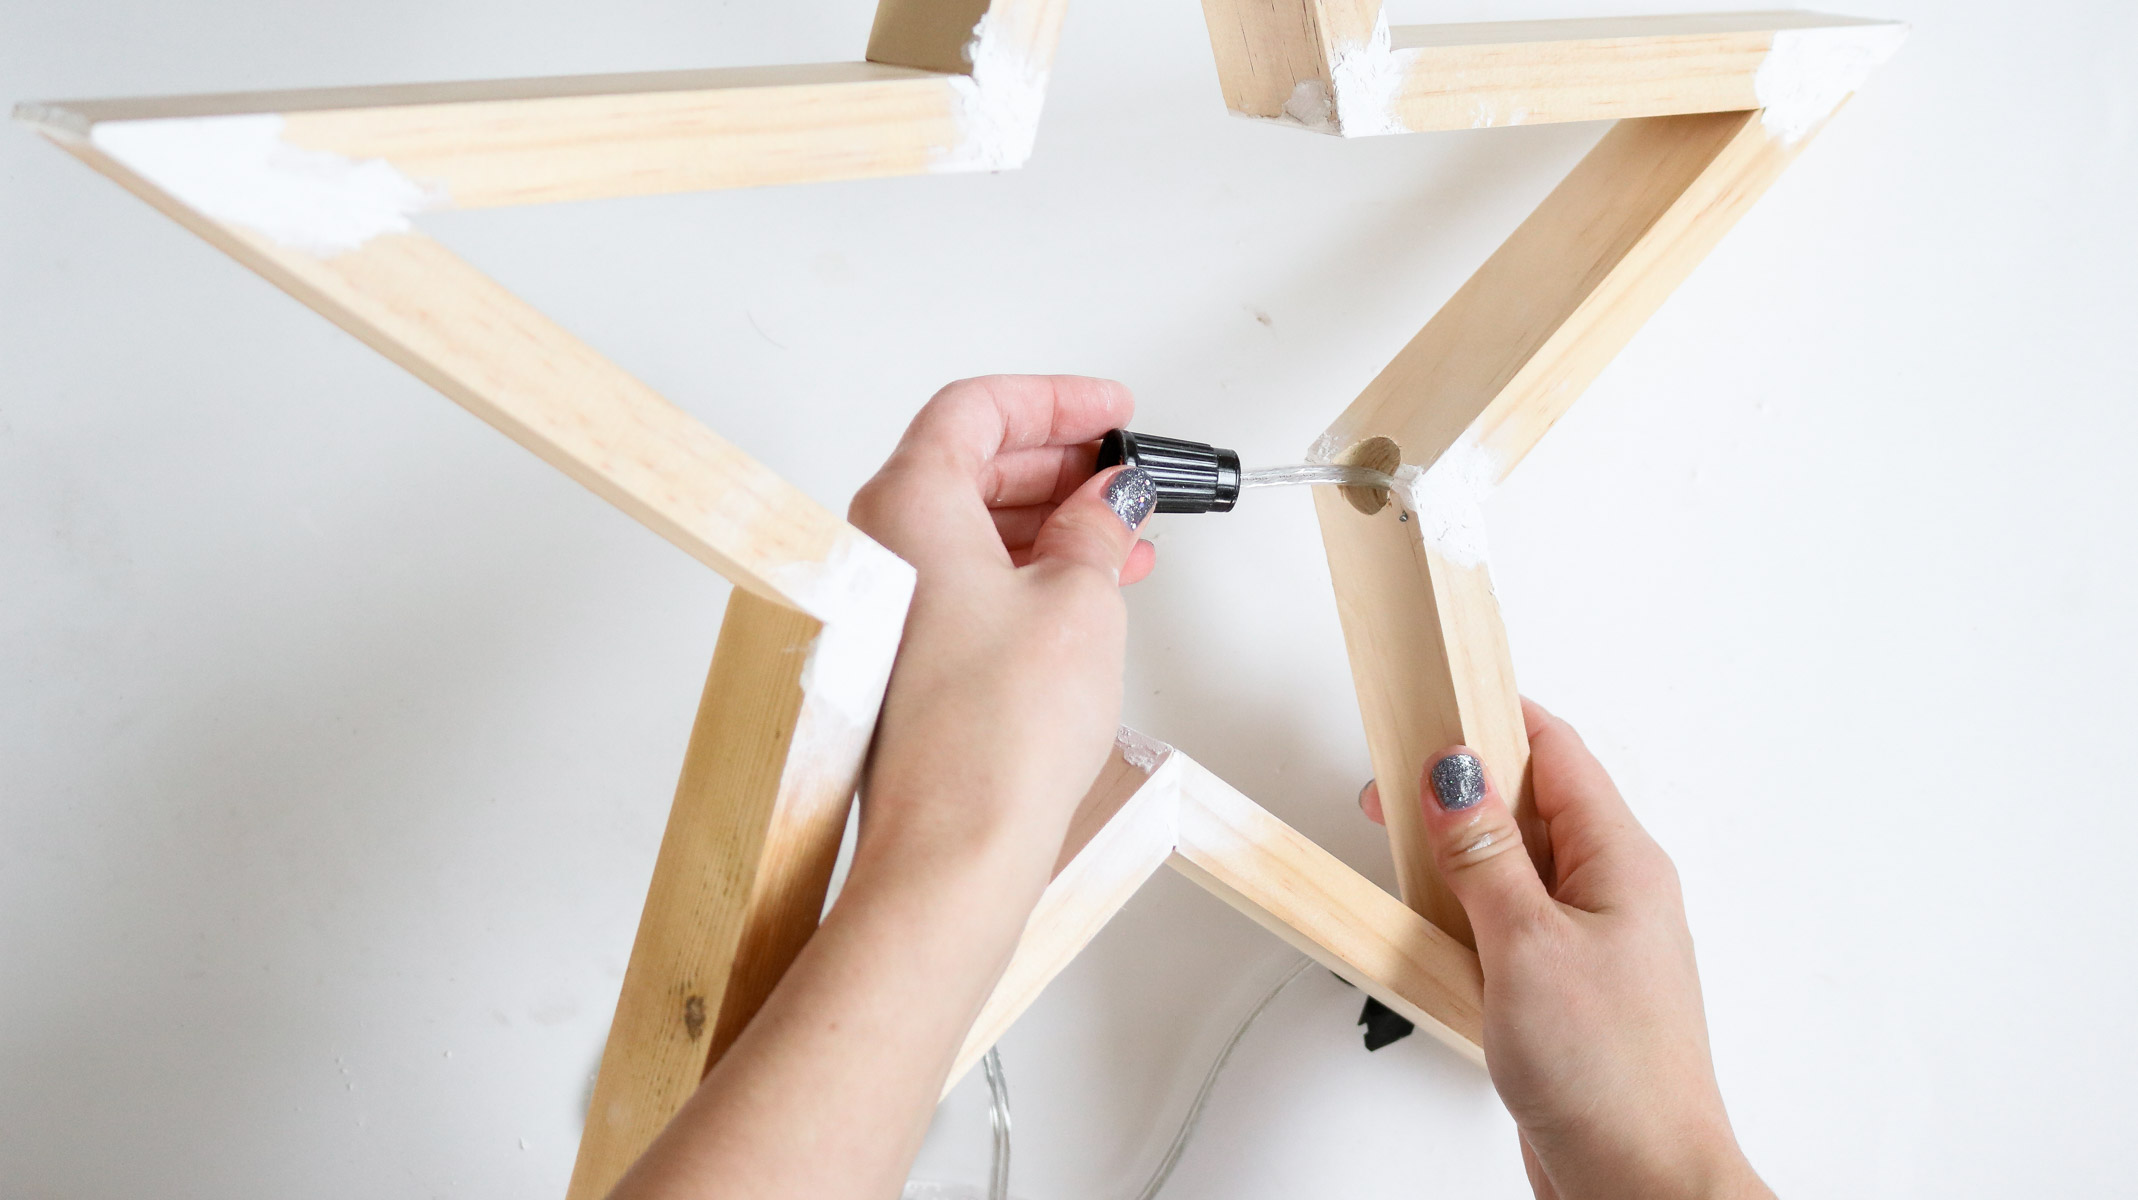
To secure the light socket in the hole I just hot glued it.
Here’s how it looks all done!! This would look awesome in a kids room! Maybe a few of them hanging on a wall. If I needed a nursery at the moment I would totally use them to make a twinkle twinkle little star themed room 😬😍!


That’s all for today! I hope you’re inspired by these beautiful stars to make your own wood star!
Comment which one is your favorite? 😬

Here’s another wood project you might love! DIY wood dowel wreath !
I just found your blog when I was looking for air dry clay recipes. And then I saw your star. It is wonderful especially because you went into such detail with the miter saw. Excellent photos and directions. Thank you.
YAY!!! So happy to hear this! I was pretty worried about the instructions. This was a tough one to explain 😀 ! Happy you liked it! Thank you Lucy! 😀
Not to be picky, but the angles on the wood pieces are actually 54 degrees. The cut on a miter saw is a 36 degree angle. On a table saw the cut is actually a 54 degree angle. Practice makes perfect.
Total length for each piece was about 10″ in length from what I remember. did you make a 45 degree jig to get the 18 degree cut. Not sure if you should have a 54 degree cut on one end. I’m not good with angles but from what I remember one side should be 36 and the other 18 degrees.
Ralph is correct the angles on a star are 18 and 54, it shouldn’t be hard to see the angle is greater than 45. 54 – 18 =36 degree cut line I can see how you are confused but also understand 18 is doable on a mitre saw, the gauge goes to 18, with a 1×2 you will need an auxiliary fence to keep your work piece from getting pulled into the gap in the main fence. On the DWS799 anything larger than 3inch doesn’t need the aux fence but it helps keep it straight. You can make 2 zero clearance fences, one for each angle.
We first made a jig with a 45 degree angle. You then set the miter saw to 27 degree and get an 18 degree cut. You need to have the piece with 45 degree angle clamped to the miter while cutting the 18 degree angle. Hope that makes sense.
Your instructions are great. Definitely an 18 degree angle is challenging on a miter saw. There is a lot of torque on the piece you are trying to cut at such an aggressive angle.
I followed your advice for the ‘jig’ but made the 45degree face longer so I had more surface area on which to hold the piece I was cutting. Then just to be really safe (I do like my fingers)…I screwed the piece I was cutting to my jig.
Really safe and no chance the piece could twist.
That’s a great tip! Thanks for sharing
Do you think you could hang this on the wall or not strong enough?
Sure why not.
I found sight very point to point very easy to follow can not wait to start the star
i found it esey to follow cant wait to make one thanks for shairing . mike