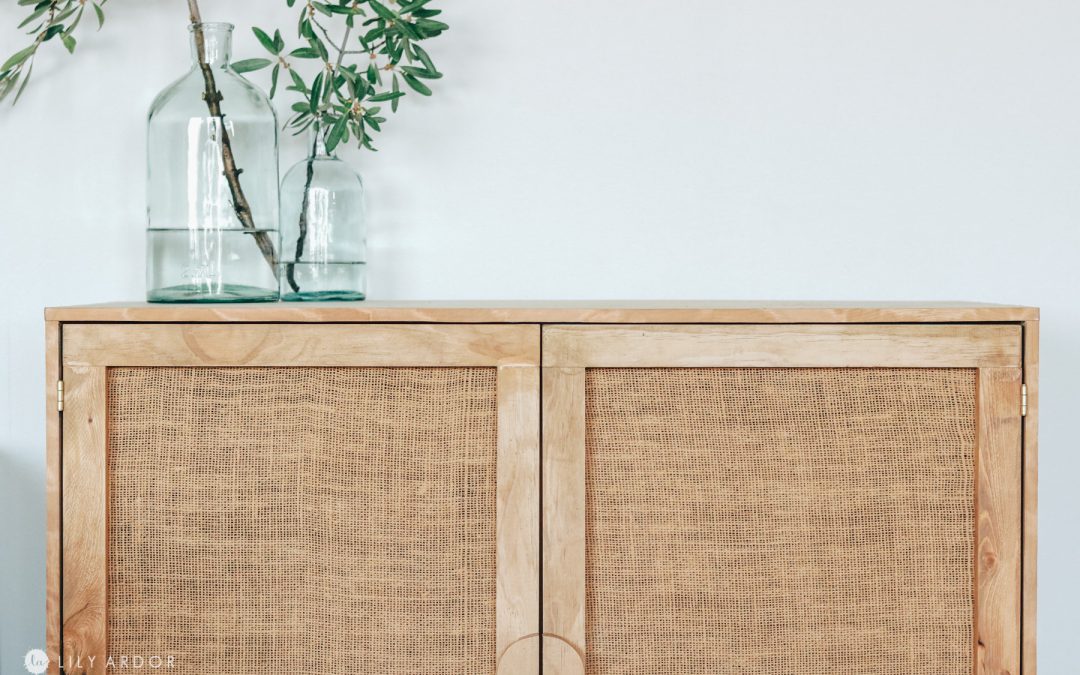
Hi Everyone, today I’m sharing my DIY rattan cabinet.
This is a look I’ve been wanting to get in my house for so long. A few weeks ago when I set out to buy a rattan cabinet all the ones I liked were out of stock because they were cheaper and even though I loved the expensive ones I couldn’t afford them.
So after much thought I had a light bulb moment 😬. Last year I made some closet doors using burlap and it looked really similar to rattan. I decided it would be much cheaper to make the cabinet and using the burlap to substitute for the rattan. In all honesty it’s really hard to get a hold of rattan. We don’t have any local stores in idaho that sell it. At least not that I know of and after finding out how much it cost online I figured I had to make it work with the burlap.
Time Needed:
This took me about 2 and a half days to complete. It’s a pretty easy project. A lot easier then I expected.
Total Cost:
This cabinet cost me around $90 not including all my wasted supplies I messed up on. I initially bought more wood to create double sided panels and realized after stapling the burlap to one panel that I didn’t need all that extra wood on the other side since the burlap edges wouldn’t be visible on the inside. YES I realized this after cutting and staining it the wood 😩 total brain fart. I also wasted about a yard and a half of burlap because I couldn’t get the color right when painting it. I rushed into the project thinking the color I picked was good enough only to realize after staining the wood my painted burlap didn’t match at all.
Supplies:
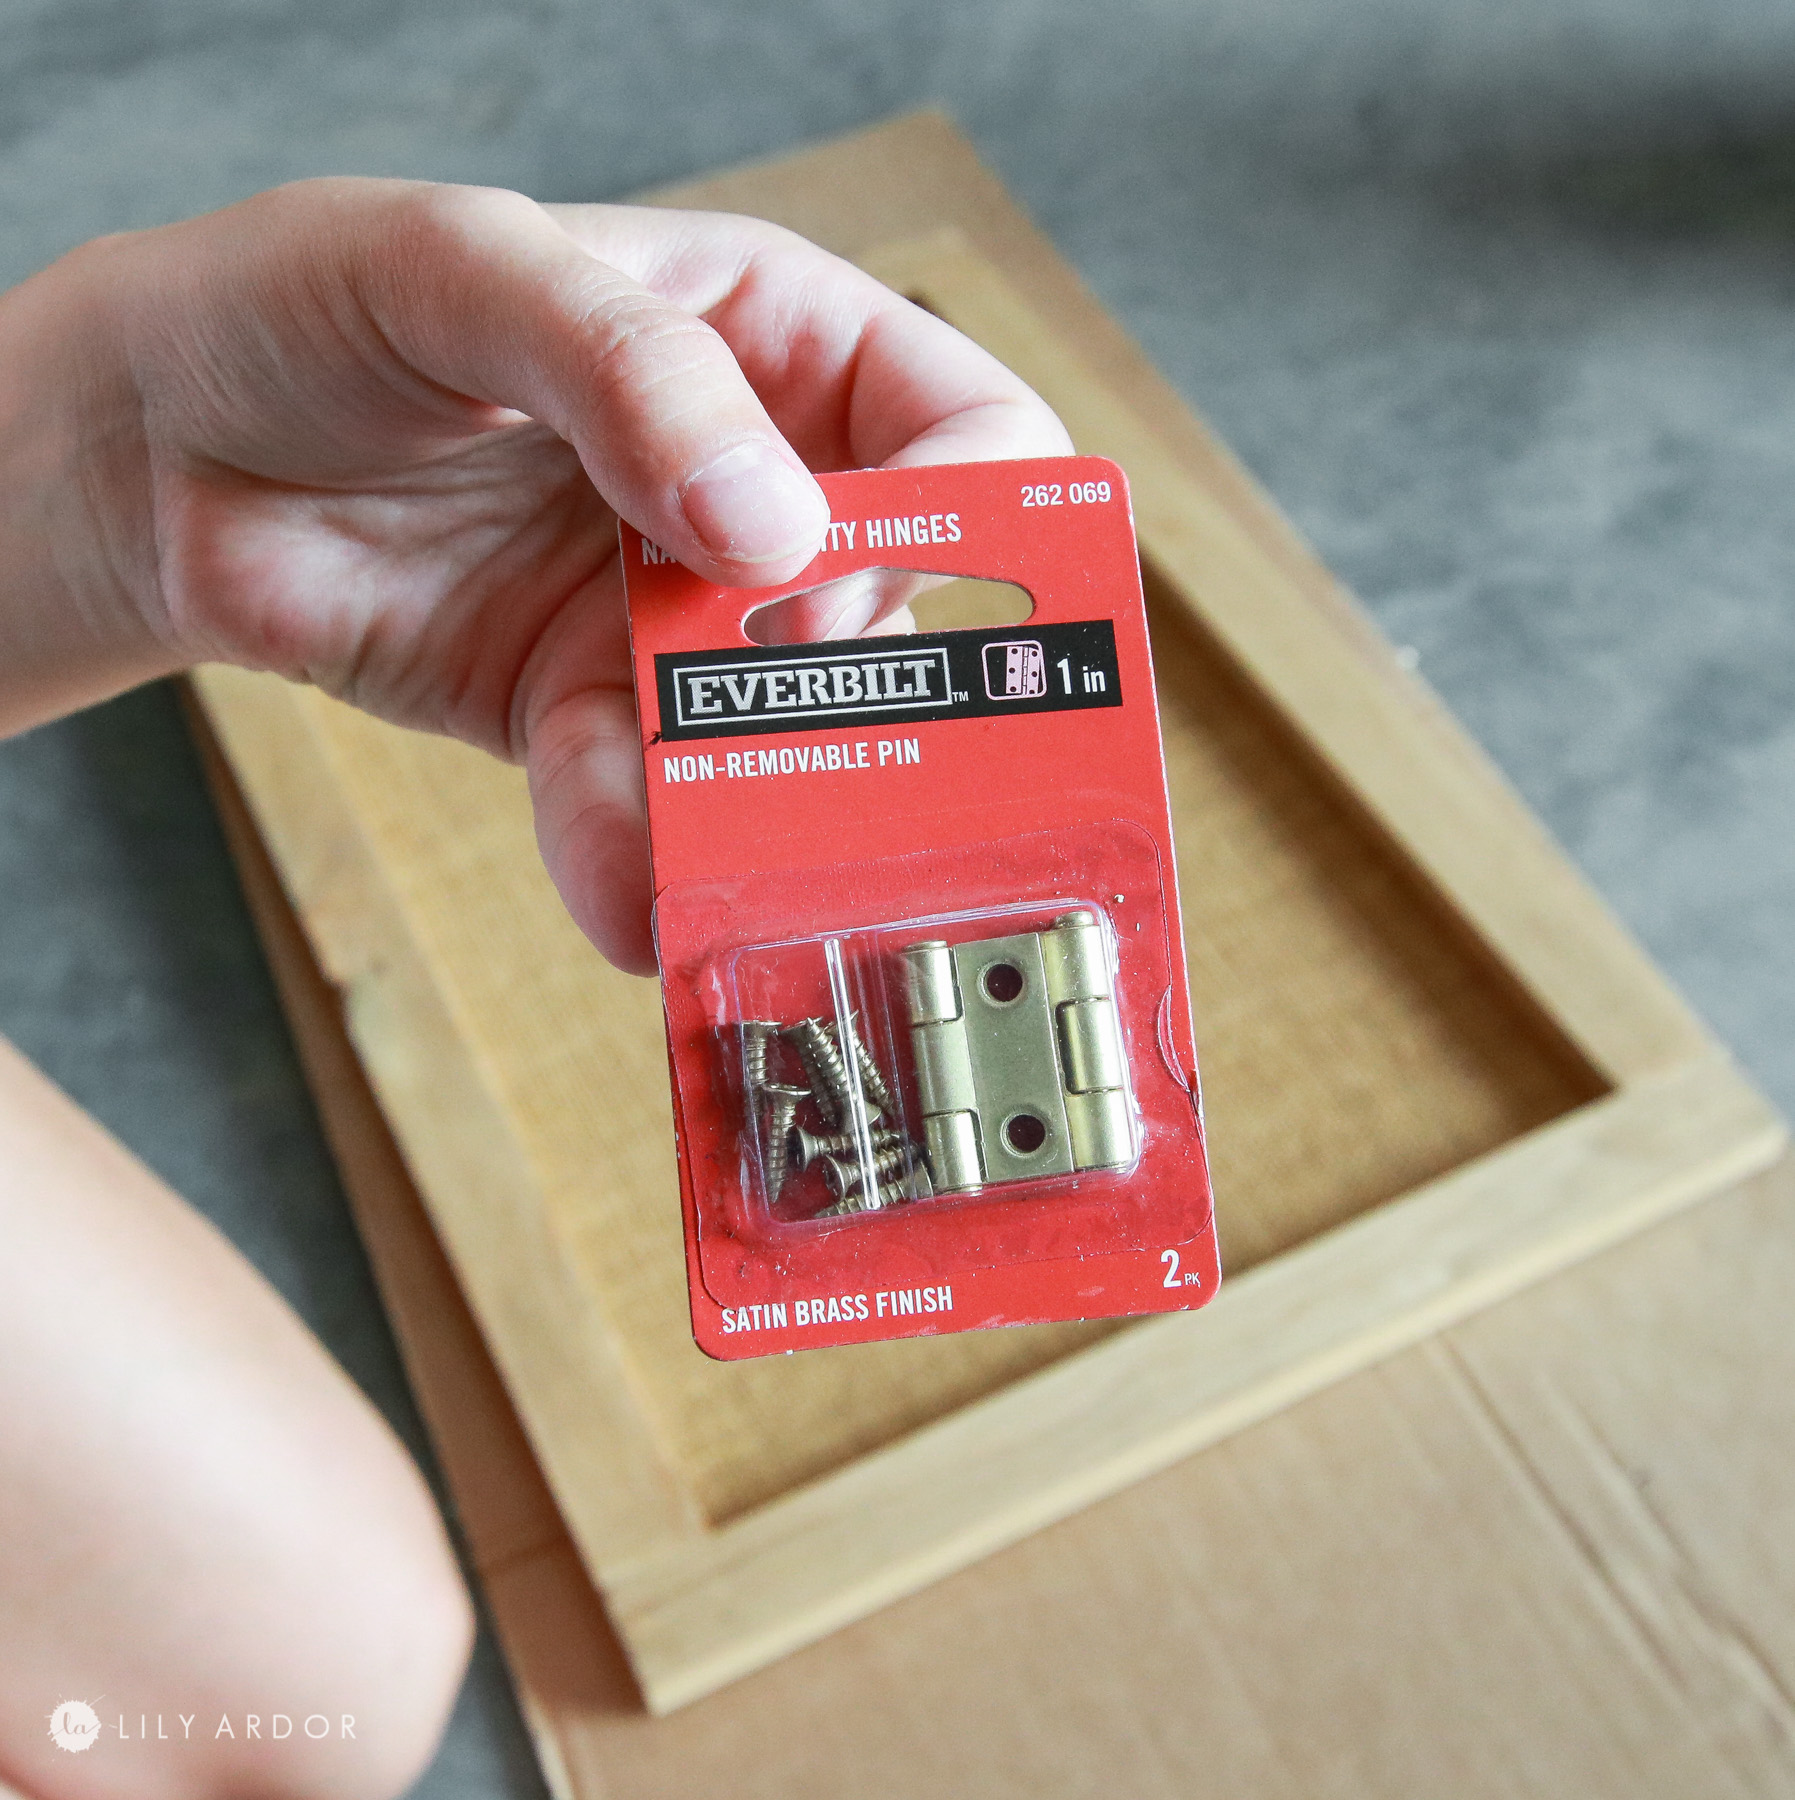
- Hinges – I used small ones. amazon sells some here – https://amzn.to/2YMpje1
- Plywood ( I got mine at home depot for $35)
- One 2″x2″x8′
- Two 1″x2″x8″
- Fruitwood Minwax Stain – Here’s the one I used – https://amzn.to/32FZ2PF
- Burlap – In the color ivory. Amazon sells some here – https://amzn.to/2EMres8
- Craft paint to stain your burlap. I used a mixture of about 4 colors to get a taupe color. I had to tone it down quite a bit with green.
- Magnetic door catch – We double a double door magnetic catch – https://amzn.to/3bb5ZMQ
- wood glue
Tools :
- jig saw ( to make the wood handles )
- kreg jig – https://amzn.to/2ED1M8E
- circular saw – https://amzn.to/31FHCDB
- brad nailer – https://amzn.to/32E4u5J
- staple gun
- miter saw ( optional could also be done with circular saw)
LET’S DO THIS!
Here’s a video version of this cabinet DIY
DIY Rattan Cabinet!
building the cabinet!
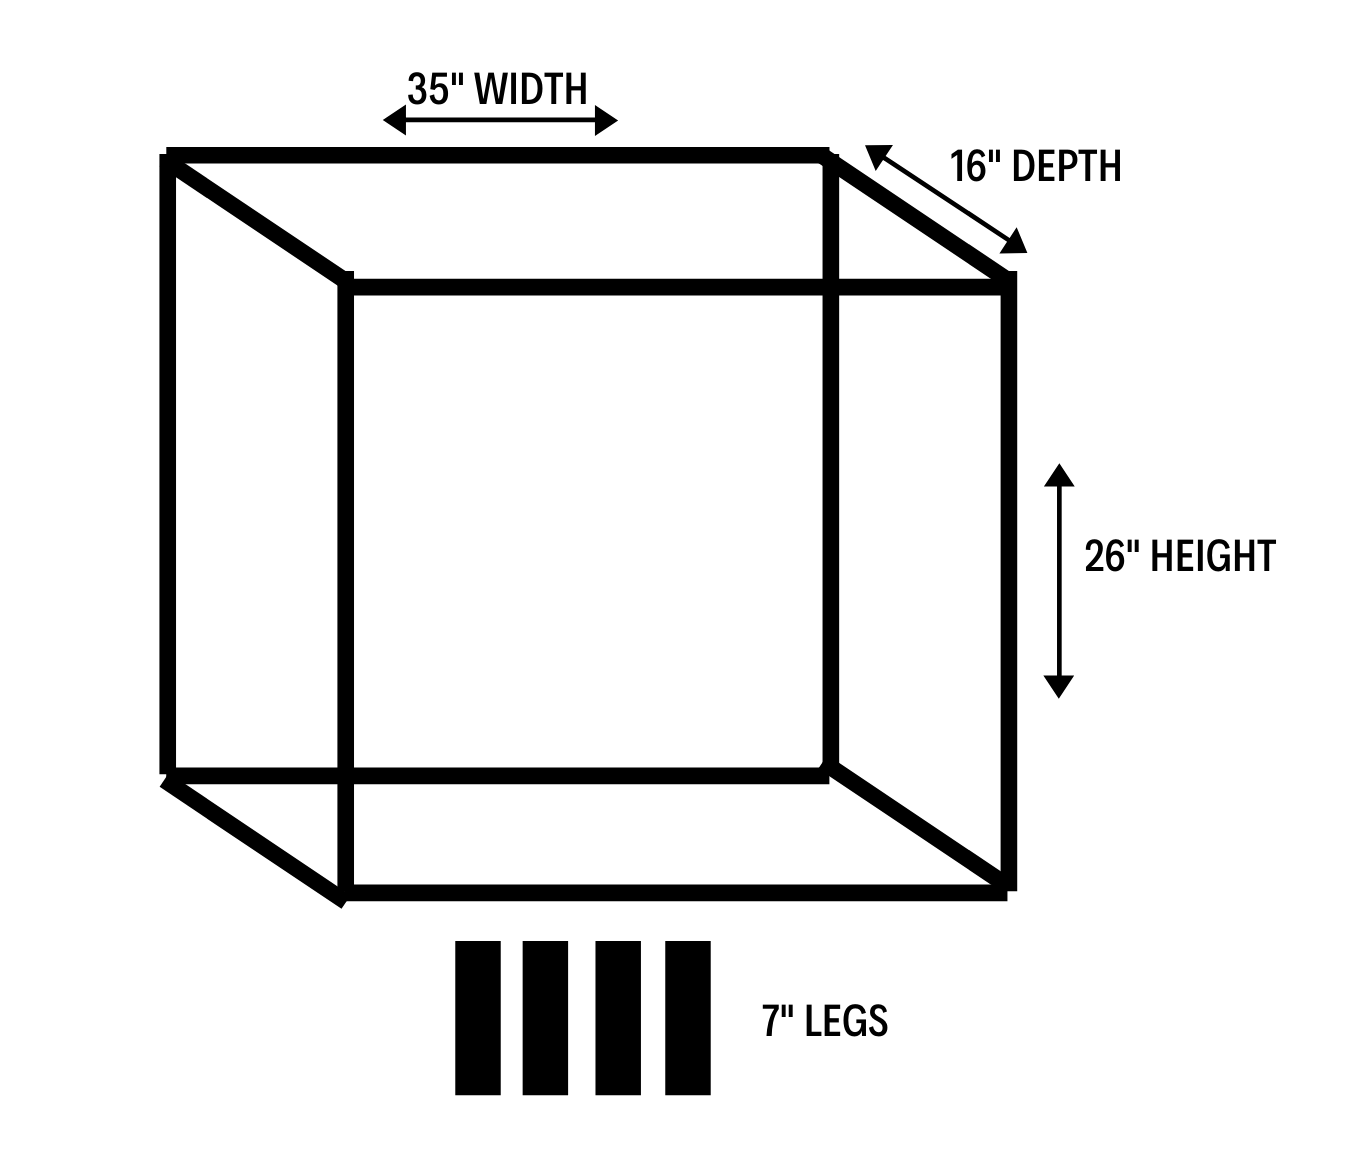
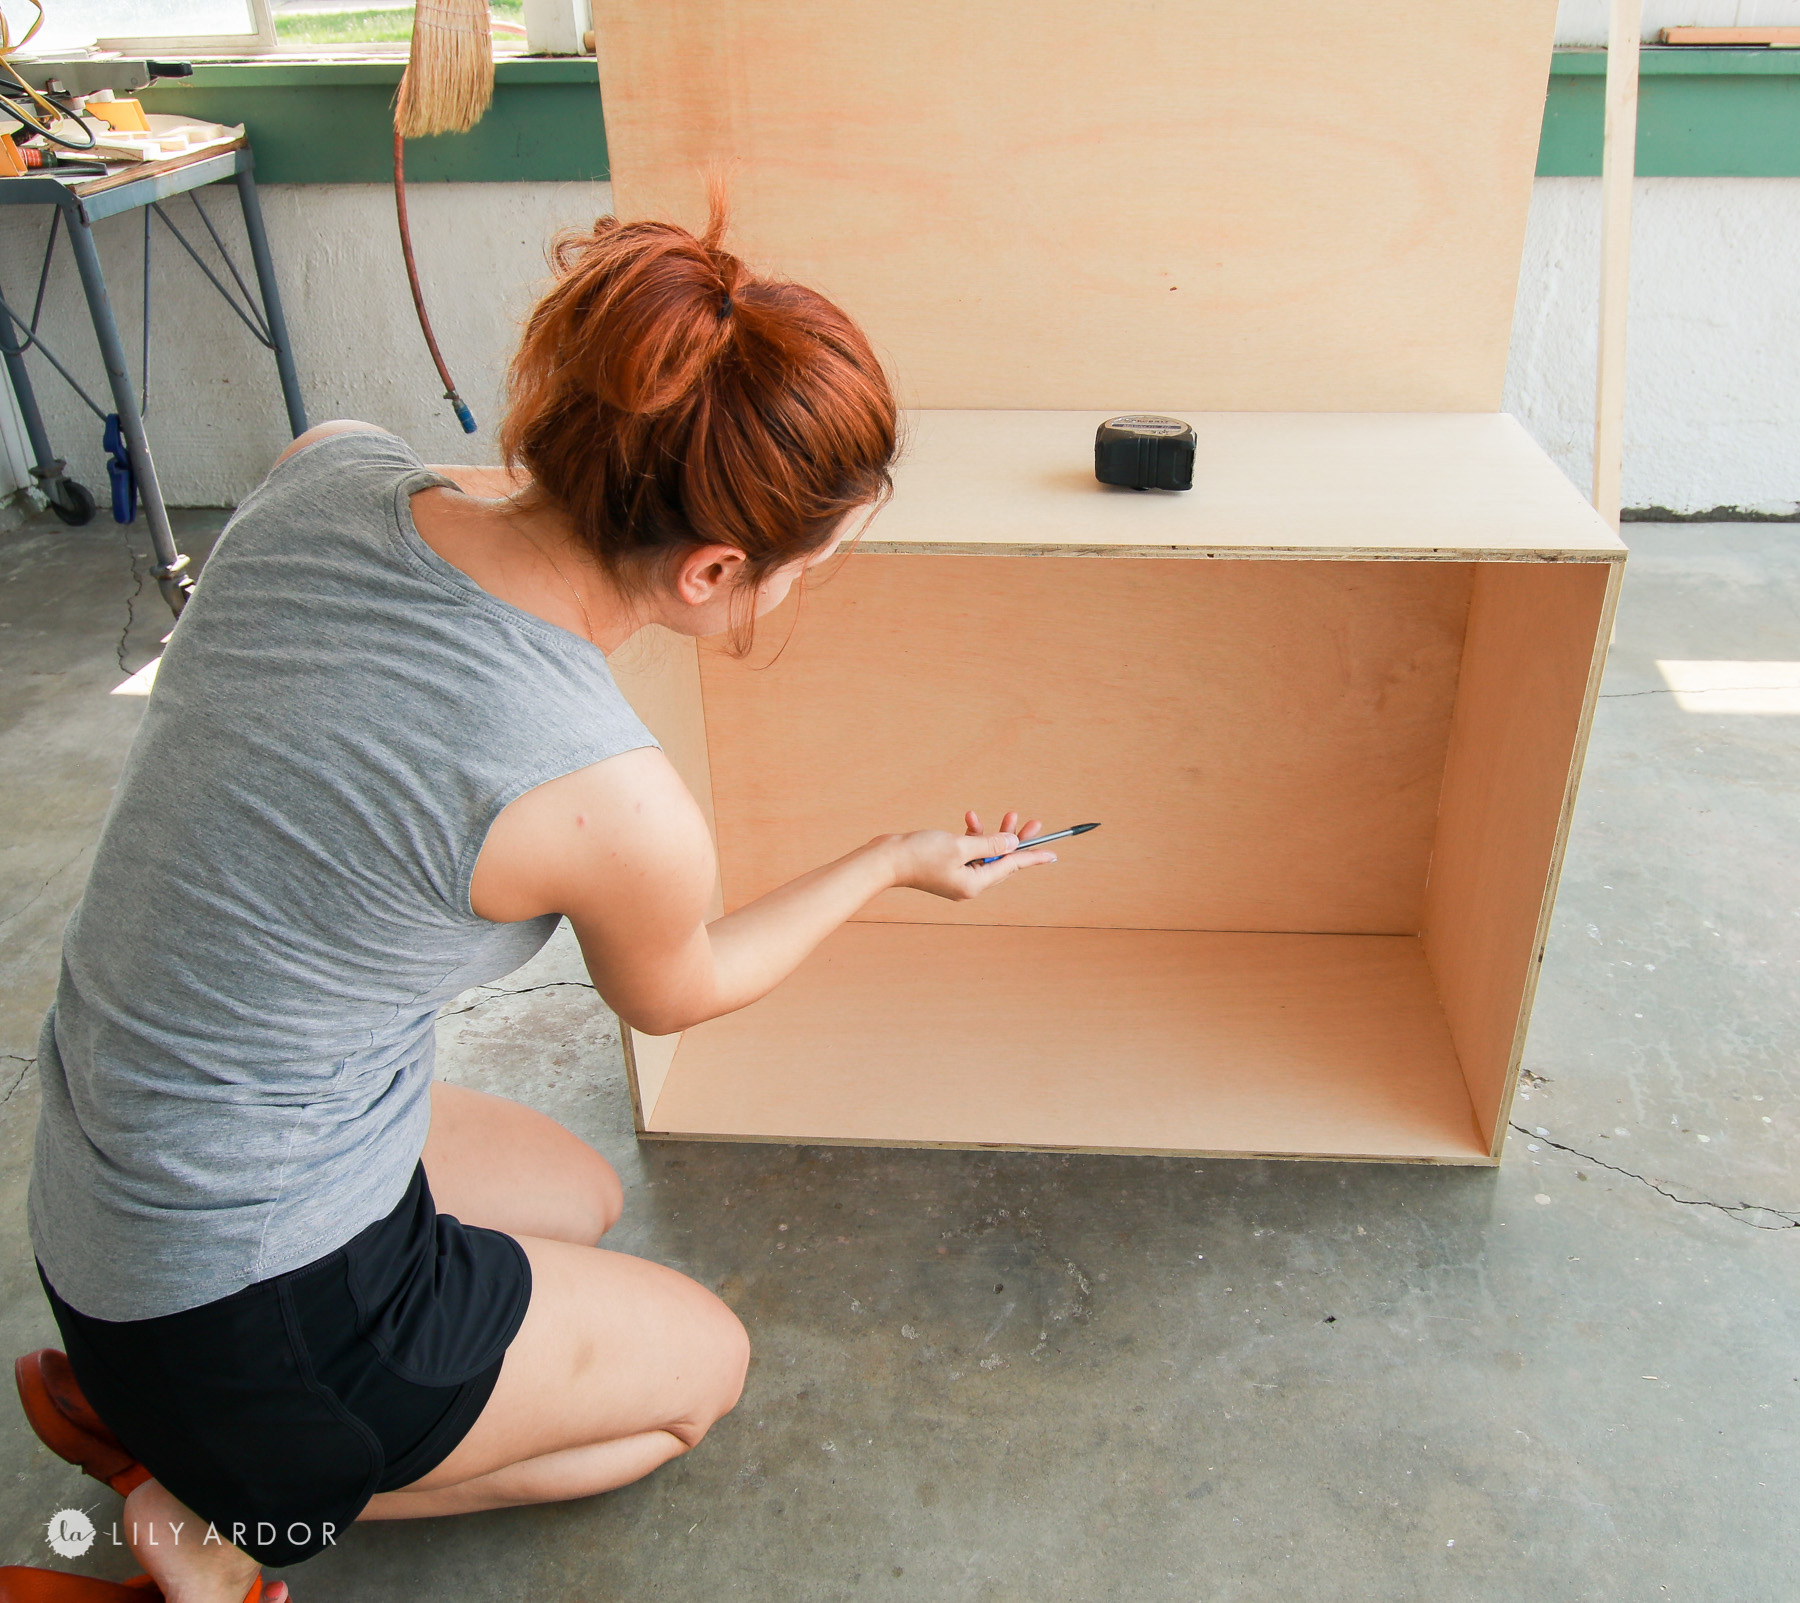
Here are the dimensions for my cabinet ( photo below) . I actually had them cut my plywood at homedepot so I could fit it in my car. This saves me so much time. They cut the top bottom, and sides for me and I was left with a bigger piece for the back of the cabinet that we cut down to size later at home.
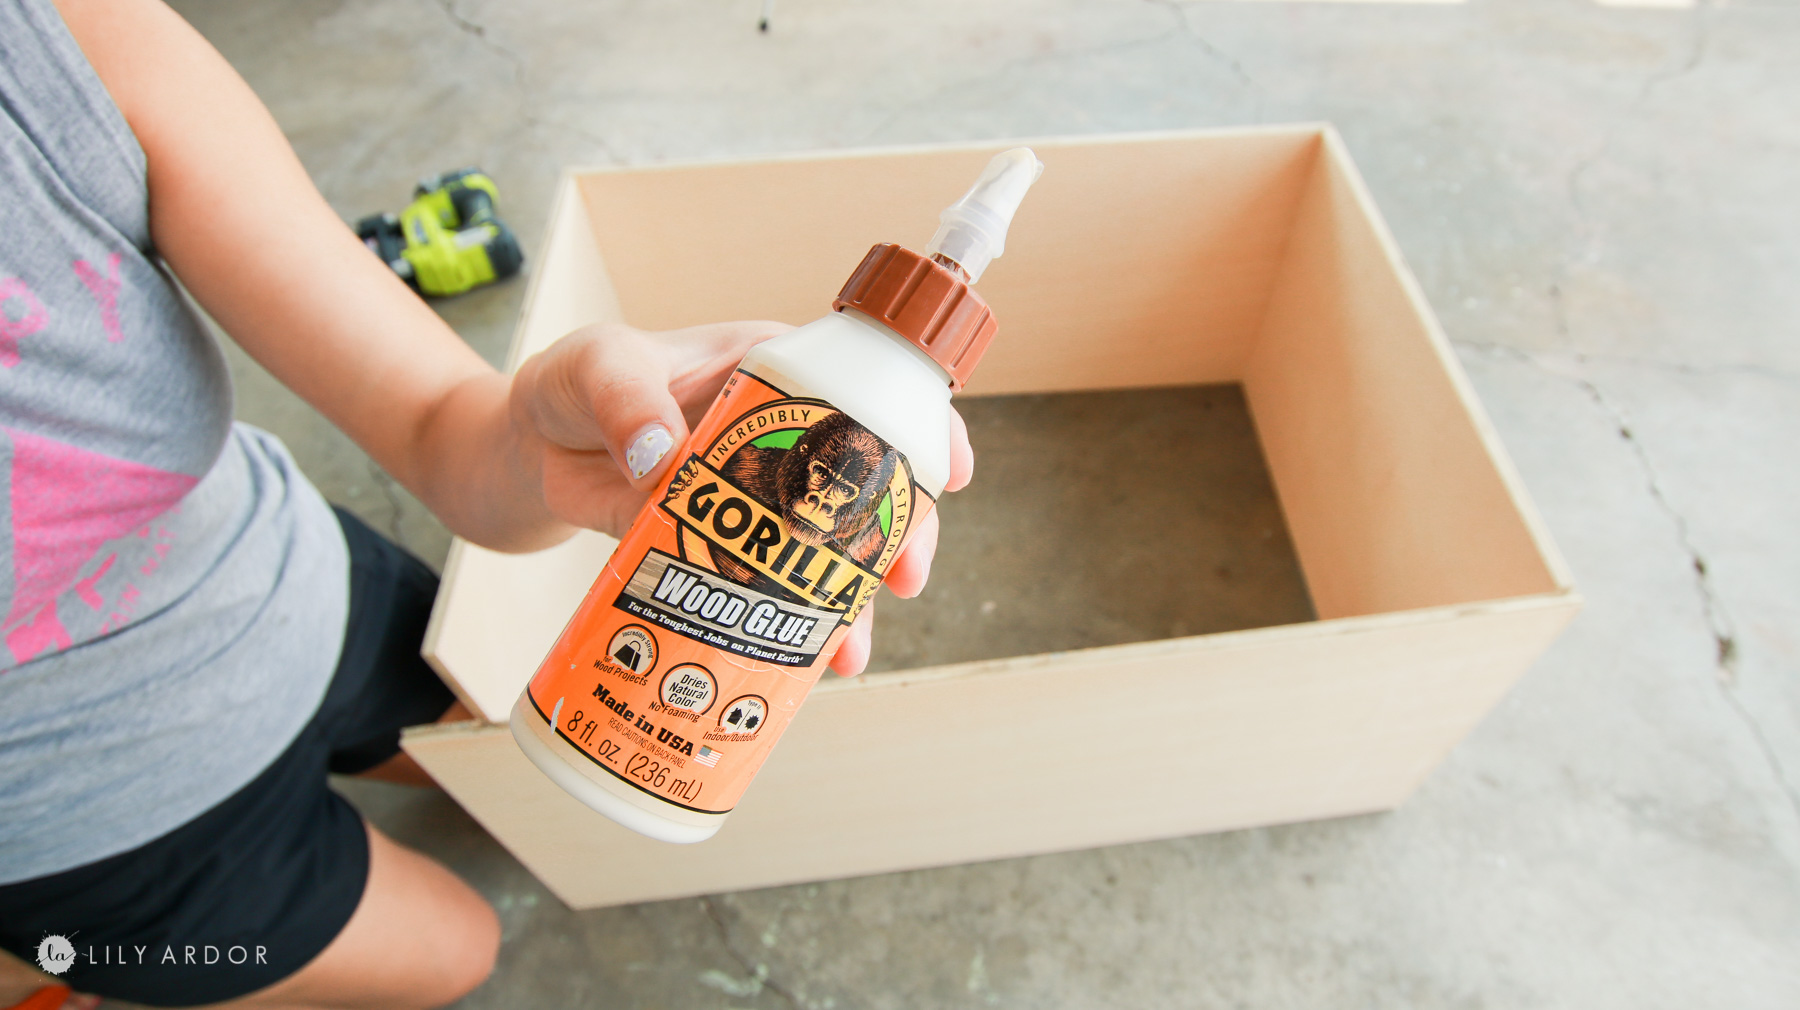
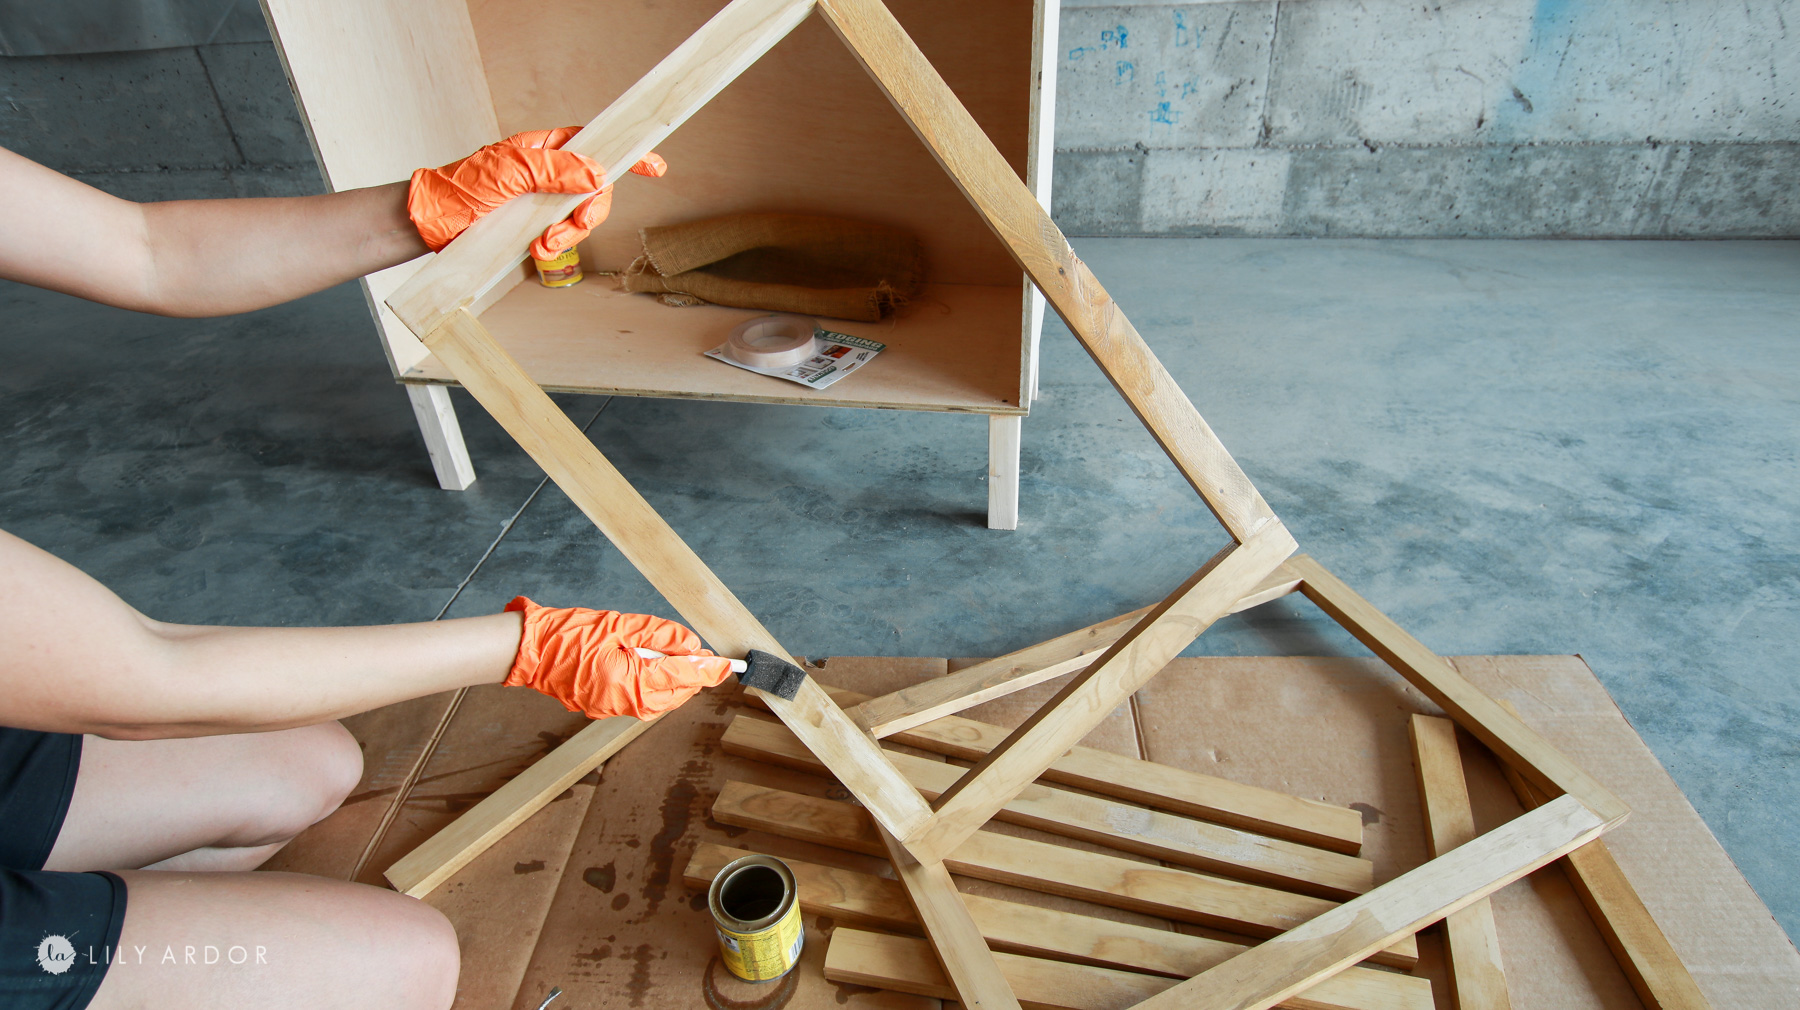
We first started off by securing the top , bottom and sides together with a brad nailer and some wood glue.
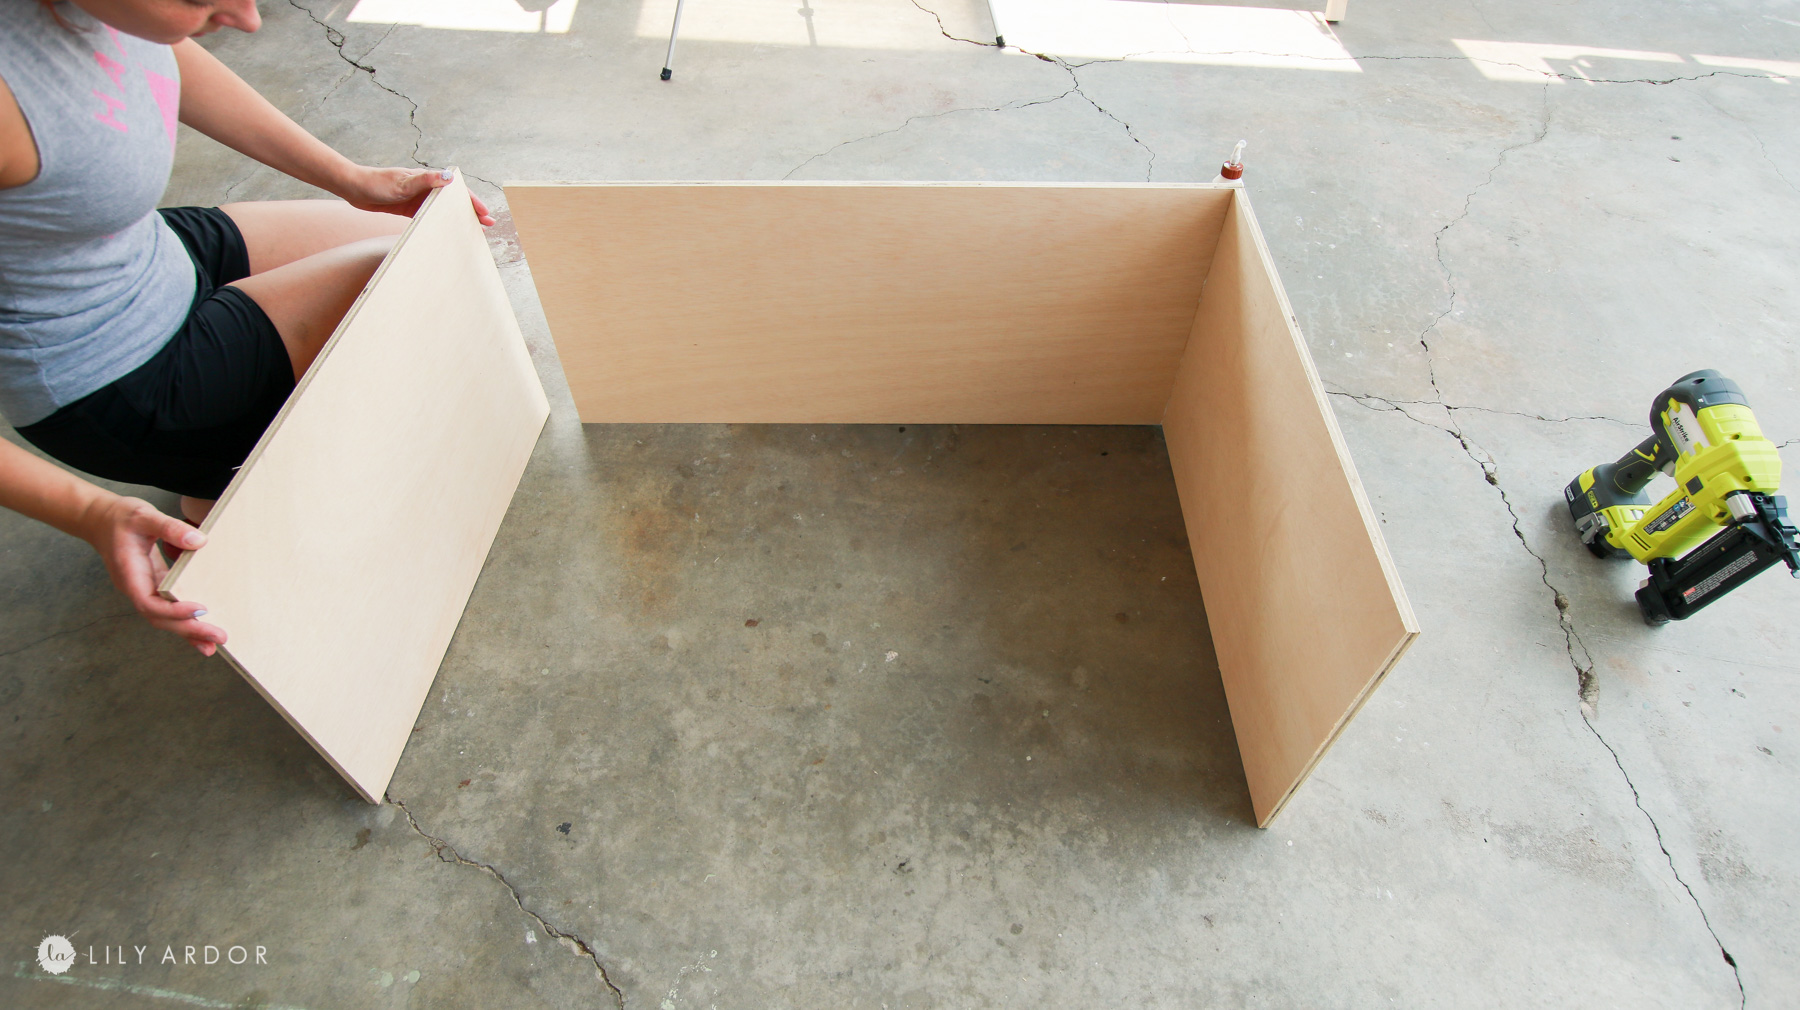
Make sure you use wood glue for this step. It makes such a huge difference. This glue is super strong. We tried gluing two pieces of wood together and ripping them apart after it dried and the glue wouldn’t come off the wood broke instead.
Next Tony propped up the plywood against the cabinet and I traced inside along the edges with a pencil. He used the circular saw to cut it down to size and the back panel was ready.
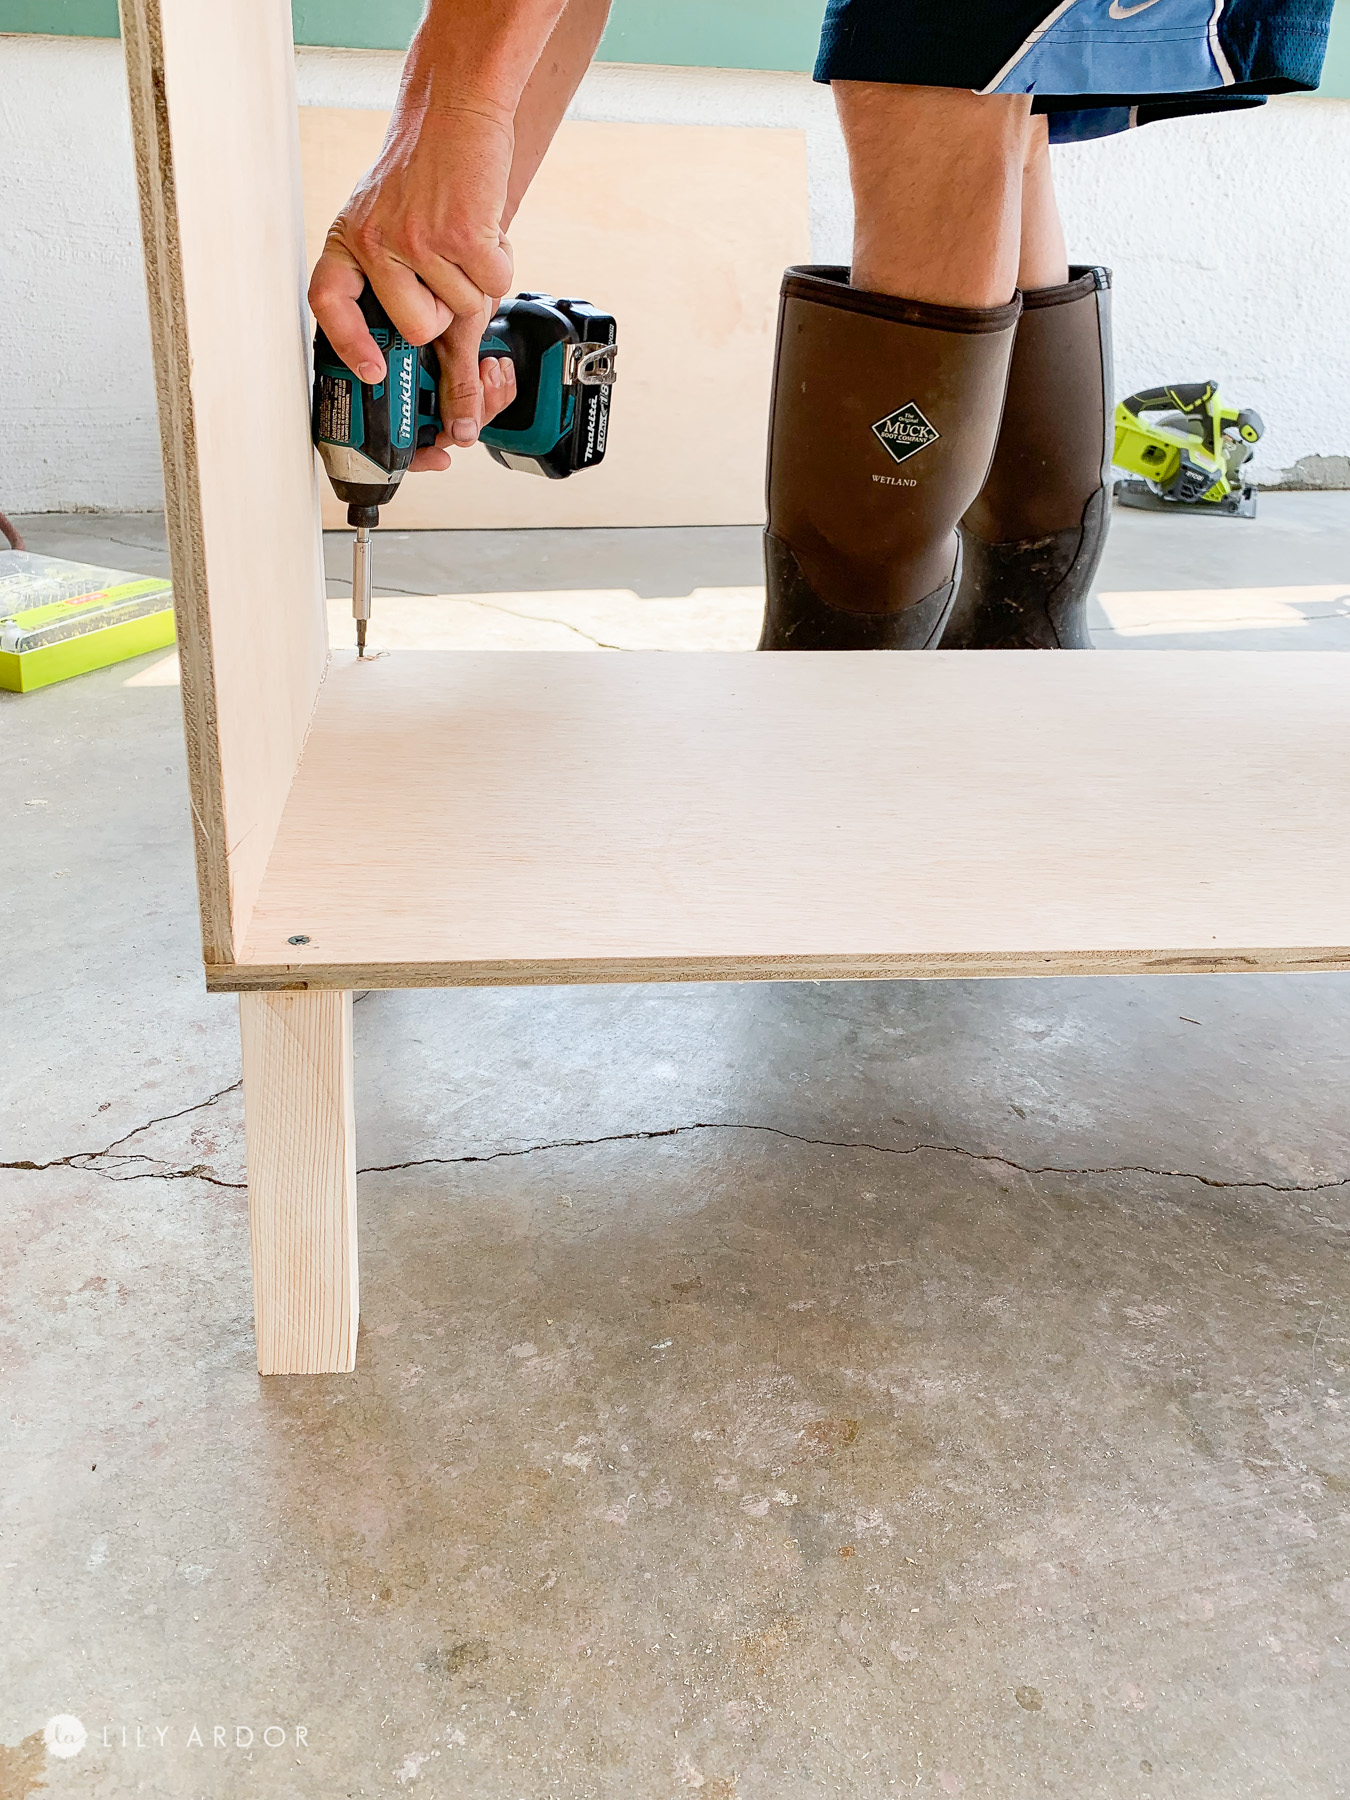
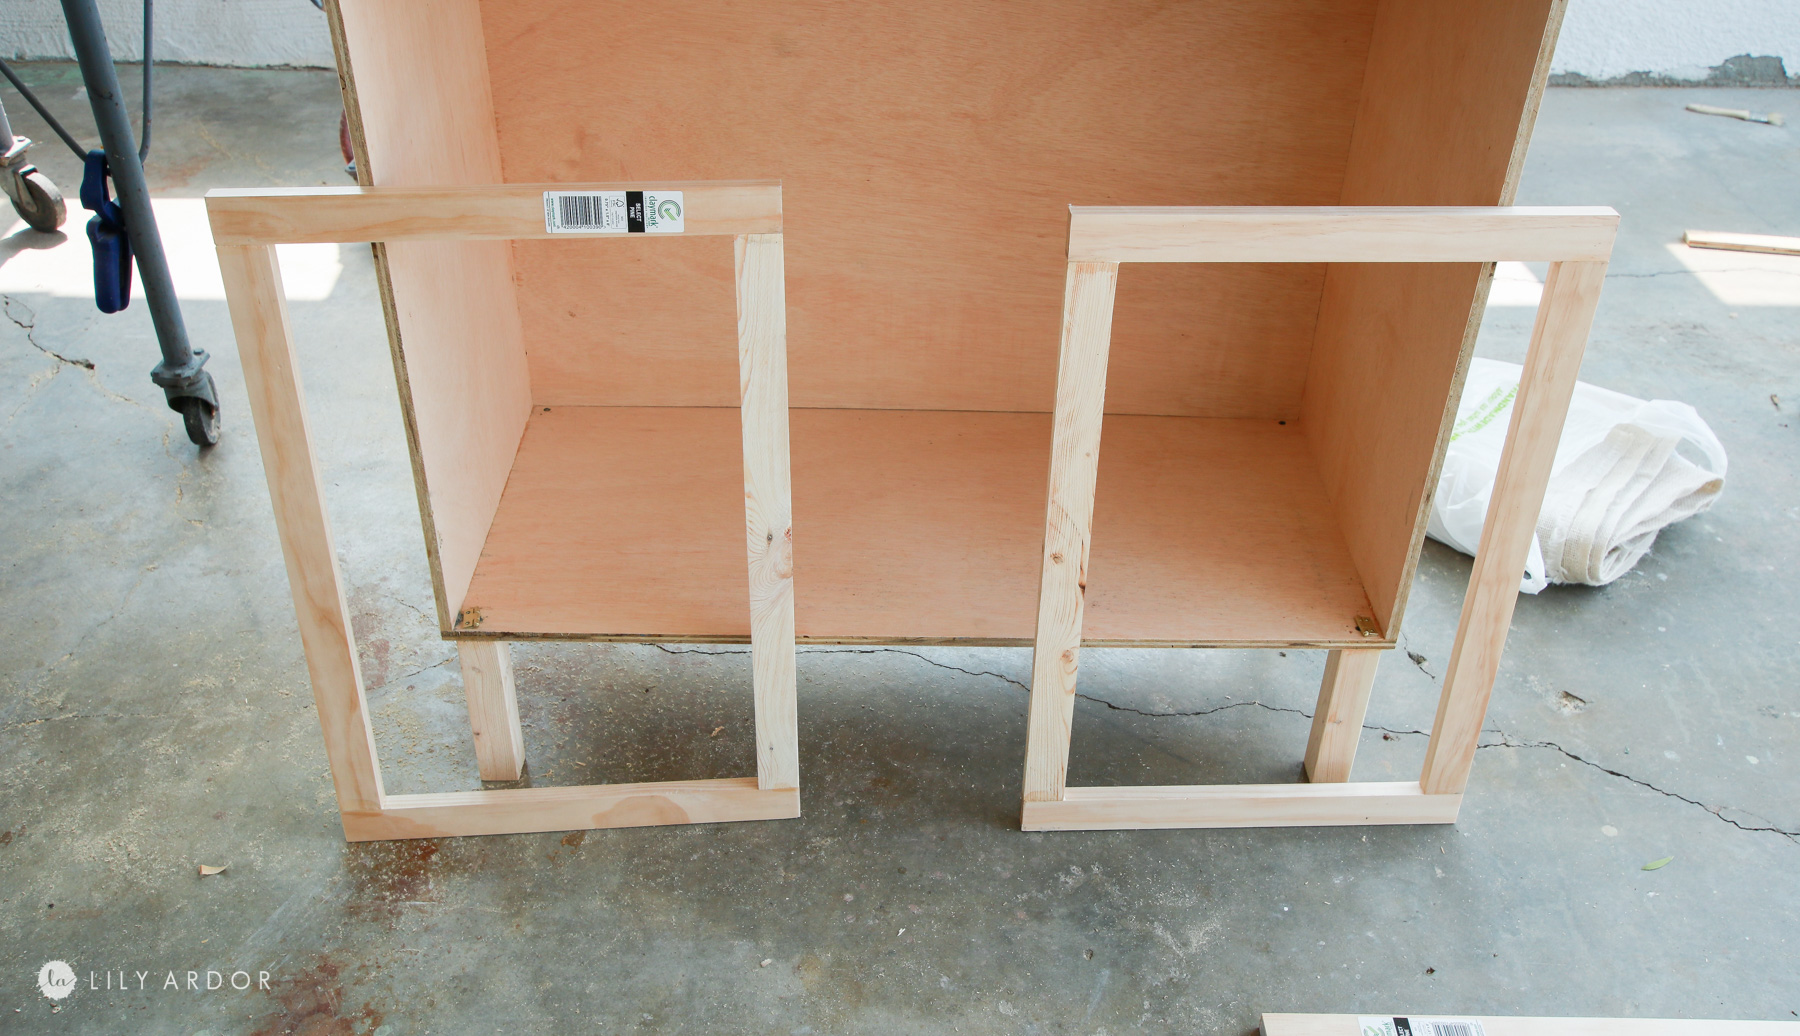
Making the LEGS
Before attaching the back panel we cut 4 pieces for the legs from the 2×2 and glued them onto the bottom of the cabinet. Our legs measured 7″ inches. Tony also added a brad nail into each one before we flipped it over and secured it additionally with screws. Be sure to pre-drill your holes so the legs don’t crack.

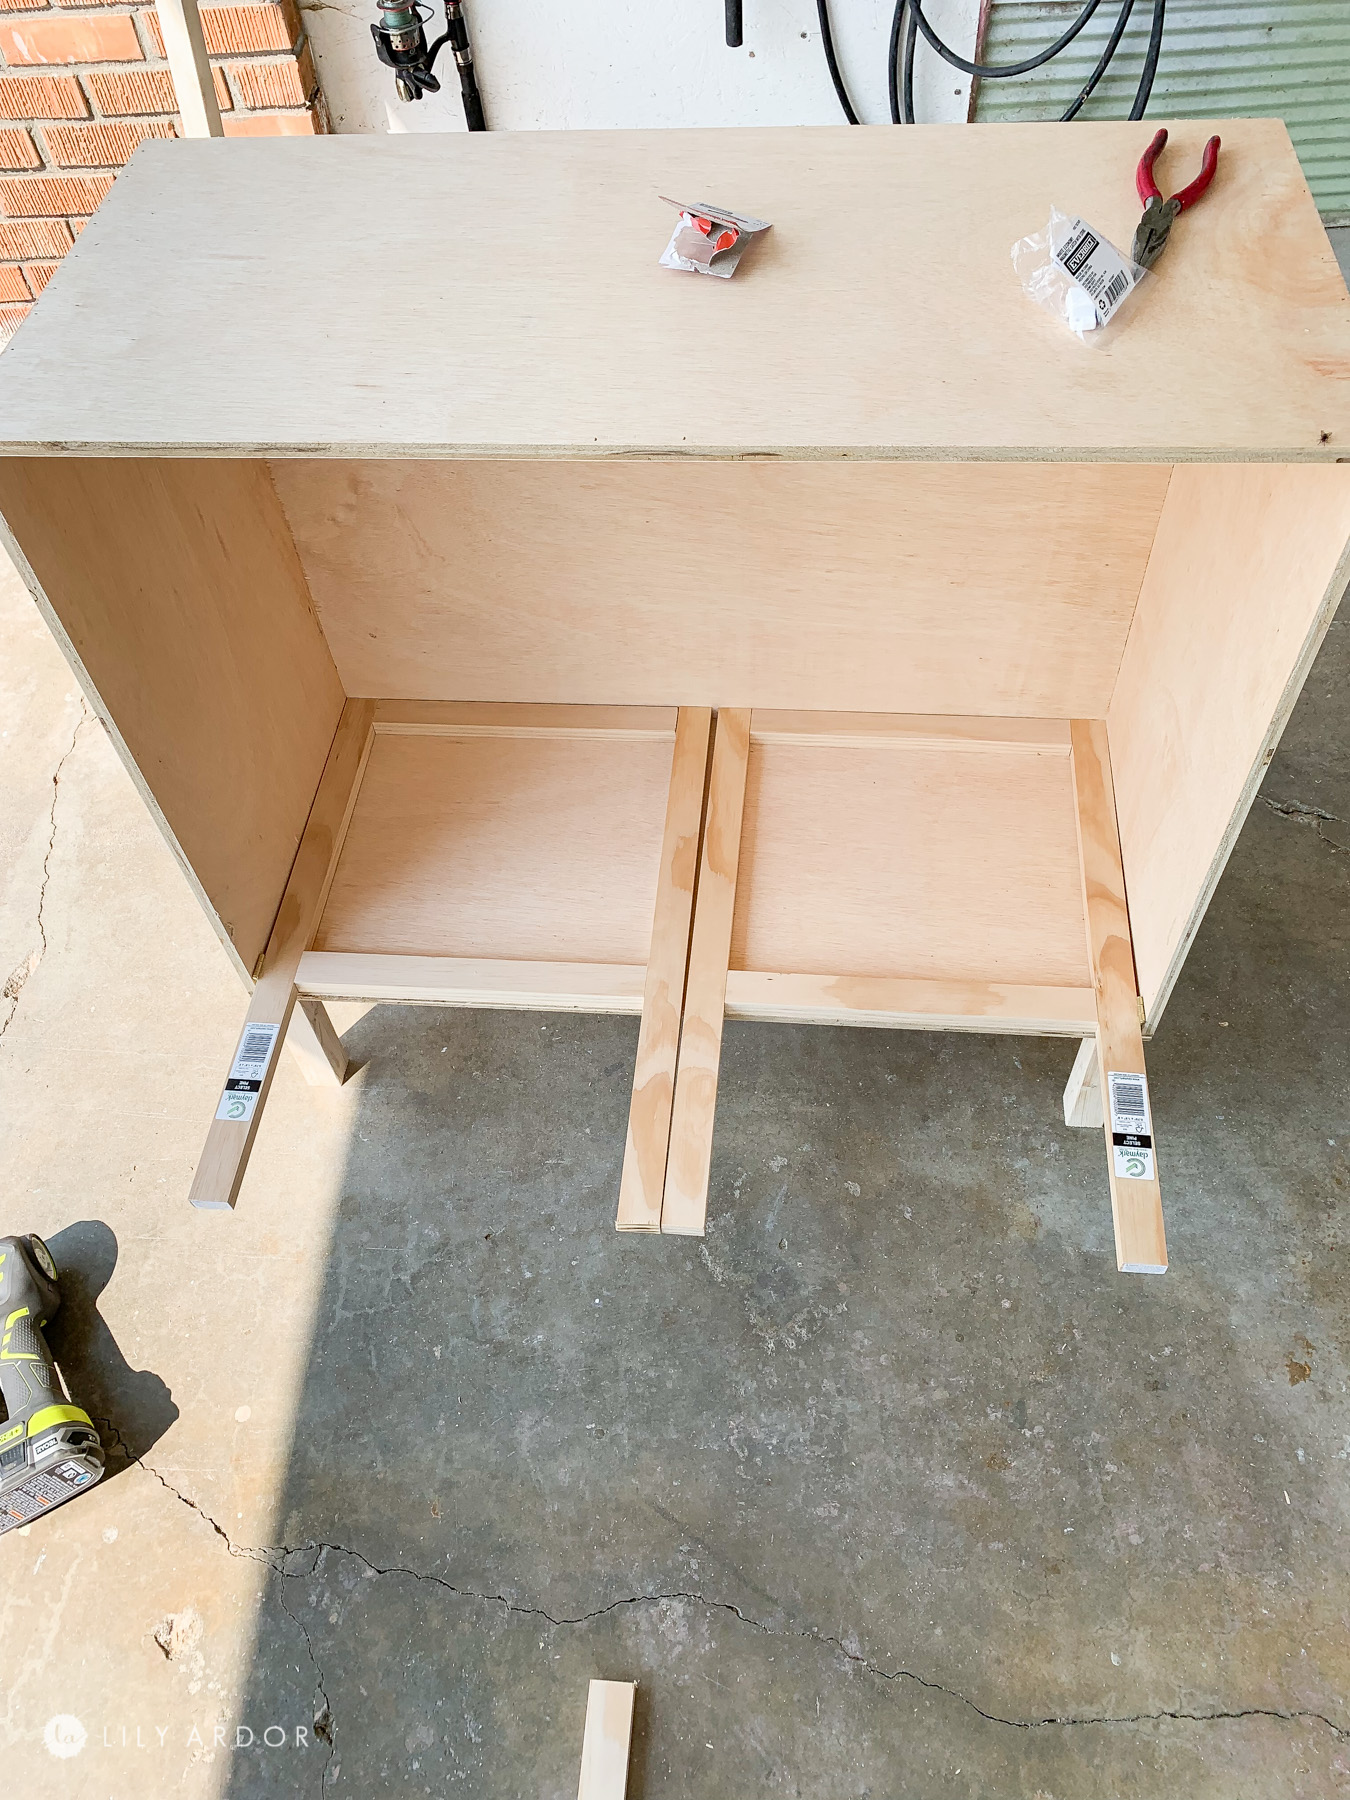
MAking the door panels
Next I cut down the 1×2 to create two door panels. I’m not great with math so I found it easier to simply lay out the wood pieces inside the cabinet with the hinges on the sides just to make sure I had enough room in the middle to still let the doors shut smoothly.
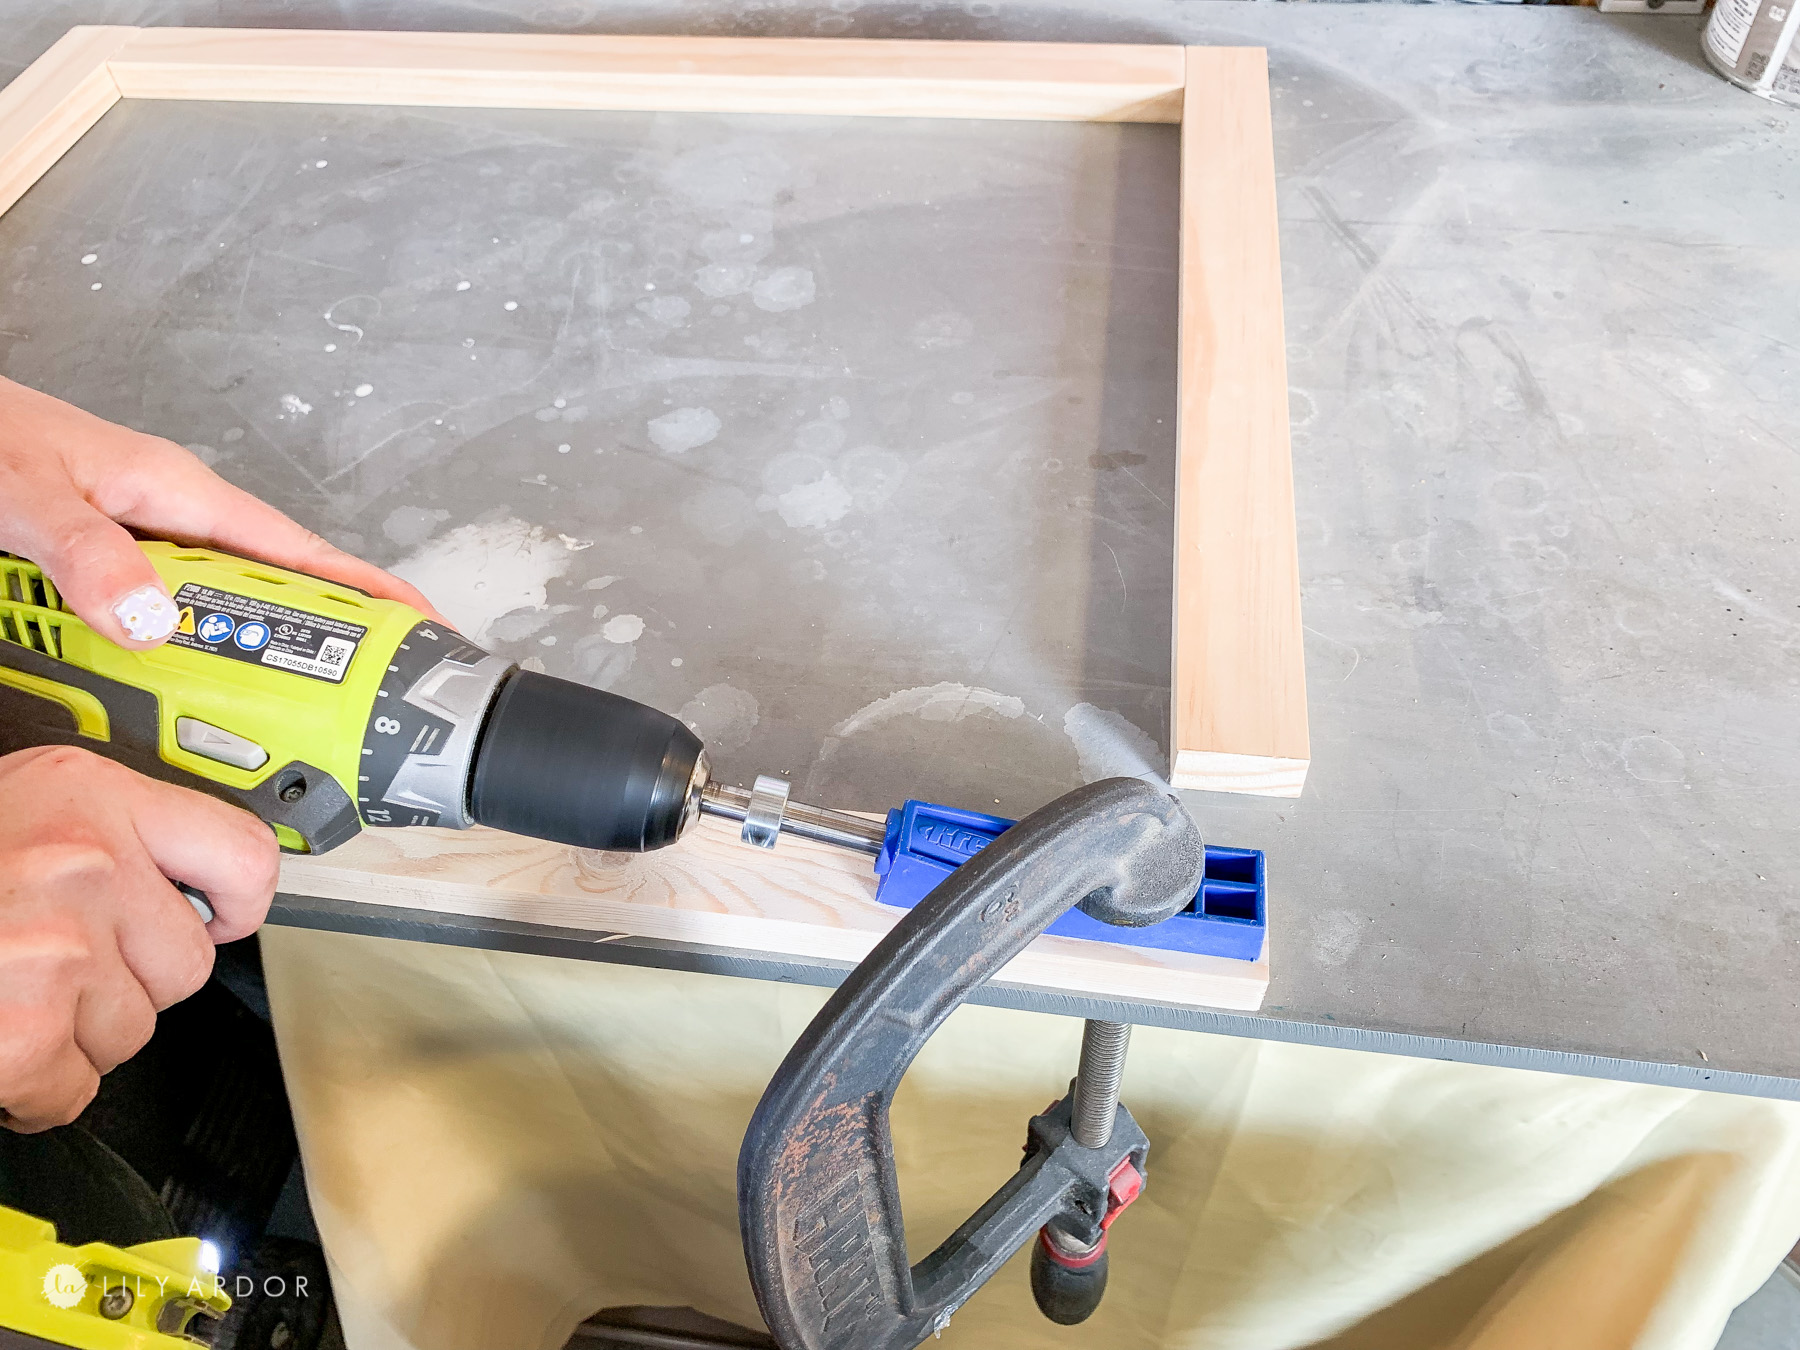
To secure all the pieces together for each door I used a kreg jig to make slanted holes. Then we applied glue and secured the pieces together with screws. ( I show how I did this in the video – https://youtu.be/vMYX3sFk5RI )
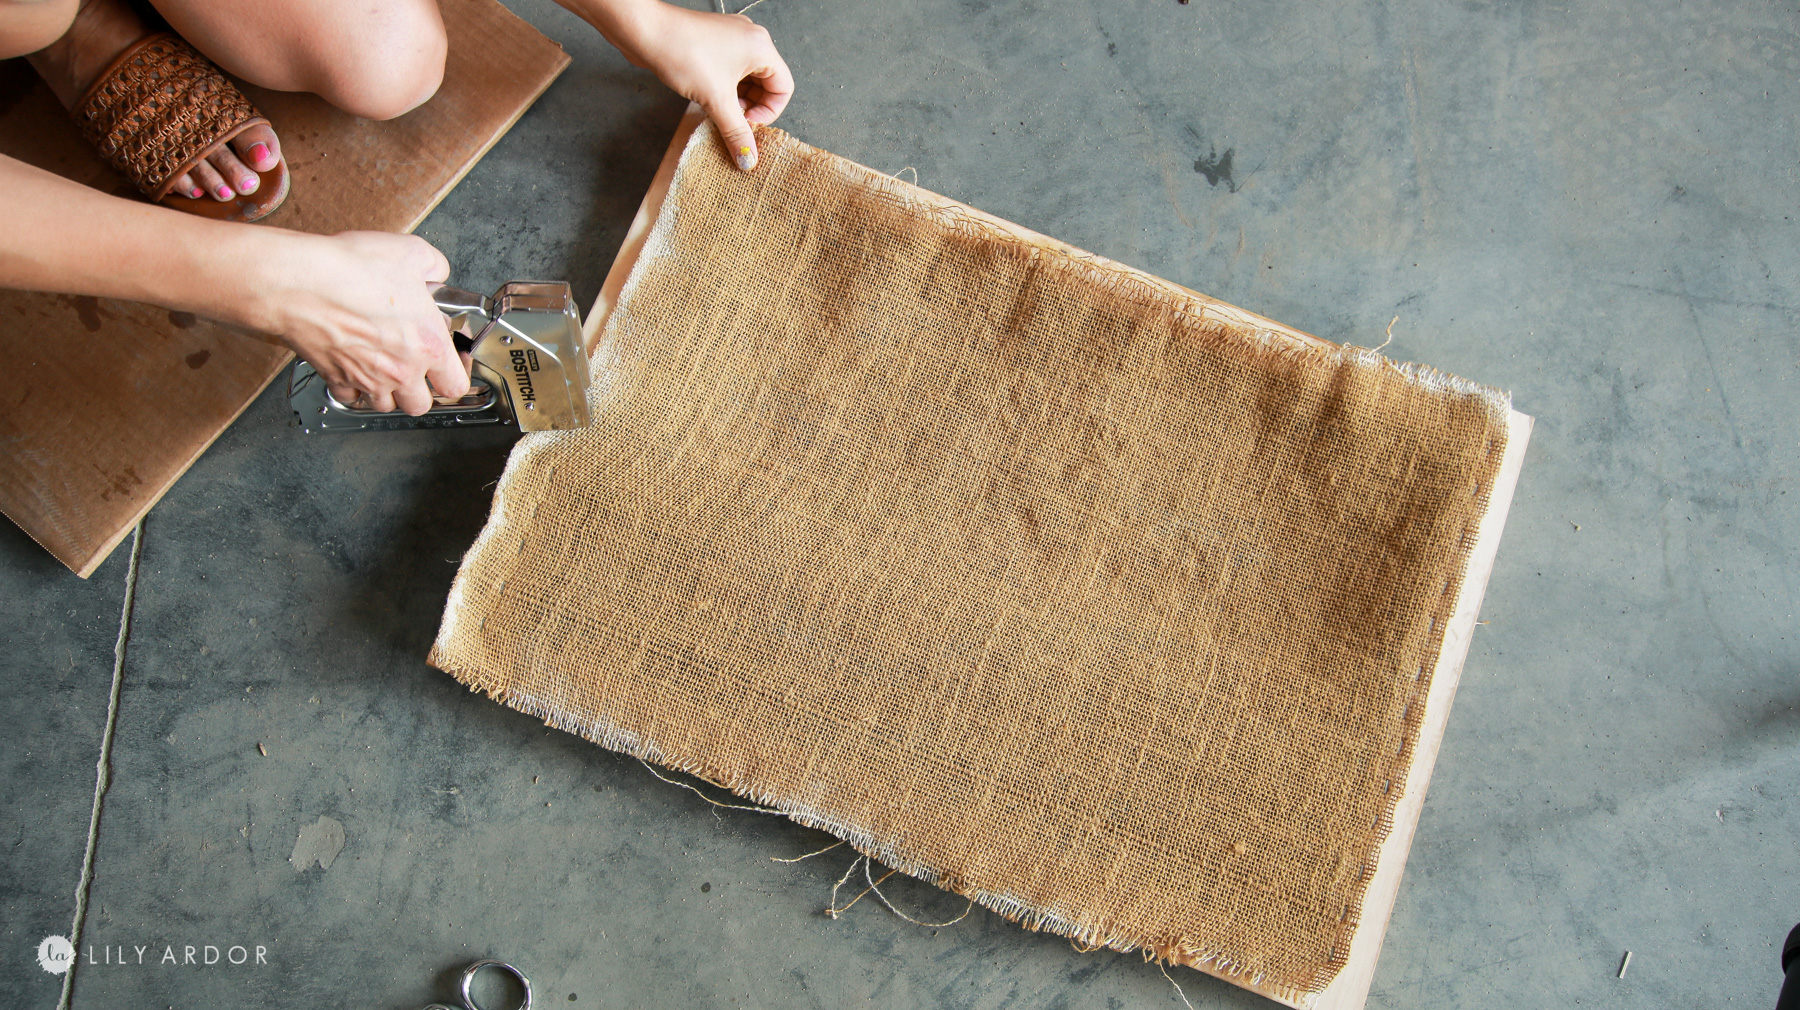
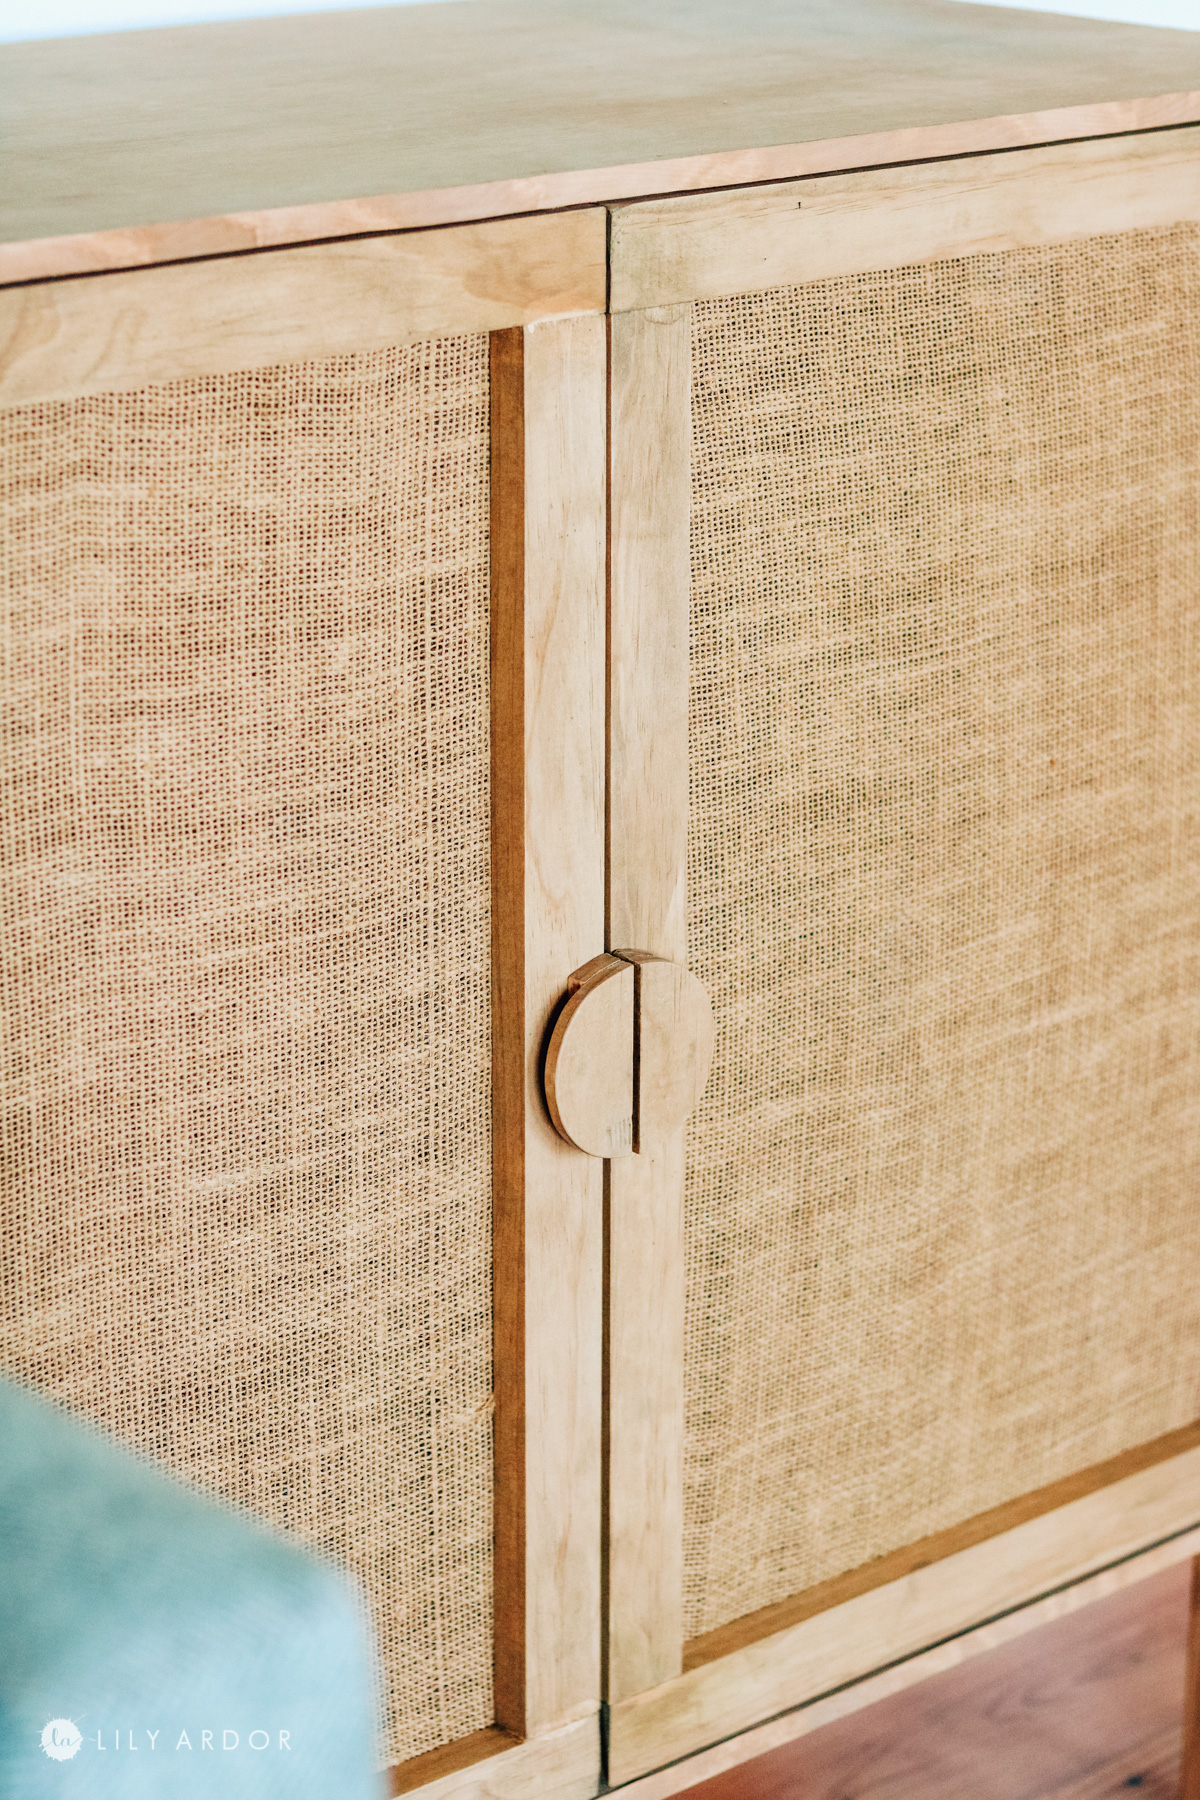
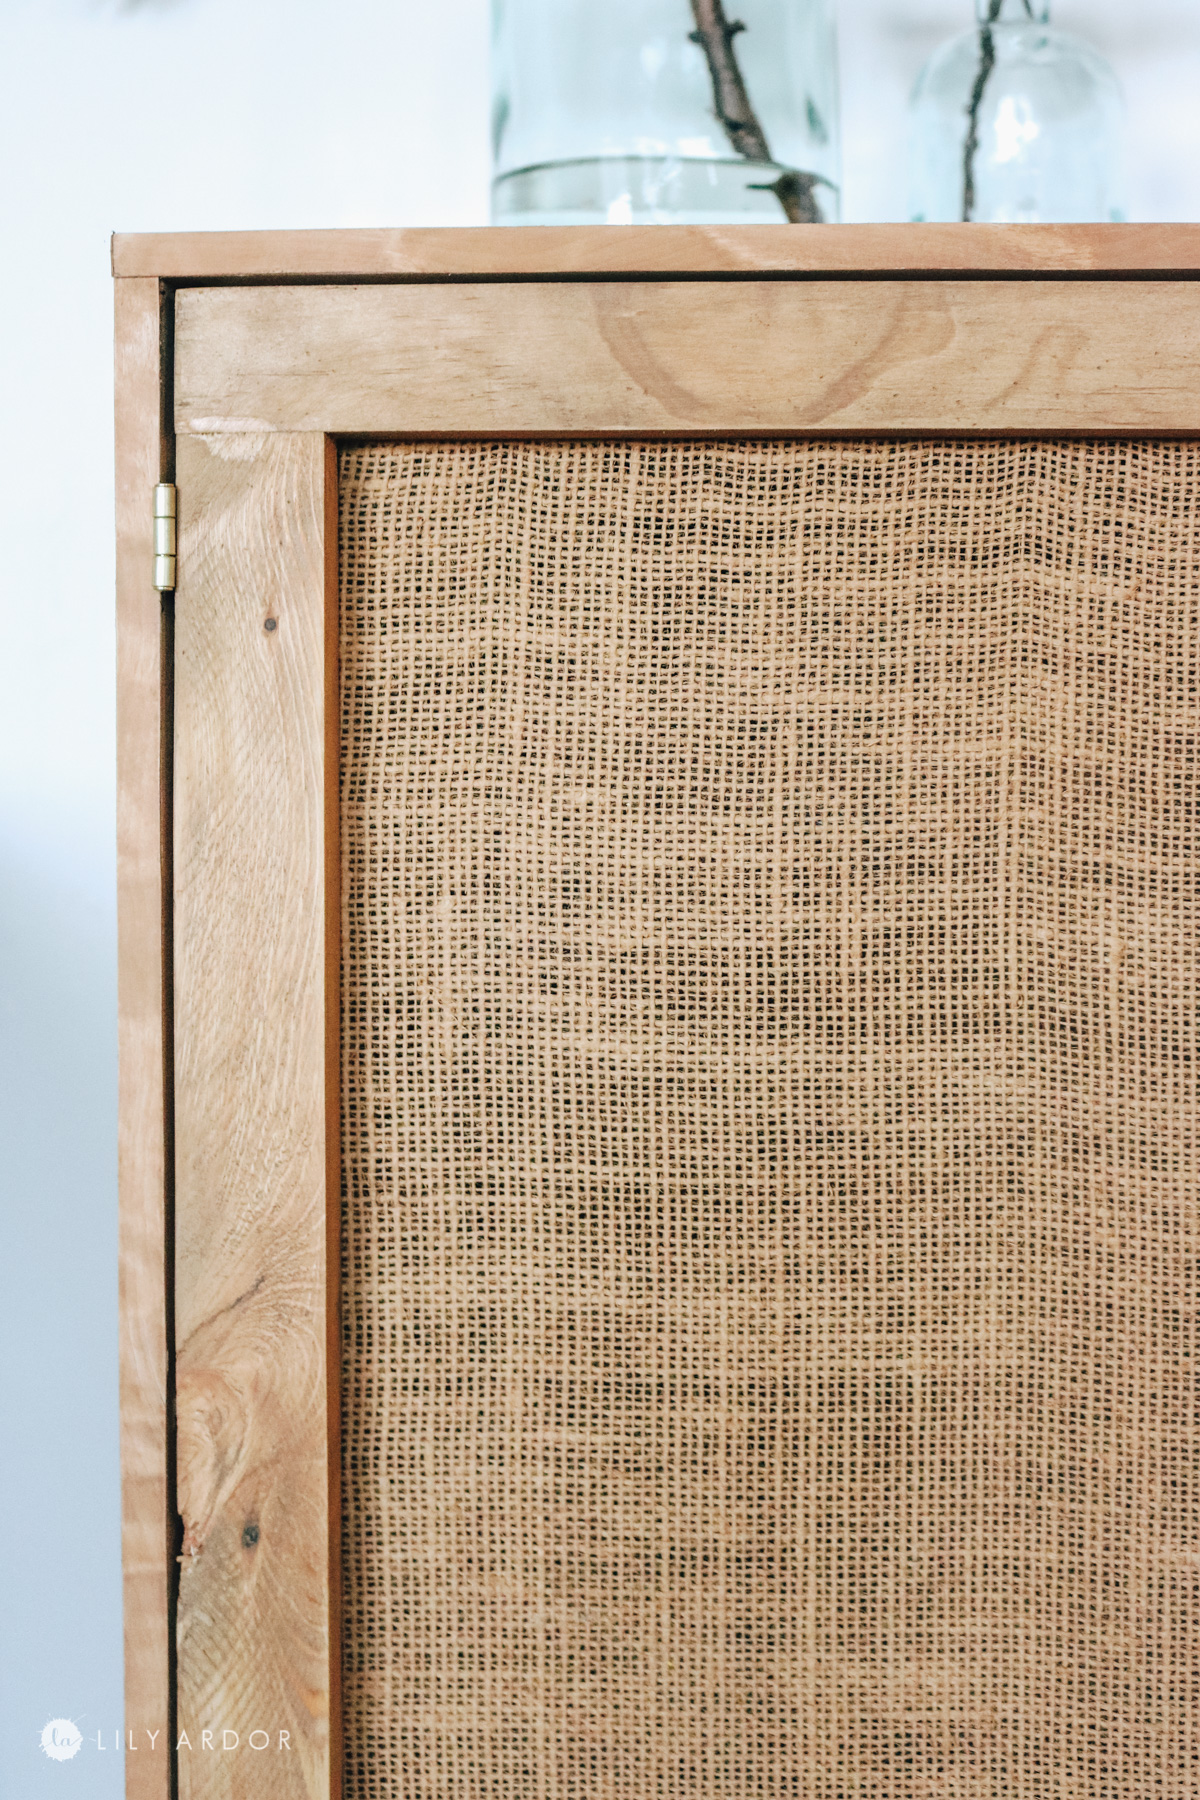
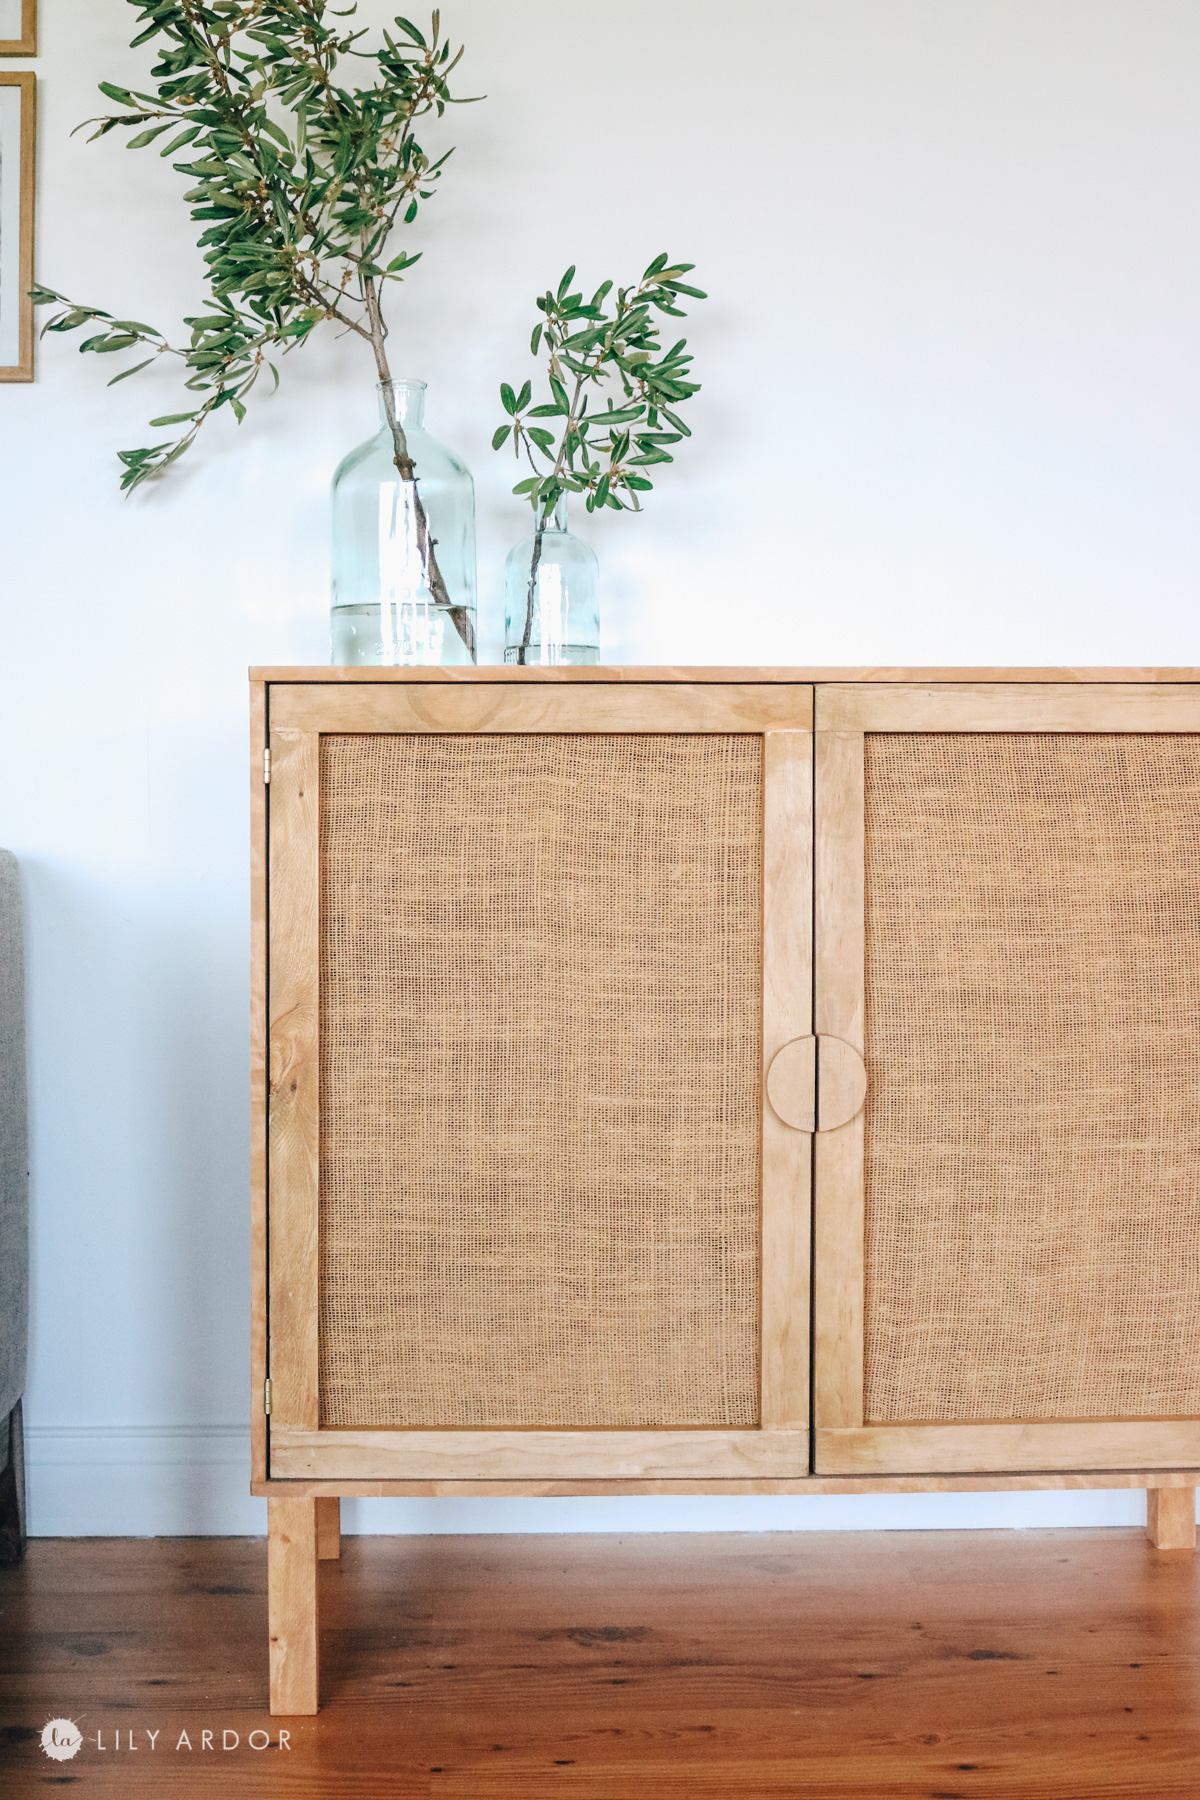
FAUX RATTAN HACK! Attaching the burlap!
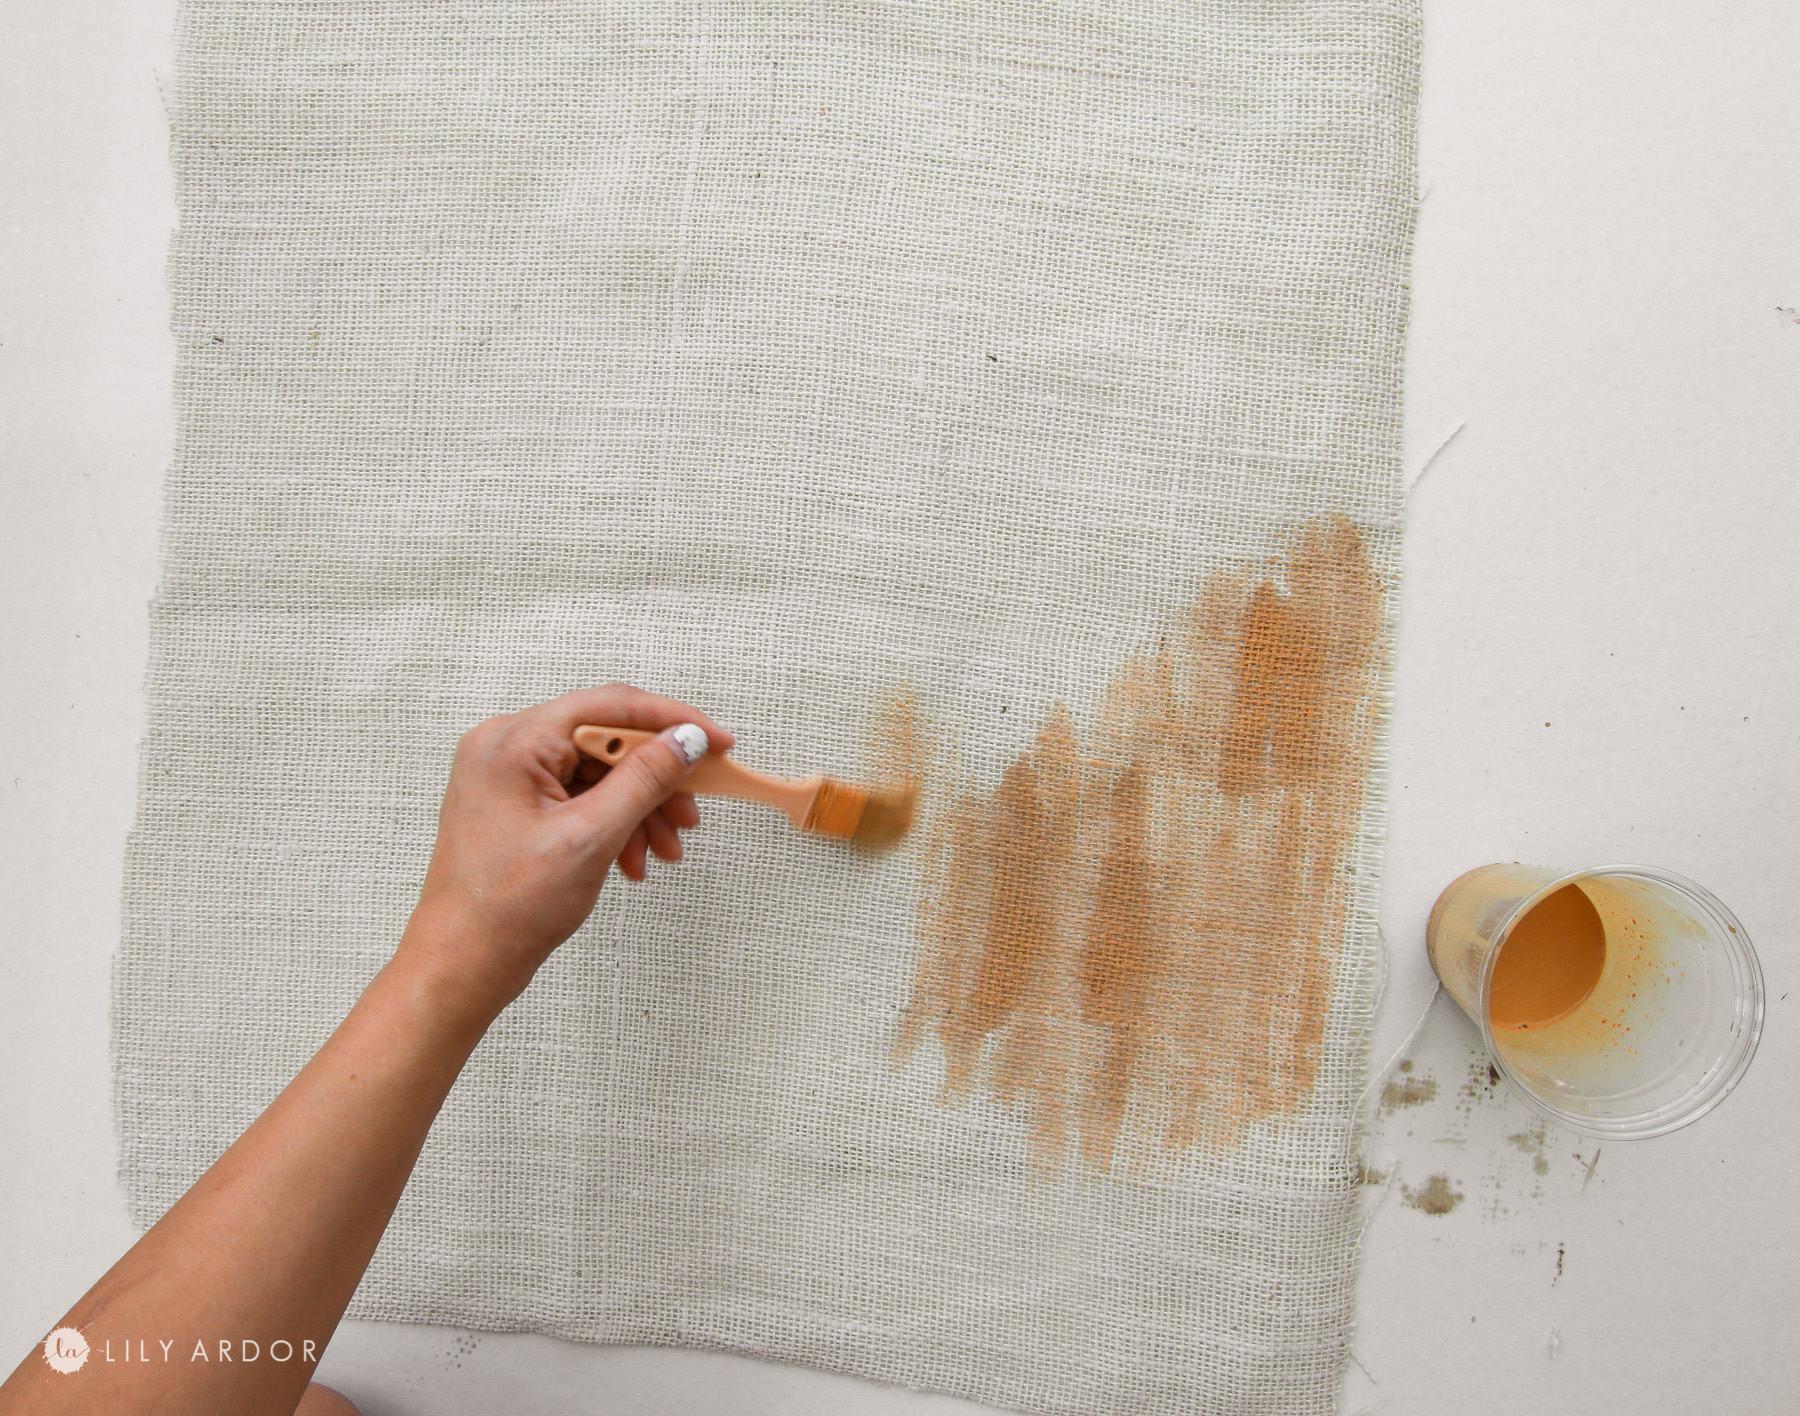
I used the lightest color burlap sold at joanns and applied regular acrylic paint onto it to stain it. You’ll need to dilute the paint quite a bit to help it easily soak into the burlap. I made the mistake by painting my panels before staining my wood. Working ahead of myself and I ended up having to repaint the panels again. After making small test swatches I finally got the color to match the wood. To dry them I let them sit out in the sun and ironed them out before attaching to the panels.
TIP: It’s also best to make one big batch of acrylic stain. Enough to cover both panels with the same batch. It’s really hard to match the color if you run out of paint.
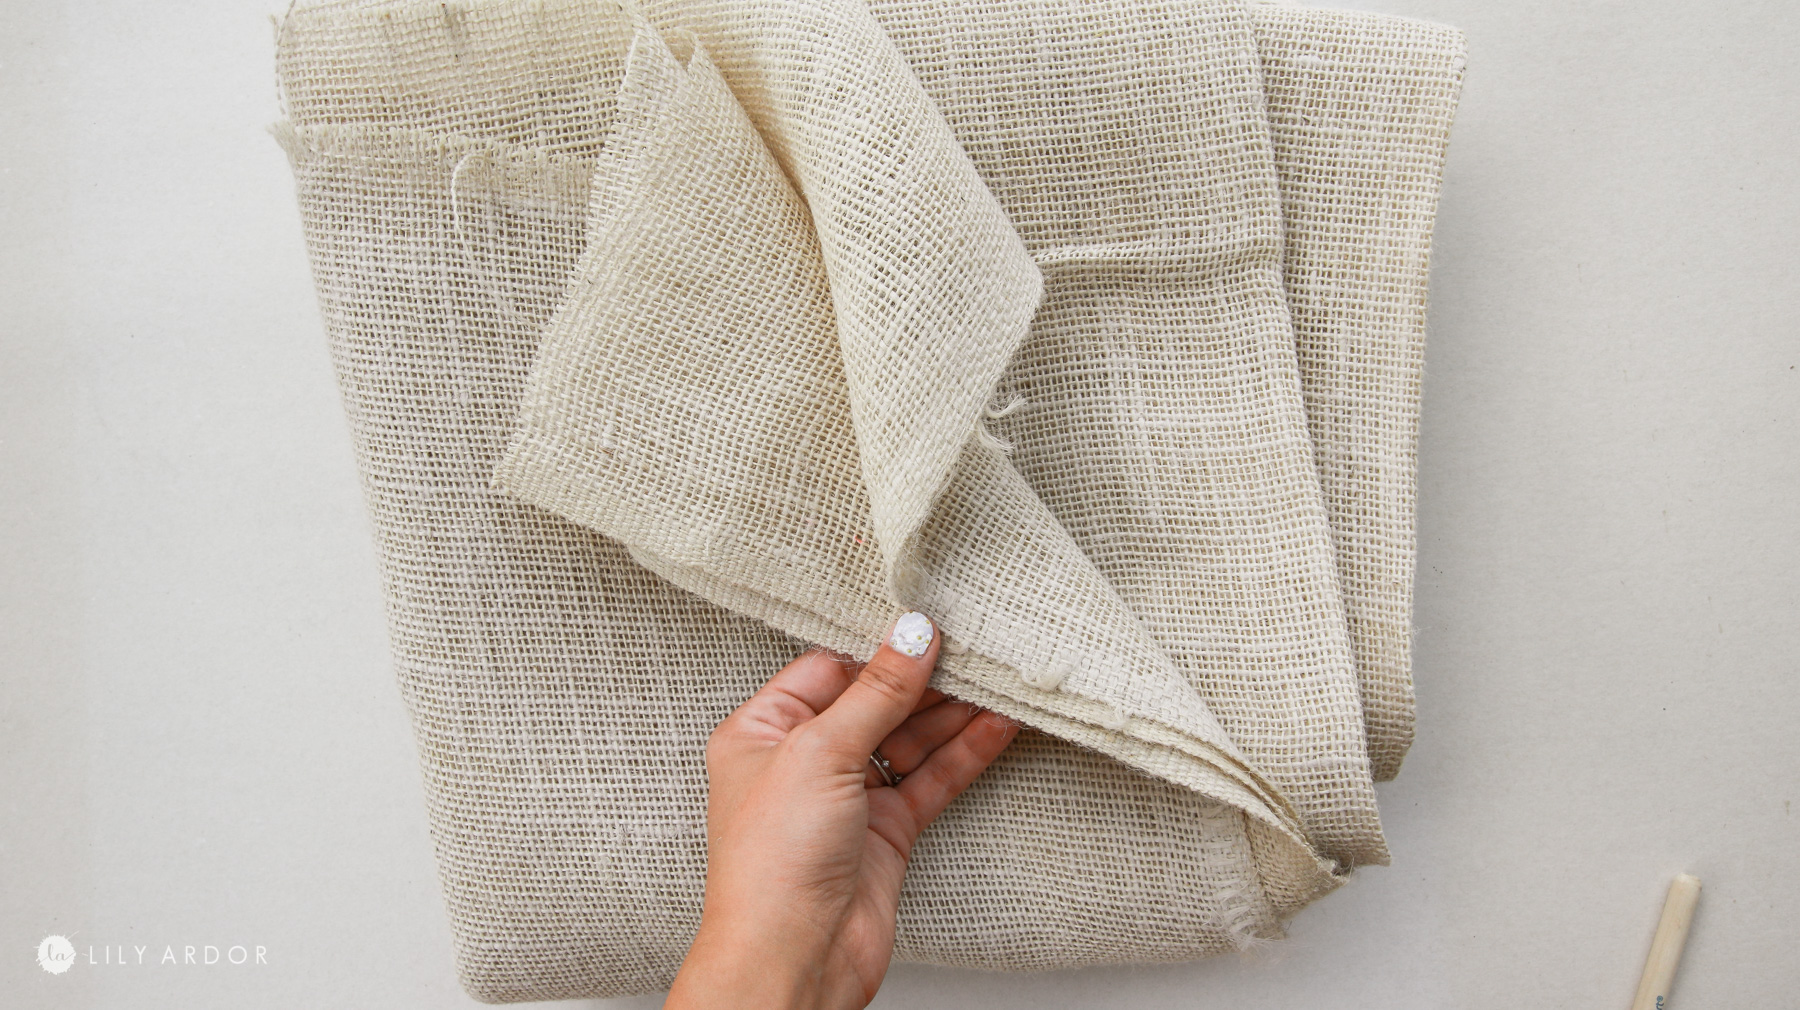
To get the right size I simply lay the panel over the burlap and roughly cut out the size. It doesn’t need to be perfect because it’ll be trimmed later.
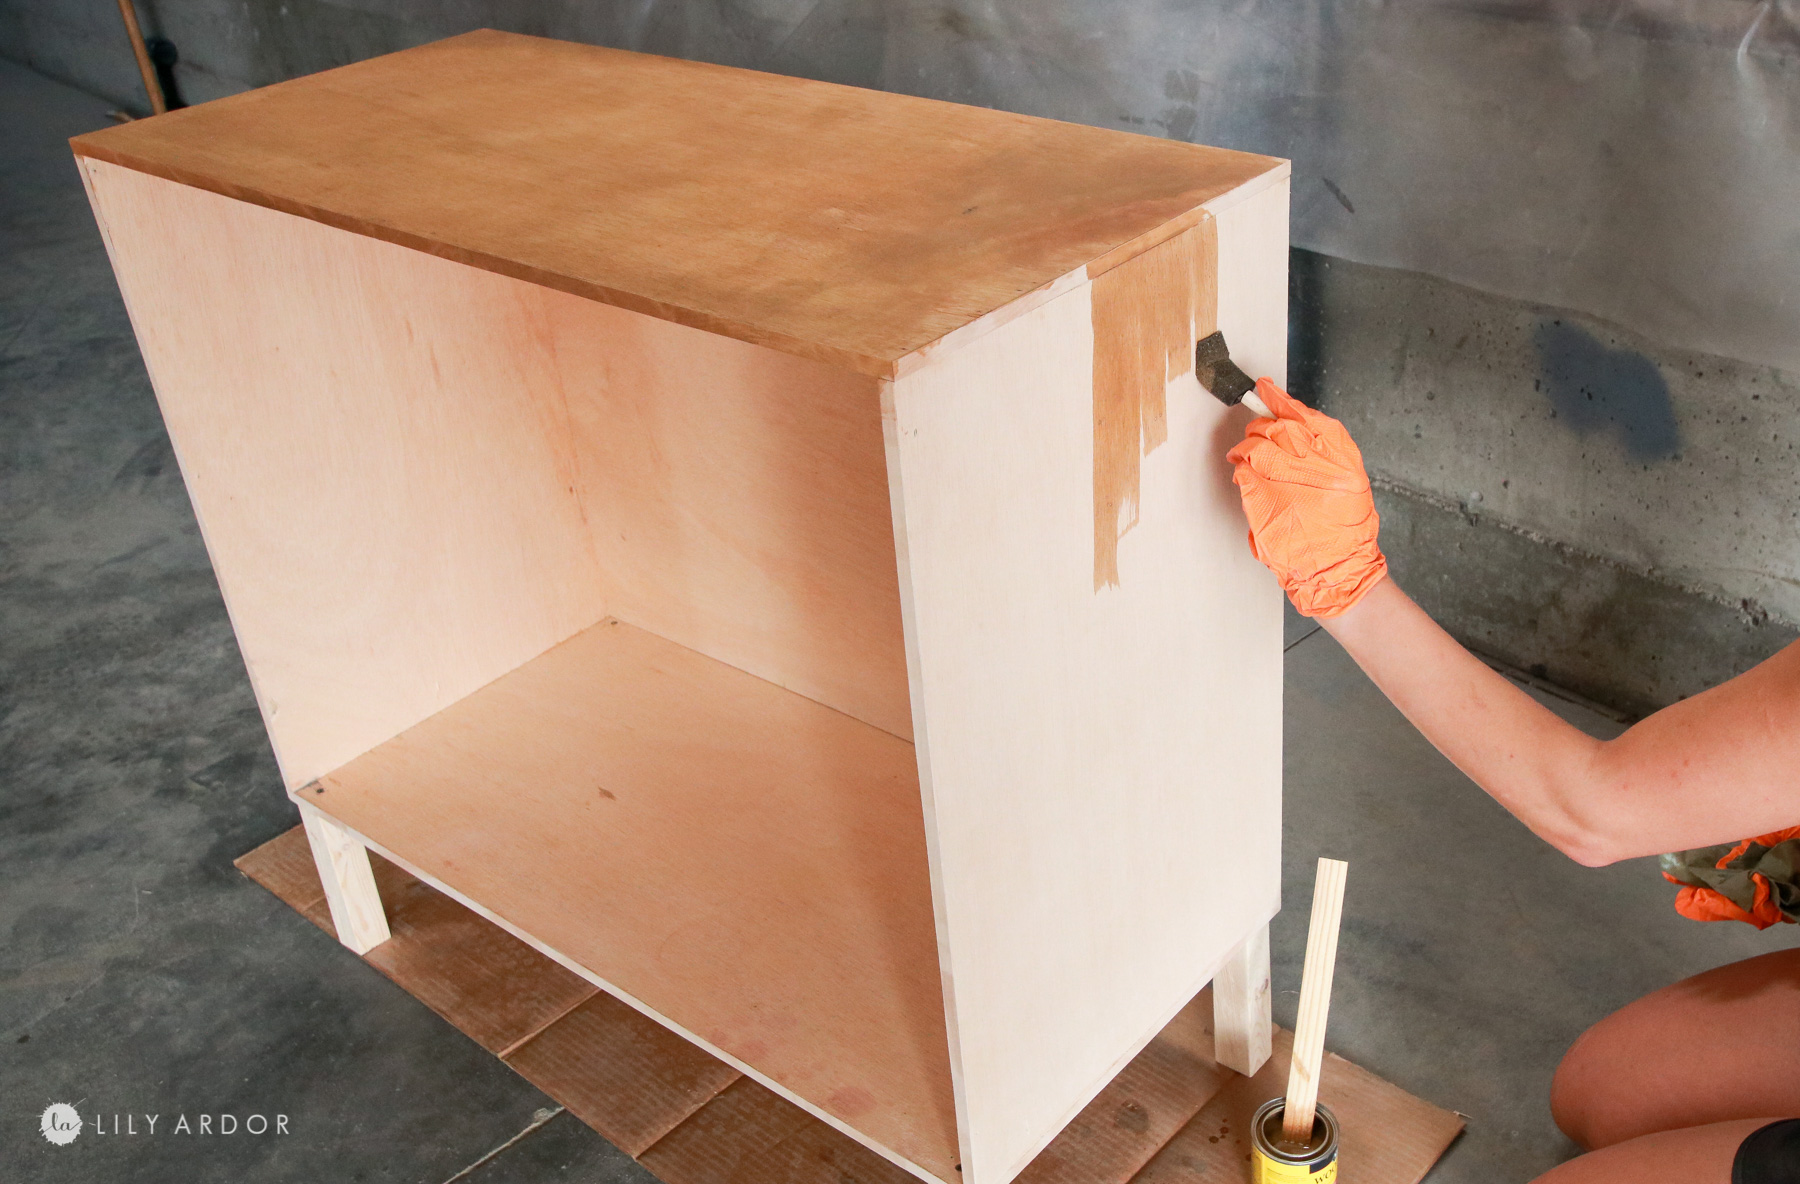
I stained my wood while the burlap was drying. I used my favorite wood stain. Minwax in the color fruitwood.
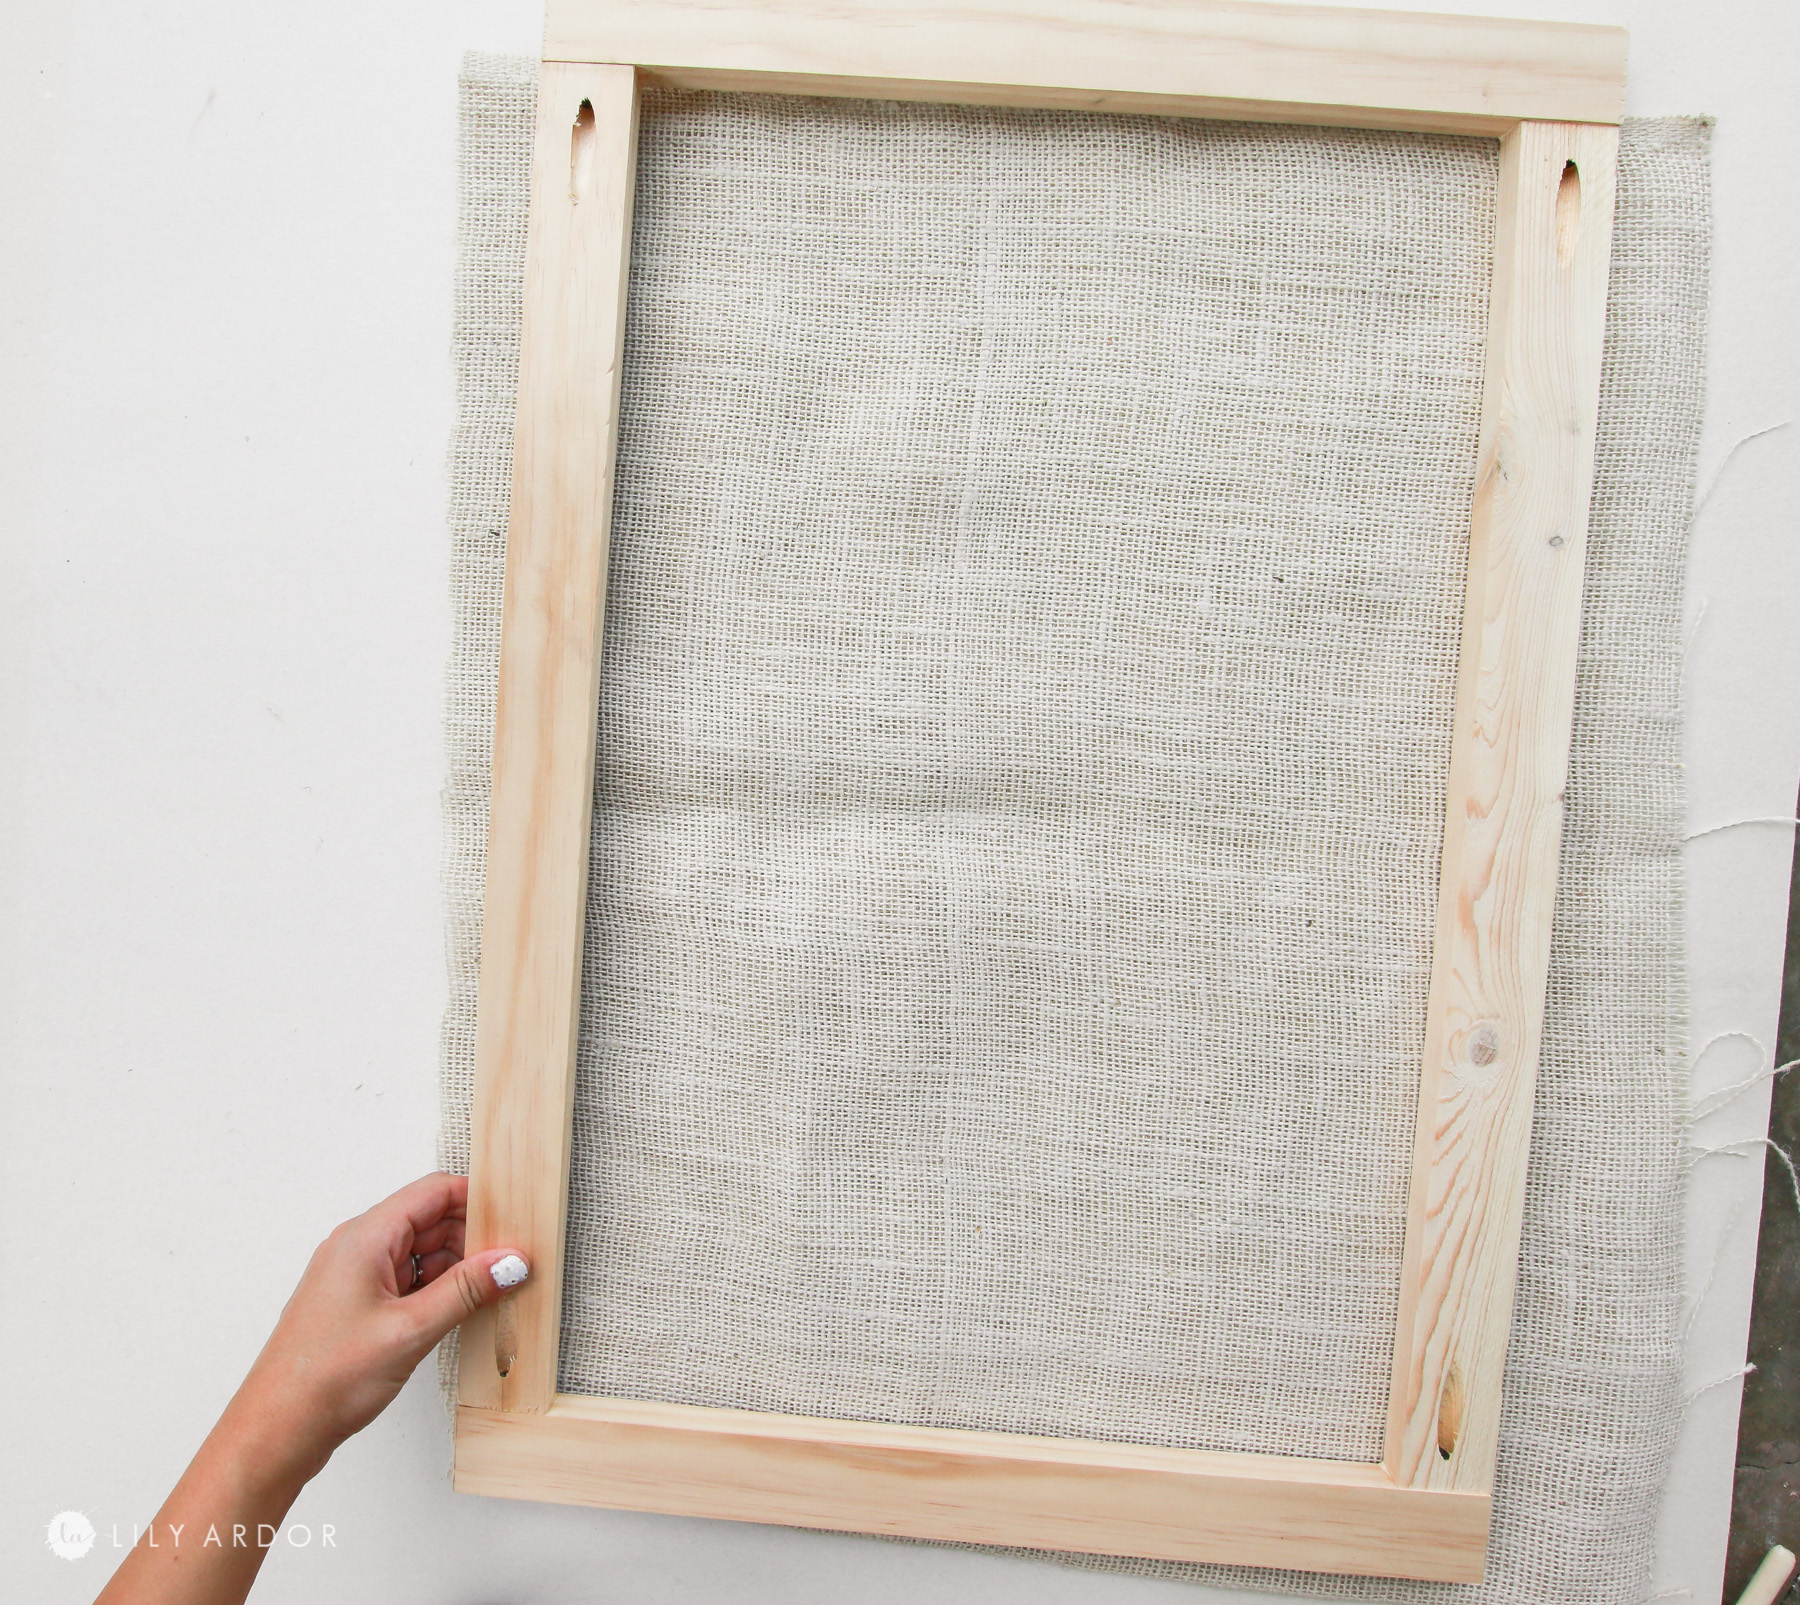
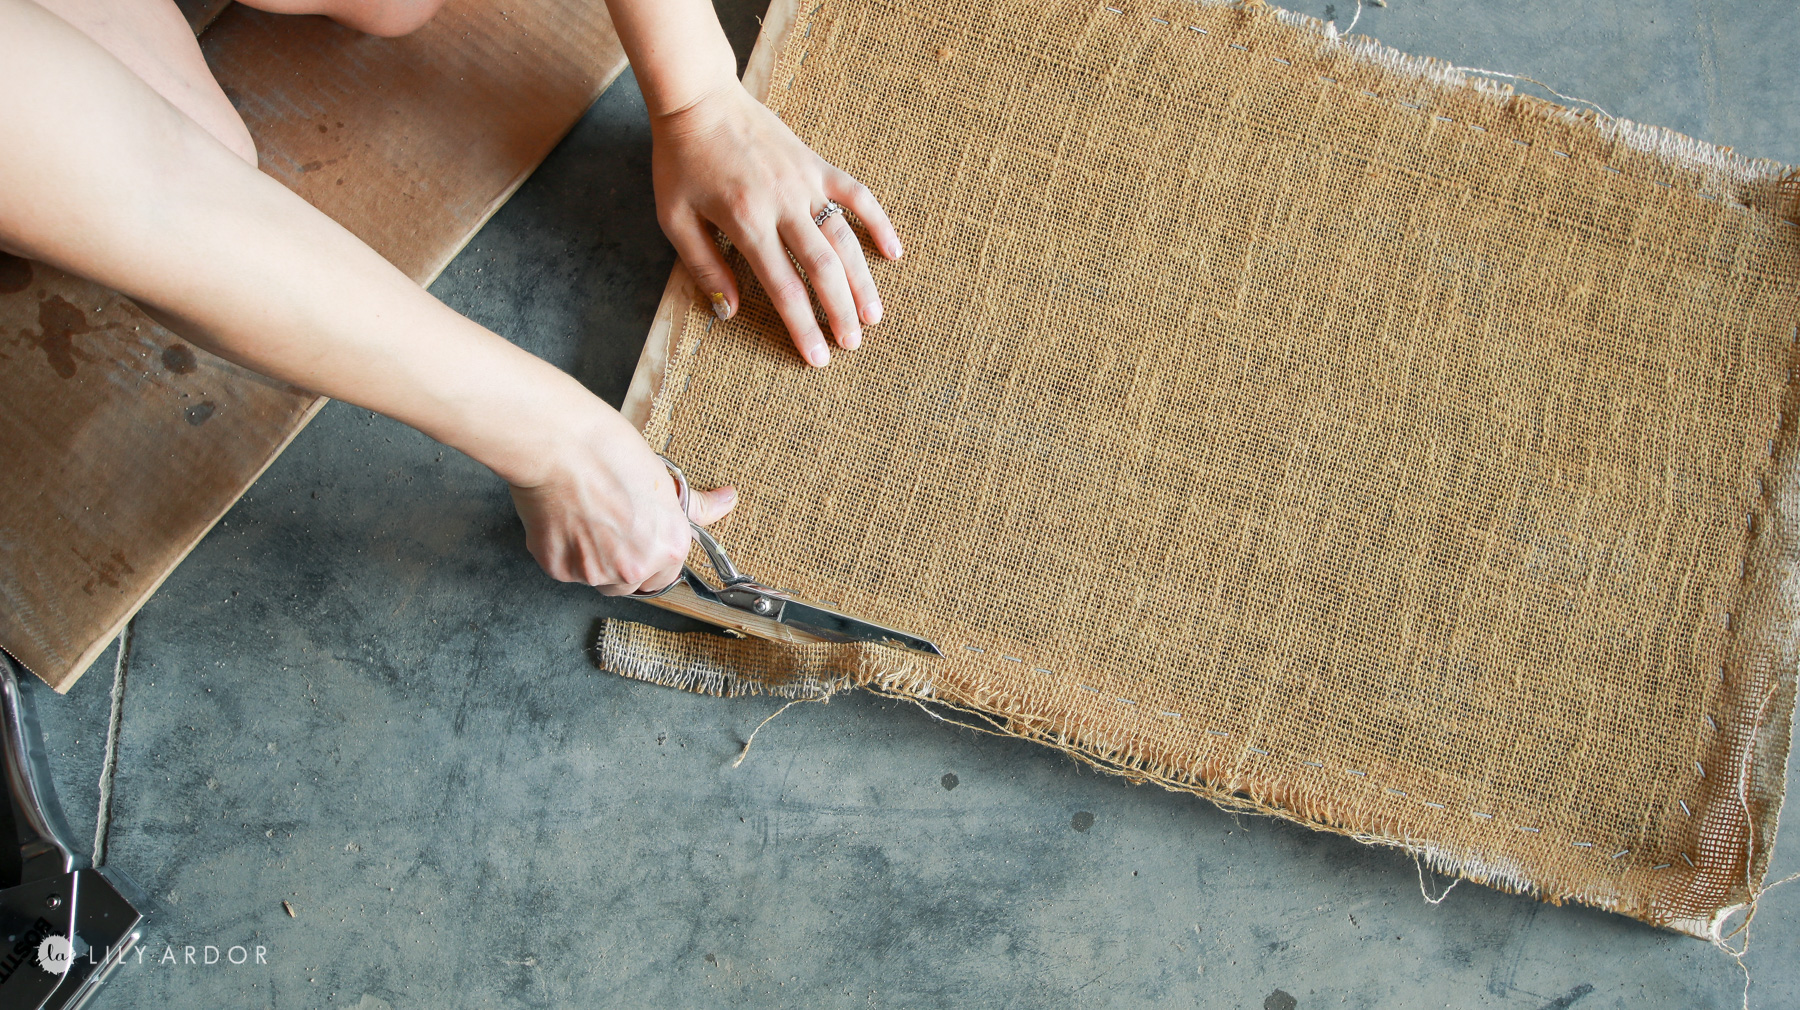
After the burlap was dry I used my stapler to staple it and trimmed any excess burlap around the edges. If your staples are fairly close to one another your burlap shouldn’t fray.
Finishing touches on the cabinet!
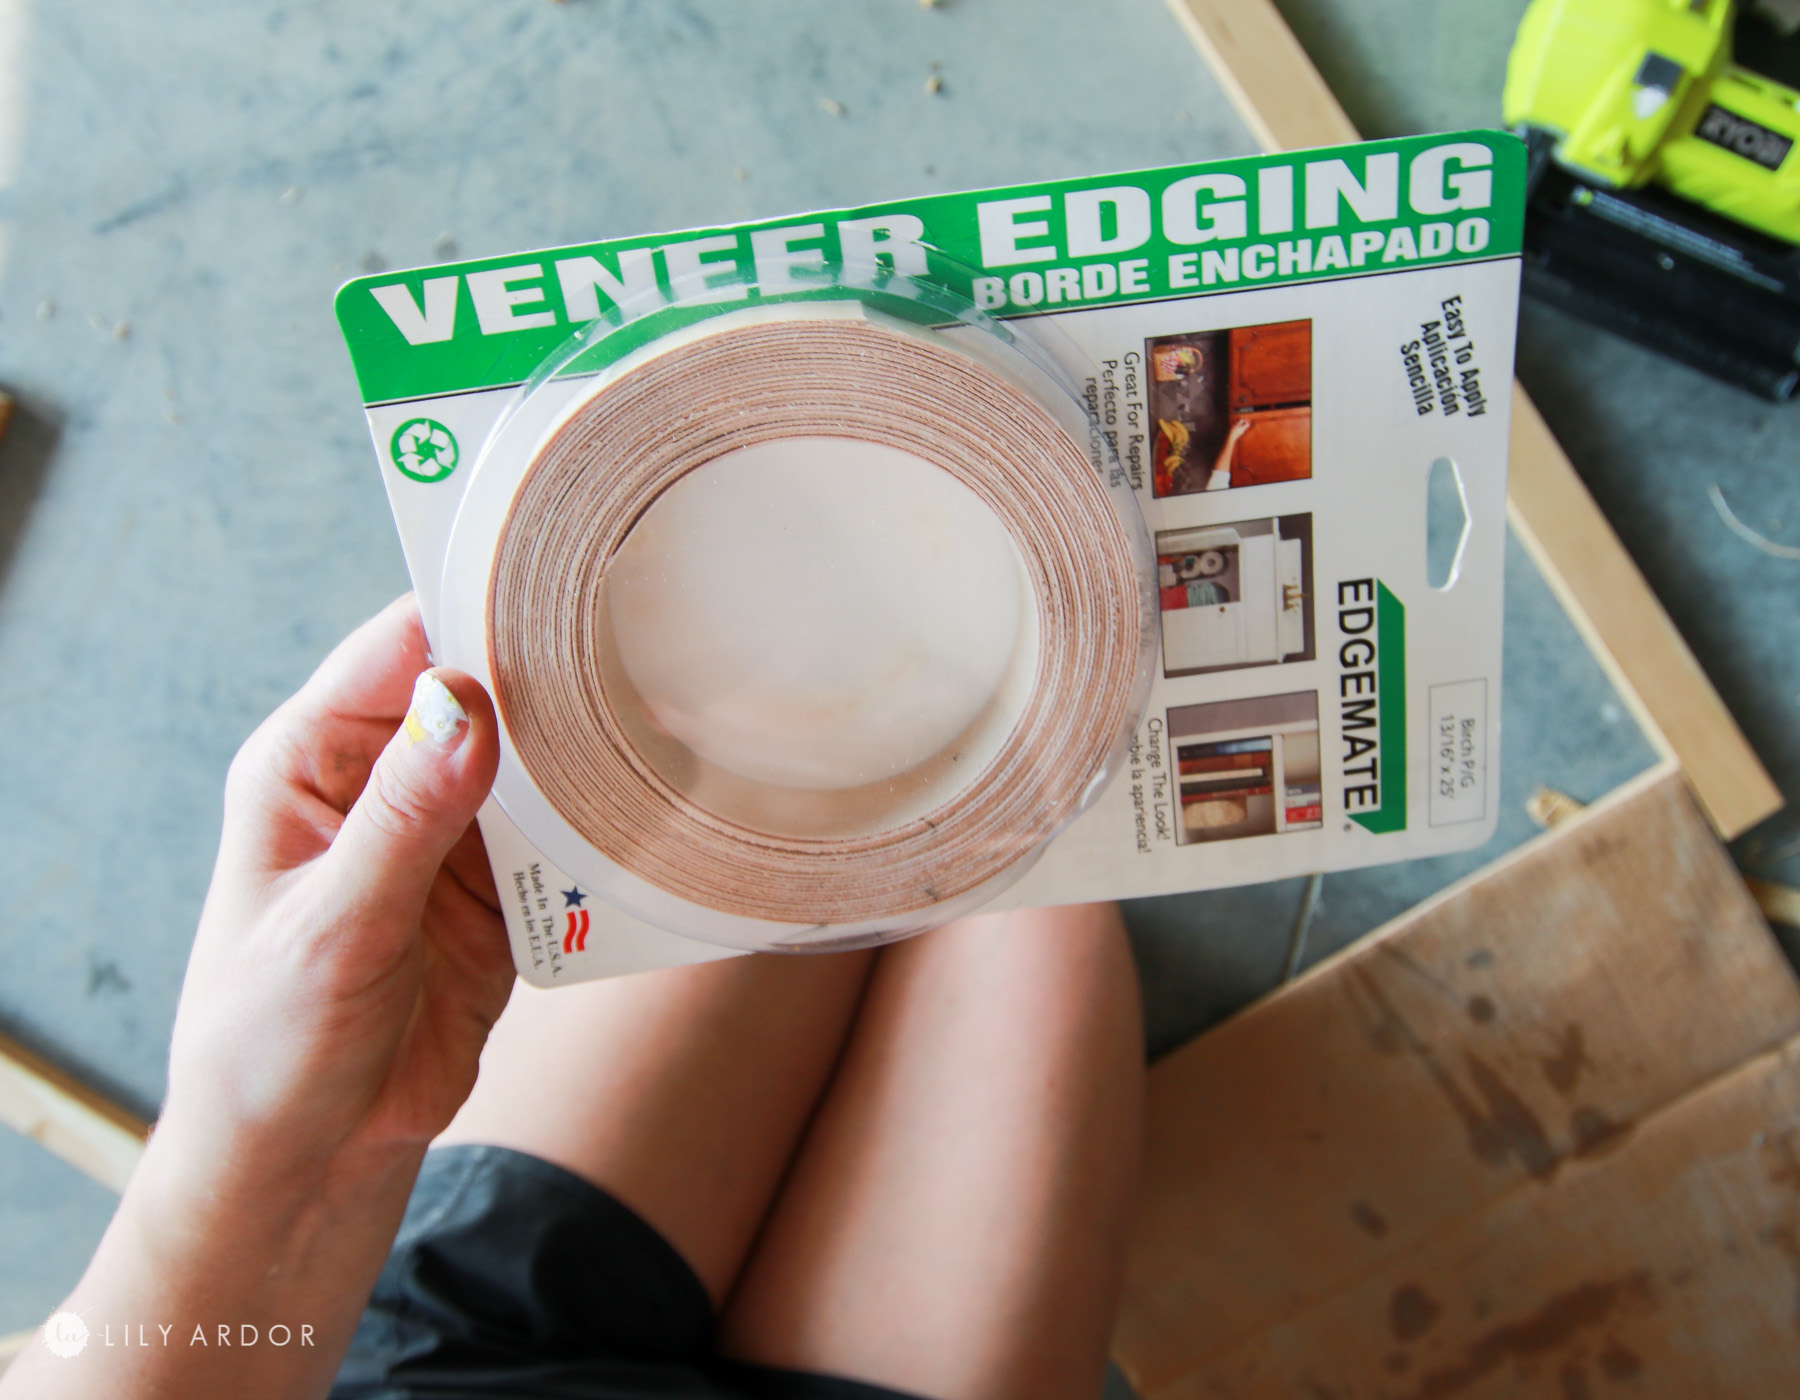
Next I used some veneer edging and secured it to all the edges on the pylwood simply by ironing it. I found the best way to do this was to pre-cut the width needed for the plywood then attach it by using my iron. This stuff is amazing. It’s so strong!

Next I stained the cabinet and we attached the doors to the cabinet using some small hinges.
That’s it! I still can’t believe that burlap looks that good! I do think getting the perfect color on the burlap makes a huge difference. 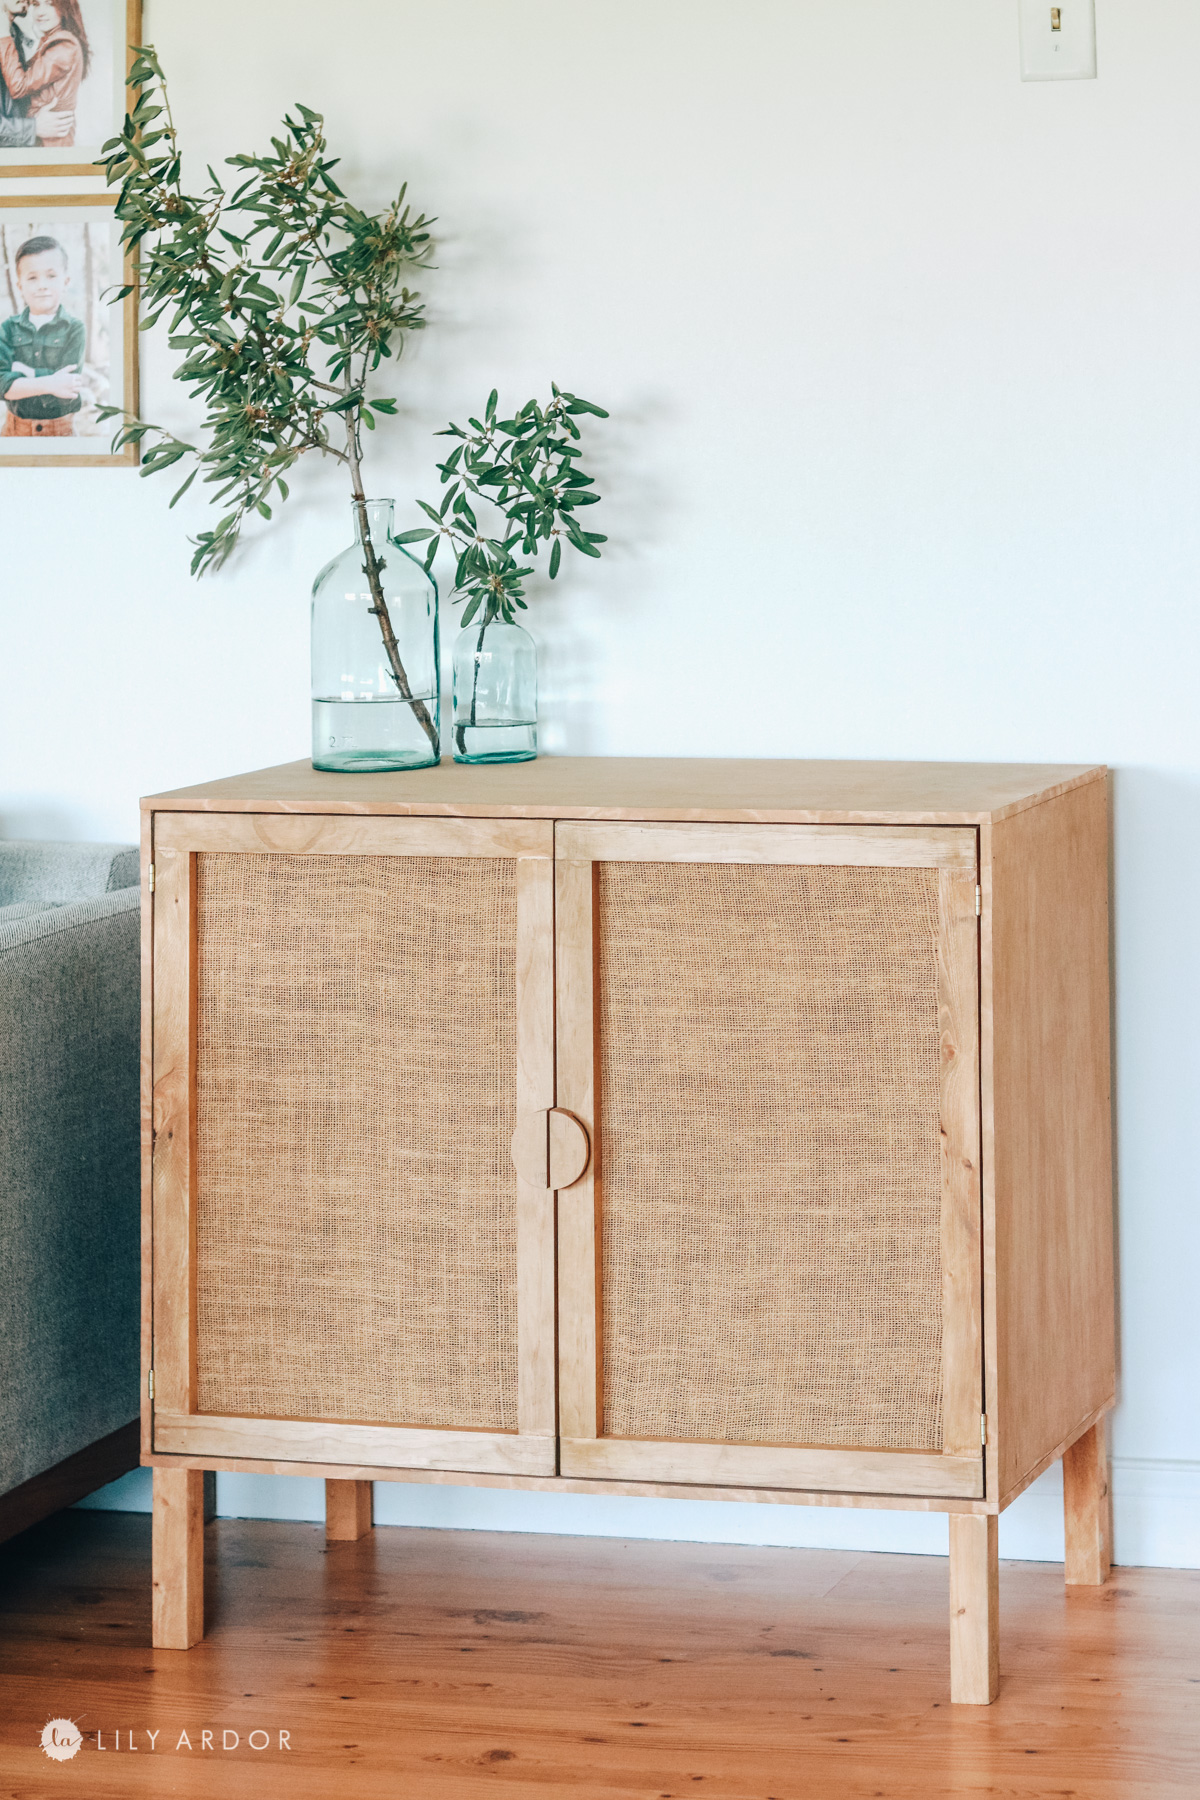
If you have questions feel free to let me know in the comments. You can also check out the video. I share the DIY more in depth there. PS: I also show how we made the wood handles if you’re wondering.
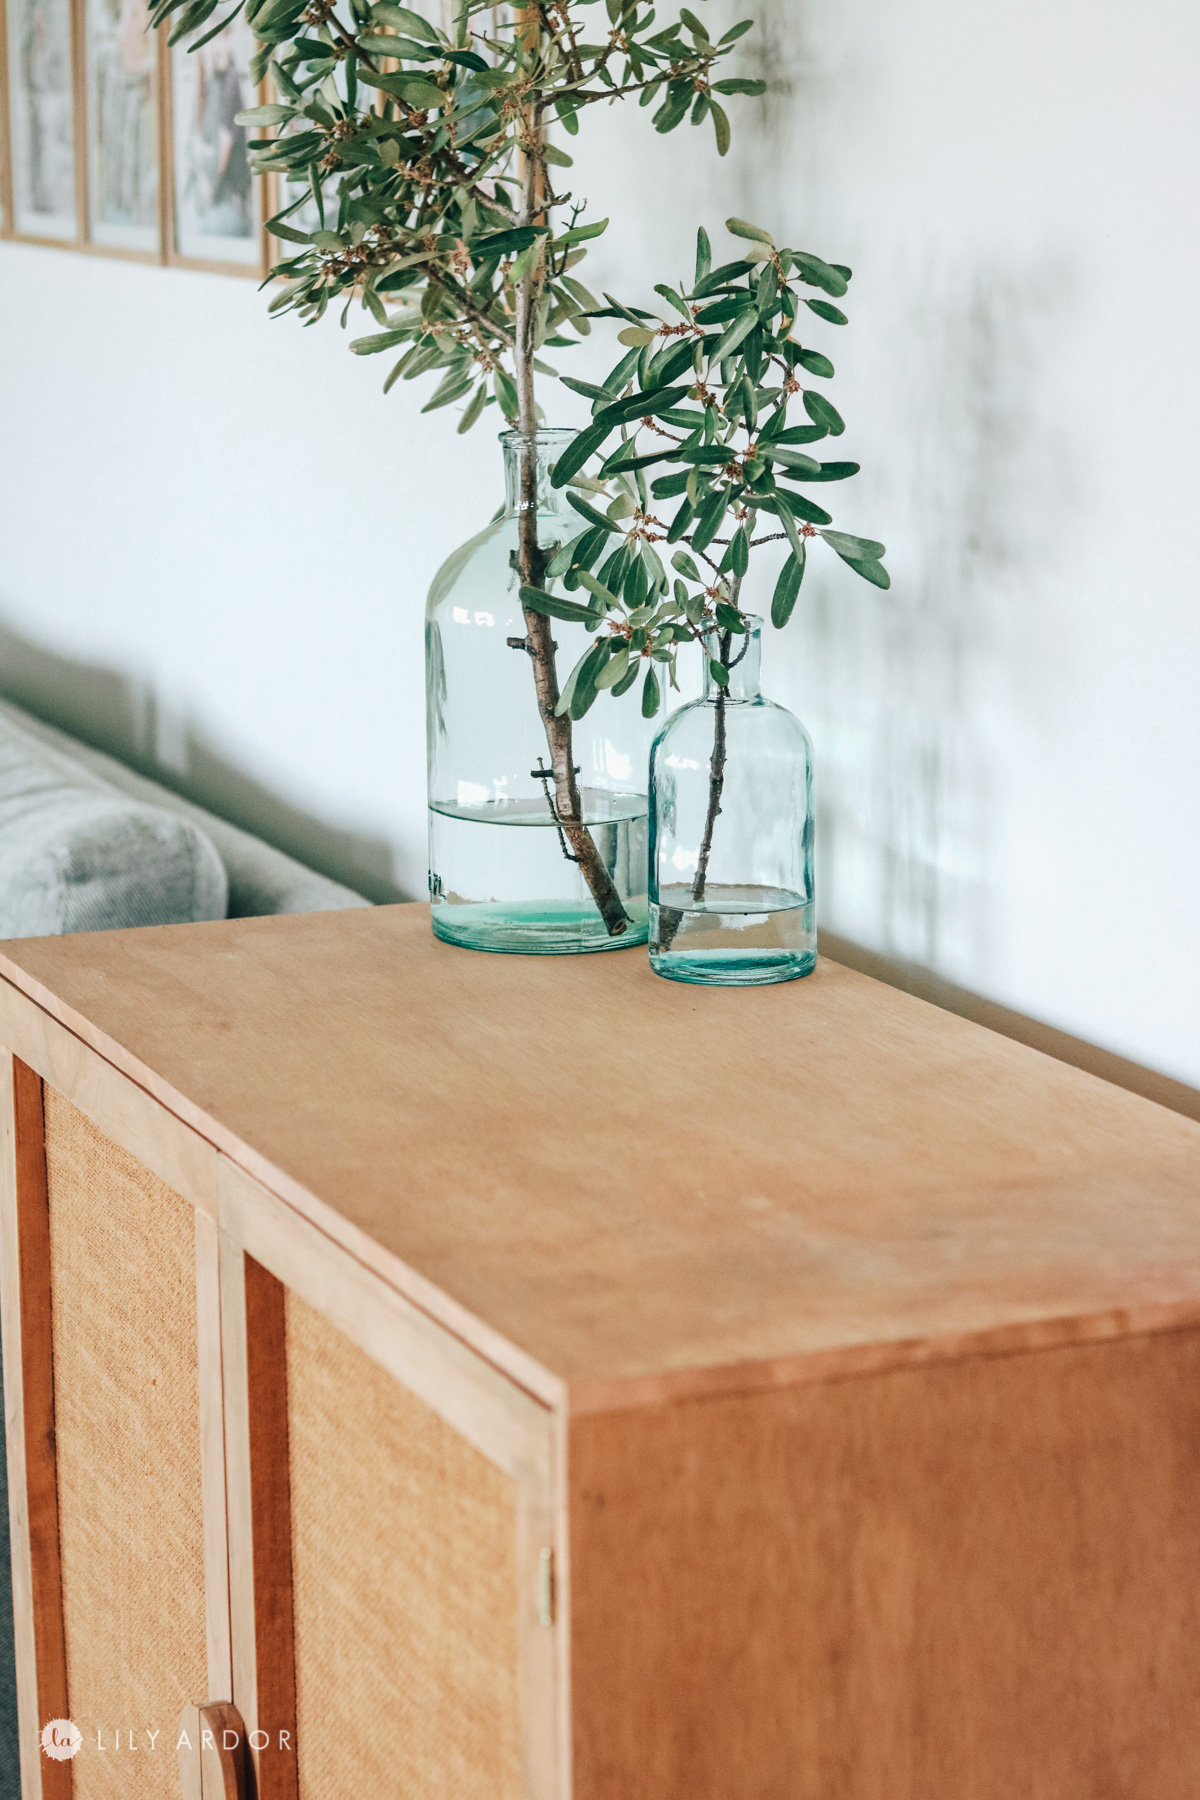
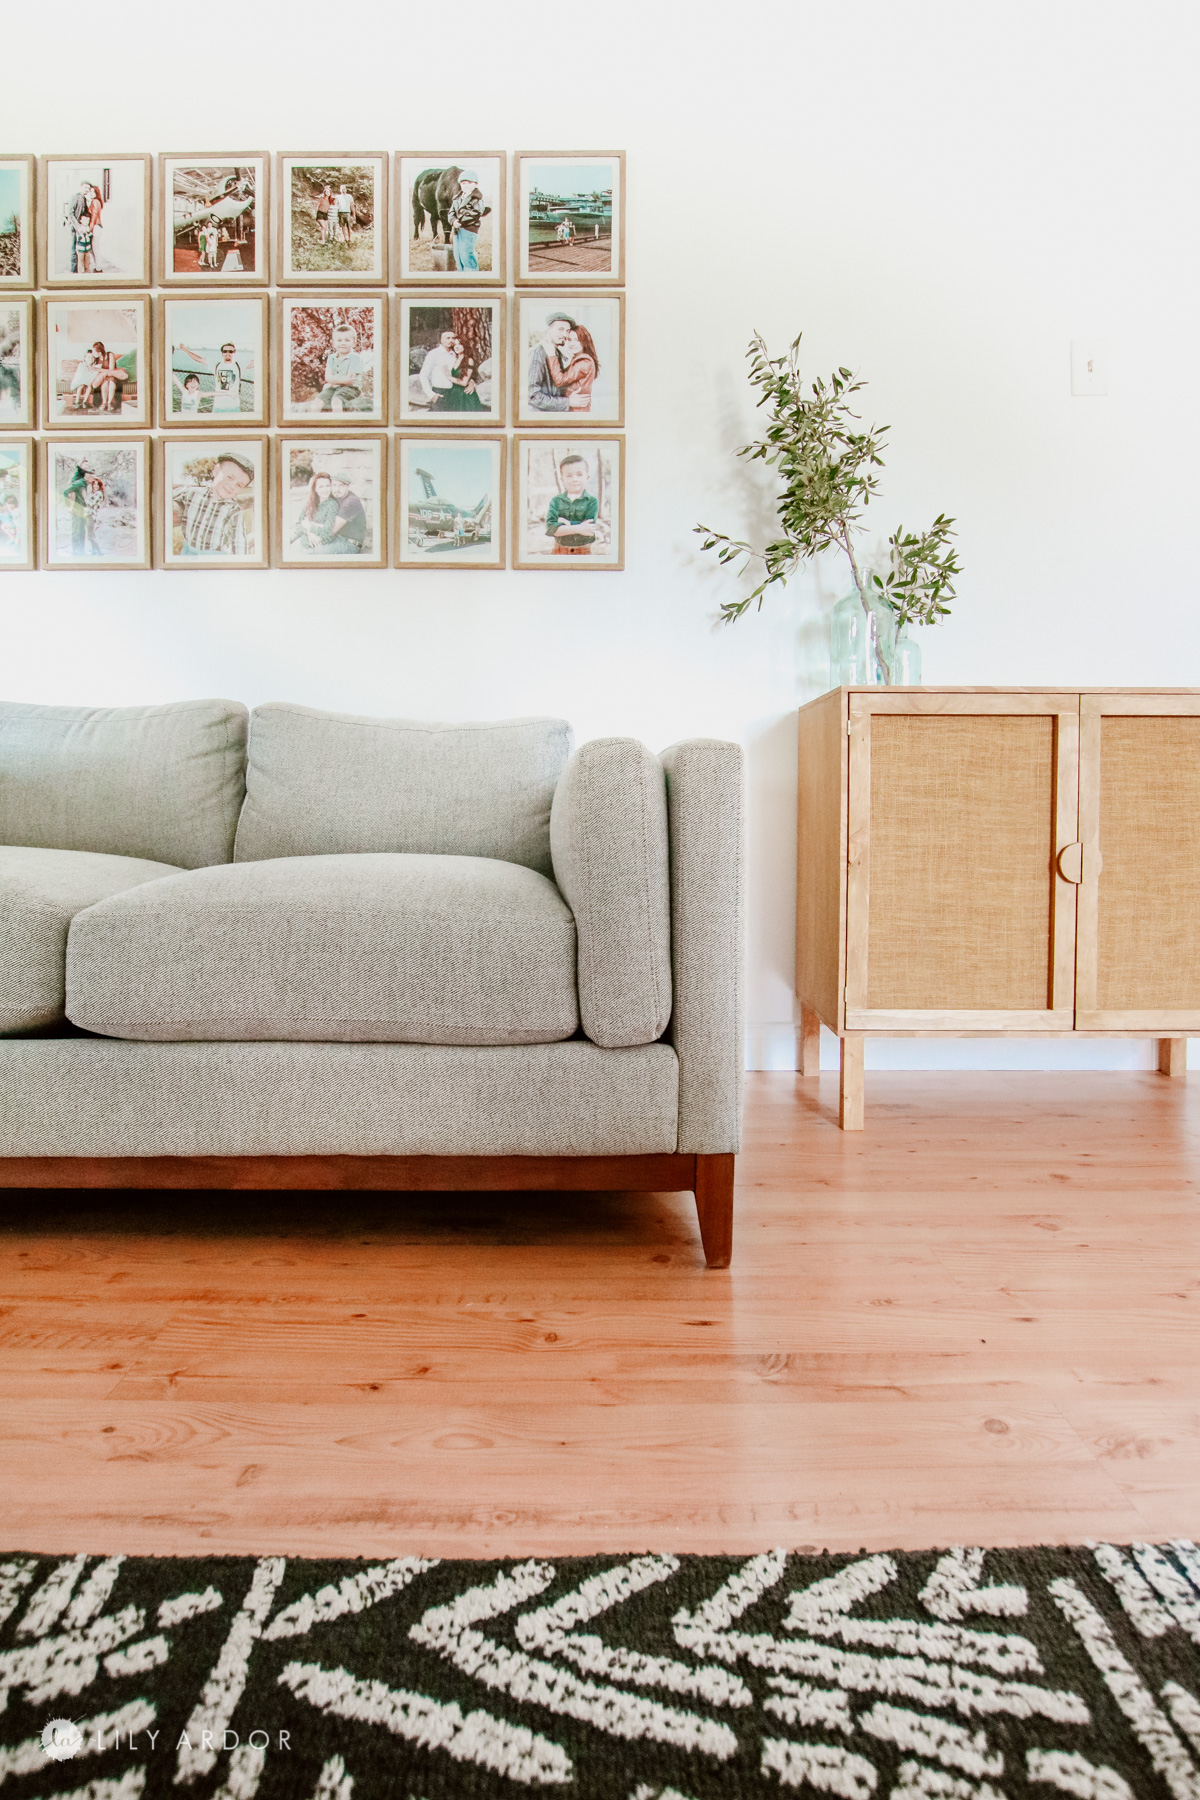
I got these glass vases at target. They’re from the magnolia line. Definitely on the pricer side and I had seconds thoughts about buying them but, once I set it all up I don’t regret getting them at all. I love how simple and cute they look. They’ll match some many different styles of decor and they’re super versatile for seasonal decor.
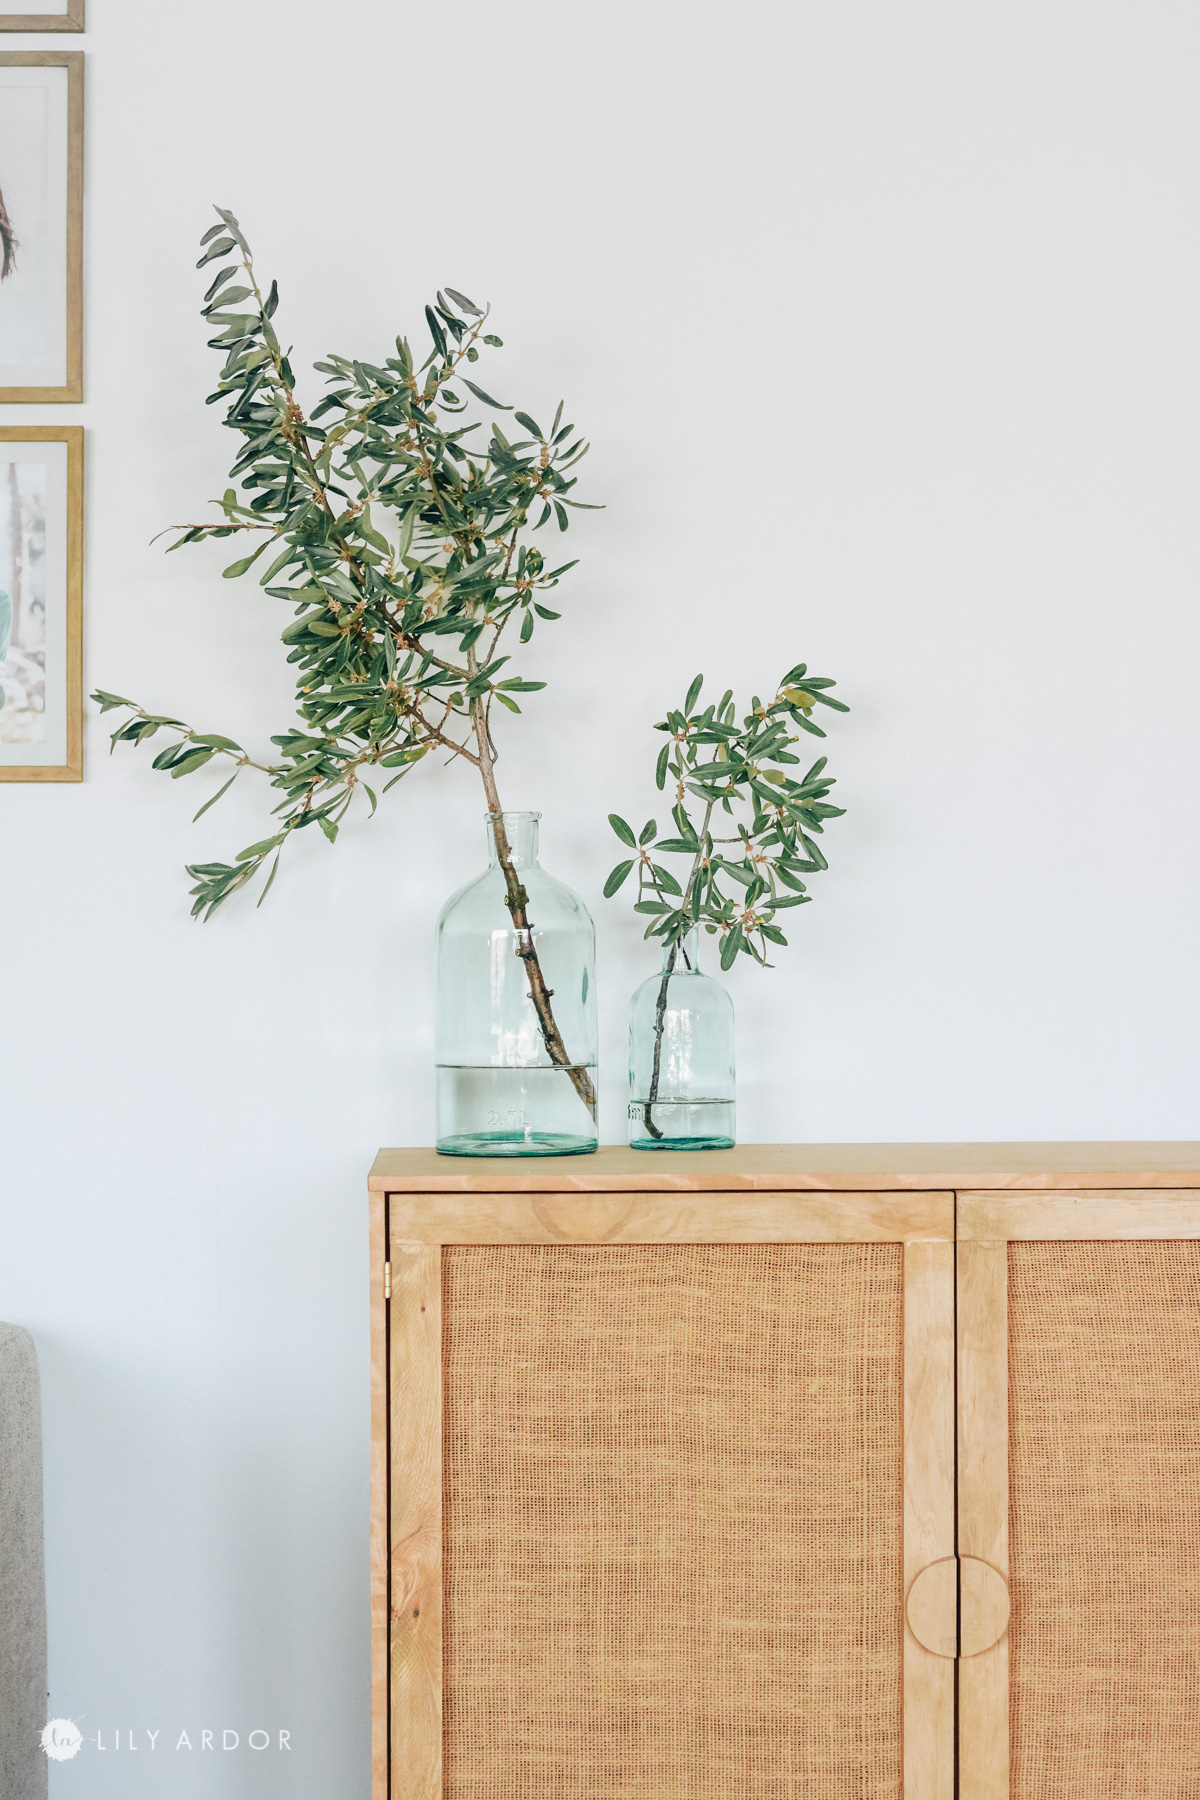
I just finished hanging up my gallery wall yesterday as well. I love how the space is coming together. There’s a few more things I want to add to the living room and it’ll be complete.
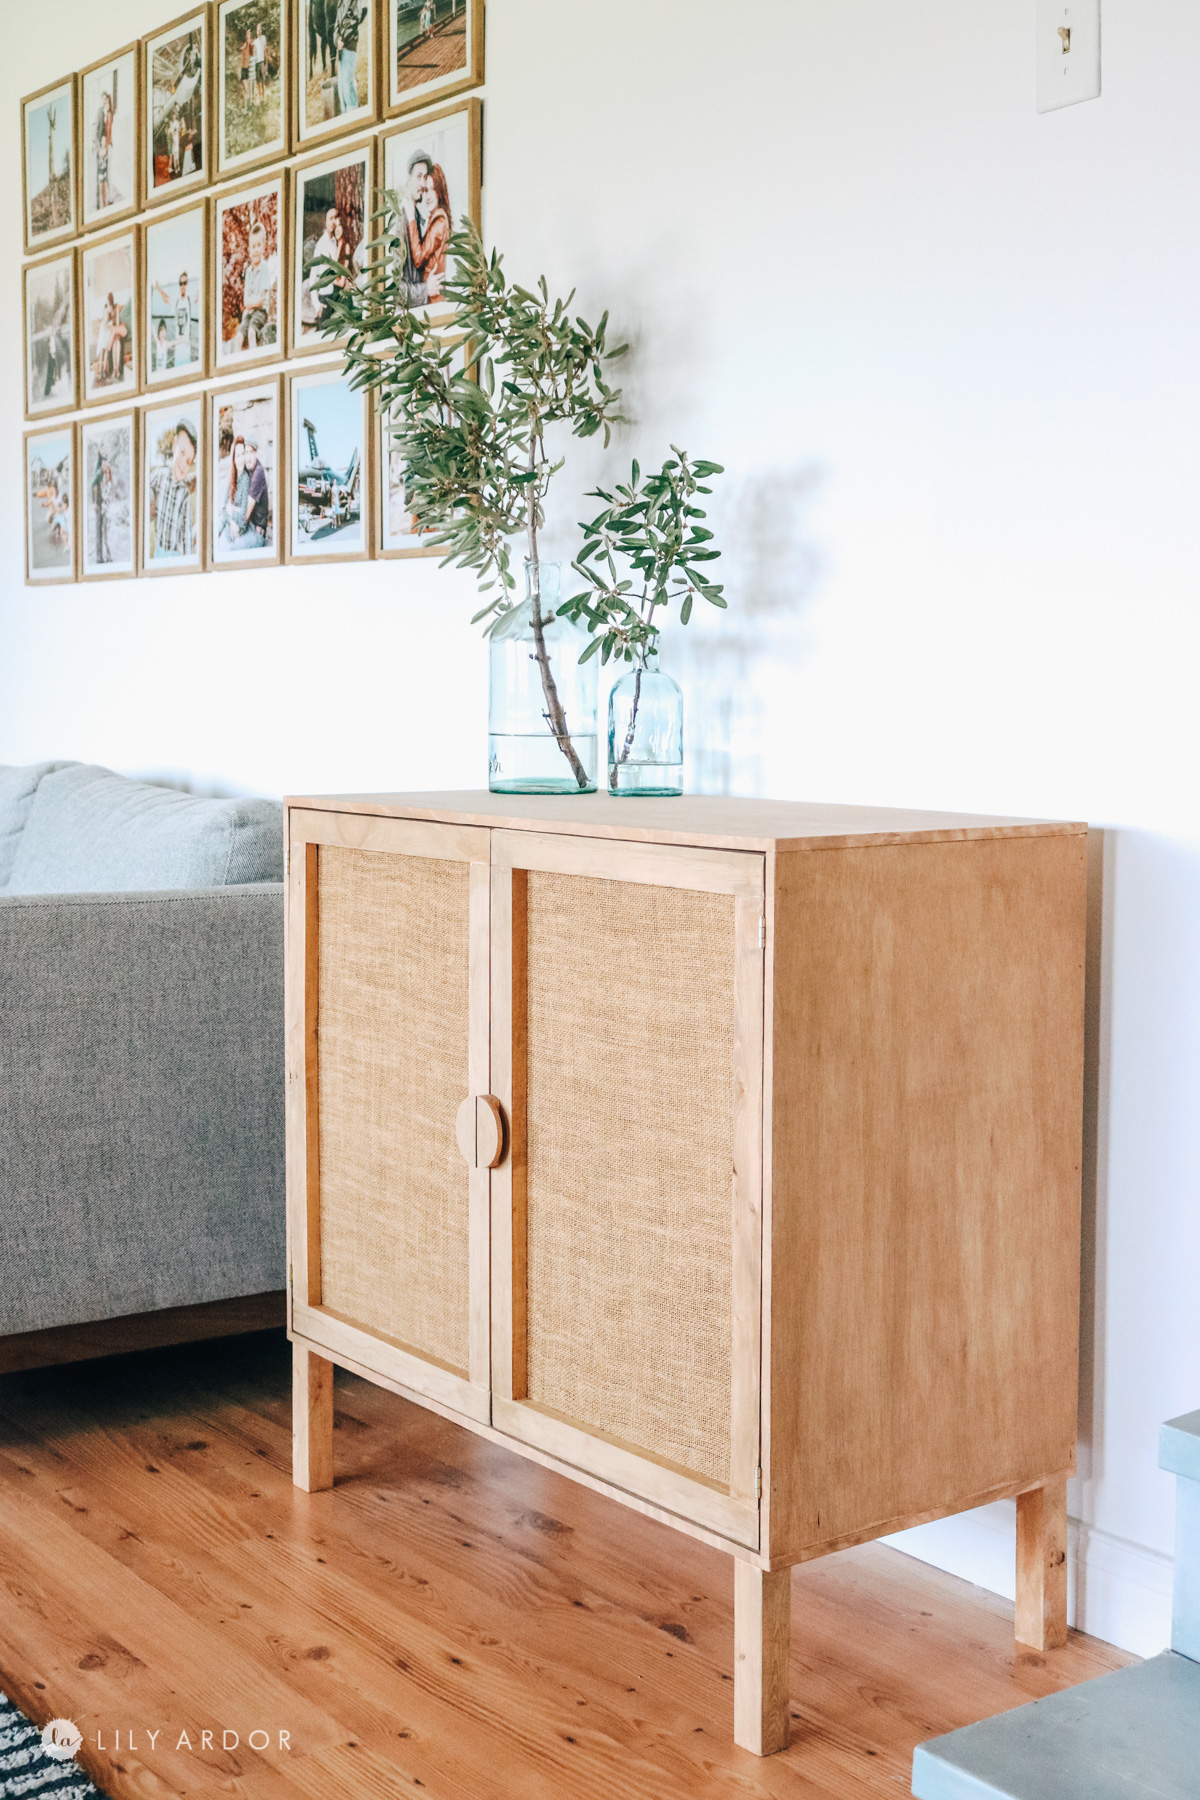
I will probably be adding a lighter color rug and a nice coffee table soon. I feel like now that I have plenty of warm wood tones going on I need to cool it down with something and the dark rug isn’t doing much for the space. It was also moved back to far in this photo I didn’t realize this until now. LOL 😅 OOPS. What can I say… I move my stuff around a lot 😬. #DIYlife
That’s it for today! I’ll see you all next time. I hope you’re having an amazing weekend and you find this DIY helpful 🙂
Best Wishes,
Lily
Love these tutorial and your furniture piece. What stain did you use?
Thank you so much I used fruitwood by minwax 😀
What 4 Colors did you use for your burlap stain?
I don’t remember for sure because it took me a while to get the color and I tried so many different acrylic colors. I think it was 2906CA coffee latte by folkart, 942 honeycomb, some white, peachy color paint and a bit of green to tone down the warm.
I don’t remember for sure because it took me a while to get the color and I tried so many different acrylic colors. I think it was 2906CA coffee latte by folkart, 942 honeycomb, some white paint and a bit of green to tone down the warm.
Hello! Do you recall what color acrylic paints you used? The finished burlap you achieved looks beautiful and I’d love to try it with my own project but I’m not sure which base paint colors to get. Thank you!
folk art cinnamon and honeycomb, and light mocha, + a bit of green to cancel out too much red. That’s what I remember using.
Hi! Thank you so much for this DIY, I love the look. If I plan to make two cabinets, do you think I should buy two of the 8oz wood stain you linked or would one suffice?
It might be close. I would just get a 16 oz in case. Gladd you loved it.
Hi,
The cabinet is super cool! The video link to the instructions on the wood handles doesnt work. Can you please provide an updated link?
Thank you!!!
I LOVE this so much!! I am doing the ORC and attempting out pantry and this has been so helpful. I have never built cabinets before either. Thanks for putting this together!!
That sounds amazing!
The darker one was already to dark and the undertone was too green.