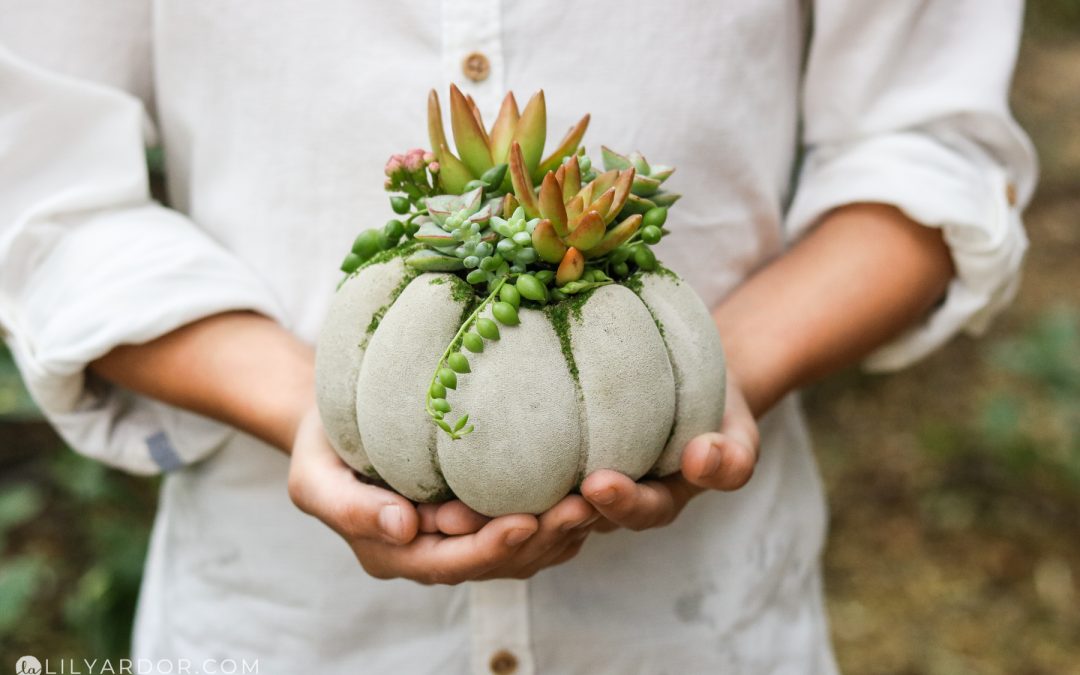
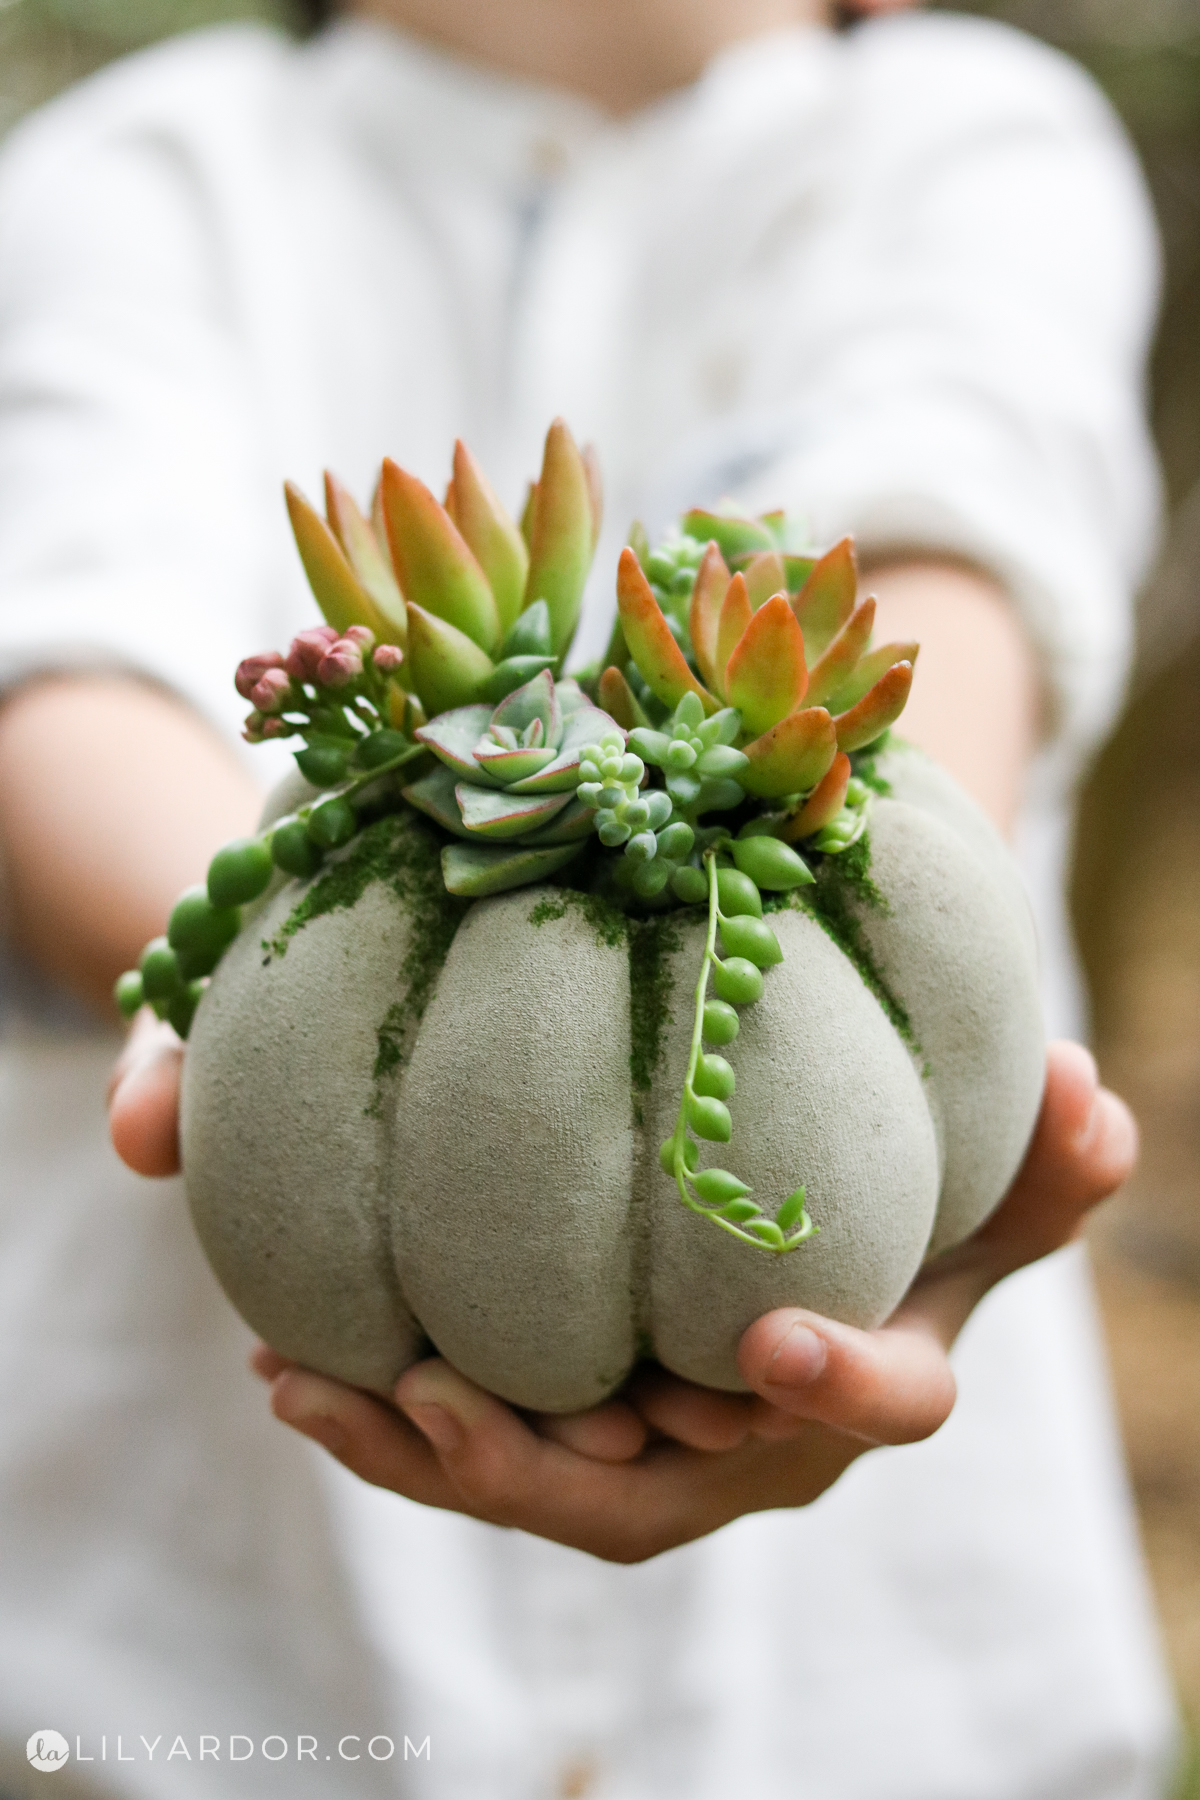
It’s been a while since I did a project with little Oleg! This DIY shows how we made a succulent pumpkin using tights and concrete. It was so easy to make! If you’ve been following along you’re probably familiar with my previous concrete pumpkins. This is very similar however we used different concrete mix that takes only hours to set which changes the DIY a little bit. I hope you love these as much as we did!
Let’s get started!
*may include affiliate links
Time Needed:
about 25 minutes
Total Cost: about $17
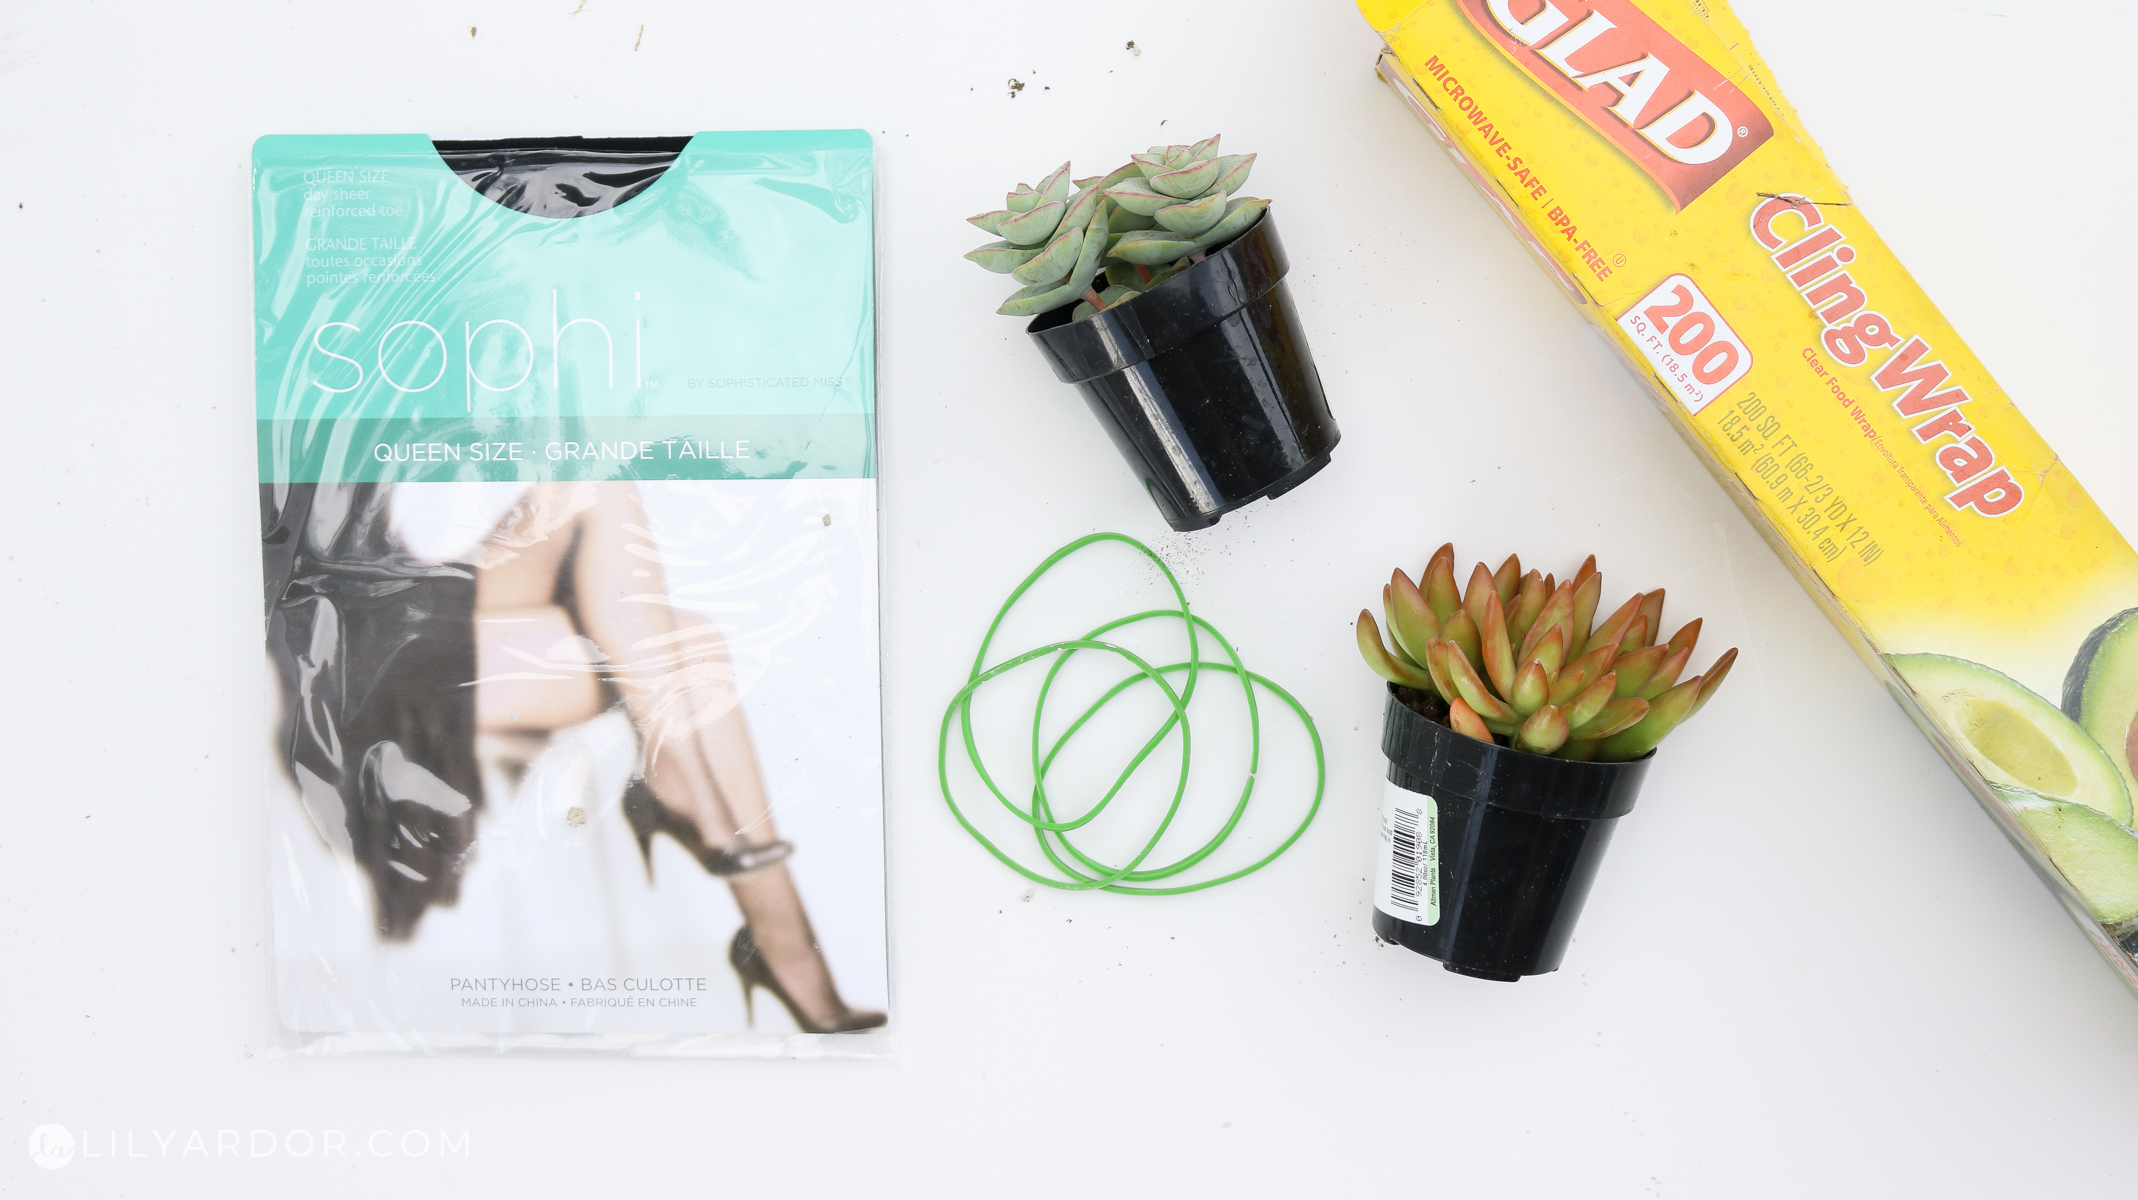
Supplies:
- sheer tights
- small 2.5″ potted succulents ( if you’re looking for realistic looking faux succulents you can find some here – https://amzn.to/35qPRCH )
- cling wrap
- rubber bands
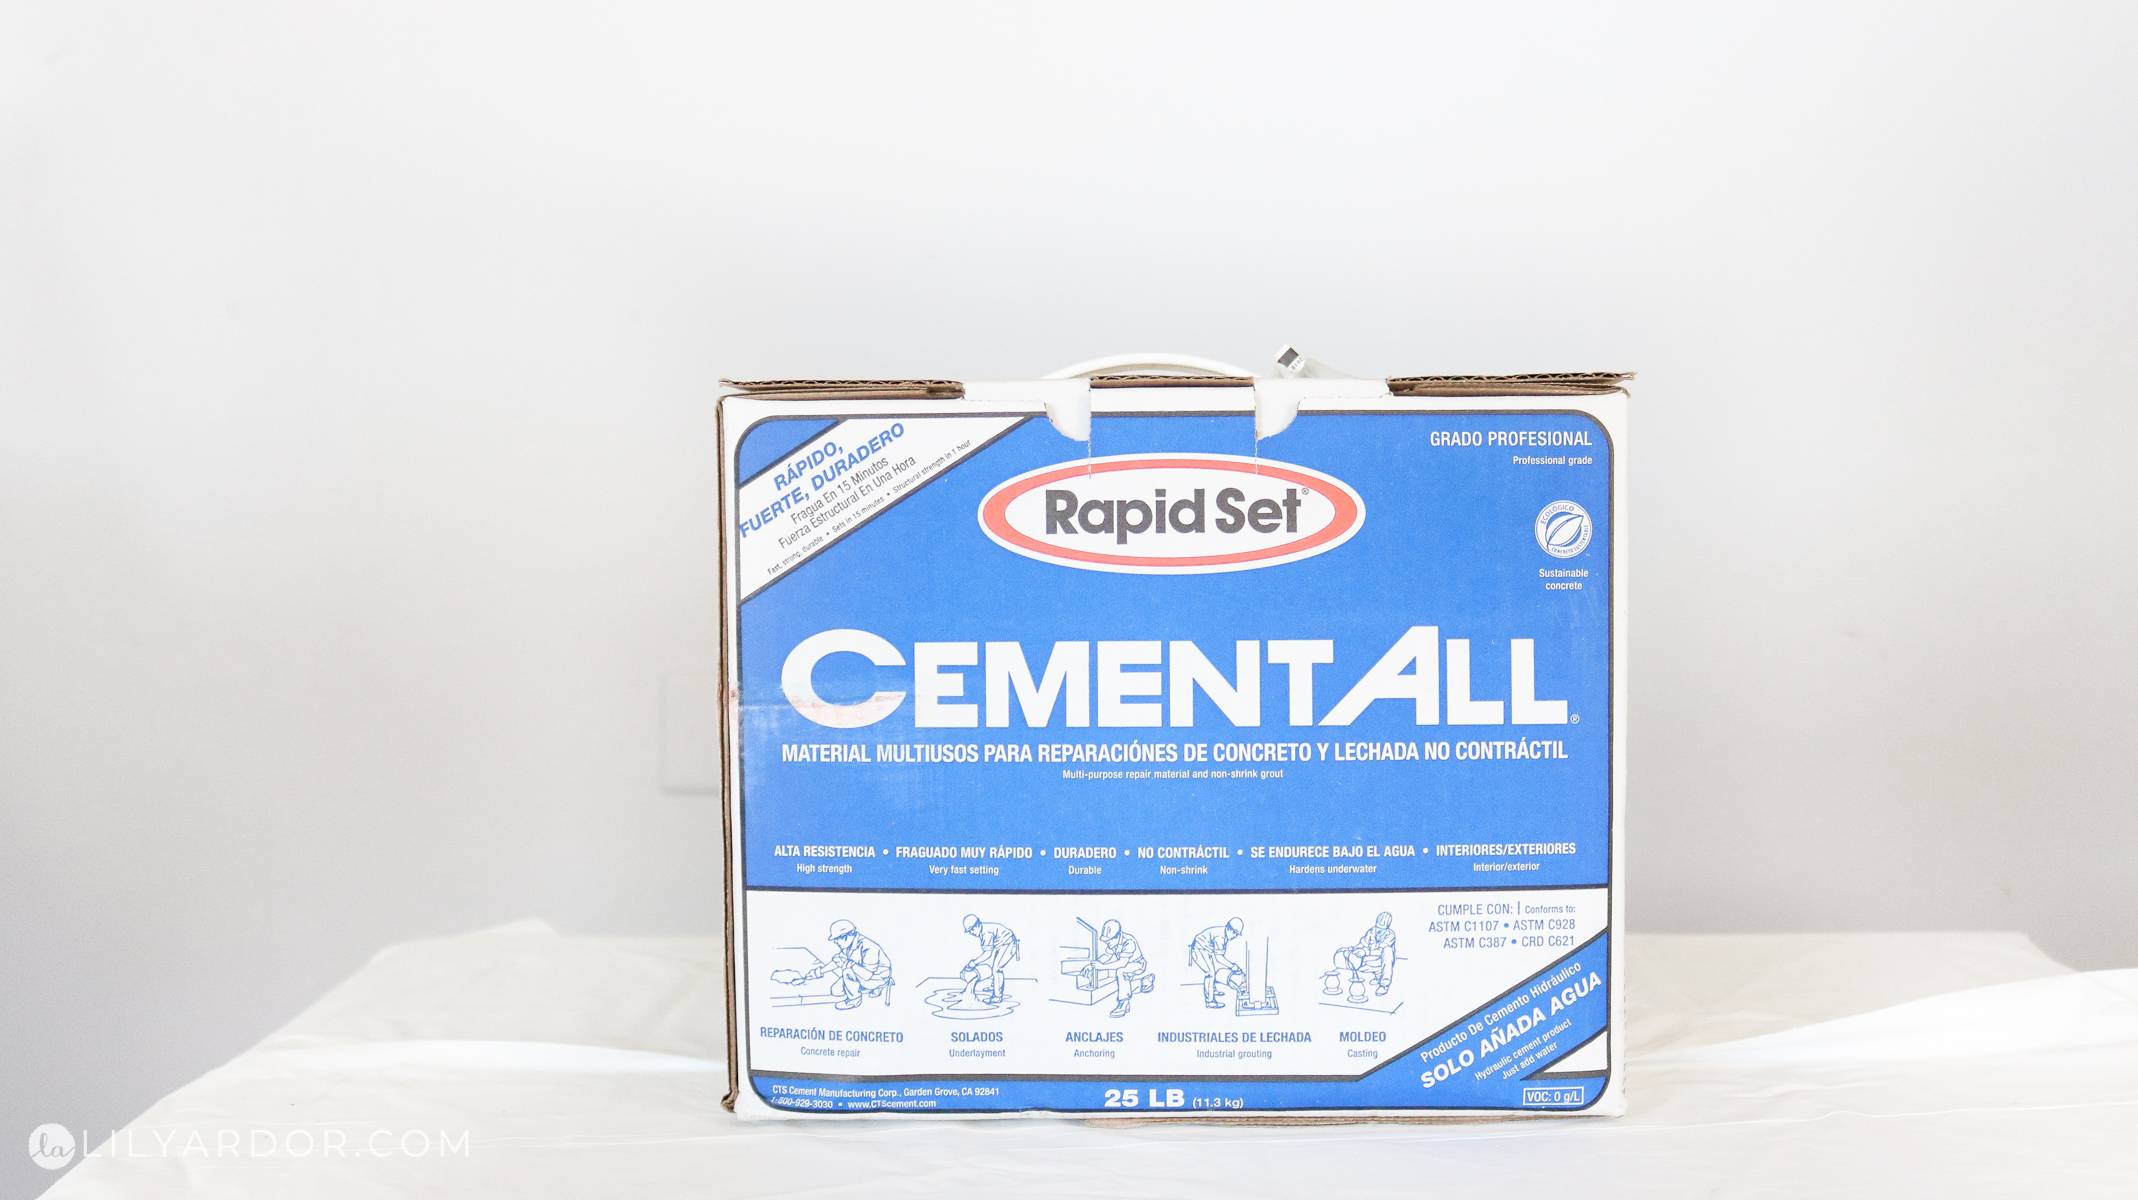
- cement all (by rapid set – https://amzn.to/37HqDlw )
- water + mixing supplies
DIY Succulent pumpkin
Let’s do its!
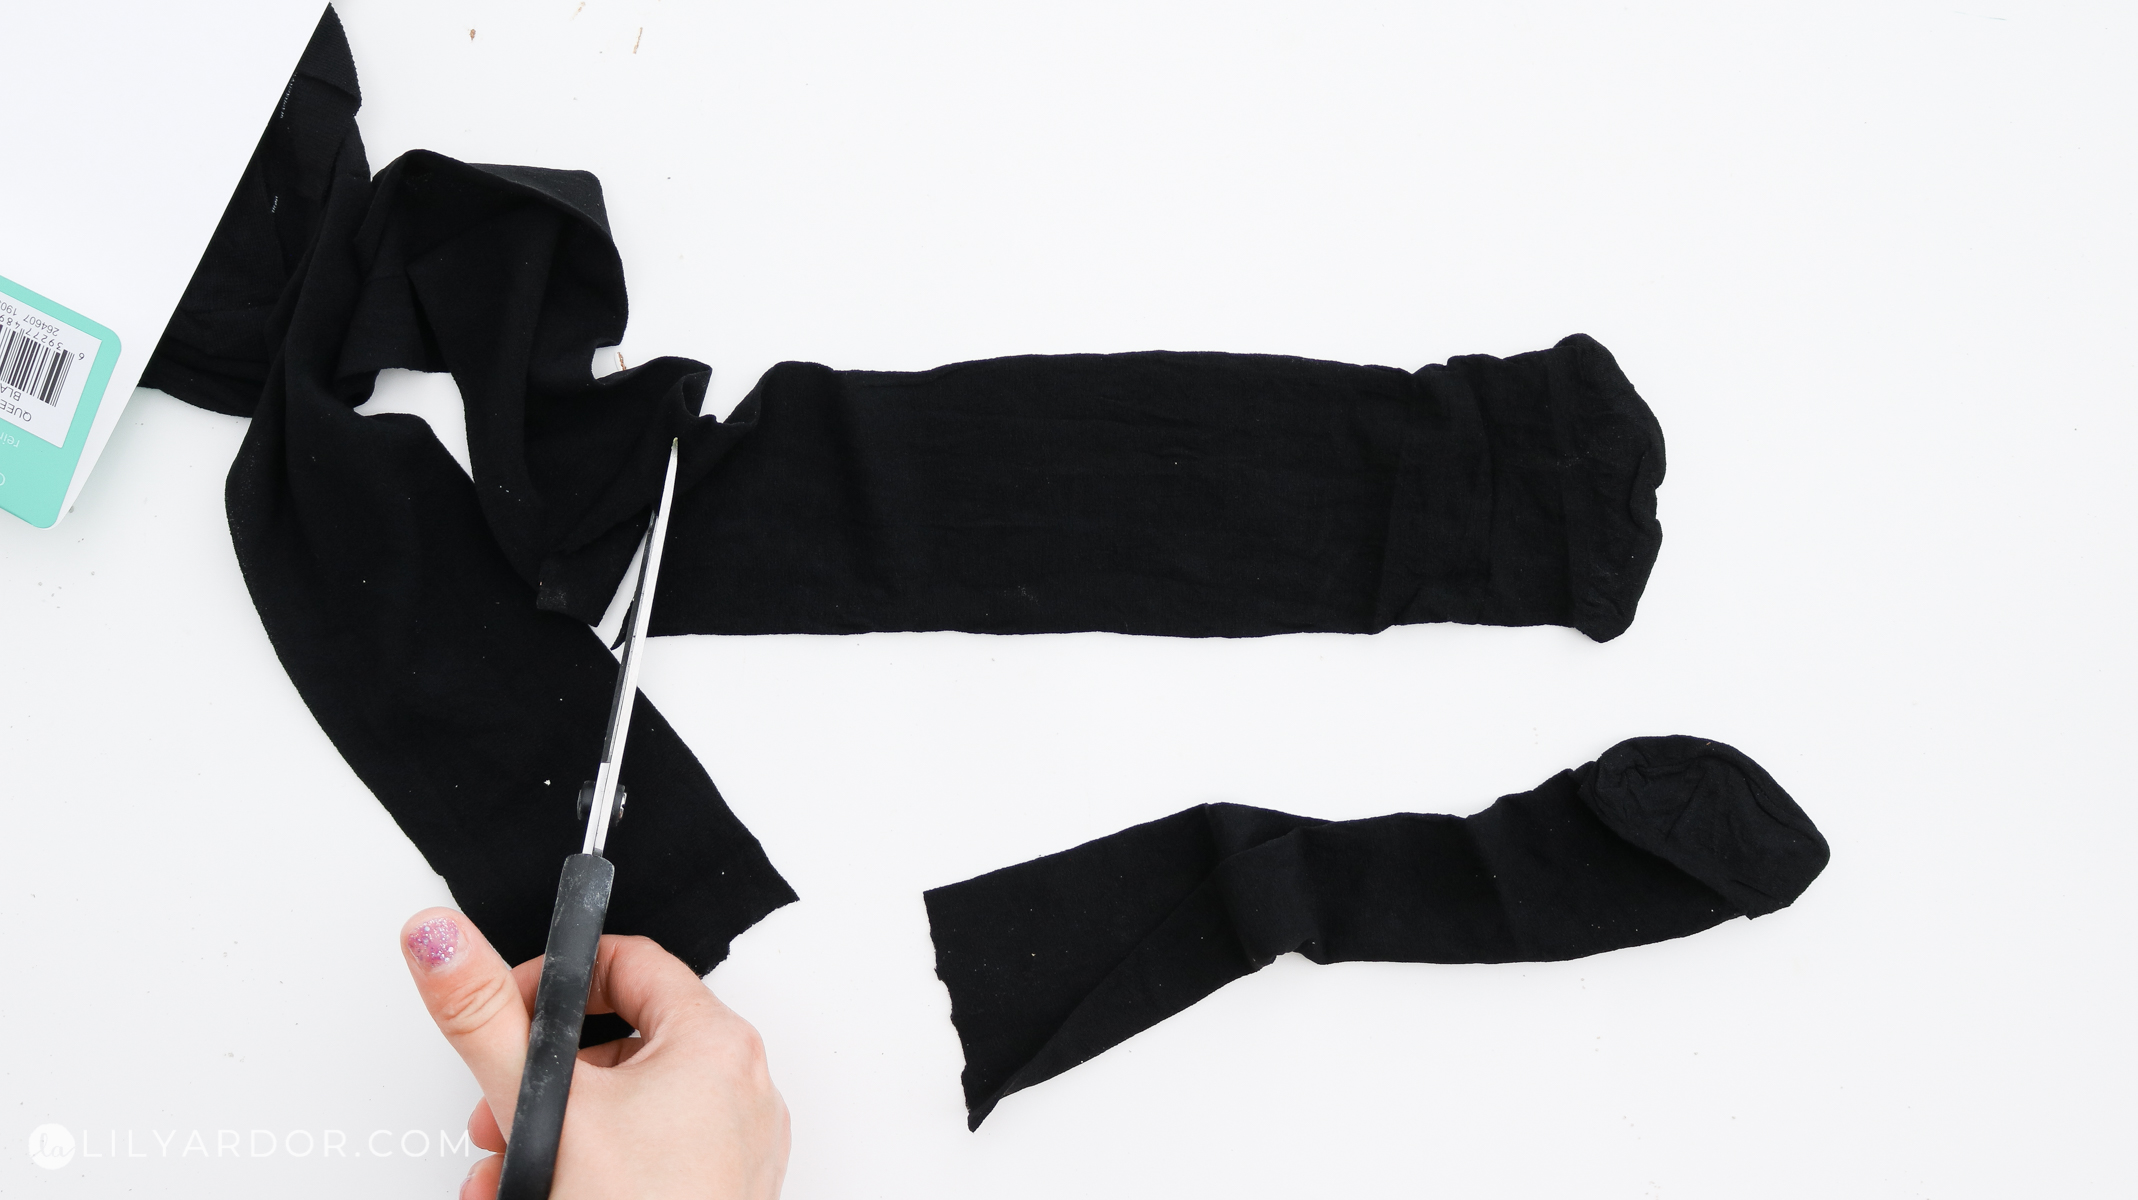
Prepping Your Sheer tights
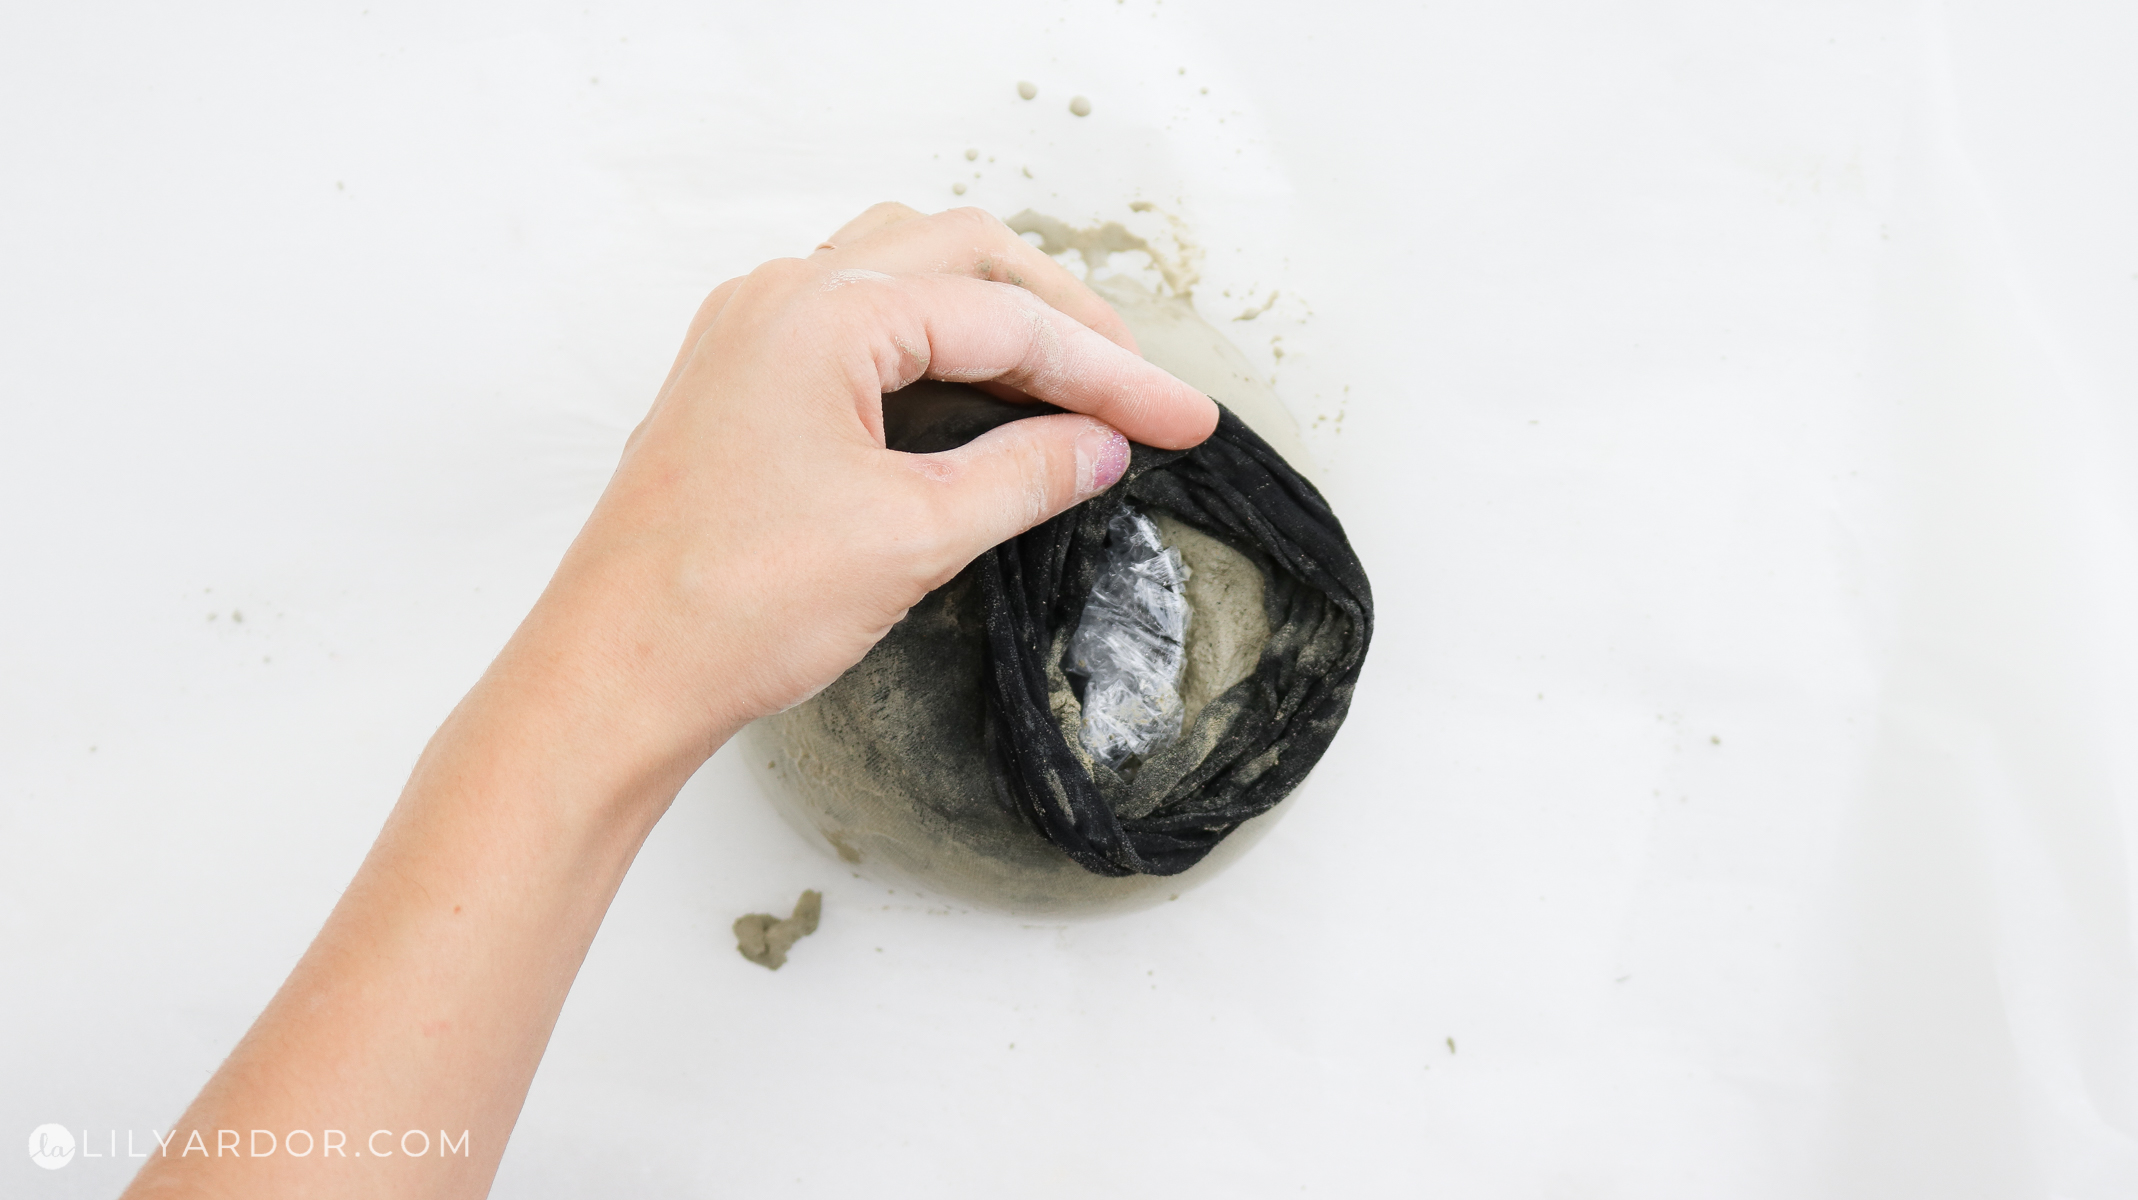
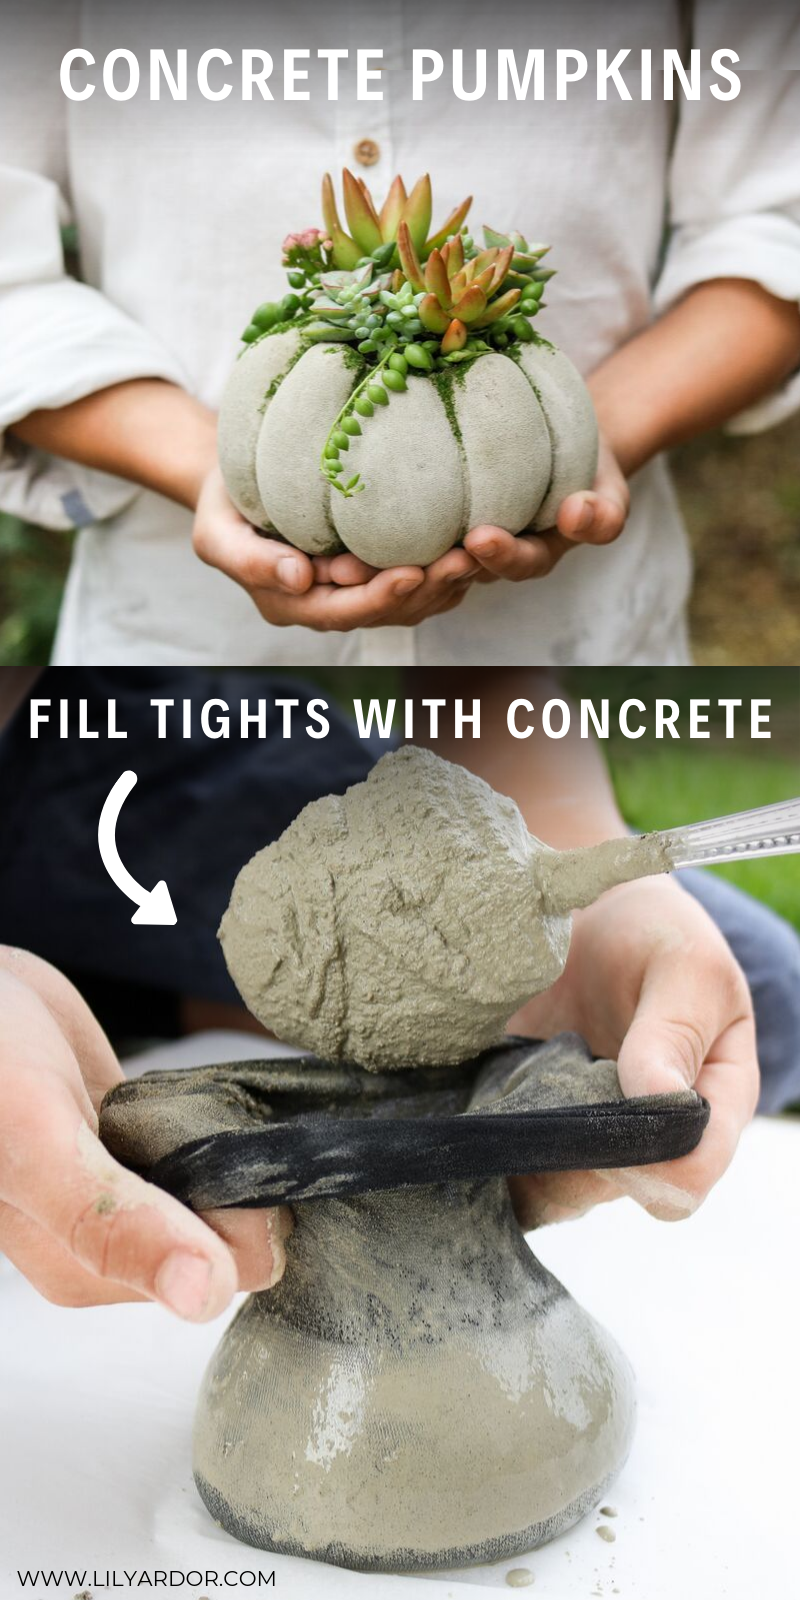
Because this cement mix starts setting pretty quick I would recommend prepping the tights and pots before you mix the cement. We used the bottom 12 inches of the tights. If you plan on using the rest of the tights as well you’ll just need to cut another 12″ section and tie a knot on the bottom before you fill it with concrete.
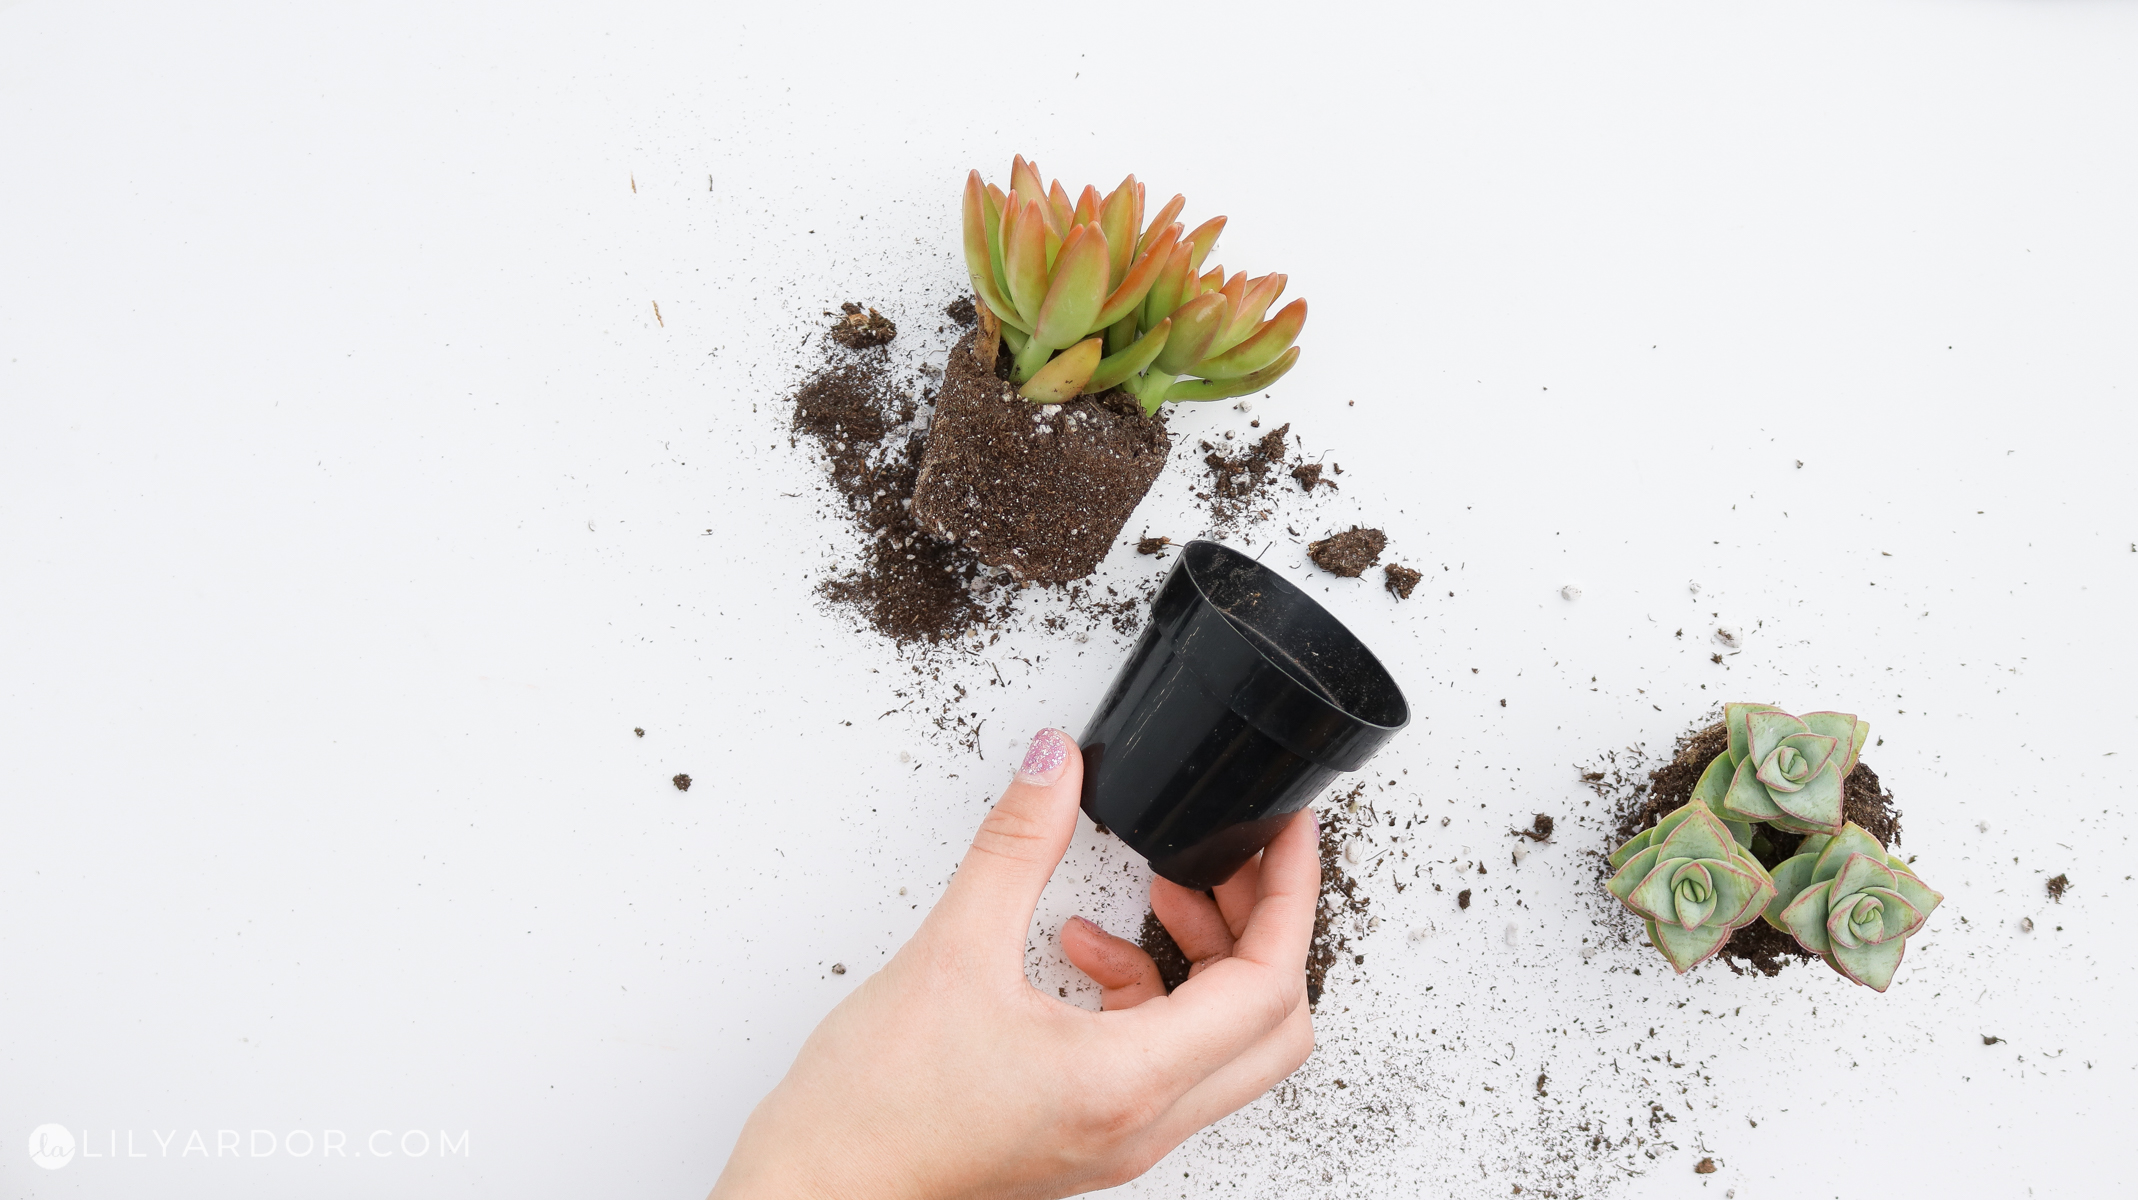
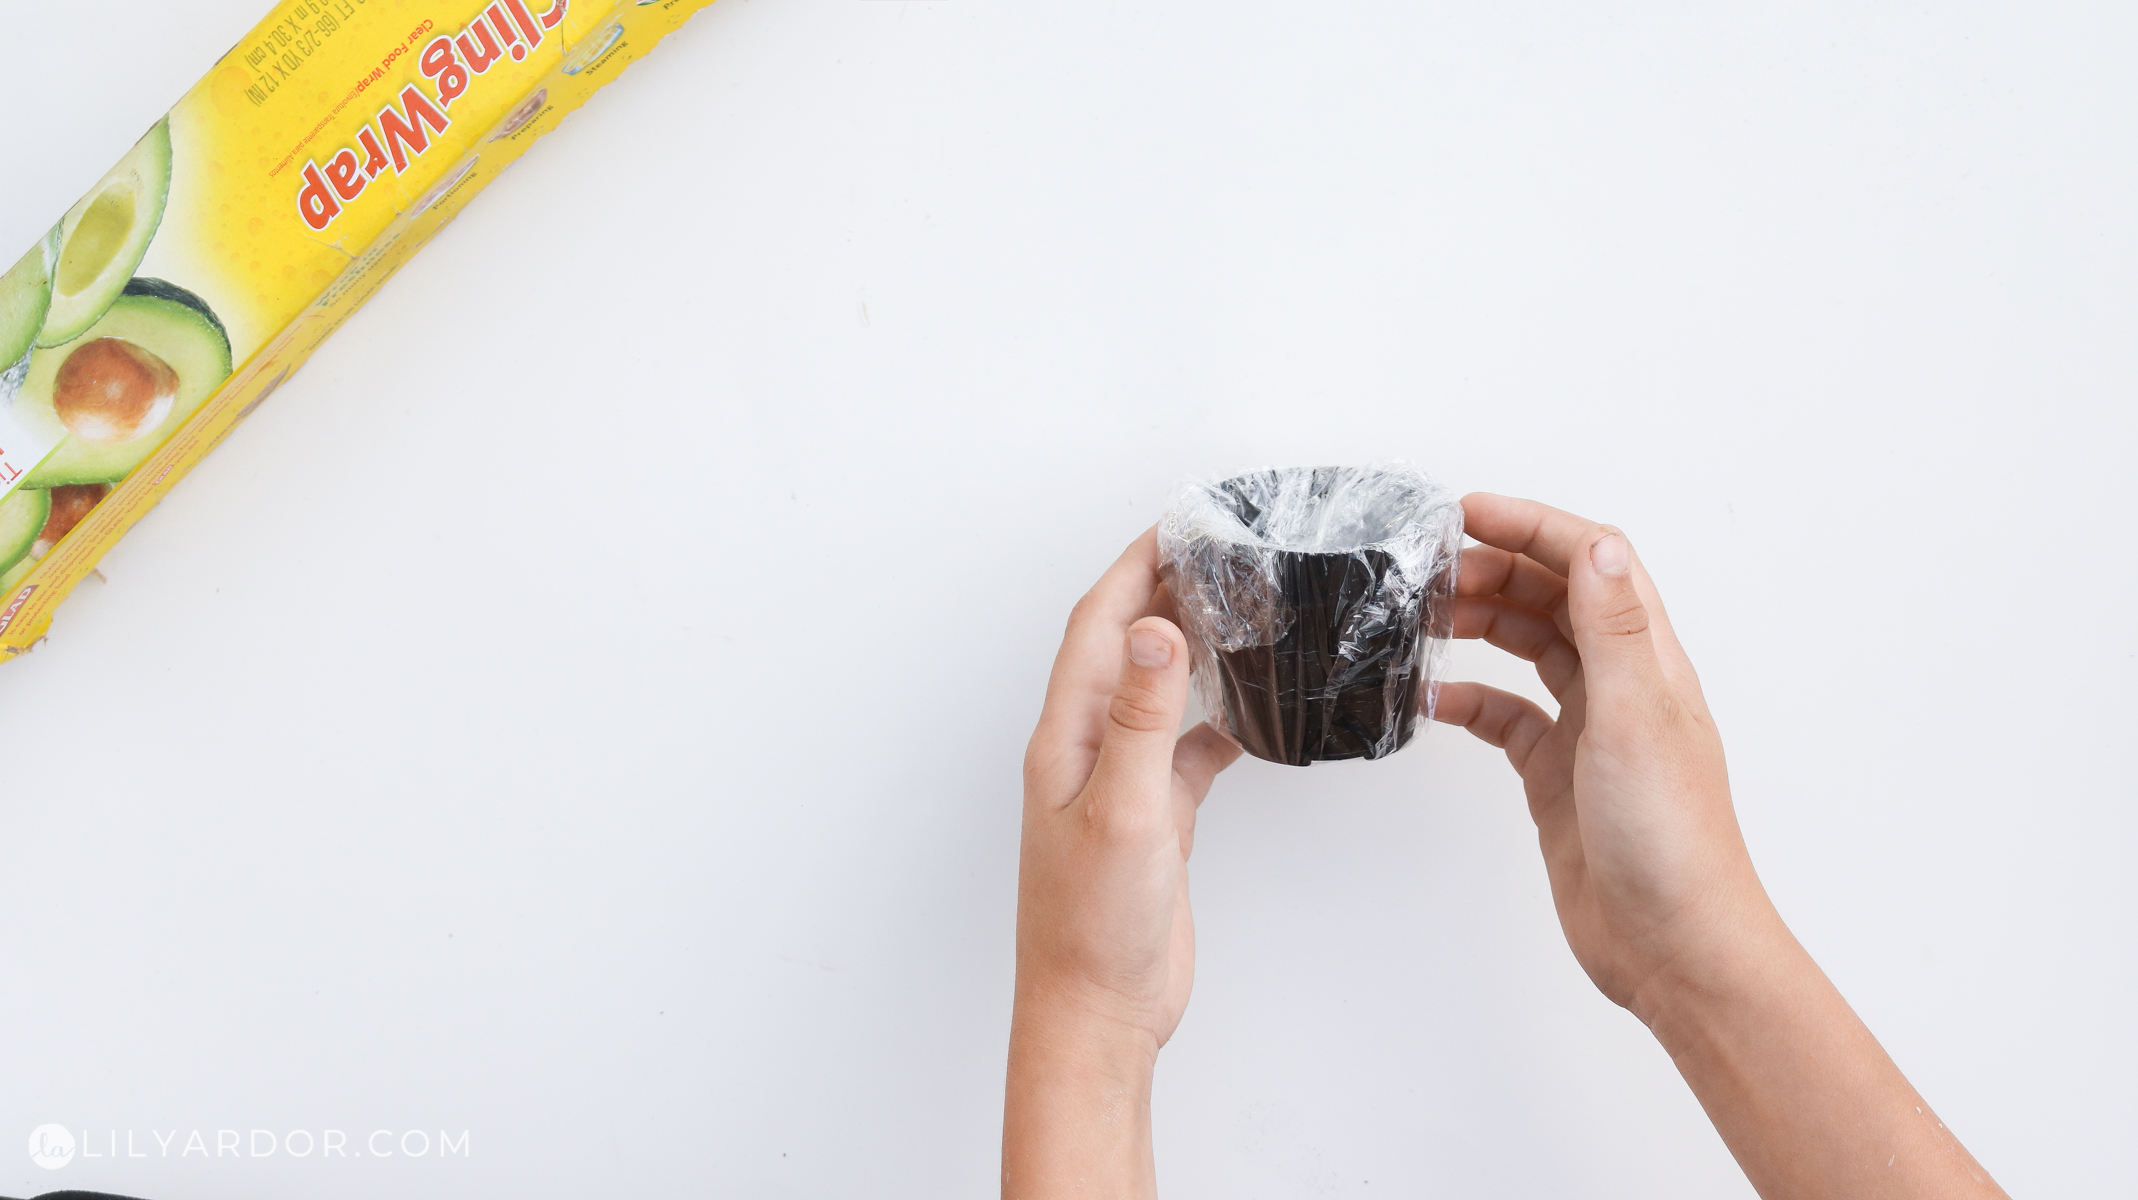
Prepping Your Succulent Pots
We got these mini succulent plants at homedepot. I believe they were in a 2.5″ pot. We removed the succulents and wrapped the pot in cling wrap.

Here’s the cement we used to make our succulent pumpkins. It’s super easy to work with and sets a lot faster than the concrete mix we used last time.
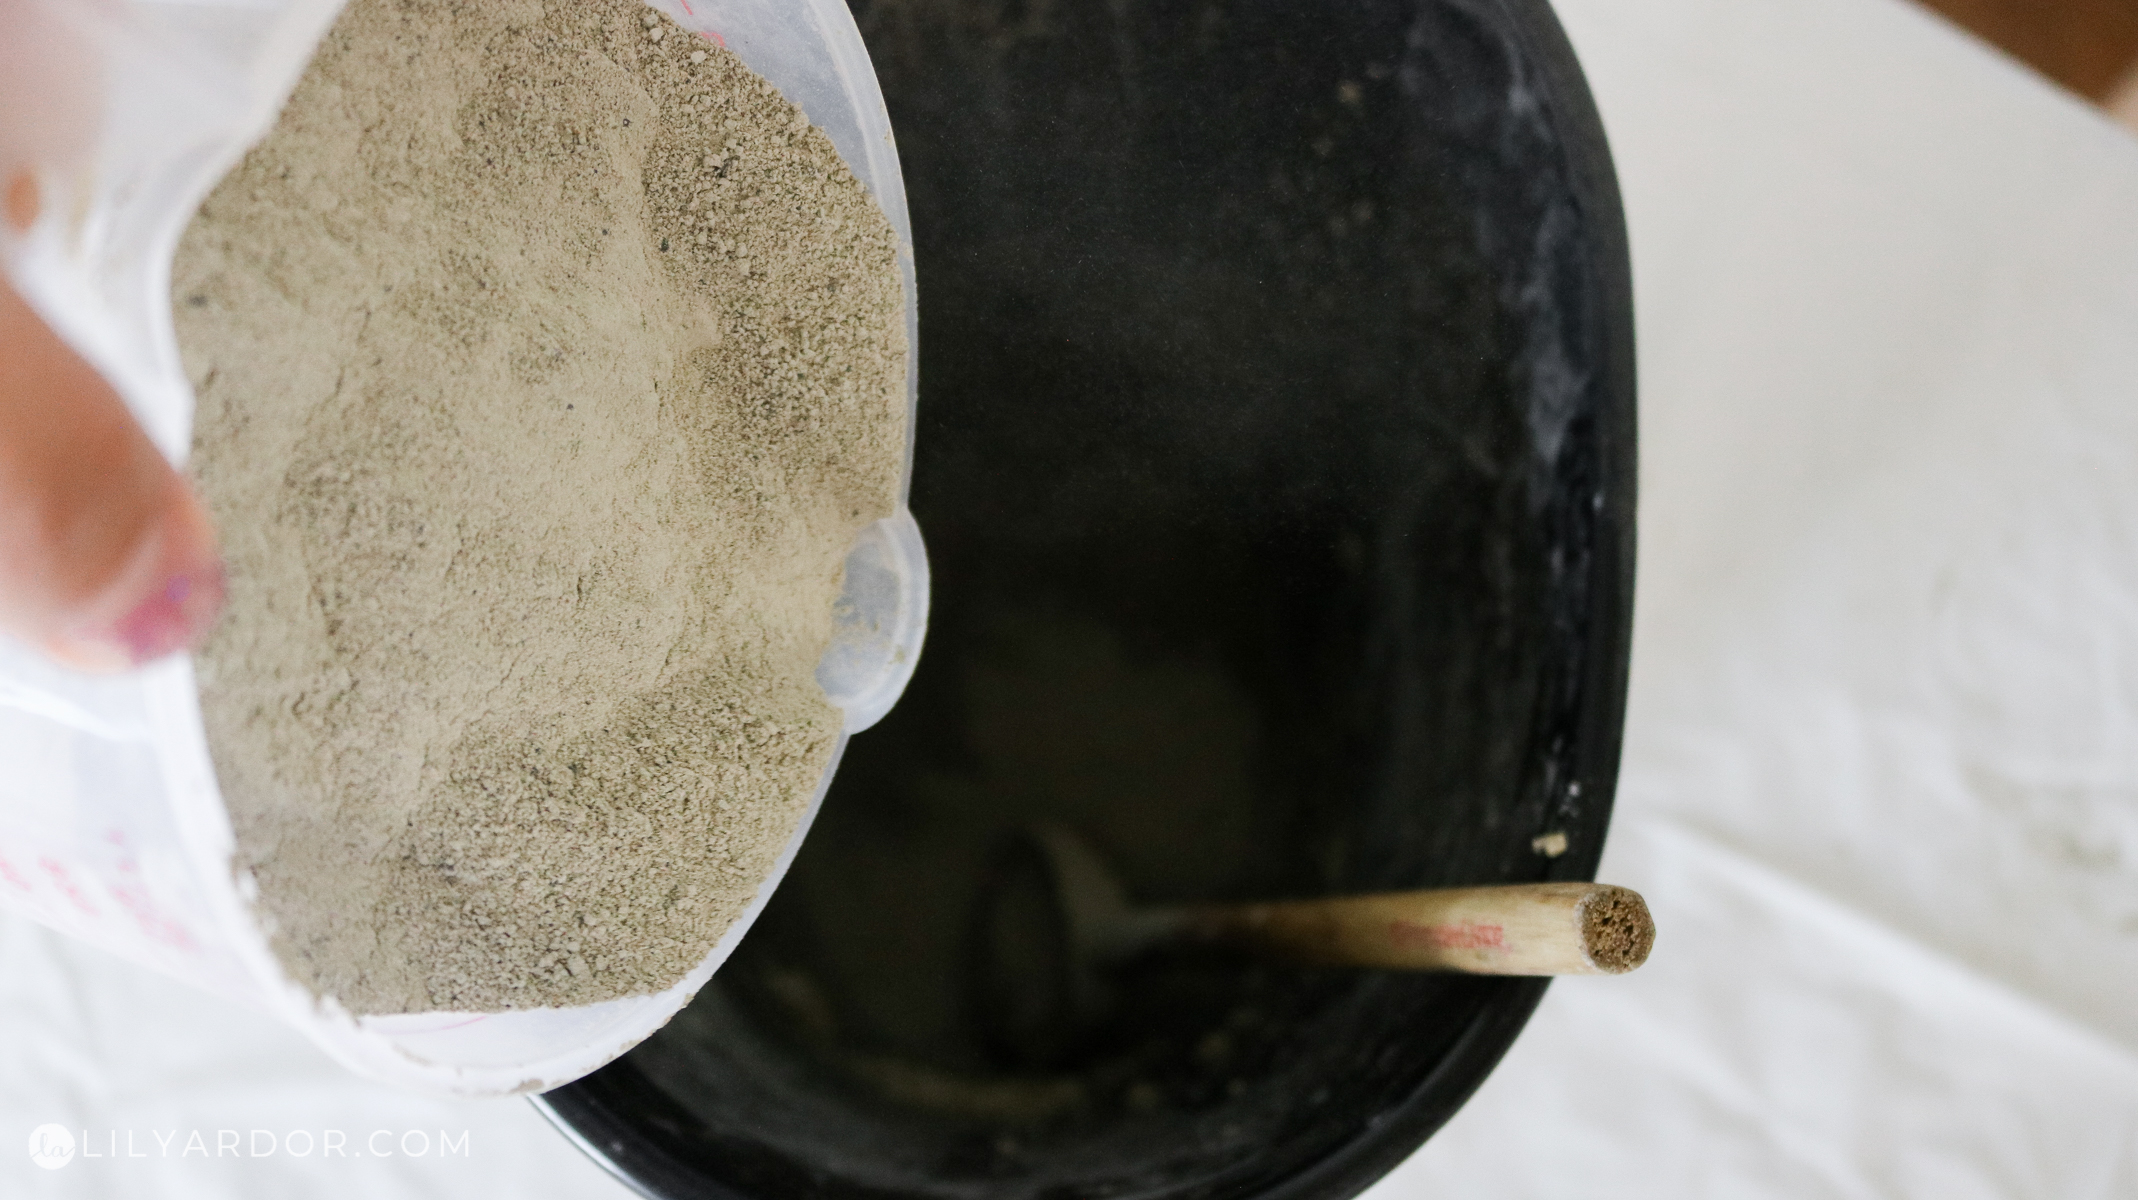
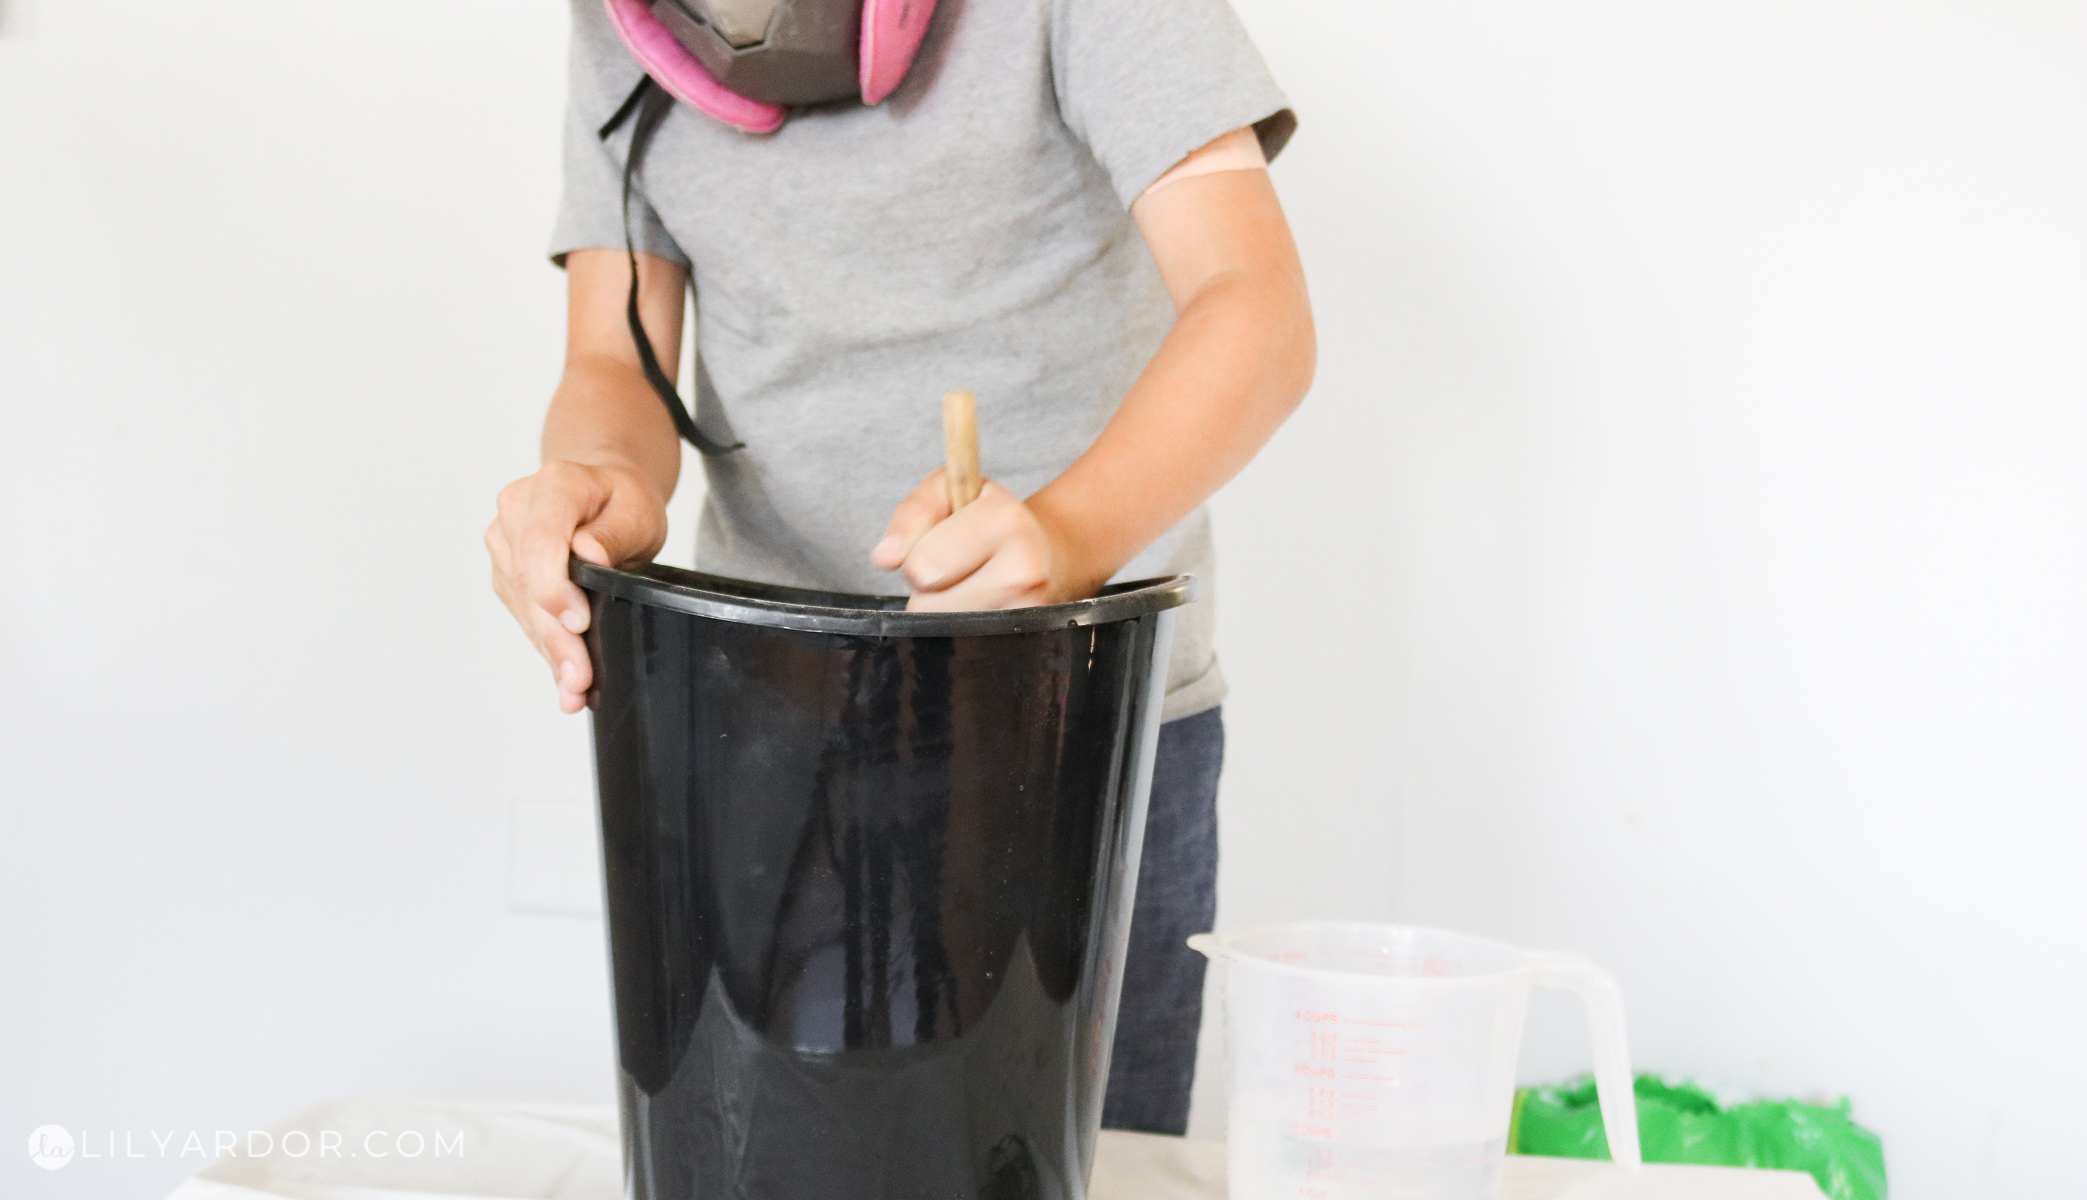
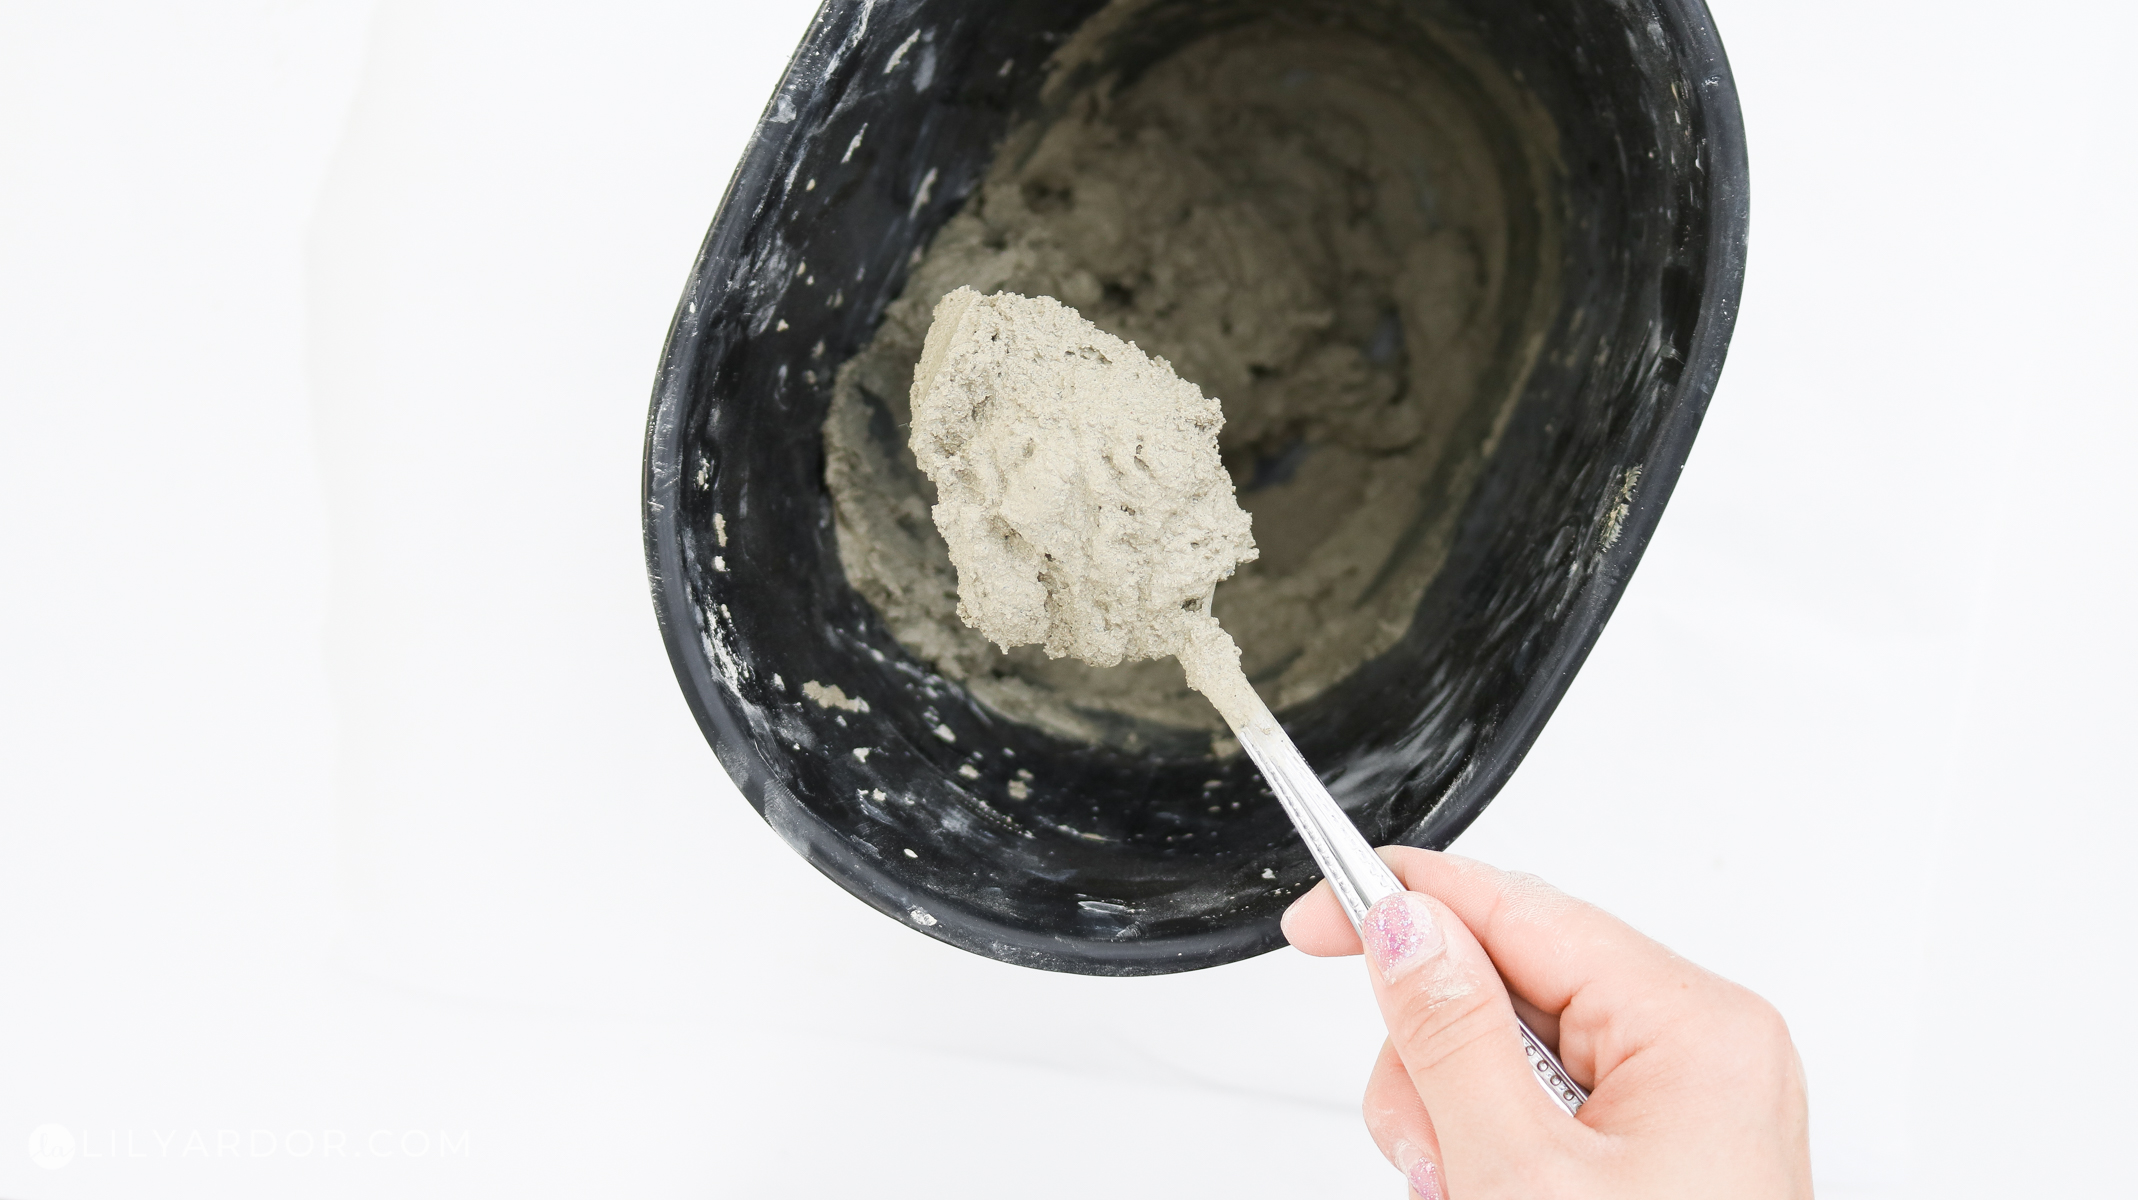
Mixing the cement
We ended up using a total of 4 cups of concrete mix for each pumpkin. We added just under 1 cup of water in total to the 4 cups of cement mix and combined it really well. A metal spoons works best for mixing. Make sure to scrape away all the edges.
A few tips from our experience :
Your concrete mix can become really soupy pretty quick so, be careful when adding water. We added about 3/4 cup of water first and kept adding a few spoons at time until we got the consistency we wanted. Photo below shows the best consistency to work with. You can even make it a bit runnier than that. It all depends on what type of pumpkin shape you’re going for. The runnier your mixture is the flatter your pumpkin might end up. Keep in mind if you make it too chunky and drier it starts to set really quick. We found it harder to work with a drier mix because by the time we would start putting on the rubber bands it would already start setting.
OOPS! Cement mix set to quick?
No worries if you cement set to quick just add a bit of water to it and work it with your hands. It should become workable again. This will only work if it’s still wet and hasn’t set too much.
Making the succulent pumpkin!
Fill your tights up with your cement mix. It works best if you have someone helping you hold the tights open however it’s not required. I just like that it keeps it cleaner this way. For one pumpkin we filled the tights with all the mixture from the 4 cups of cement mix.
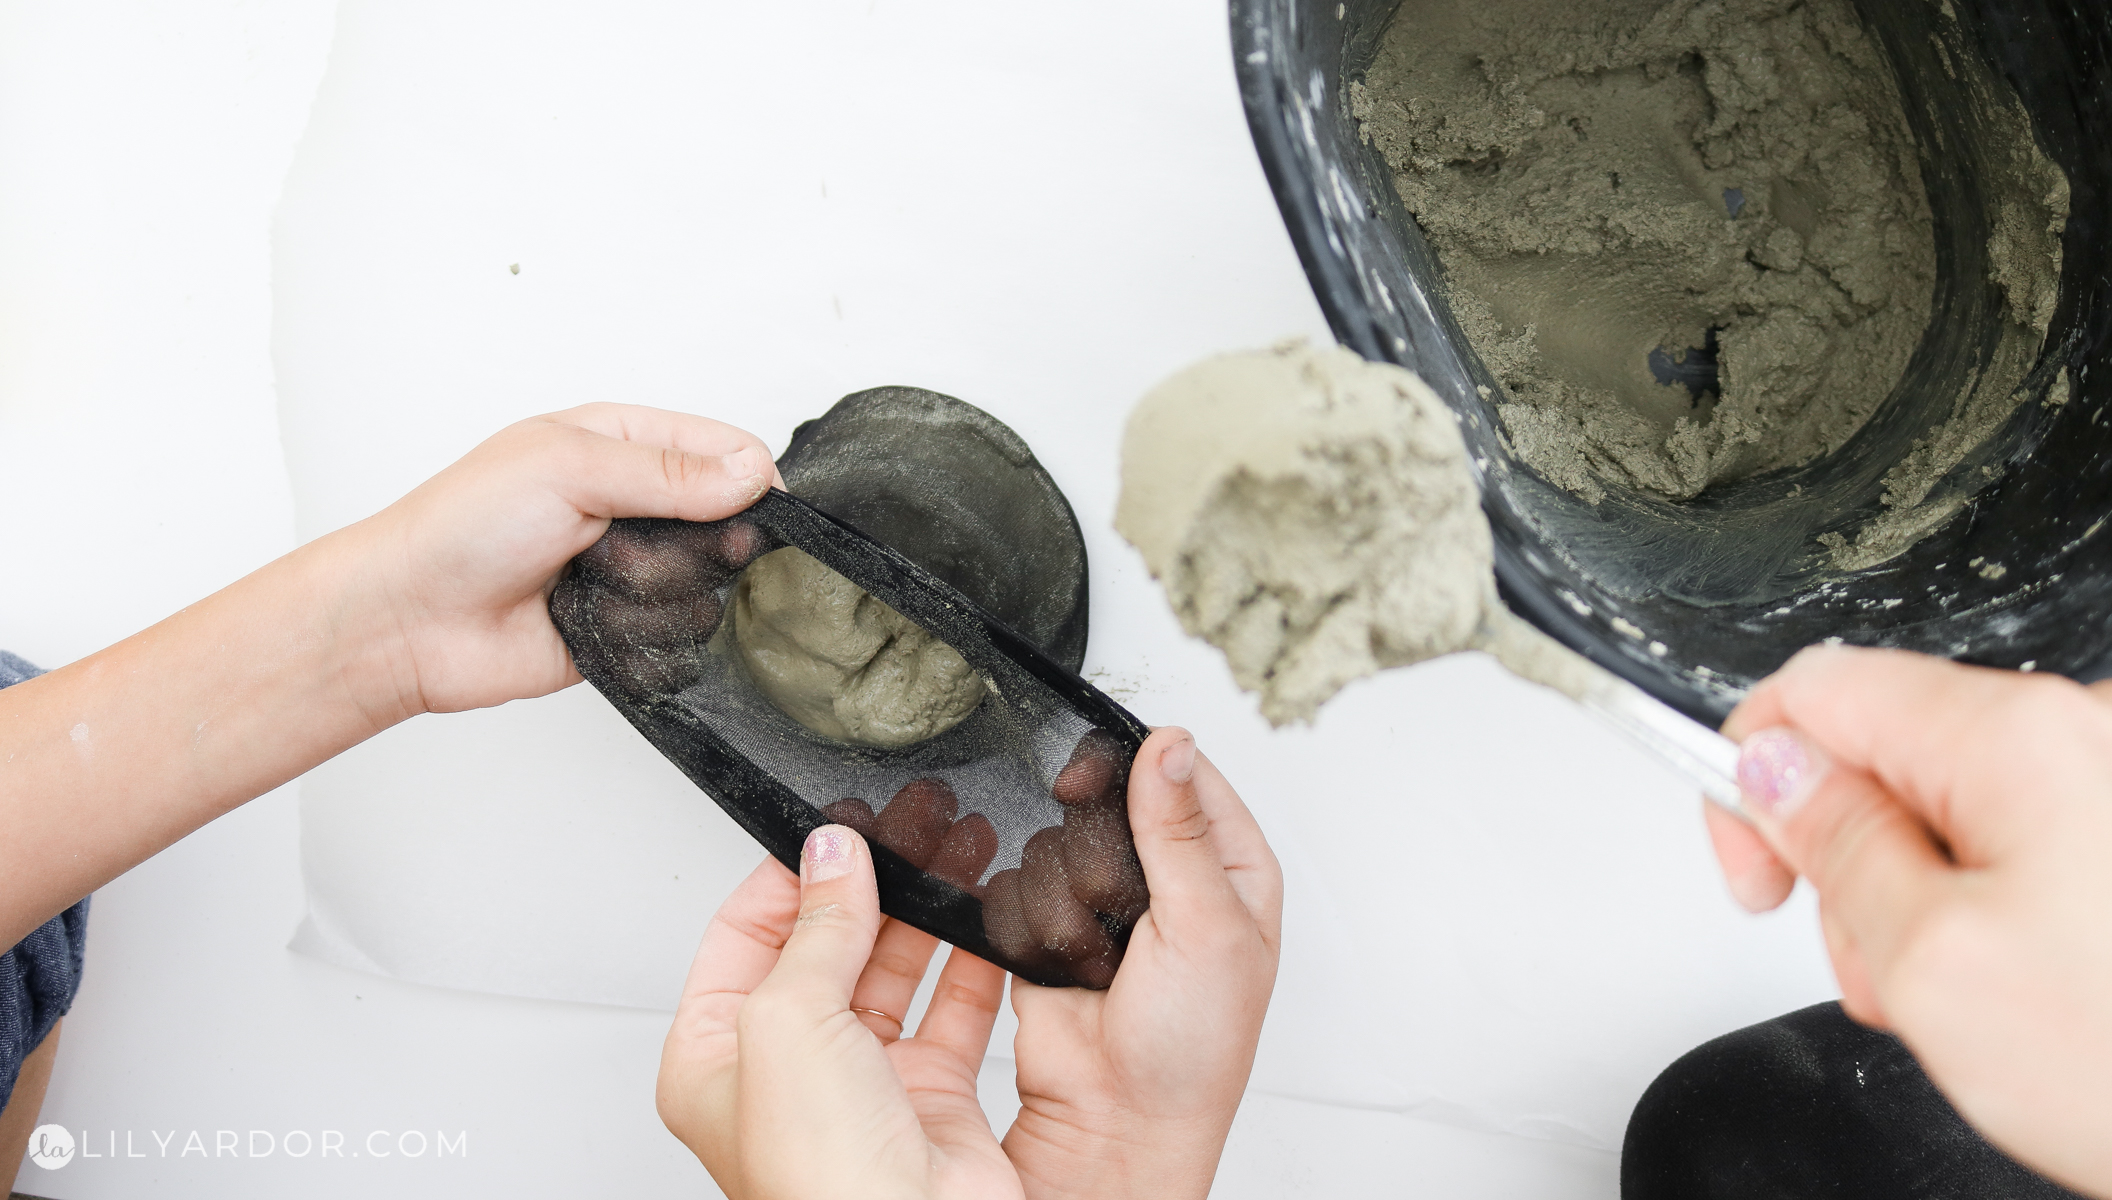
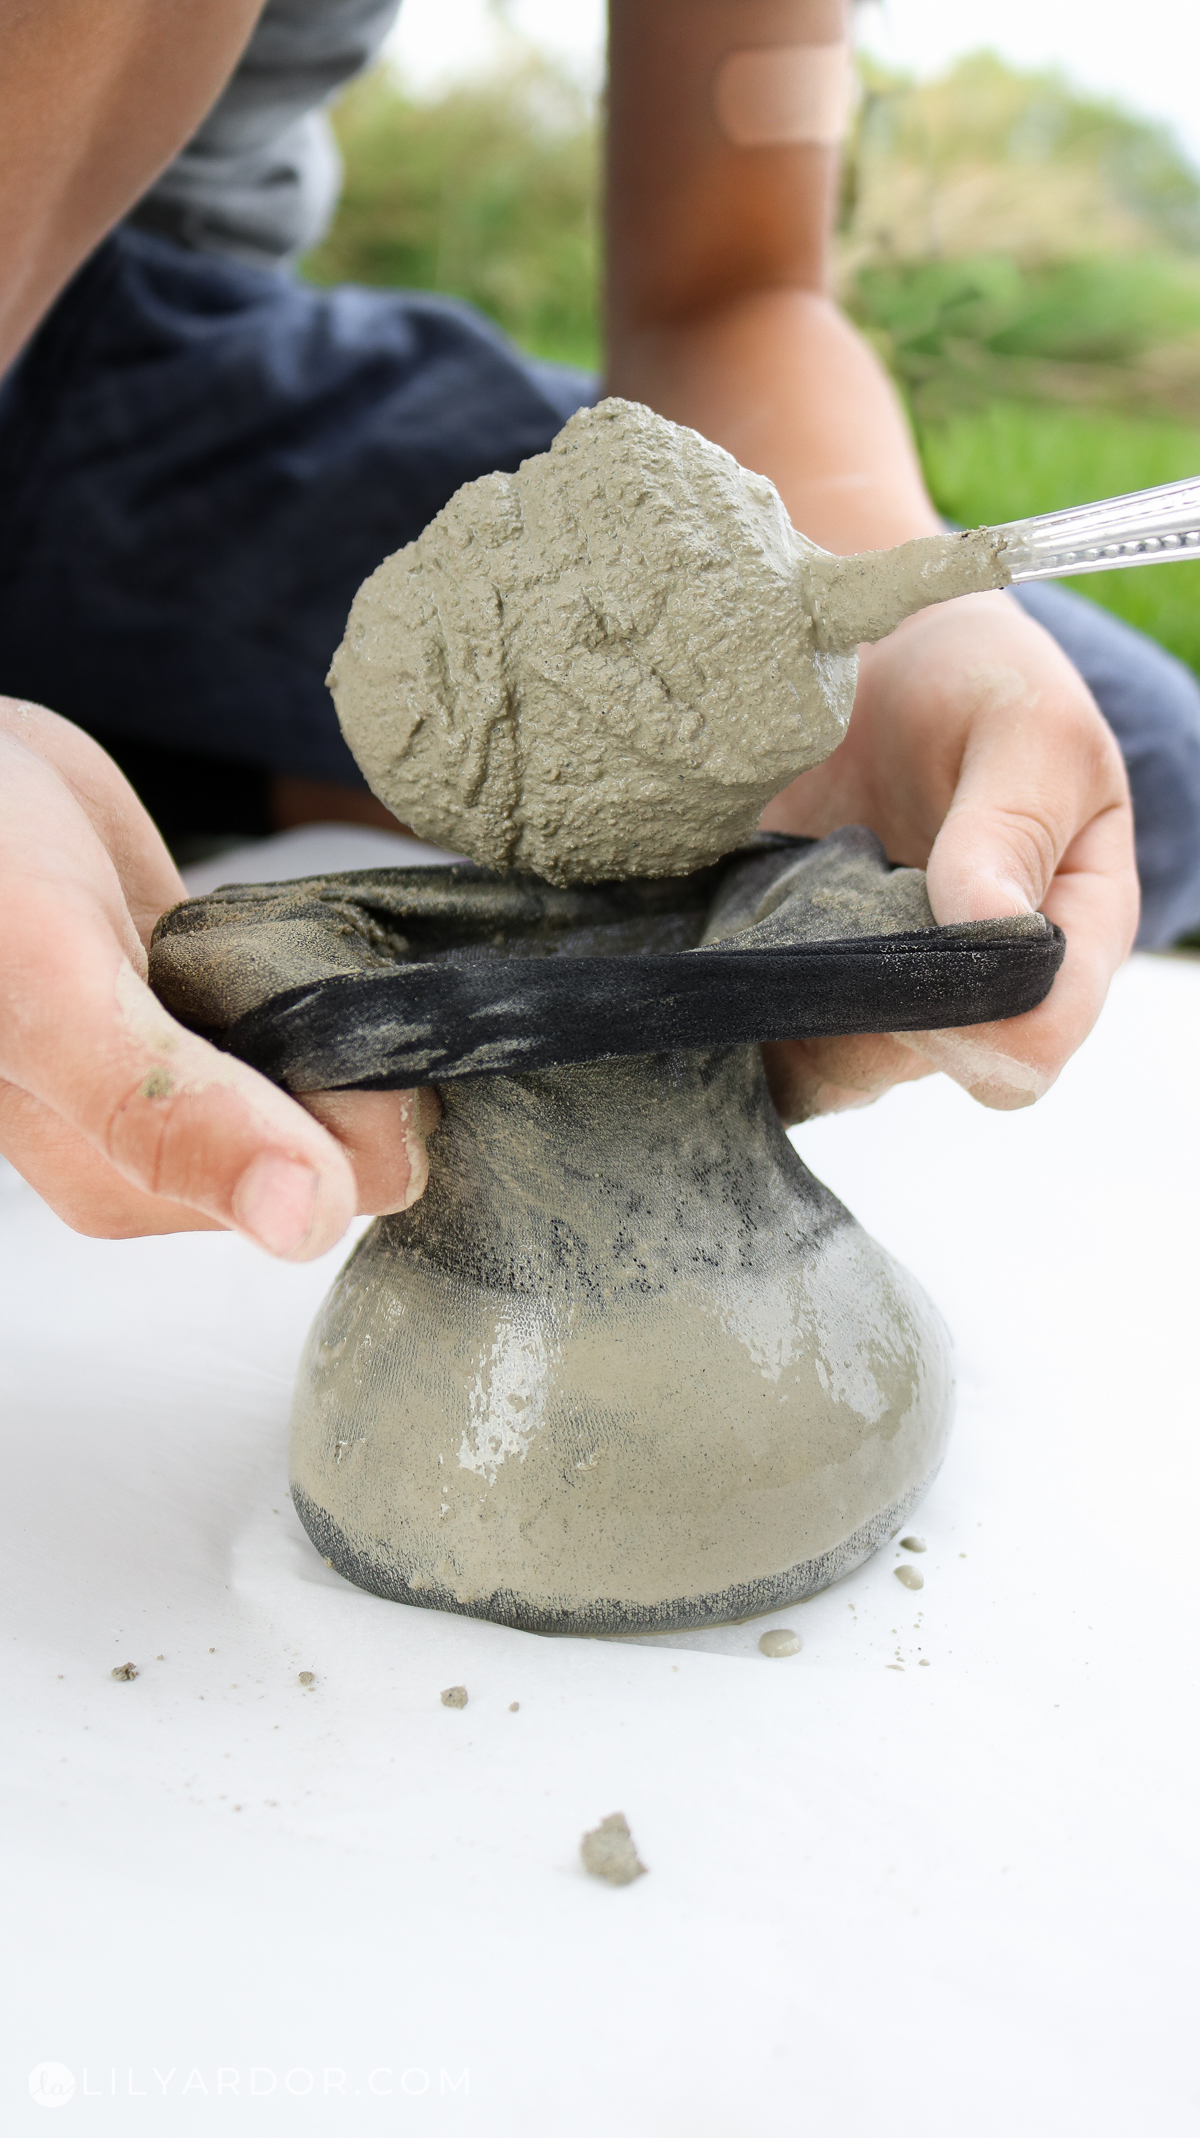
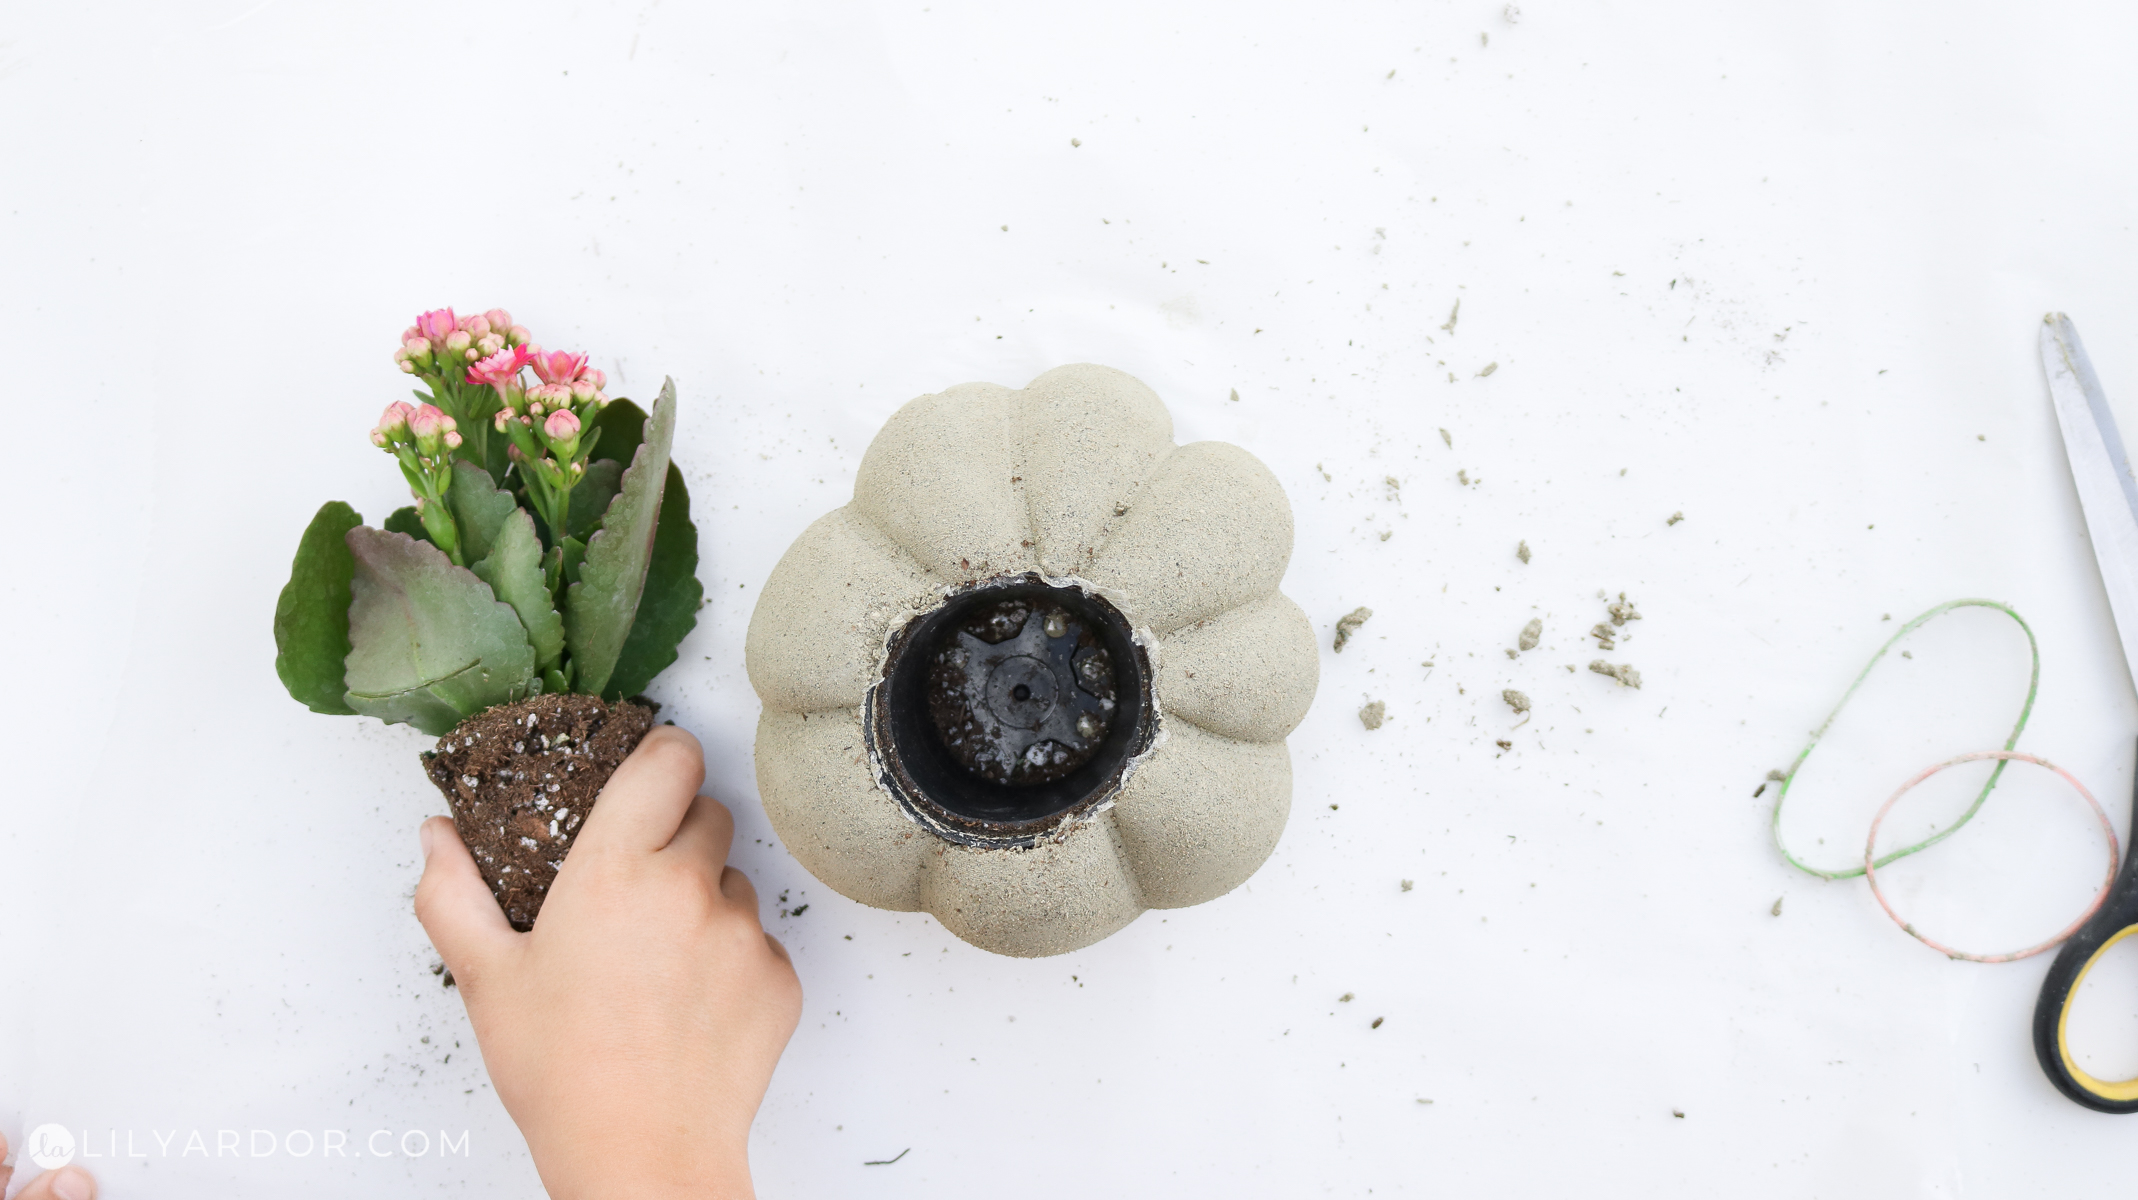
Next we took the little pot and inserted it in the center. Push it down to the bottom but make sure no concrete is higher than the pot itself.
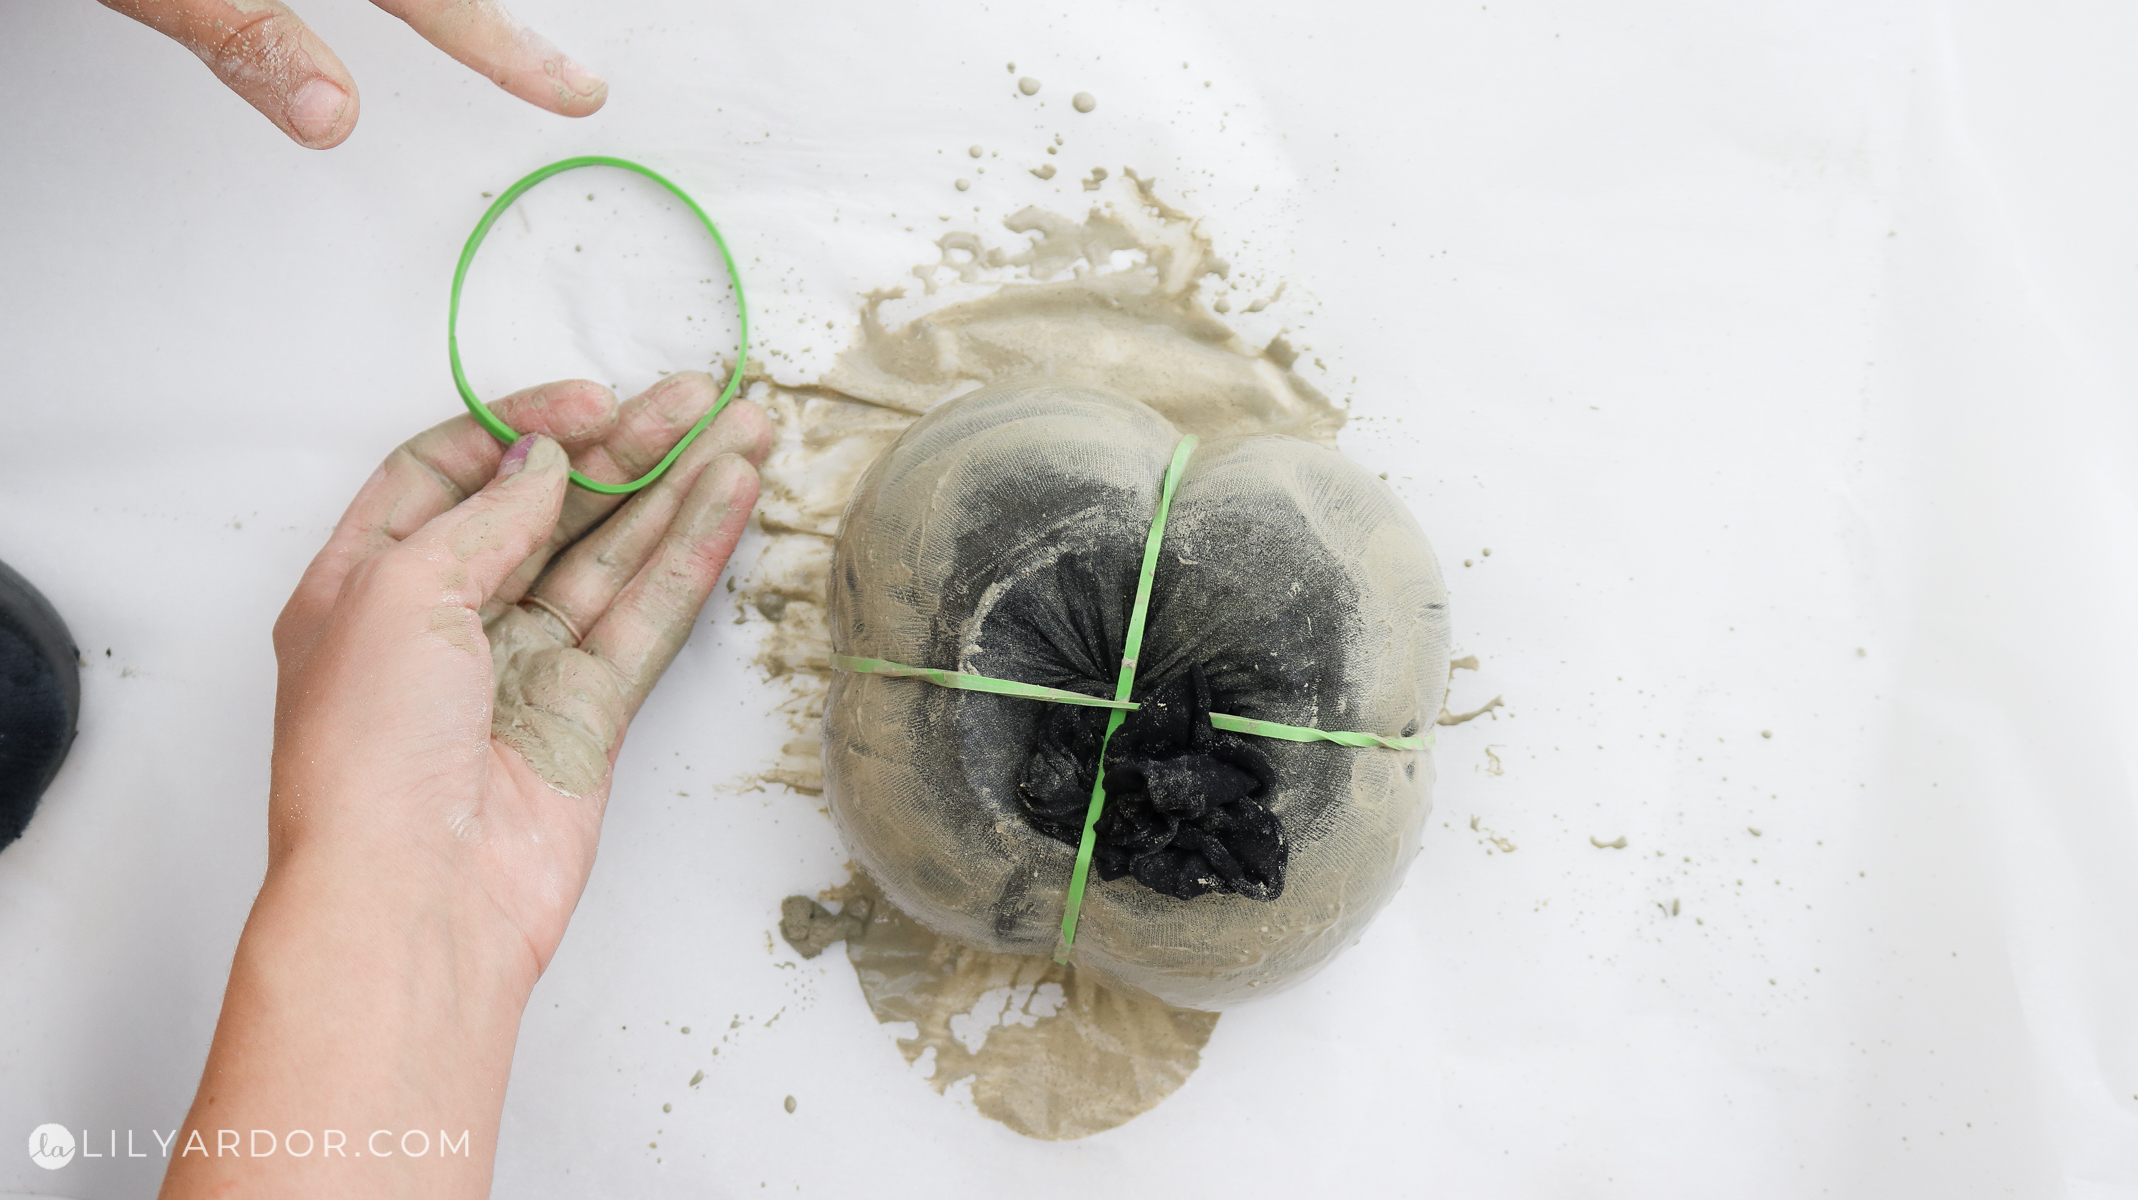
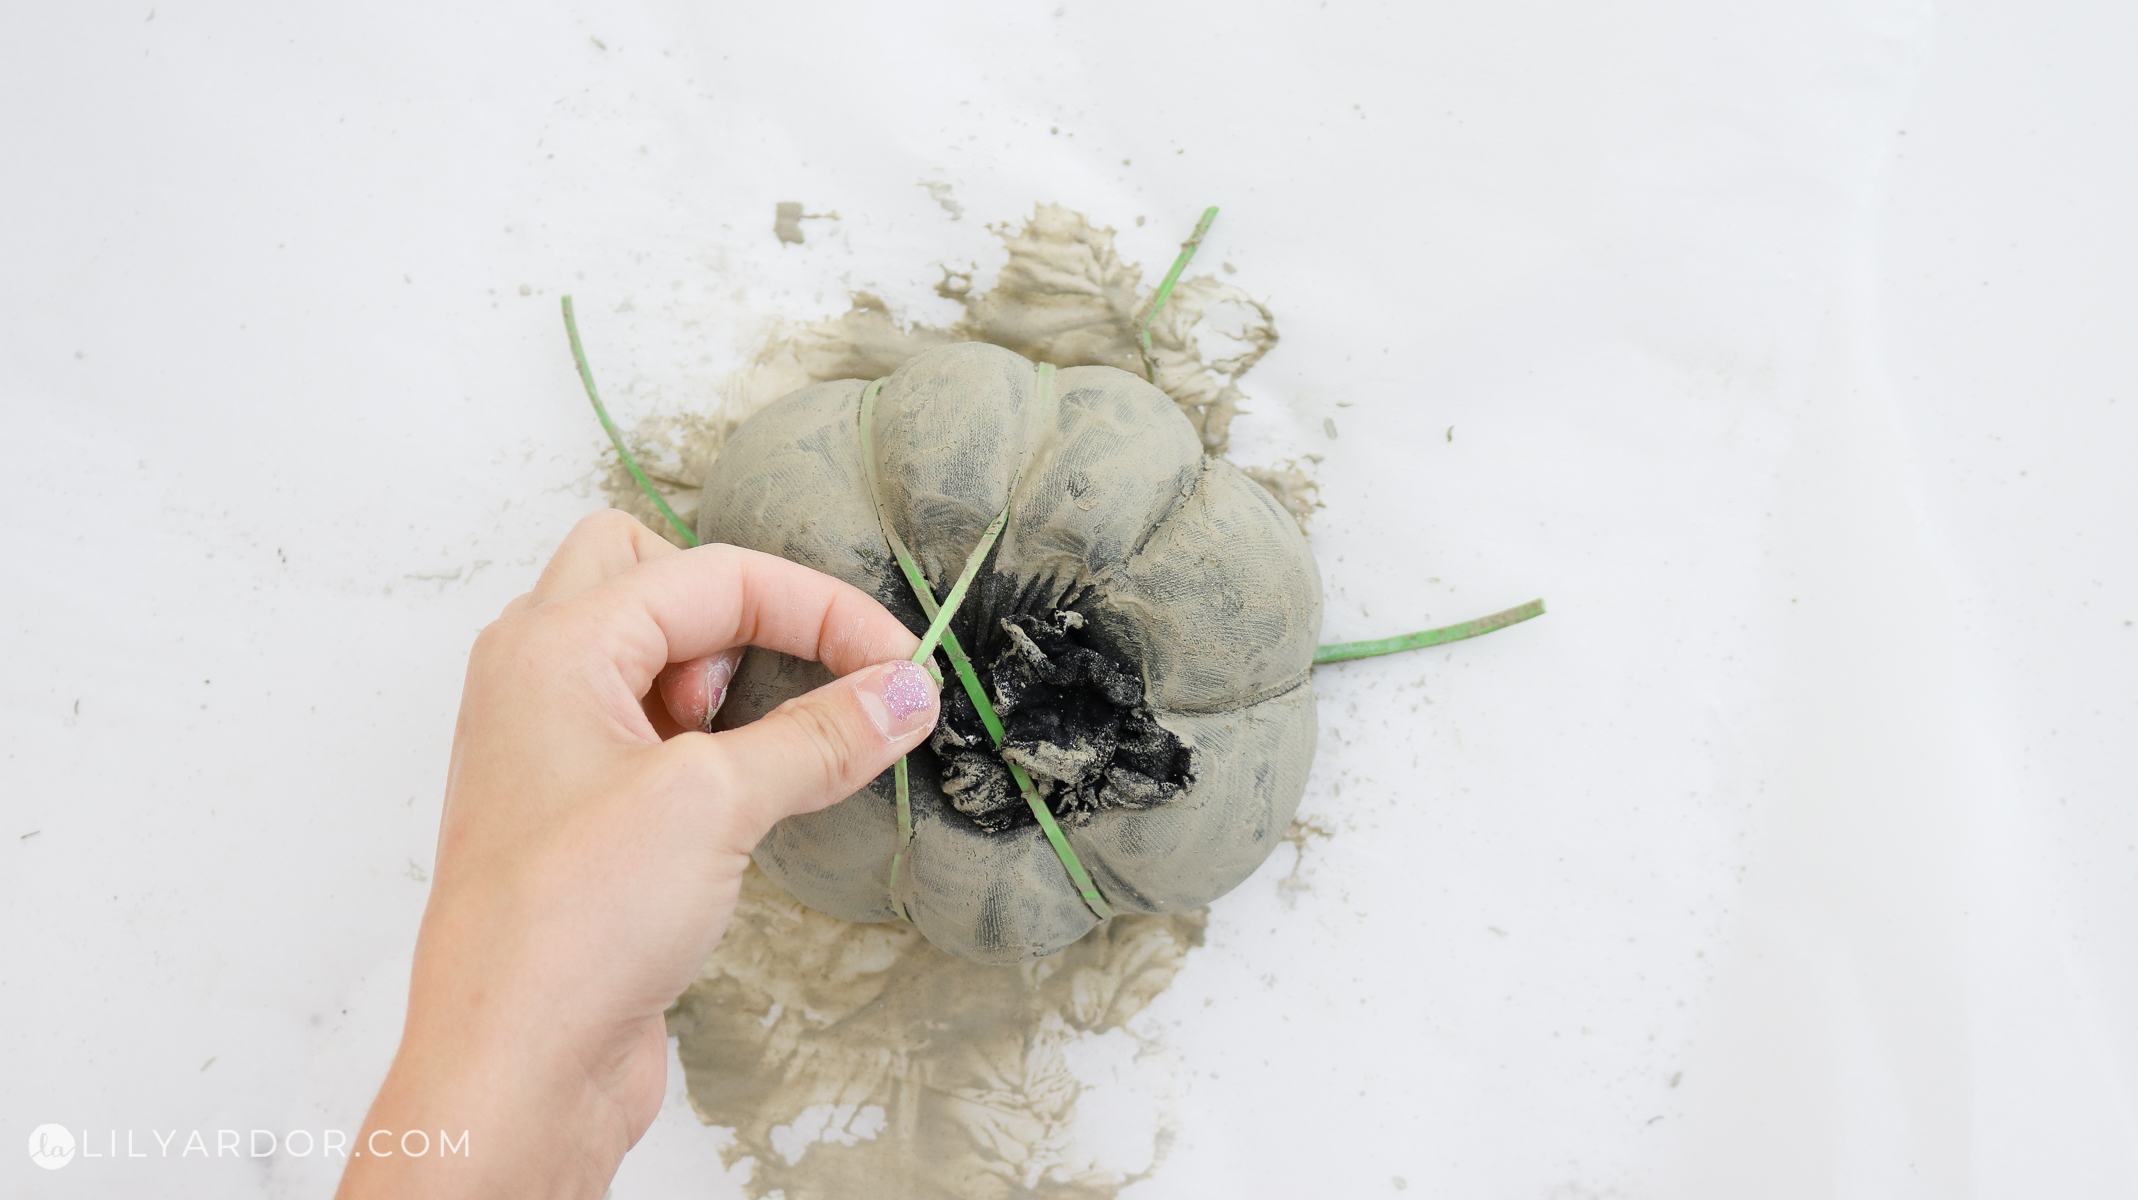
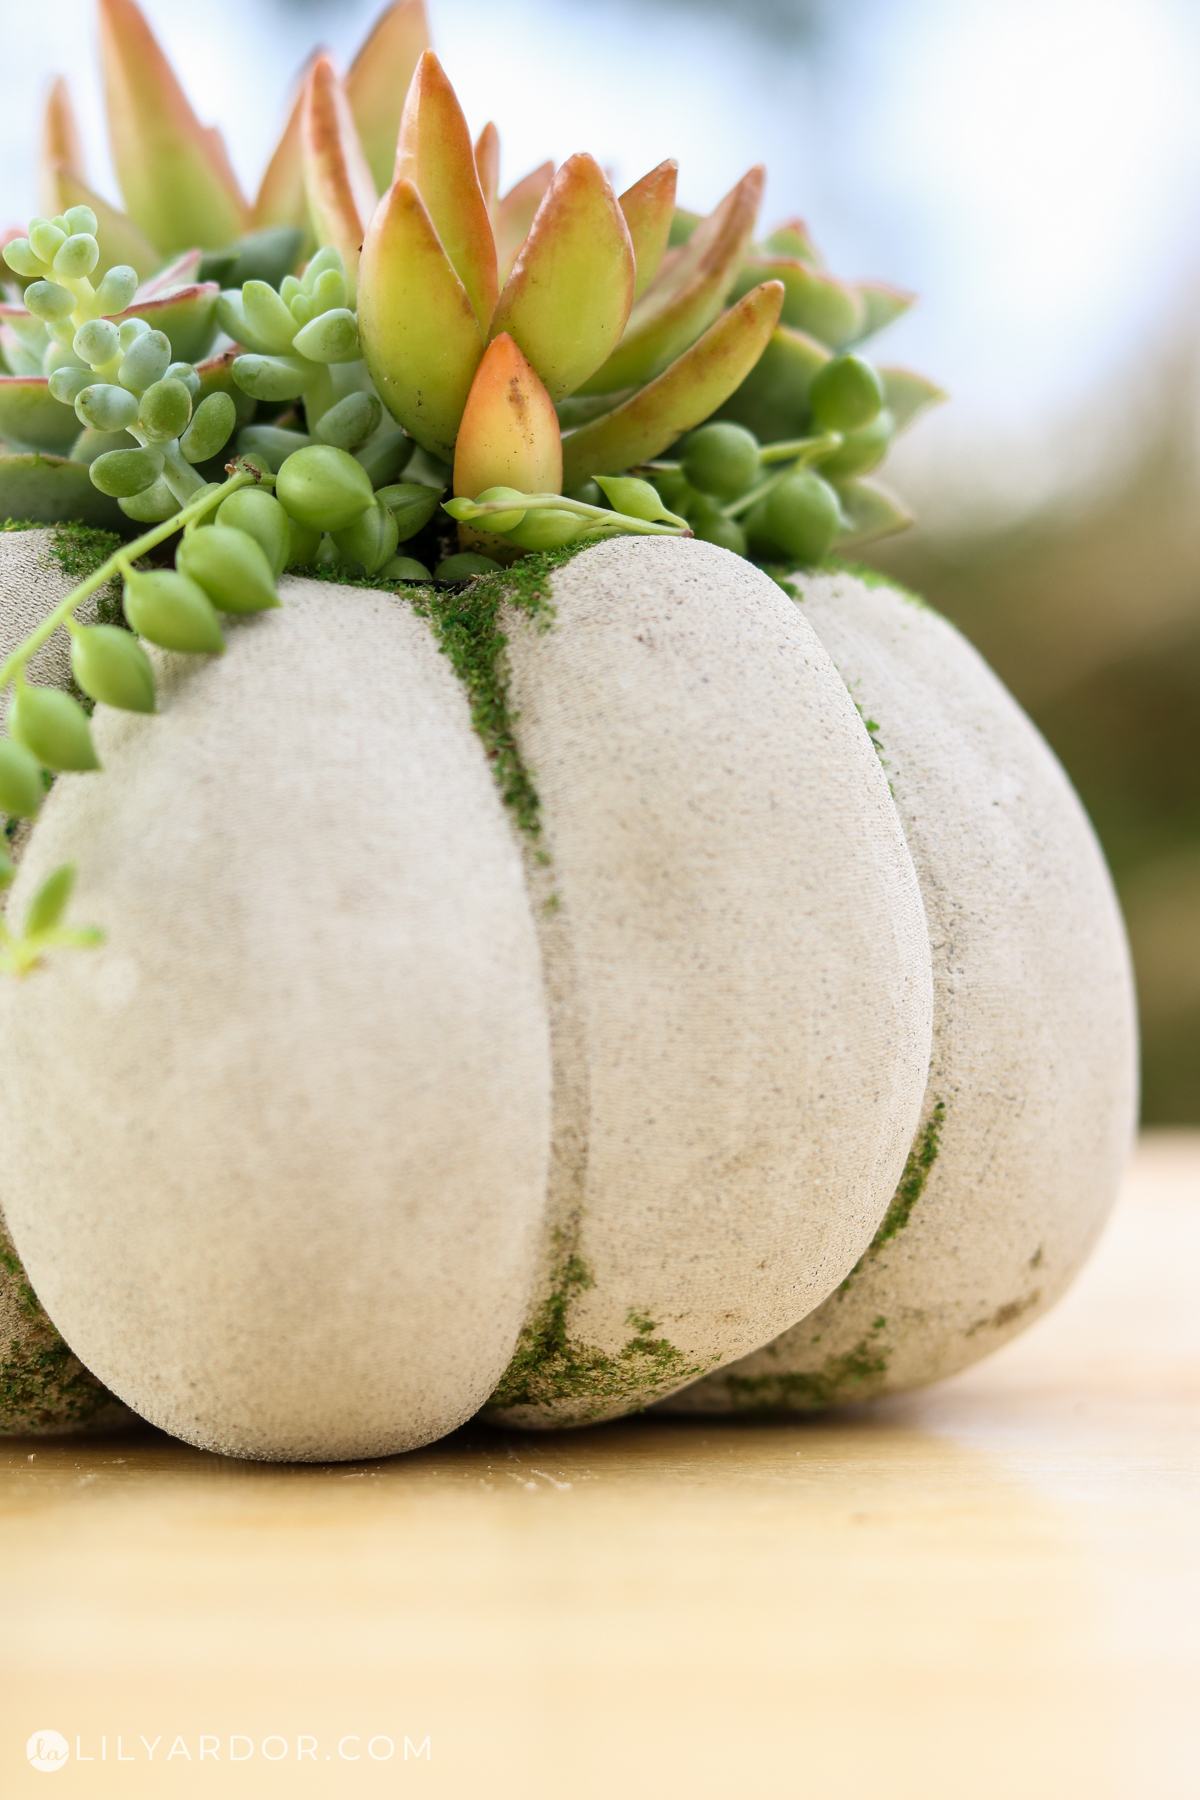
Okay now add rubber bands around you pumpkin. Make sure the rubber bands aren’t too small as they’ll slash into your pumpkin and you won’t be able to remove them ones the concrete sets. You want to be able to see the full rubber band. We added a total of 4 rubber bands.
DON’T WAIT TOO LONG!!
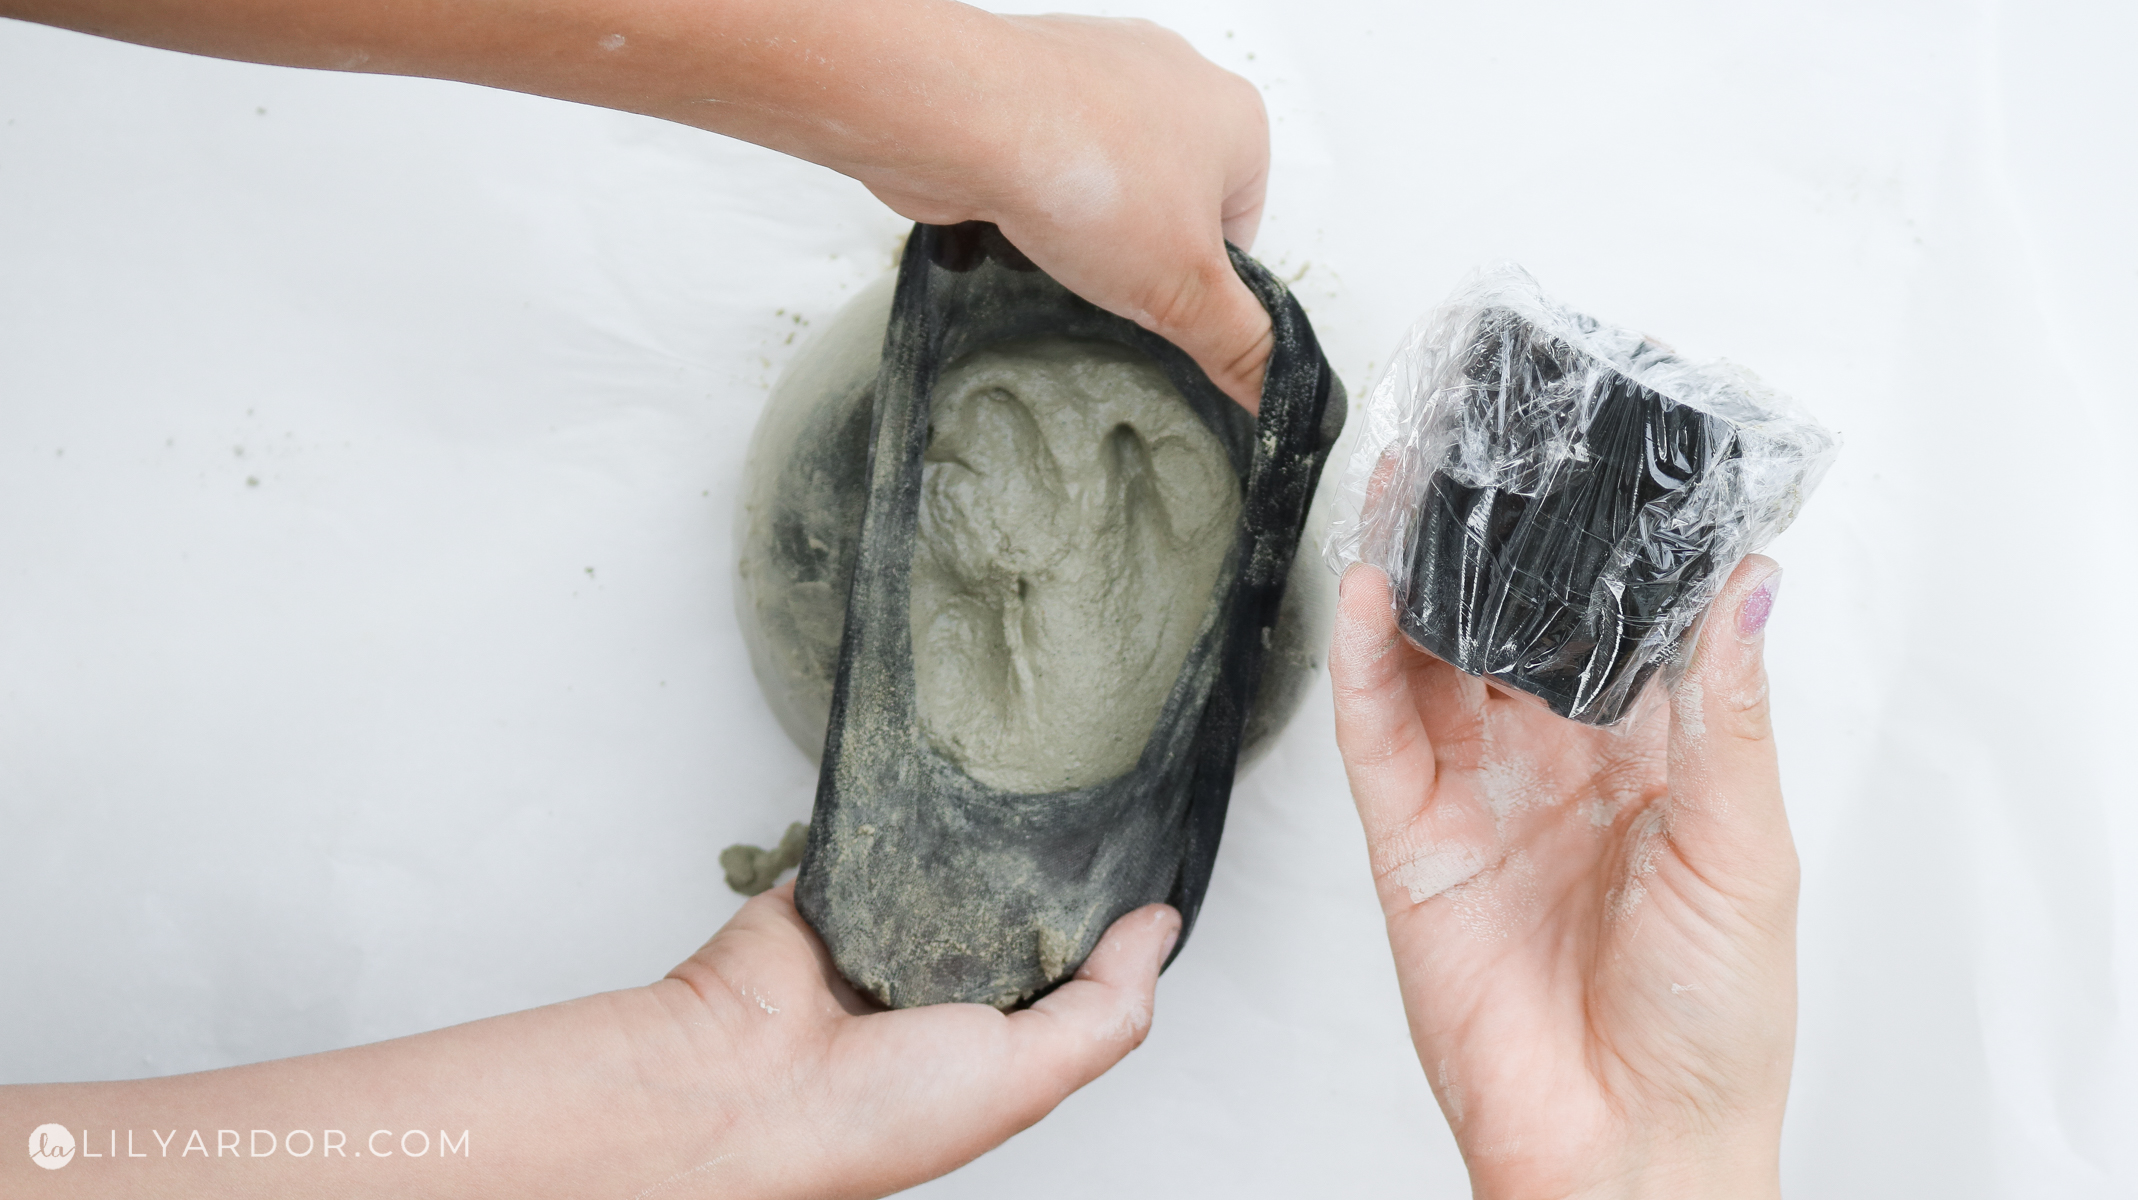
Because this cement is so fine it pretty much adheres the tights to the pumpkin if you let it set completely before removing them. In this case you’ll need to remove the tights and rubber bands about 15 minutes after you apply the rubber bands. The tights will still be wet which will help them easily remove. If you wait until the tights have dried onto the pumpkin it’s too late and it’ll seem like they were super glued. You’ll know they’re ready to be removed when you touch the concrete and can’t indent it but it’s still wet.
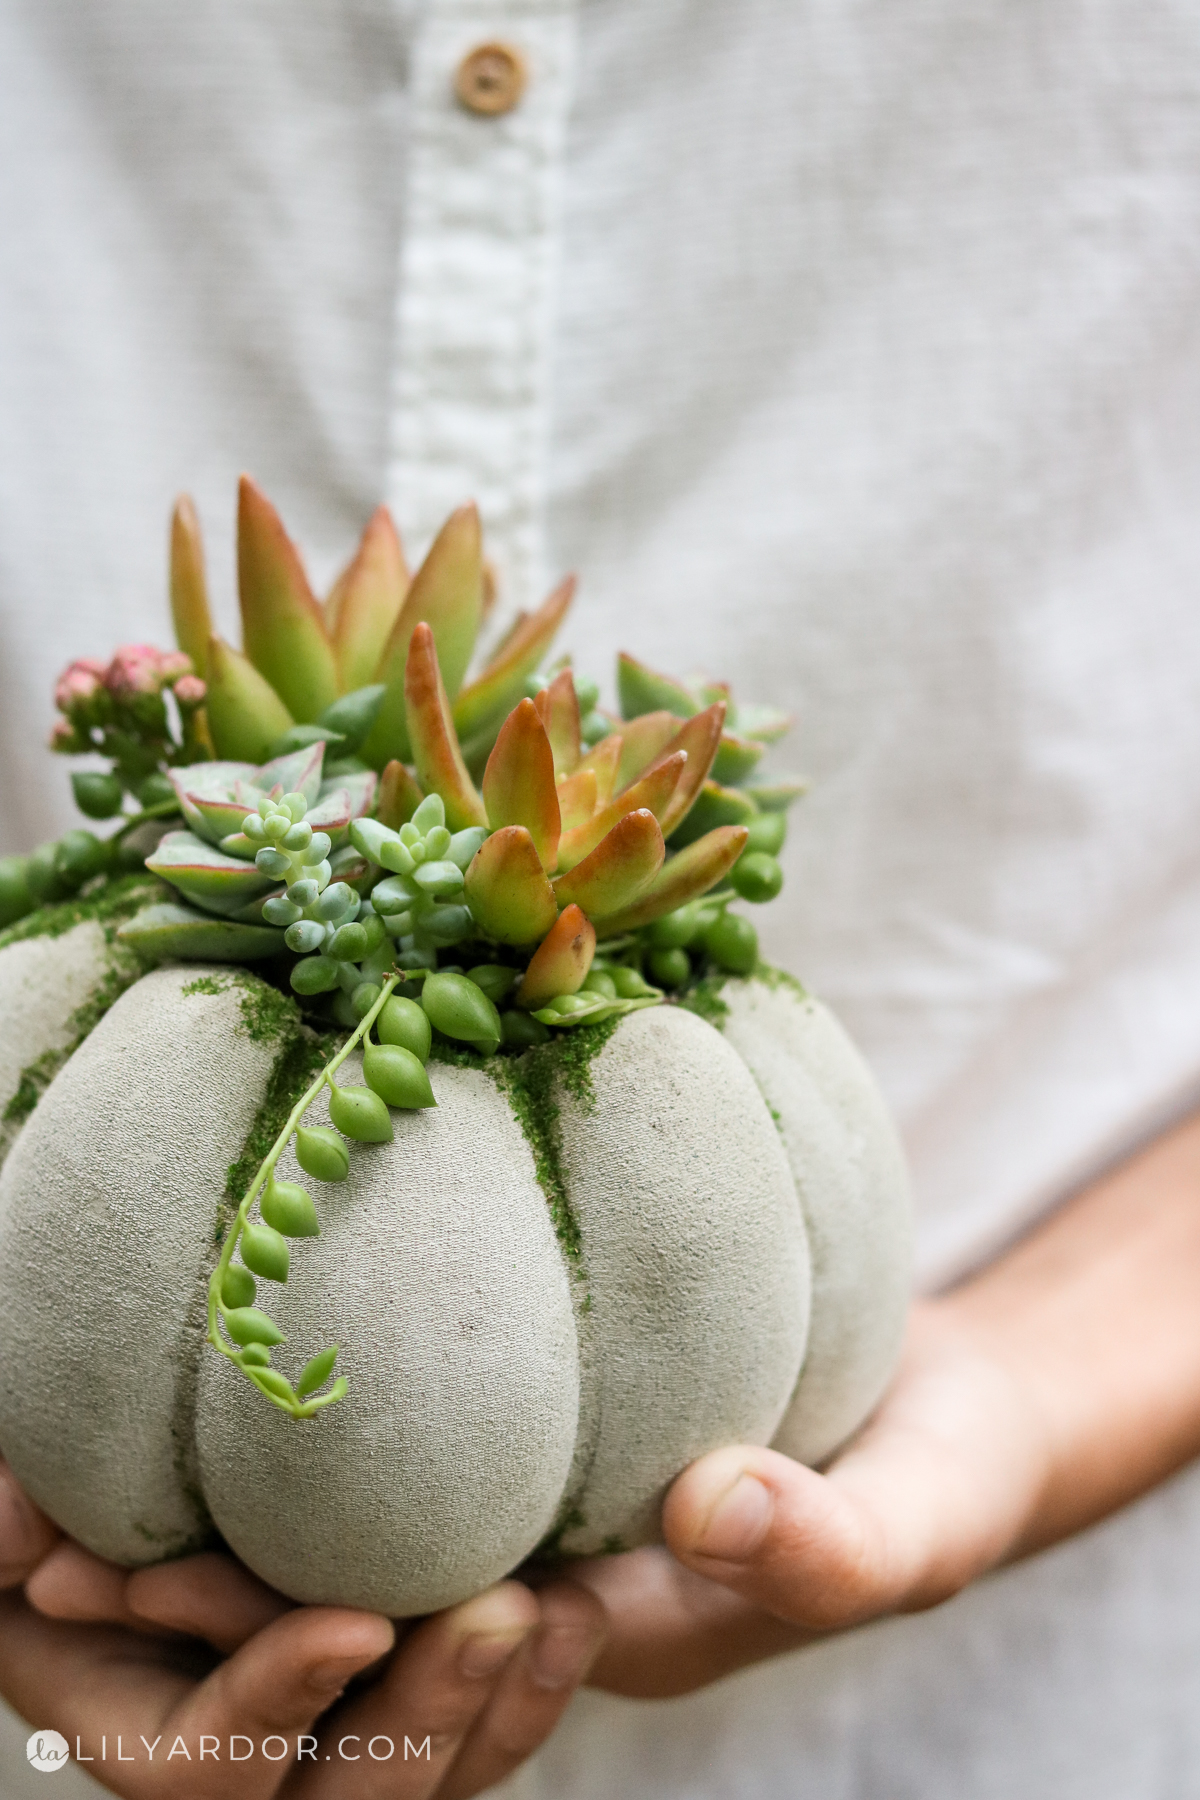
To complete it cut off any extra cling wrap sticking out and insert plant you succulents in the pot. You can also wait to remove the cling wrap. I find once the pumpkins set (at least 24 hours) the cling wrap tears out nicely. Keep in mind we didn not remove the pot we left it inside and only ripped off all the cling wrap around it.
Succulent Pumpkin Video
Complete Succulent Pumpkin !
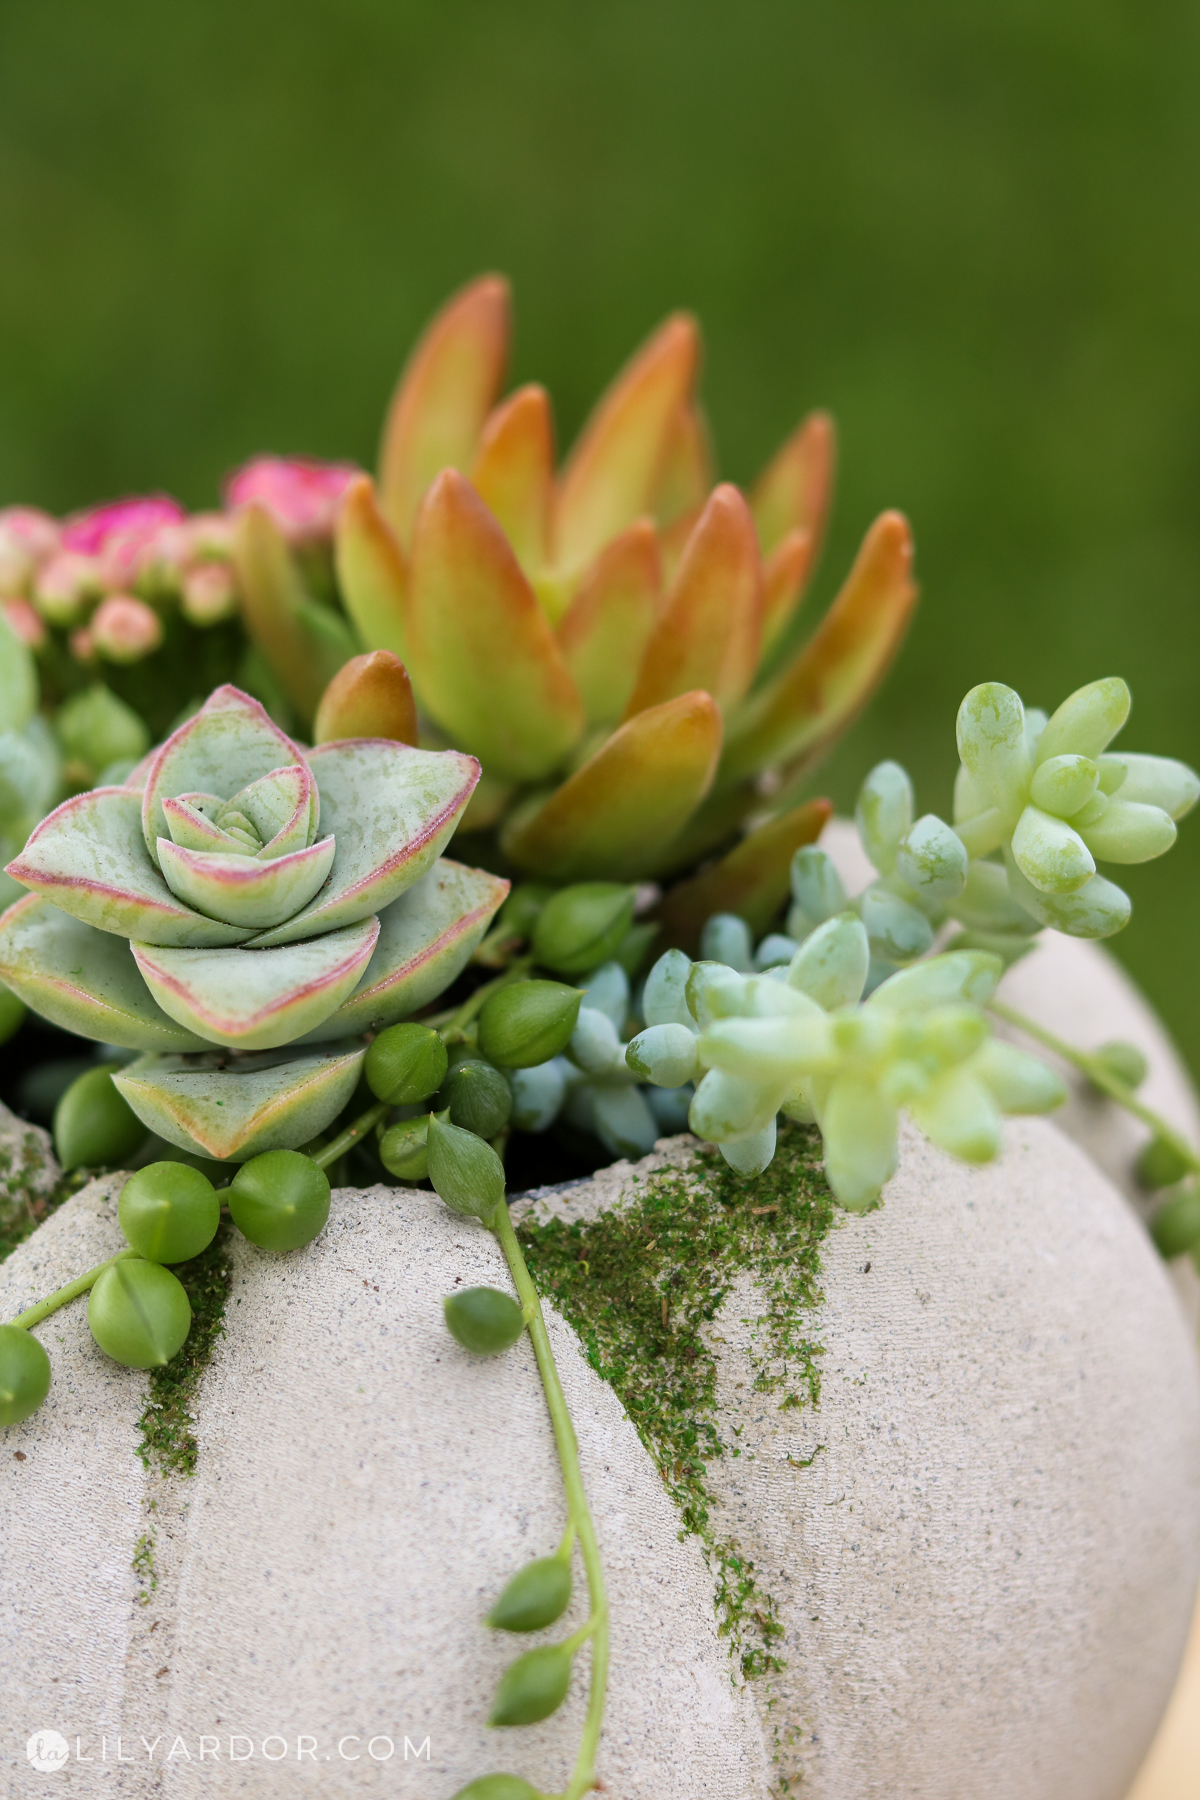
That’s it!! We love how these succulent pumpkins turned out😍😍! For the succulents we got a few different types of succulents soaked the soil in water and gently separated them before planting each in the pumpkin planter.
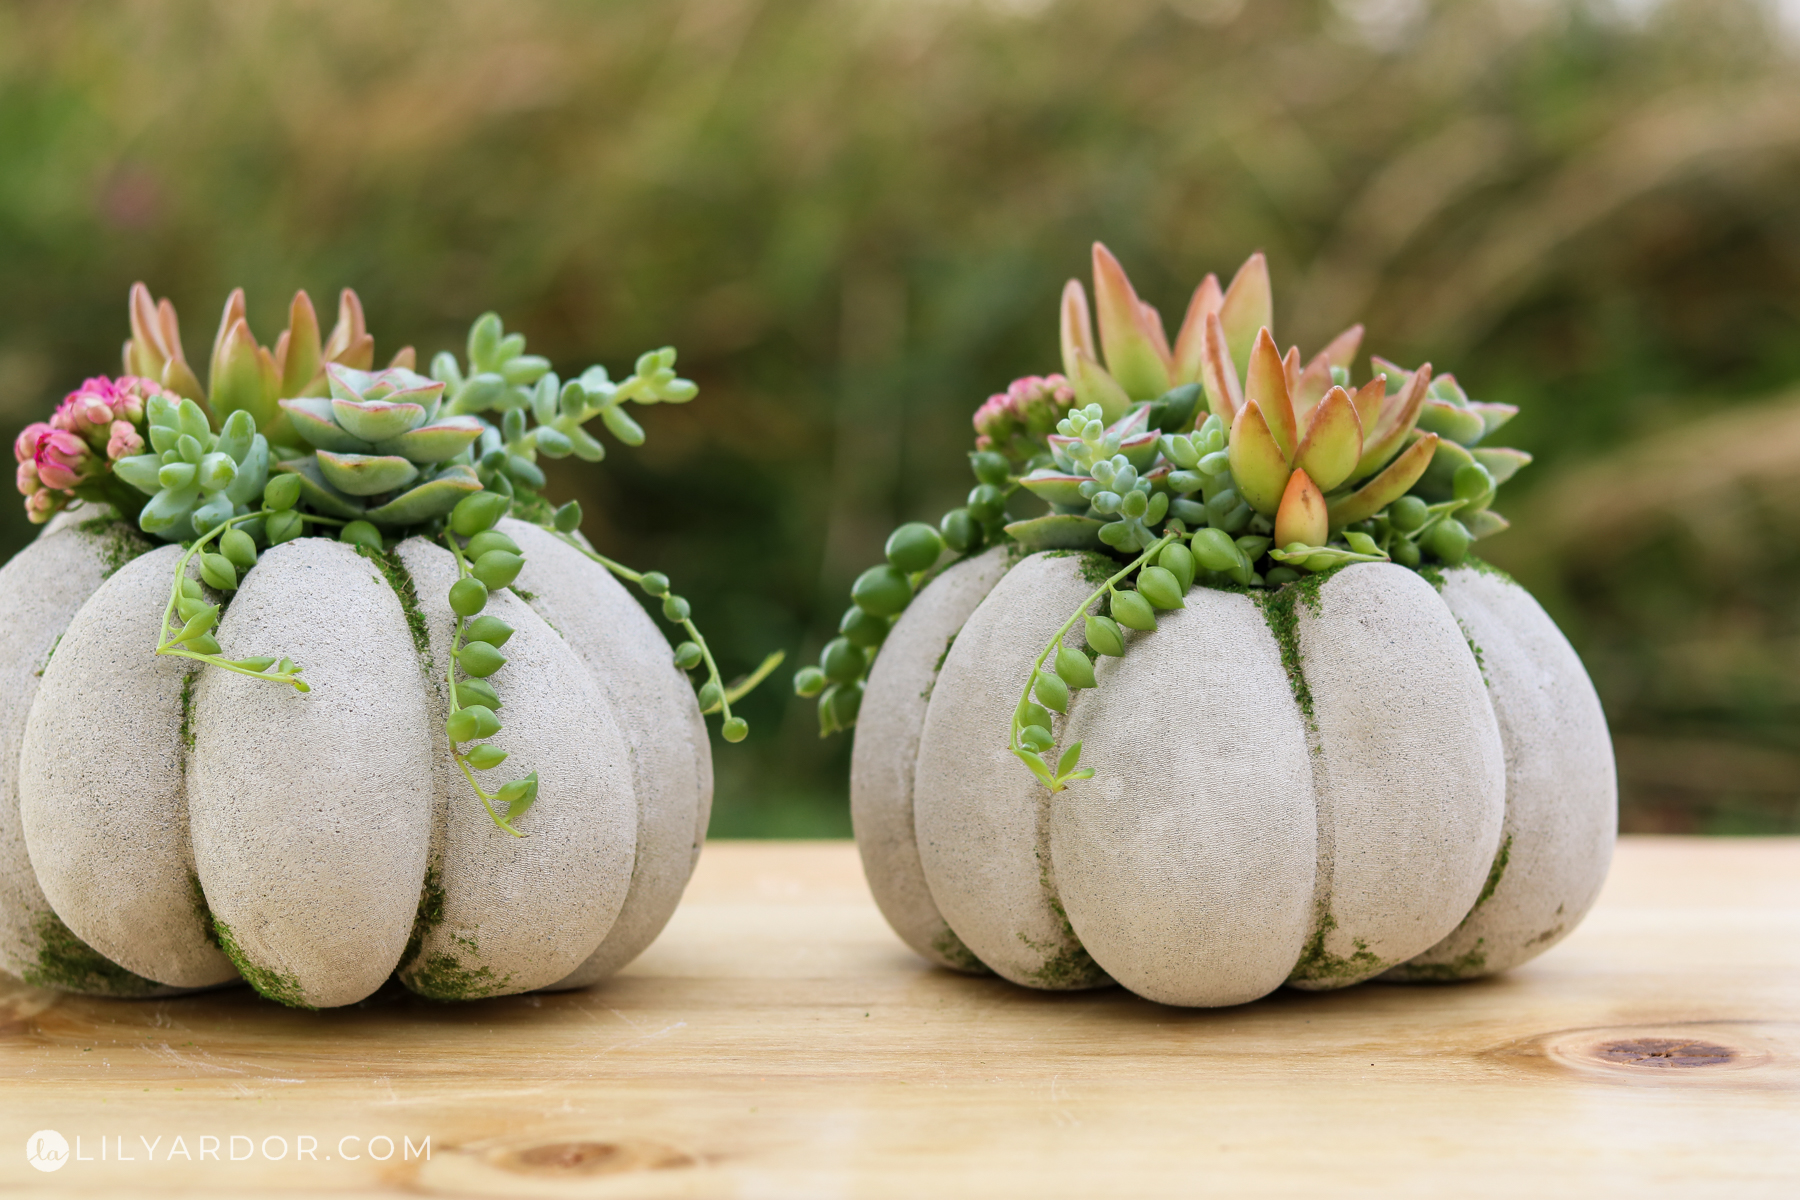
I also added some moss to the pumpkins. If want to do the same to your succulent pumpkin you can find the instructions here – https://www.lilyardor.com/concrete-pumpkin-diy/

That’s all for today!! Happy Fall everyone! I hope you liked this succulent pumpkin tutorial! They were so fun to make! I hope to make more projects that involve little Oleg. 🙂 Let me know what you think of these ? I was also thinking you could probably add colored orange powder to the concrete mix to make orange pumpkins. Those would look adorable. Hope this inspired you 🤗 Thanks for tuning in!
Here’s a pin for you to add to your Pinterest board for later You can add this to your fall decor board 😃 or diy decor board. Click on the photo to pin!
Happy Crafting!

So cute!!! And where do you get your succulents?! They are beautiful!
Thank you Danielle. I got my succulents at homedepot. I had to separate them before planting them. 🙂
Wow, girl! This pumpkin planter looks sooooo beautiful! Love all of those step by step images of how to make this gorgeousness! You always make the most beautiful DIYs!
AWWWE thank you so much girl!! Your the best!
Love this! How many pumpkins does one box of25lbs cement all make?
YAY! I’m happy to hear you loved it! Honestly I’m not really sure how many you can make from that. My pumkpins only used up about 1/4 of the box if that helps any. 🙂
Do you know what size rubber band you use?
Not sure, They were about 3 inches in diameter.
Can you use regular cement. It’s cheaper than the quick set stuff so I’m just wondering.
Yes you can. I made some with plain concrete mix here https://www.lilyardor.com/concrete-pumpkin-diy/ . It’s optional to do the hypertyfa . I probably wouldn’t even bother I you’re making small ones.
This is beyond charming…..the moss is that final cherry on top! Love it! The moss could work on clay pots to give them worn charm, as weii.
Thank you! OOH what a cute idea! I can’t wait to try it on some clay pots!
It appears to me, from the video, that you are not actually using tights, but nylons. There is a difference and from the written instructions, I would have purchased the wrong item. Tights are much thicker and are a stretchy fabric, as nylons are not. Nylons are sheer.
Meravigliosa!!!!
These are so beautiful! What did you use to get the thin layer of moss? I love that effect, but I have no idea how to do it. Thank you in advance
Thank you so much Jessie 🙂 I blended the moss then sifted it and used the fine powder. Simply apply mod podge or glue where ever you want the moss and sprinkle the fine moss powder on top 🙂
Hi! I’m making pumpkins like these, do you know if these can be indoor/outdoor?
Sure these can be outdoors too.
They look so elegant. I also made the entryway set of shelves you did a how to about. Mine is in my craft/art/sewing room. They turned out looking so great. I use mine to display things I’ve made. Thank you for sharing your brilliant ideas!!!!!
Thank you so much Wendy 🙂 That’s awesome!! I love those shelves! OOH didn’t think of adding them in a craft room that sounds lovely.
Love, love, the cement pumpkin! Where do you get the powdered orange color to mix in as an option? Could I use food coloring?
Thank you Diana 🙂 you can get the pigmented powder on amazon. Here’s a link – https://amzn.to/2NSoE5Y You can also try homedepot altough I don’t think they have a lot of colors to pick from. Any pigmented powder should work great. Not sure about food coloring I don’t see why it wouldn’t work. It’s just like adding water just tinted water 😀 I would give it a go 😀
This is a wonderful idea and beautifully executed. Thank you!
This would make a great centre piece for Thanksgiving with a candle in it
This is very cute
That would be so cute! Glad you liked the idea 🙂
I have to have a garden of these! But I need to clarify, The package shows nylons, that I have plenty of, I don’t use, Lol but the instructions show thick opaque tights, does it matter which one we use? I’m afraid the cement will “run” through the nylon.
No the cement didn’t run through the nylons eventhough it seems as though it might. if you use opaque tights they just might not make big pumpkins because it might not be as stretchy
I have a lot of plâtre de Paris. Do you think that would work as well?
I’ve never heard of that. Might be the same thing give it a try in a test spot first.