Finally A DIY Marble Resin Countertop!
Something I’ve had on my to-do list for ages 😁 ! I had no idea how I was going to make it but, I was pretty curious to see how it’d turn out.
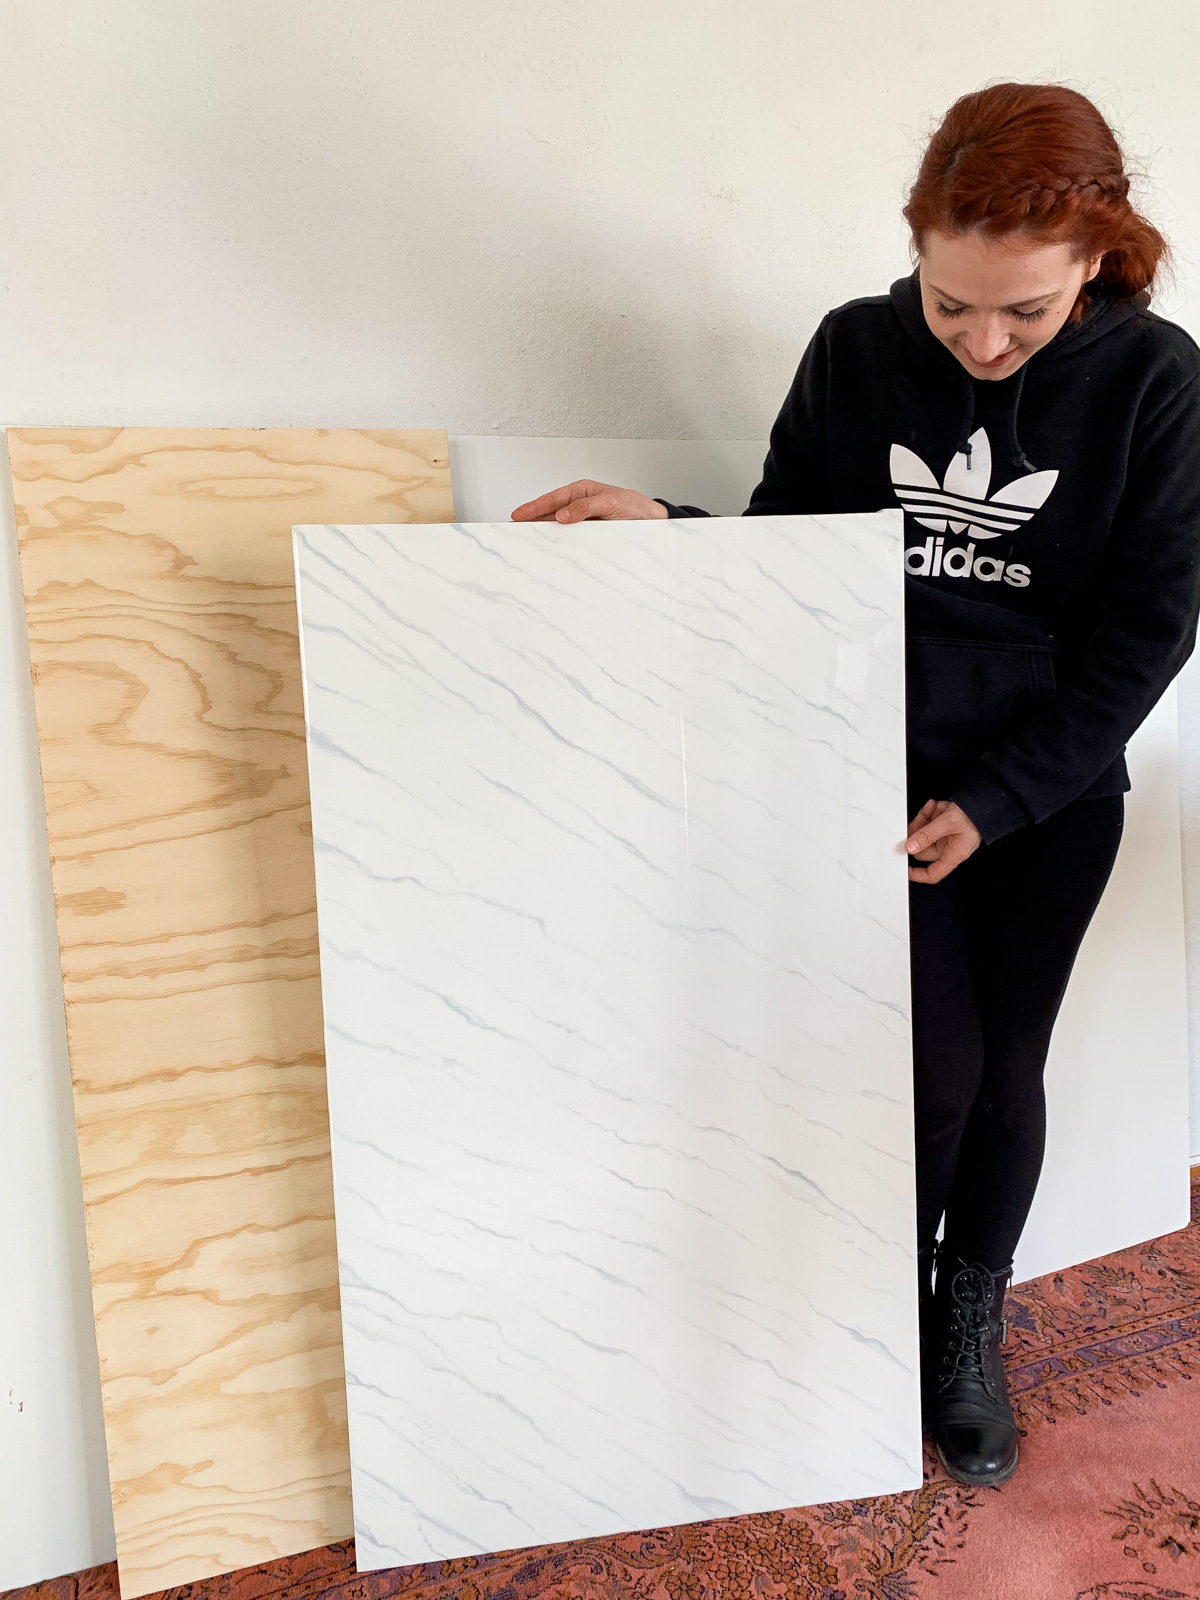
When we started remodeling our bathroom a few months back ( 😑 yes it’s been that long ) I realized marble and even quartz is pretty expensive. I’m all about saving an extra penny and honestly it just didn’t fit the budget no matter how hard we tried. I made numerous trips to homedepot and lowes hoping to come across some sort of faux laminate that would at least mimic the look I was going for. Their laminate countertops were in the right price range but the styles were far from what I wanted in my bathroom. The light an airy look I was going for seemed out of reach until I finally decided I’d give this idea a go. Turn a piece of plywood into faux marble!
Was I SCARED! HECK YES! In fact I went through a total procrastination phase with it. Literally let it sit in my workroom for a few days after we painted the plywood white LOL 😬😅 ! I ended up making a little sample just to see if my idea would work and Tony LOVED IT! I on the other hand wasn’t crazy about it because it was too much marbling for me! So we kept going back an forth on the idea of how much marbling we really wanted. I finally decided just enough for it to look like marble 🙈
OTHER DIYS YOU’LL LOVE!
- CUT OFF THE BOTTOM OF YOUR DRESSER FOR THIS MAKEOVER!
- HOW TO PAINT YOUR COUCH TO LOOK LIKE REAL LEATHER!
- FAUX RATTAN CLOSET DOORS THAT COST ME UNDER $50!
- I MADE A BENCH FROM 2X4’S!
- OUR DIY DINNING ROOM TABLE FOR UNDER $60
Basic Idea Behind This DIY Marble Resin Countertop!
For this DIY I was hoping to get most of my marbling effect done with craft paint. This would be the base before pouring resin over it. I’ve seen marbling done with resin however I’ve worked with resin A LOT and it’s really hard to control fine lines and since that was my many focus when making this countertop I figured craft paint is easier to control. Eventually I came up with the idea of pouring milky resin over the marbled effect to give it a blurred effect. You could totally go with clear resin over it however I was hoping it would fade out any imperfections in marbling effect giving it a more realistic look?! 😉🤓 It totally worked the milky resin was like magic over the painted marble.
this article contains affiliate links ( disclosure policy )
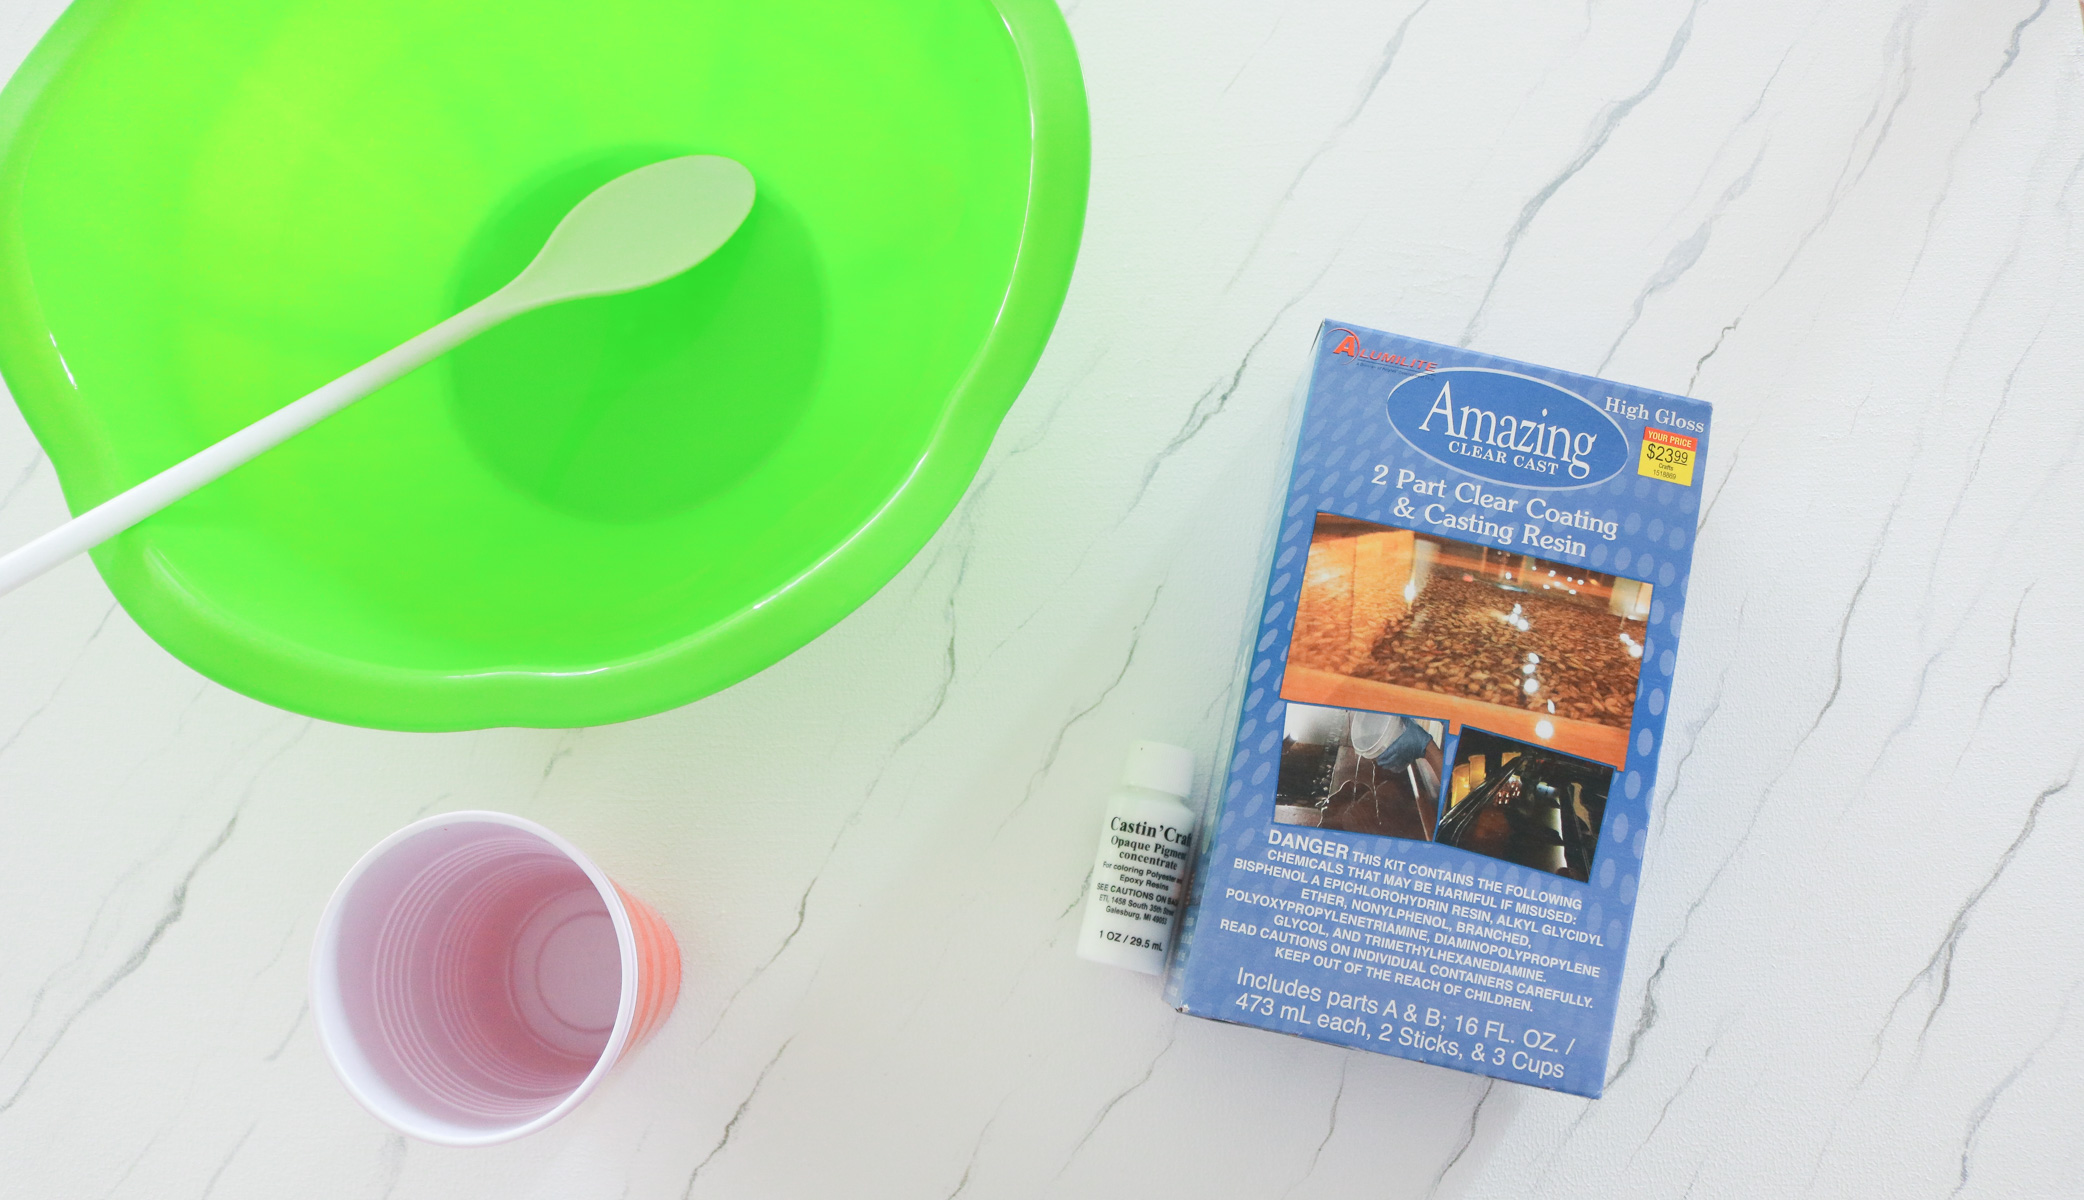
supplies:
- resin ( here’s the one I used – https://amzn.to/2Tow2HI)
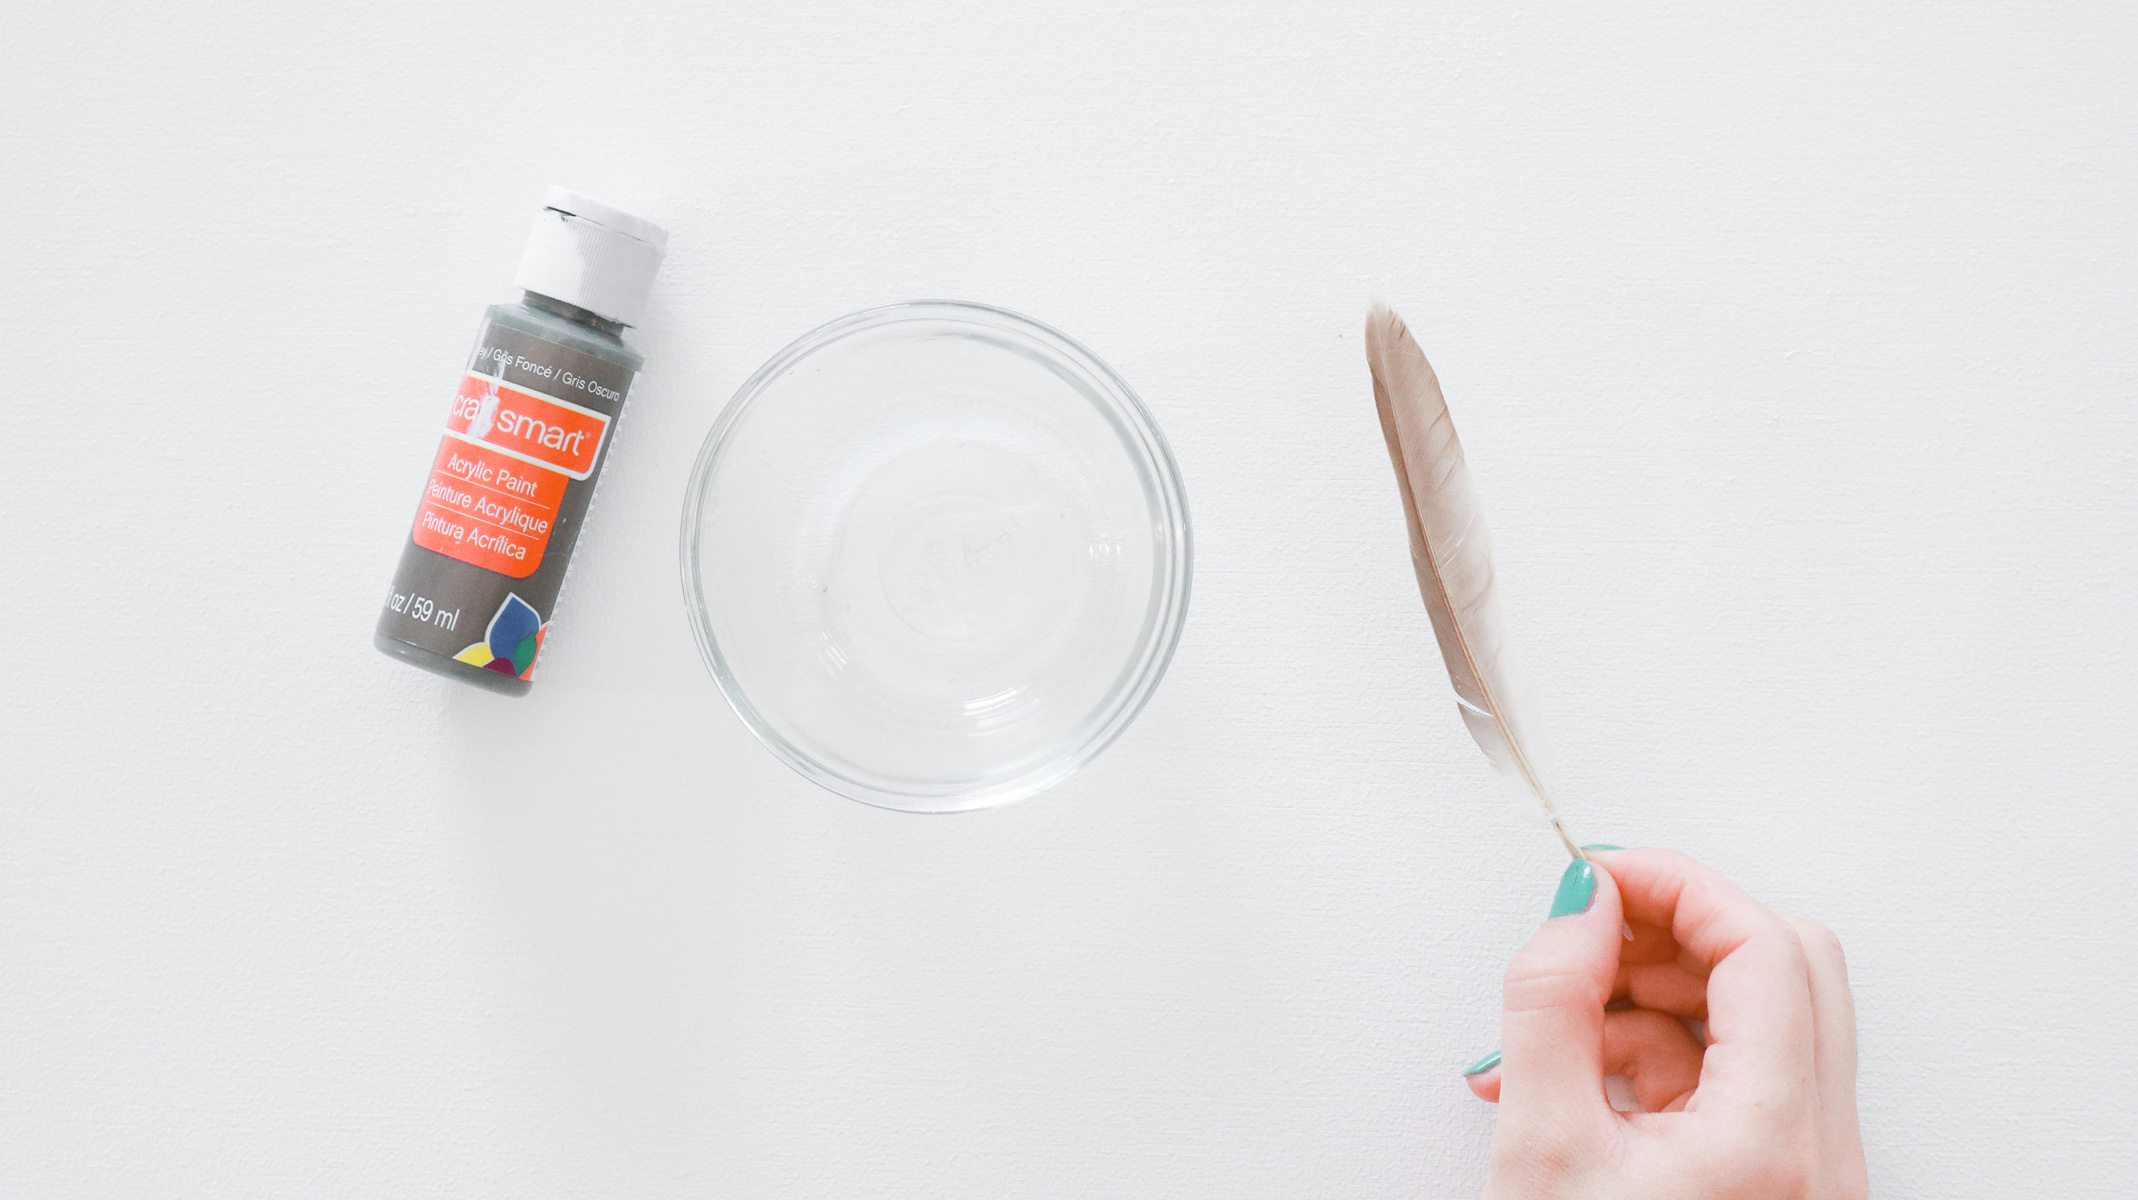
- feather ( Here’s a pack of 15 – https://amzn.to/3bp79TM)
- white paint
- plywood
- gray craft paint
Tools:
- sander
- optional: buffing tools
I organized a little gallery of the tools I always love to use! YOU CAN SHOP MY FAVORITE TOOLS HERE !
Pros:
Super budget friendly to get high end results. If you’re looking to get marble countertops this will be perfect in areas of your house the get light use.
Cons:
Definitely learned the cons after using the countertop for a while. The down side to these countertops is that they actually stain pretty easy however there’s an easy way to remove them. This was rather surprising to me because epxoy is super durable. We tried breaking it with a hammer had a super hard time even chipping it but, I guess it’s weakness is soaking stuff up. So far I’ve gotten two stains on the countertop and found an easy method to remove them. It’s actually a no scrub method. A baking soda mixture you pour on top and let it sit for 24 hours. It soaks up the stain just like that. I share all about it here. I also learned that my bleach spray removes the stains easily as well if I let it soak on the stain.
Total Cost :
Just under $50 ( for an approximate 3×4 foot section )
Time Needed :
If you procrastinate like me it’ll take maybe about a week 😅! If I was to rush it I think it’s totally doable in 1-2 days.
Adding An Edge To Your Countertop + Prepping !
Because we were trying to mimic real marble as much as possible we decided to add a thicker edge to the plywood. I got a 1×2 at home depot and Tony cut it down even thinner. I think he got it down to about 1 and 1/4 inches in thickness. Than we glued it to the edge of the plywood and added a few finishing nails. Here’s the gun I use to secure all my furniture projects together- https://amzn.to/2W9mDoU )
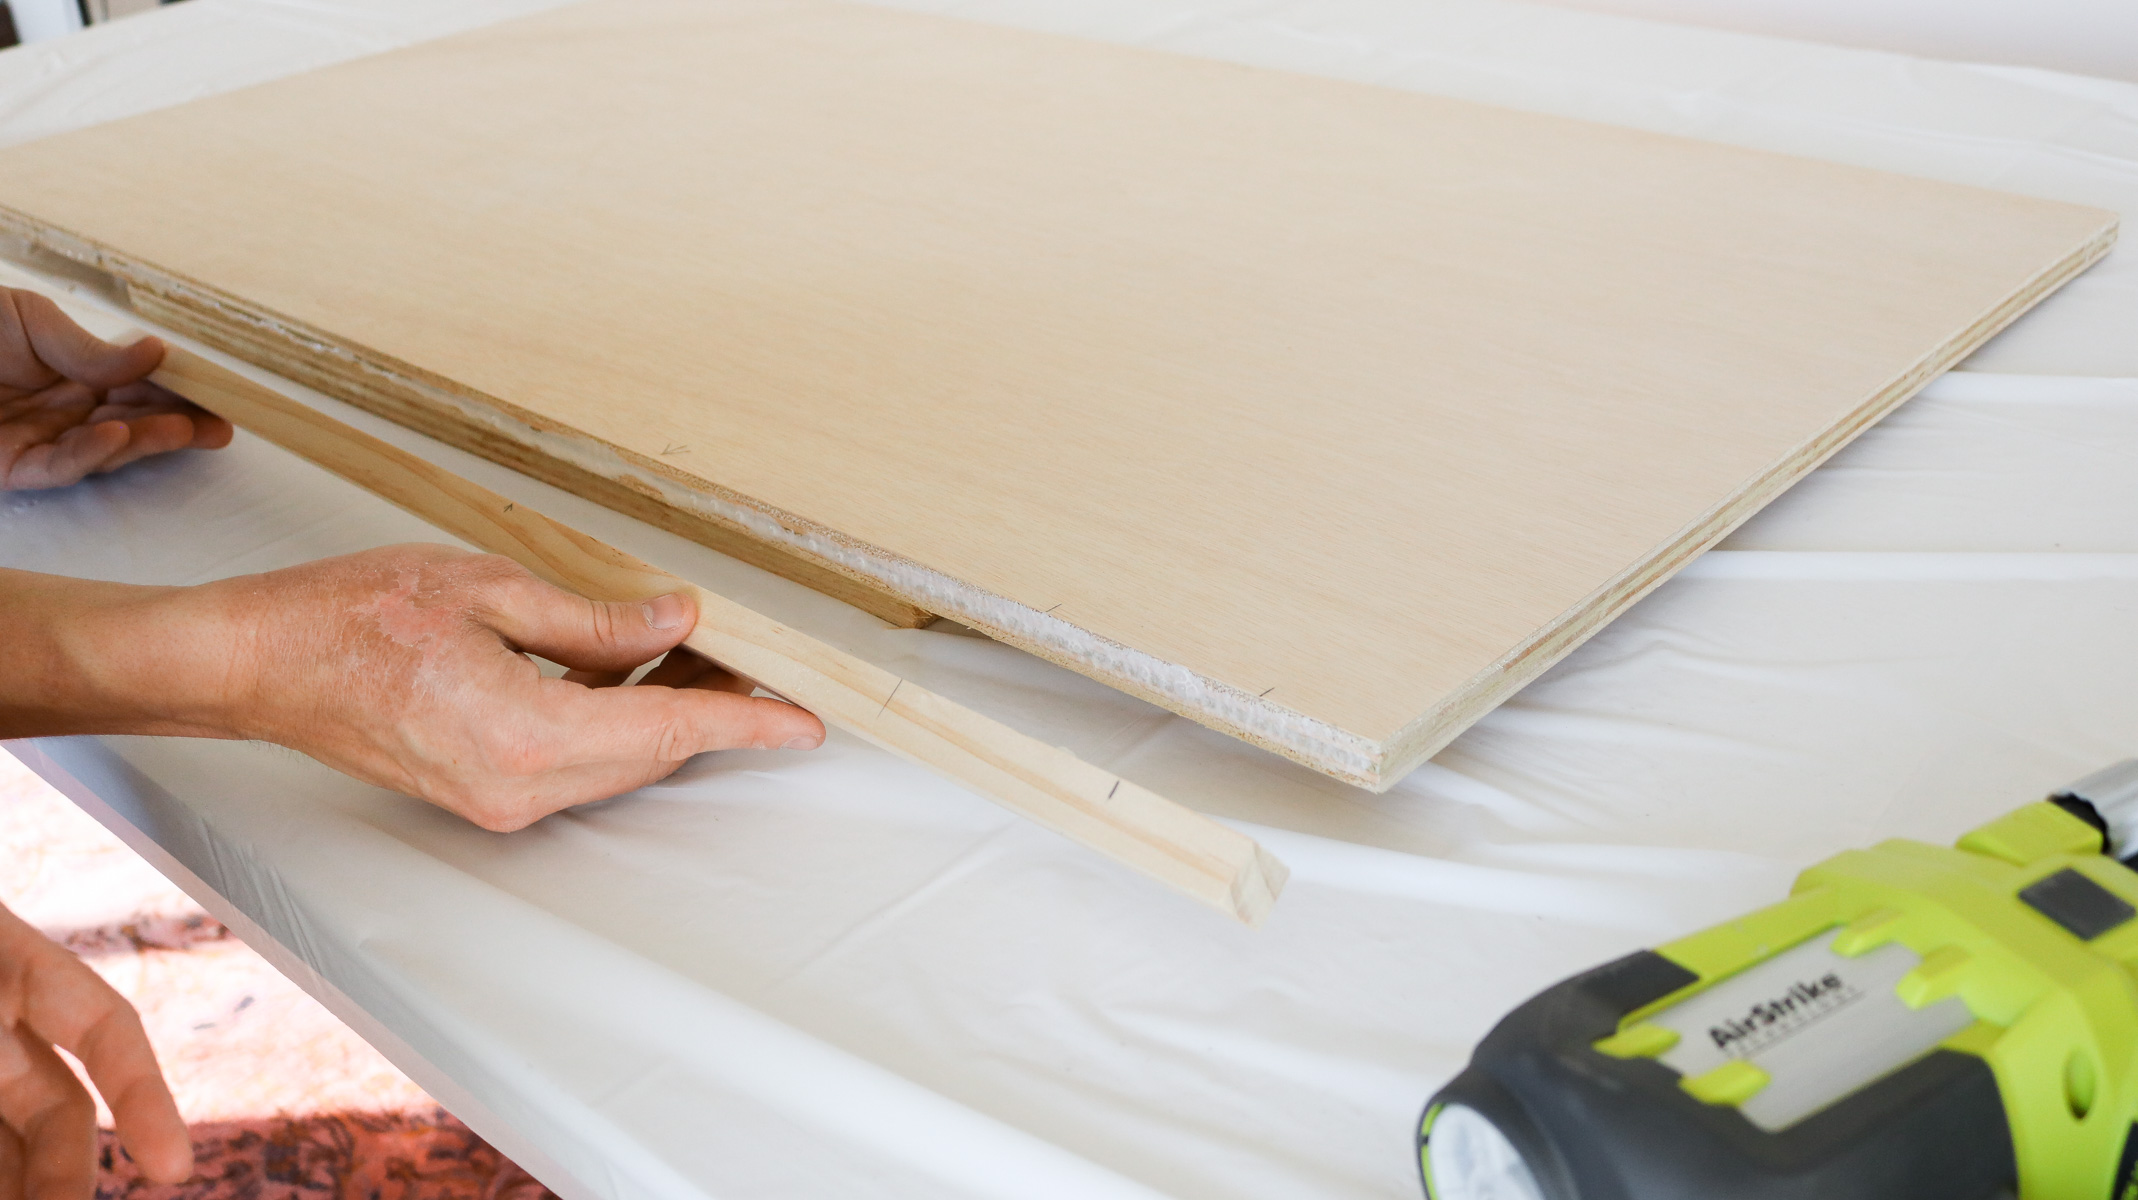
It is totally optional you can just leave the plywood as is just make sure your edges are really smooth. Seal it with plaster or sand the areas that need smoothing.
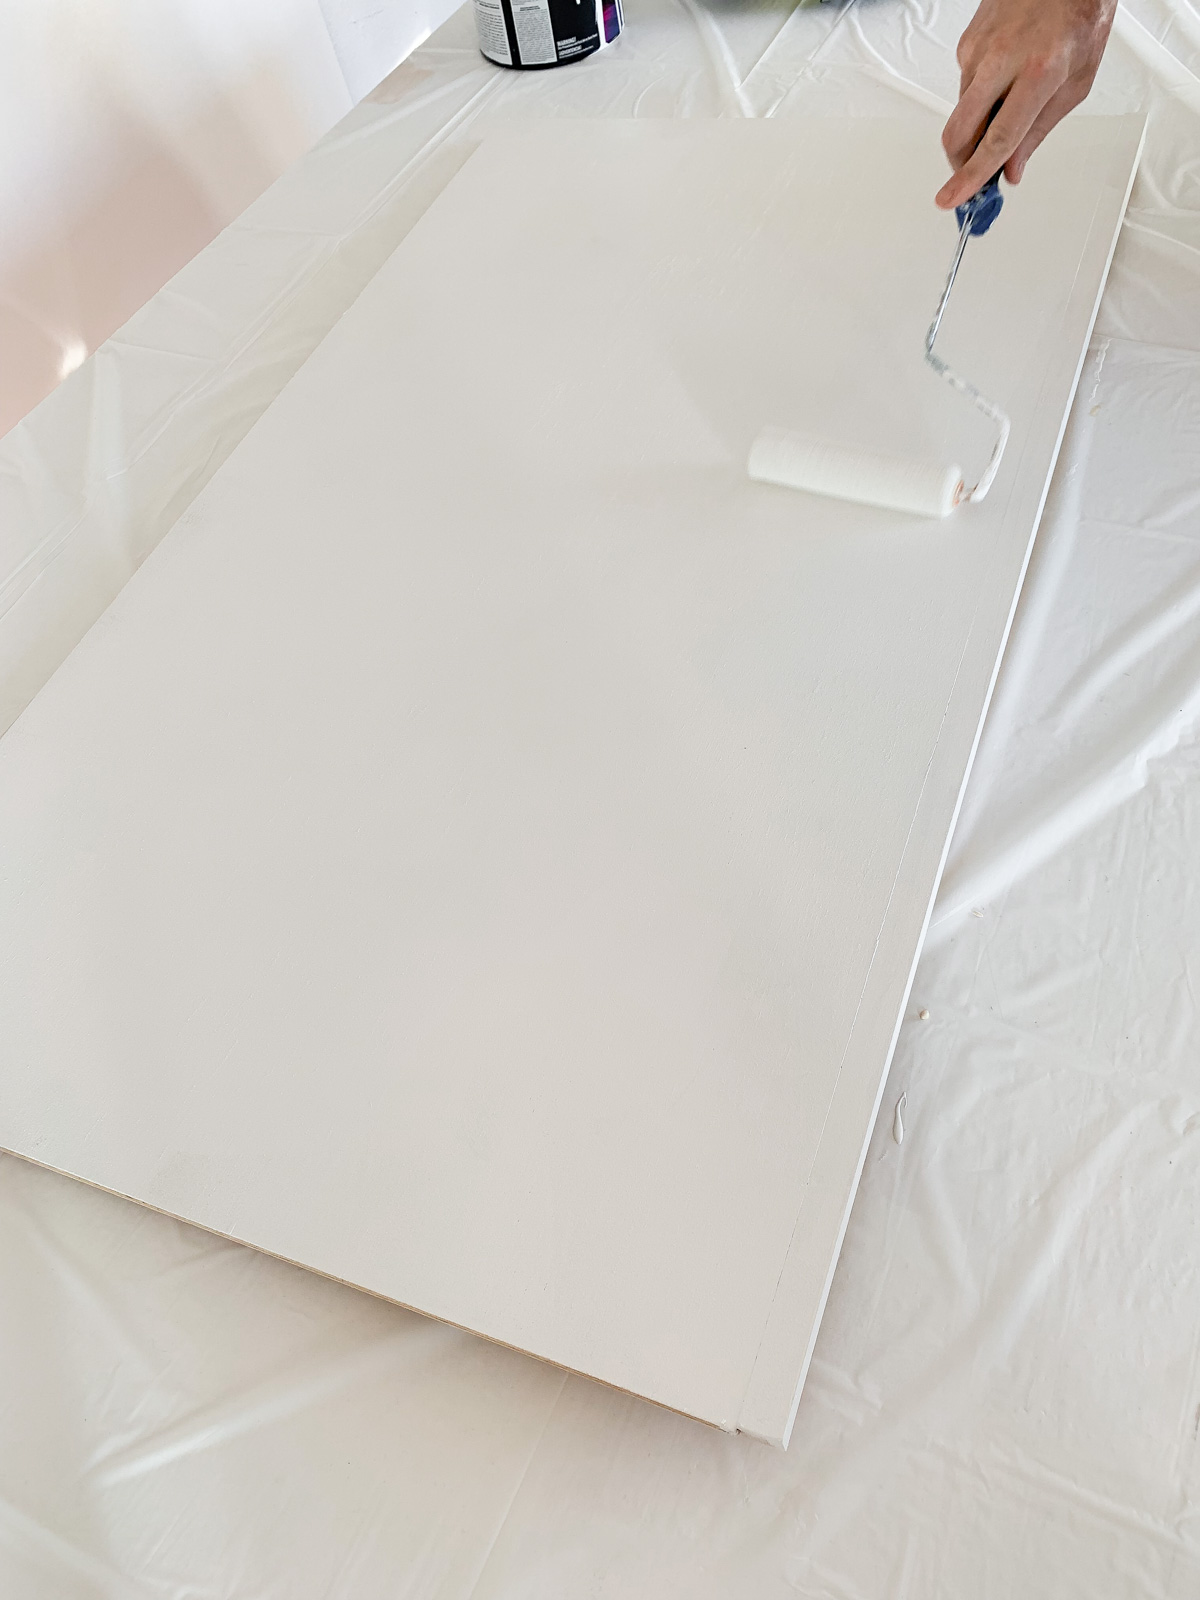
Once the edge was attached we used some latex interior white paint and applied 2 coats onto the plywood. Make sure the paint isn’t glossy. Ours was eggshell.
How to get the perfect Marble effect on your countertop
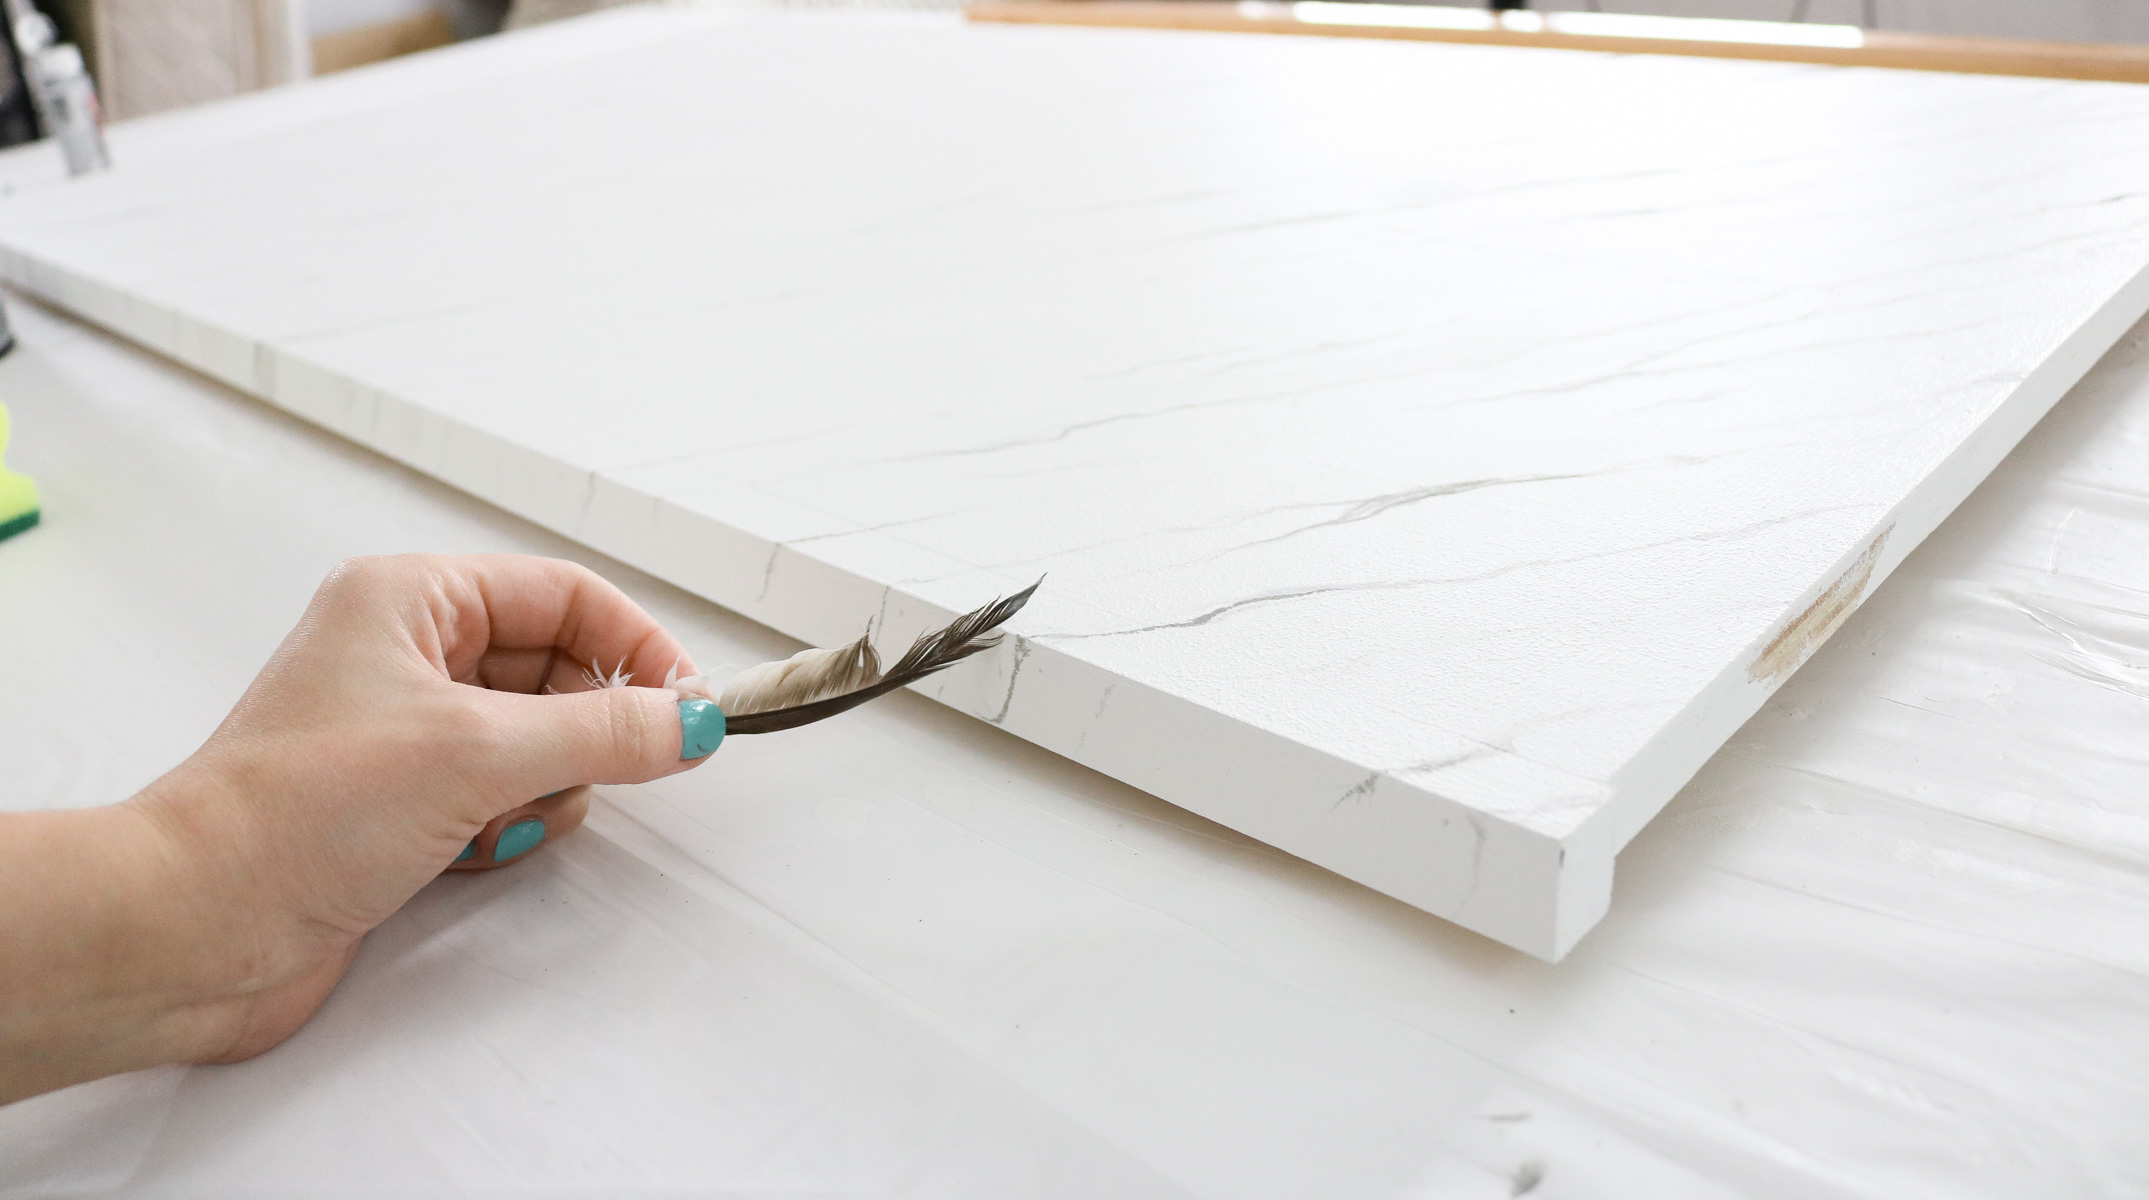
My first attempt at this was done with a thin paintbrush. It wasn’t bad but I felt like it just didn’t cut it for me. The strokes were too thick and I really wanted those fine lines in my marbling so I opted out for the feather method. I head some gray acrylic craft paint at home that I watered down a bit just so it glided on smoother. Than I would dip my feather in the paint and squiggle it onto the painted plywood. I focused on keeping all my marbling lines going in one direction. Not sure if this exists on real marble I just had this vision of what I wanted and went for it. 😀 The feather definitely helped get super fine lines.
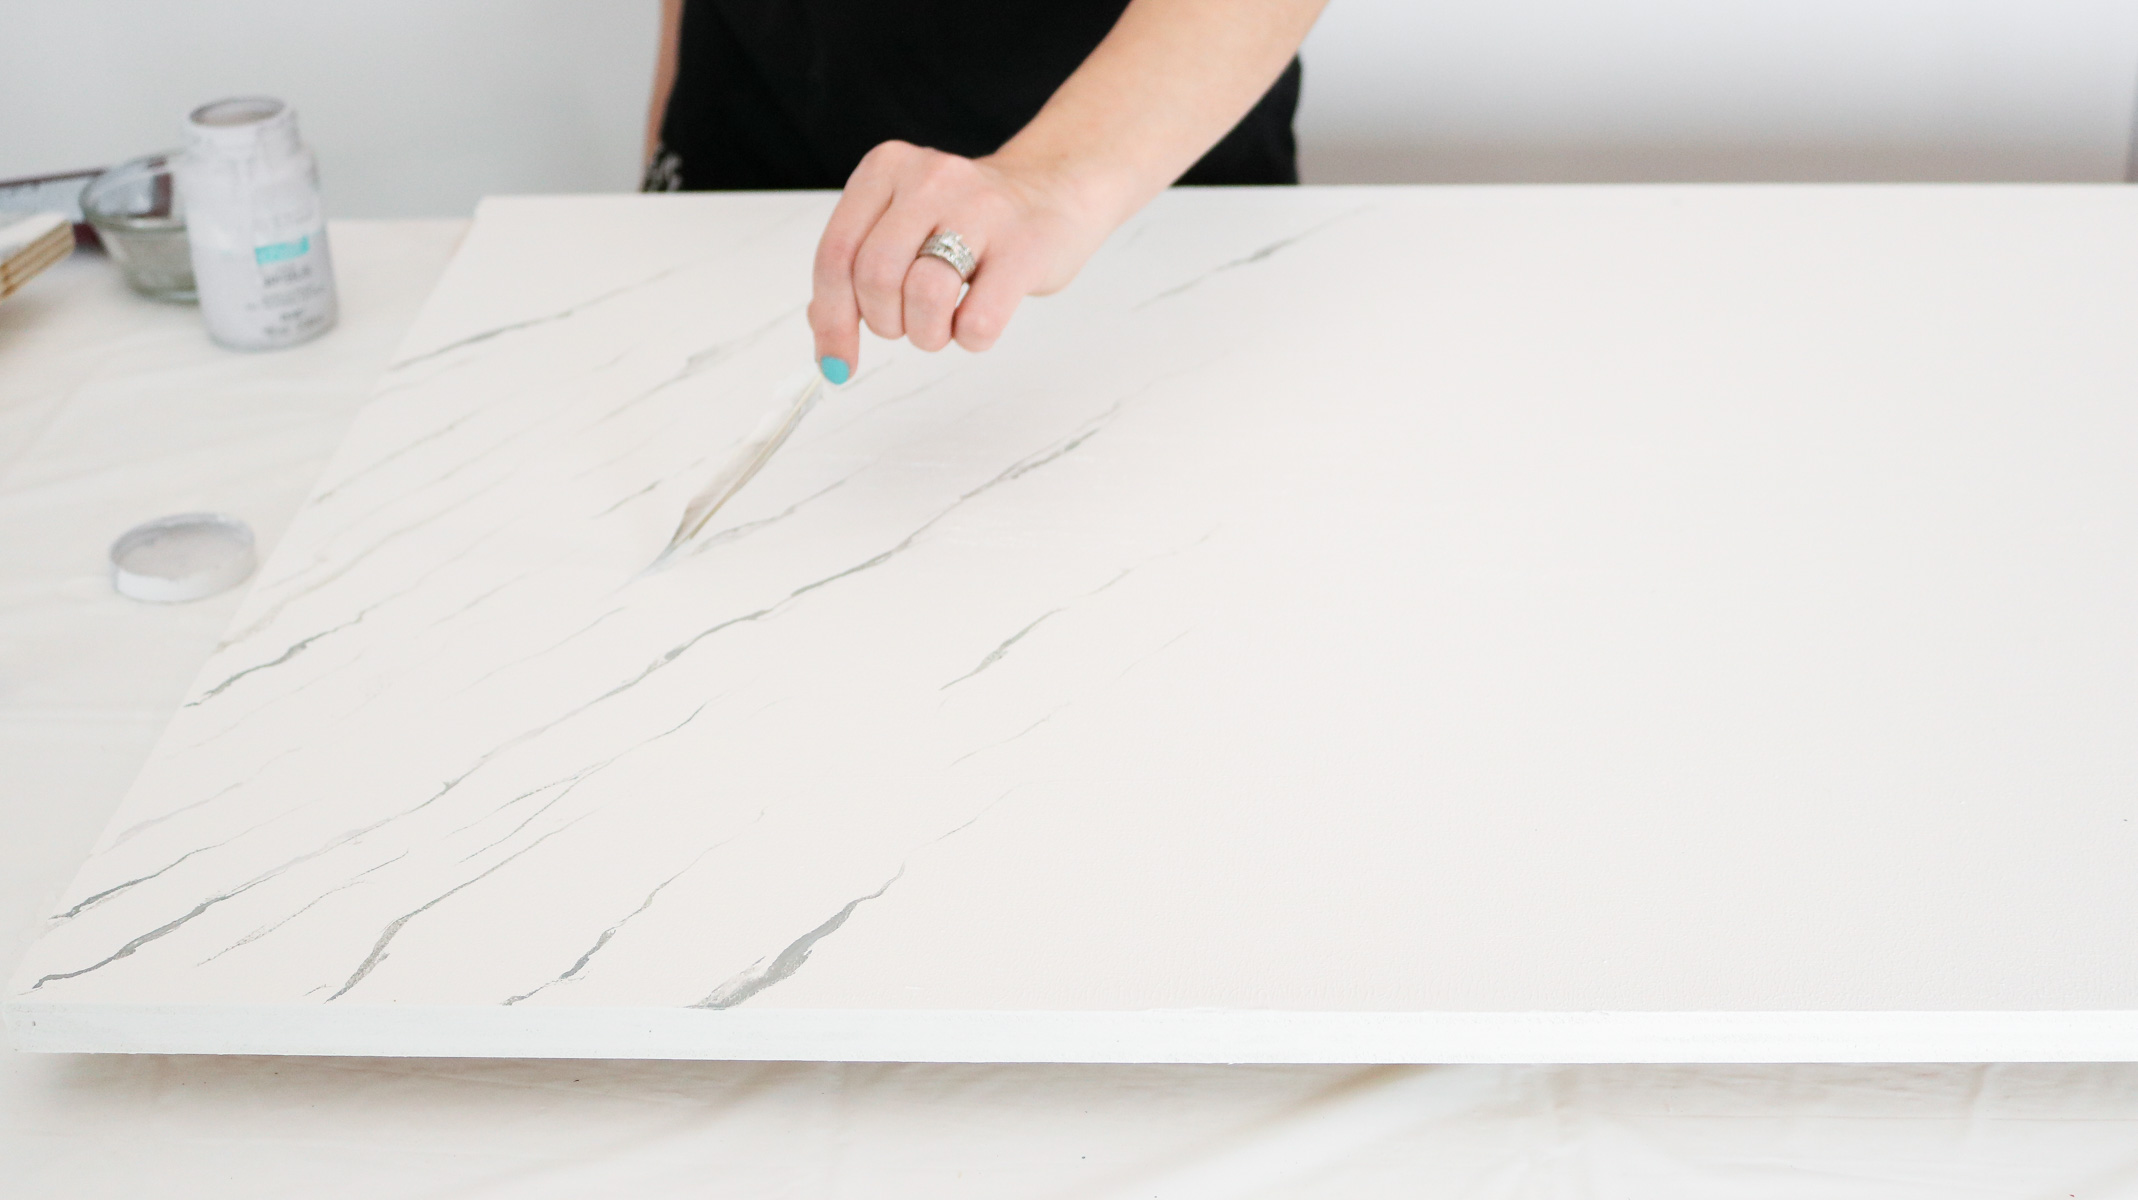
Make sure you get the edges as well.
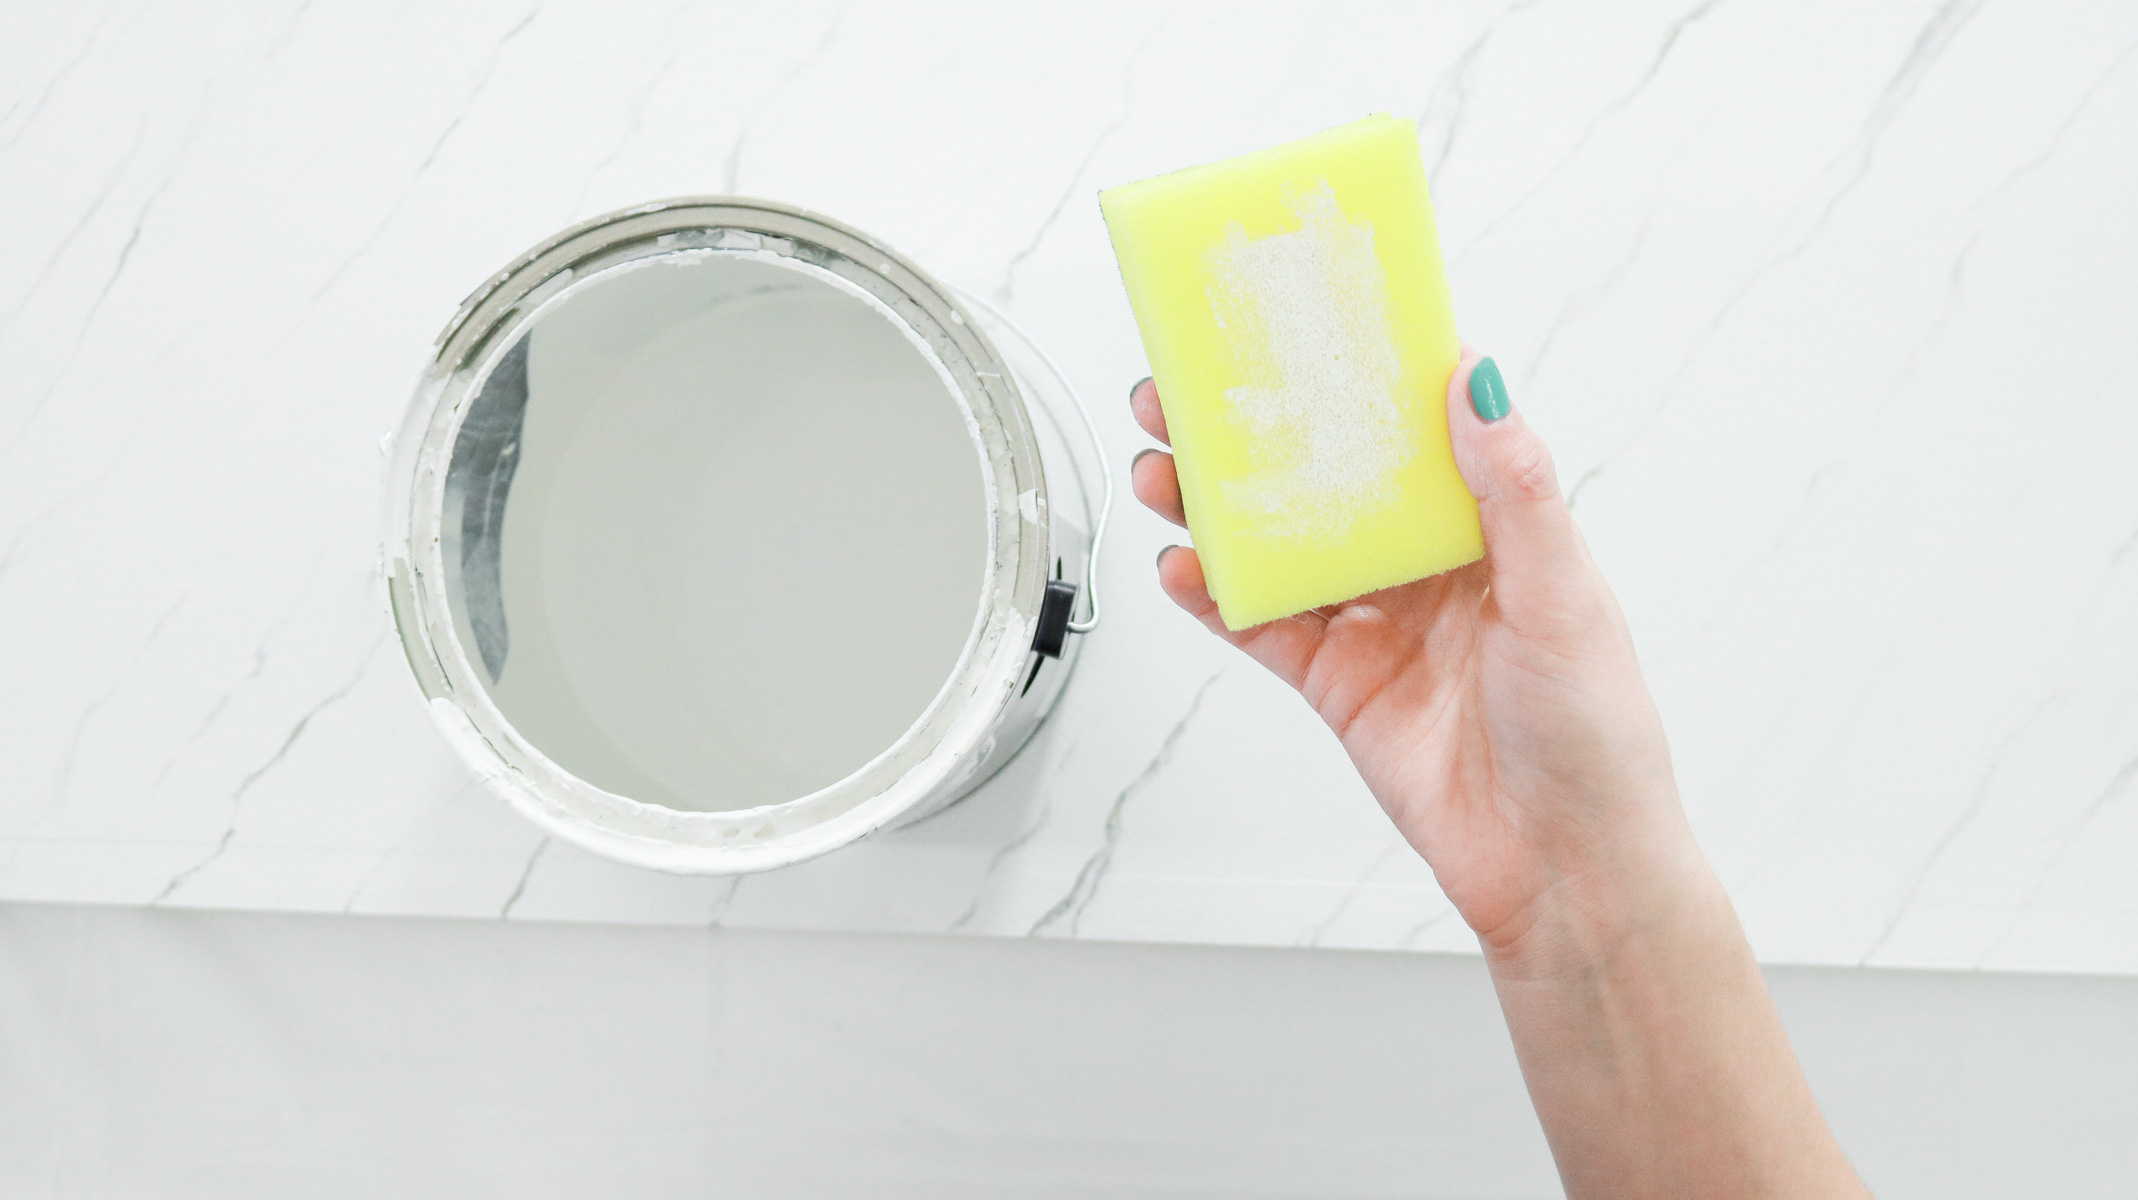
Fading it out
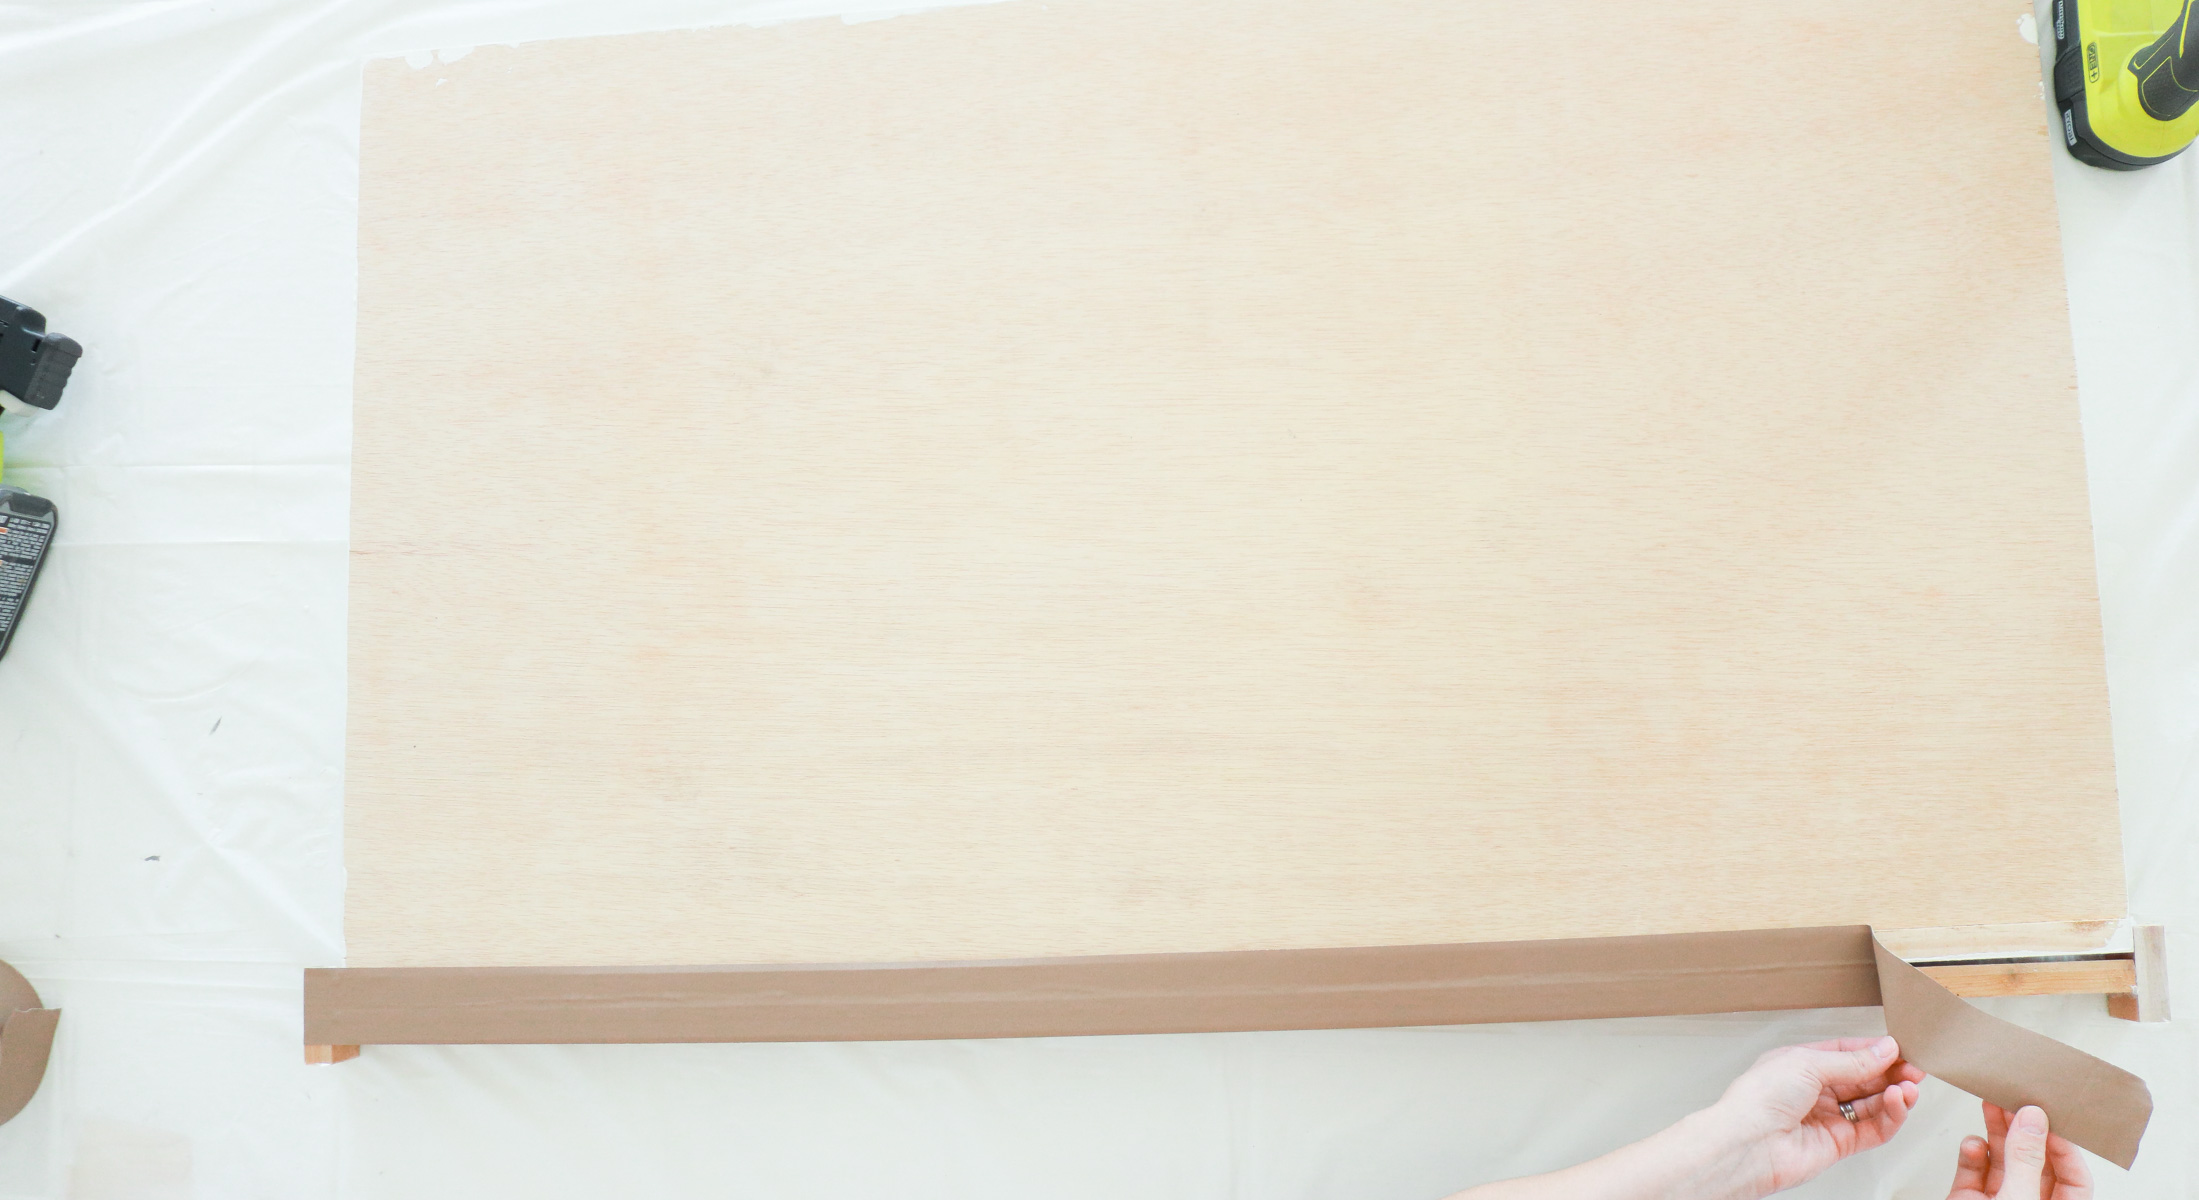
Here’s how it looked with all the lines were drawn on. I decided it needed a little bit more fading so I got a damp sponge and dabbed on some of the white paint we used to paint the plywood. Than I smothered it onto the marbled lines. This definitely gave it a more faded look.

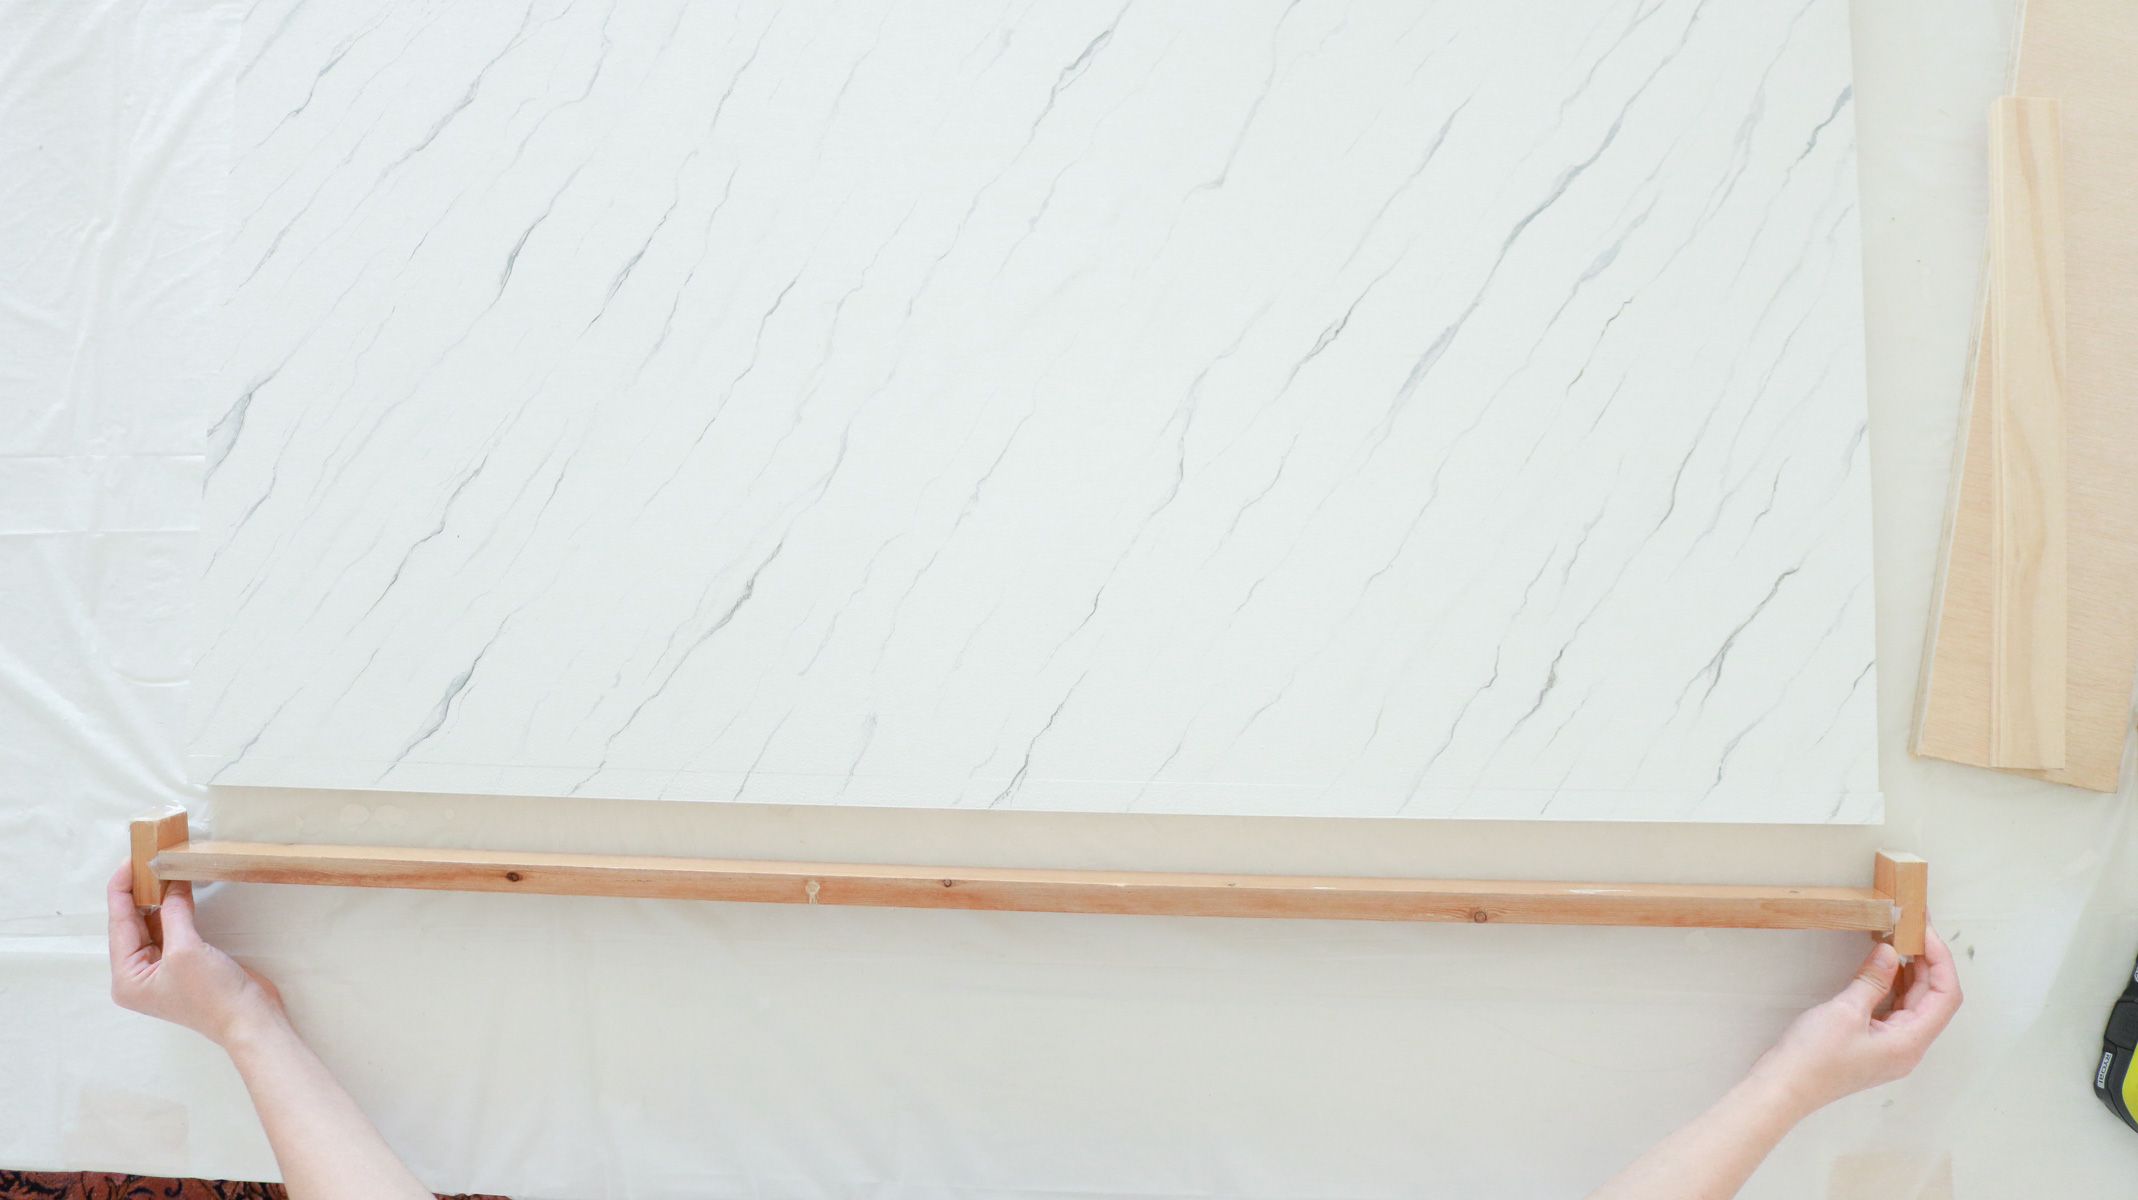
Making a mini frame for the edge! ( optional )
This step is totally optional. In fact if I was to do this again I probably wouldn’t do this step only because it causes more work later however, it did give the edge of the table a really nice finish. By more work I mean it creates a raised edge that needs to be sanded down thus causing you to buff it back to it’s original shine unless you want a matte finish countertop.
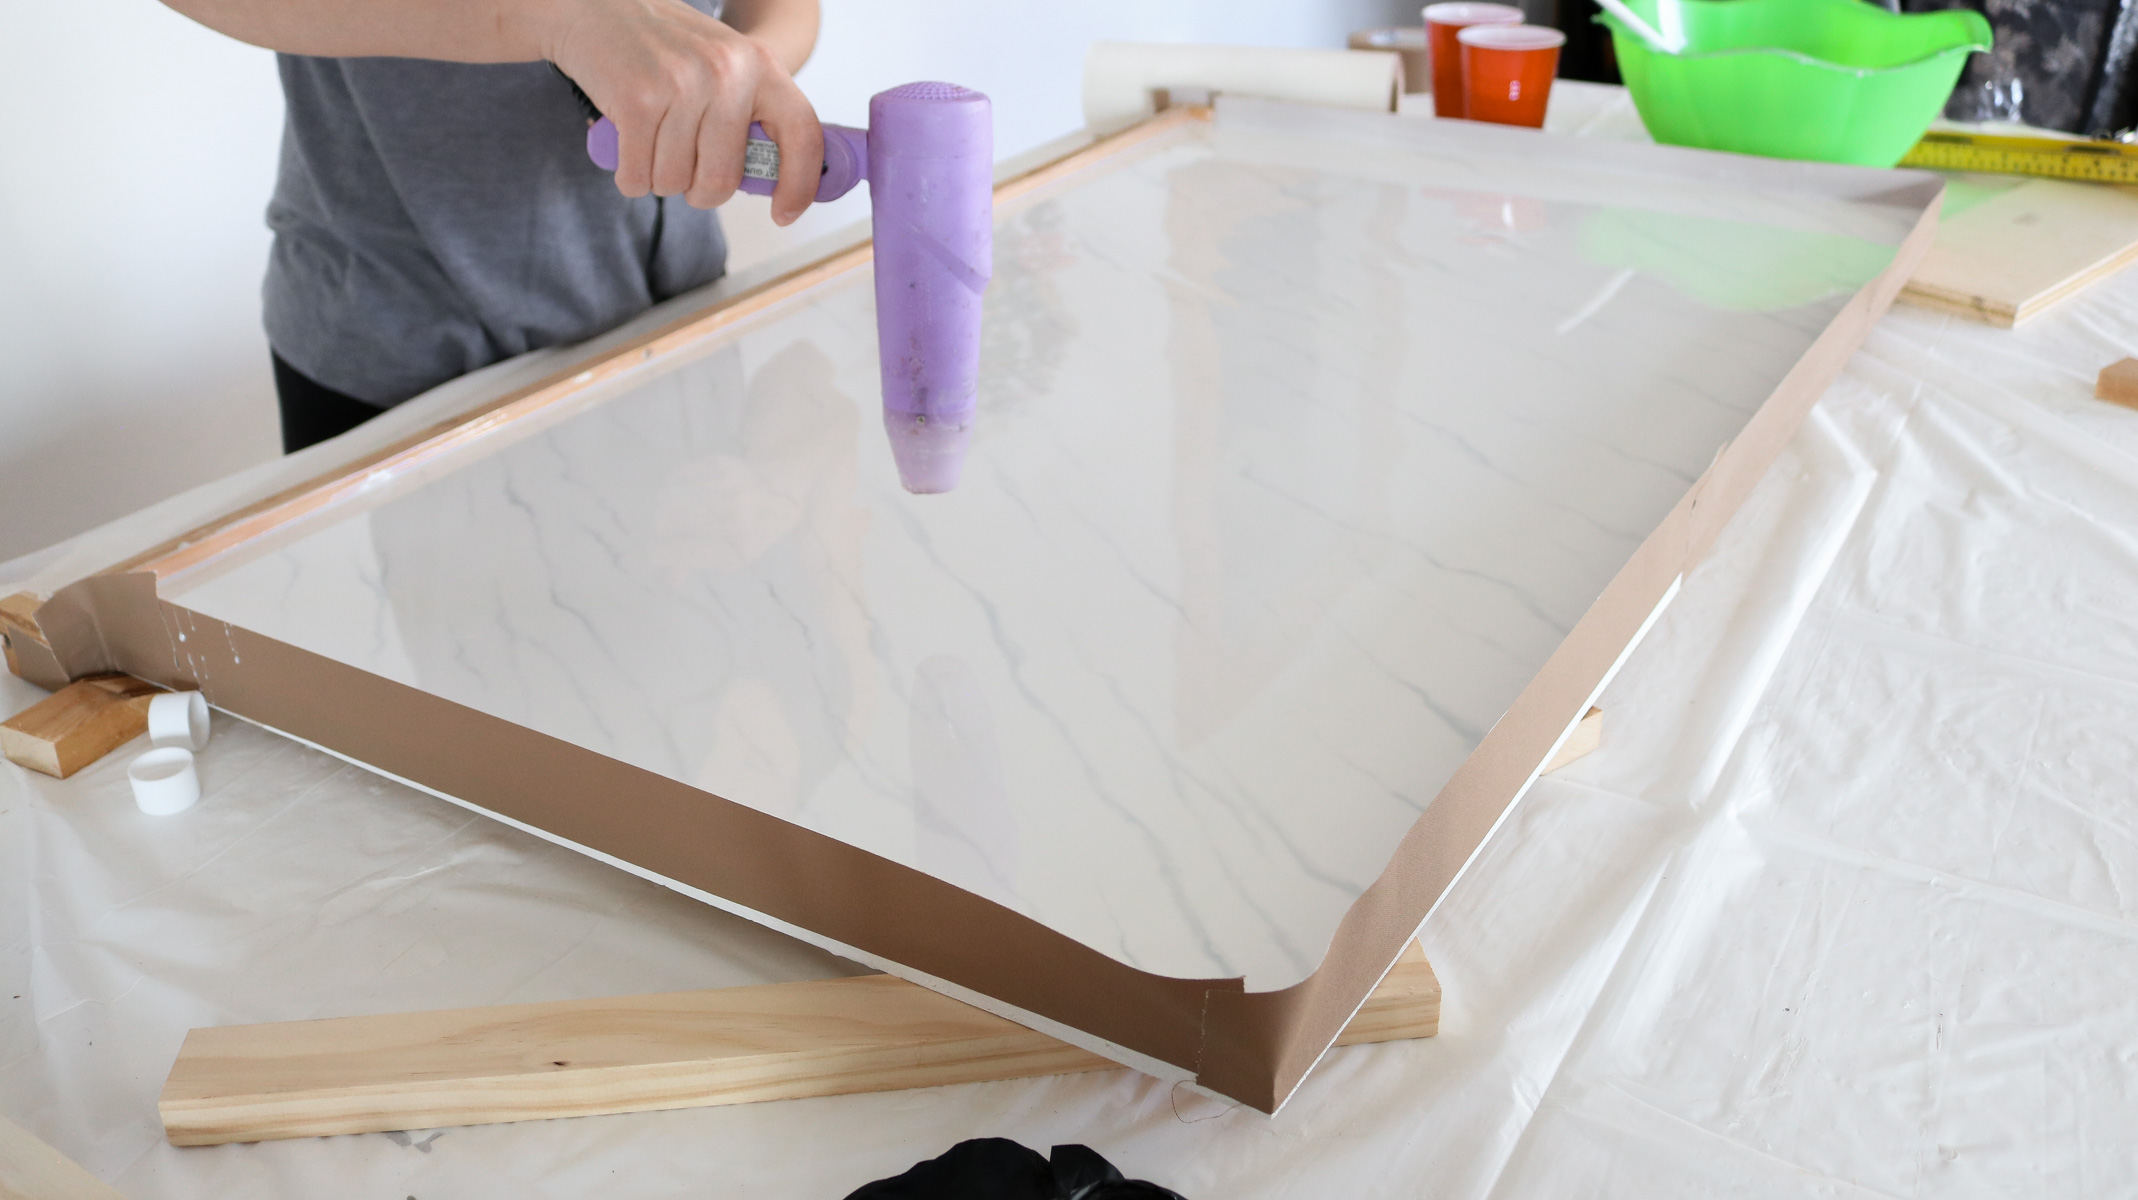
For this step I made a little frame that left a gap for the resin to fill into so your edge get’s a nice thick layer of resin. This frame will be removed once the resin has set. Make sure you apply tape to all the areas you don’t want your resin to stick to. To secure the frame to the countertop I used hotglue and small staples.
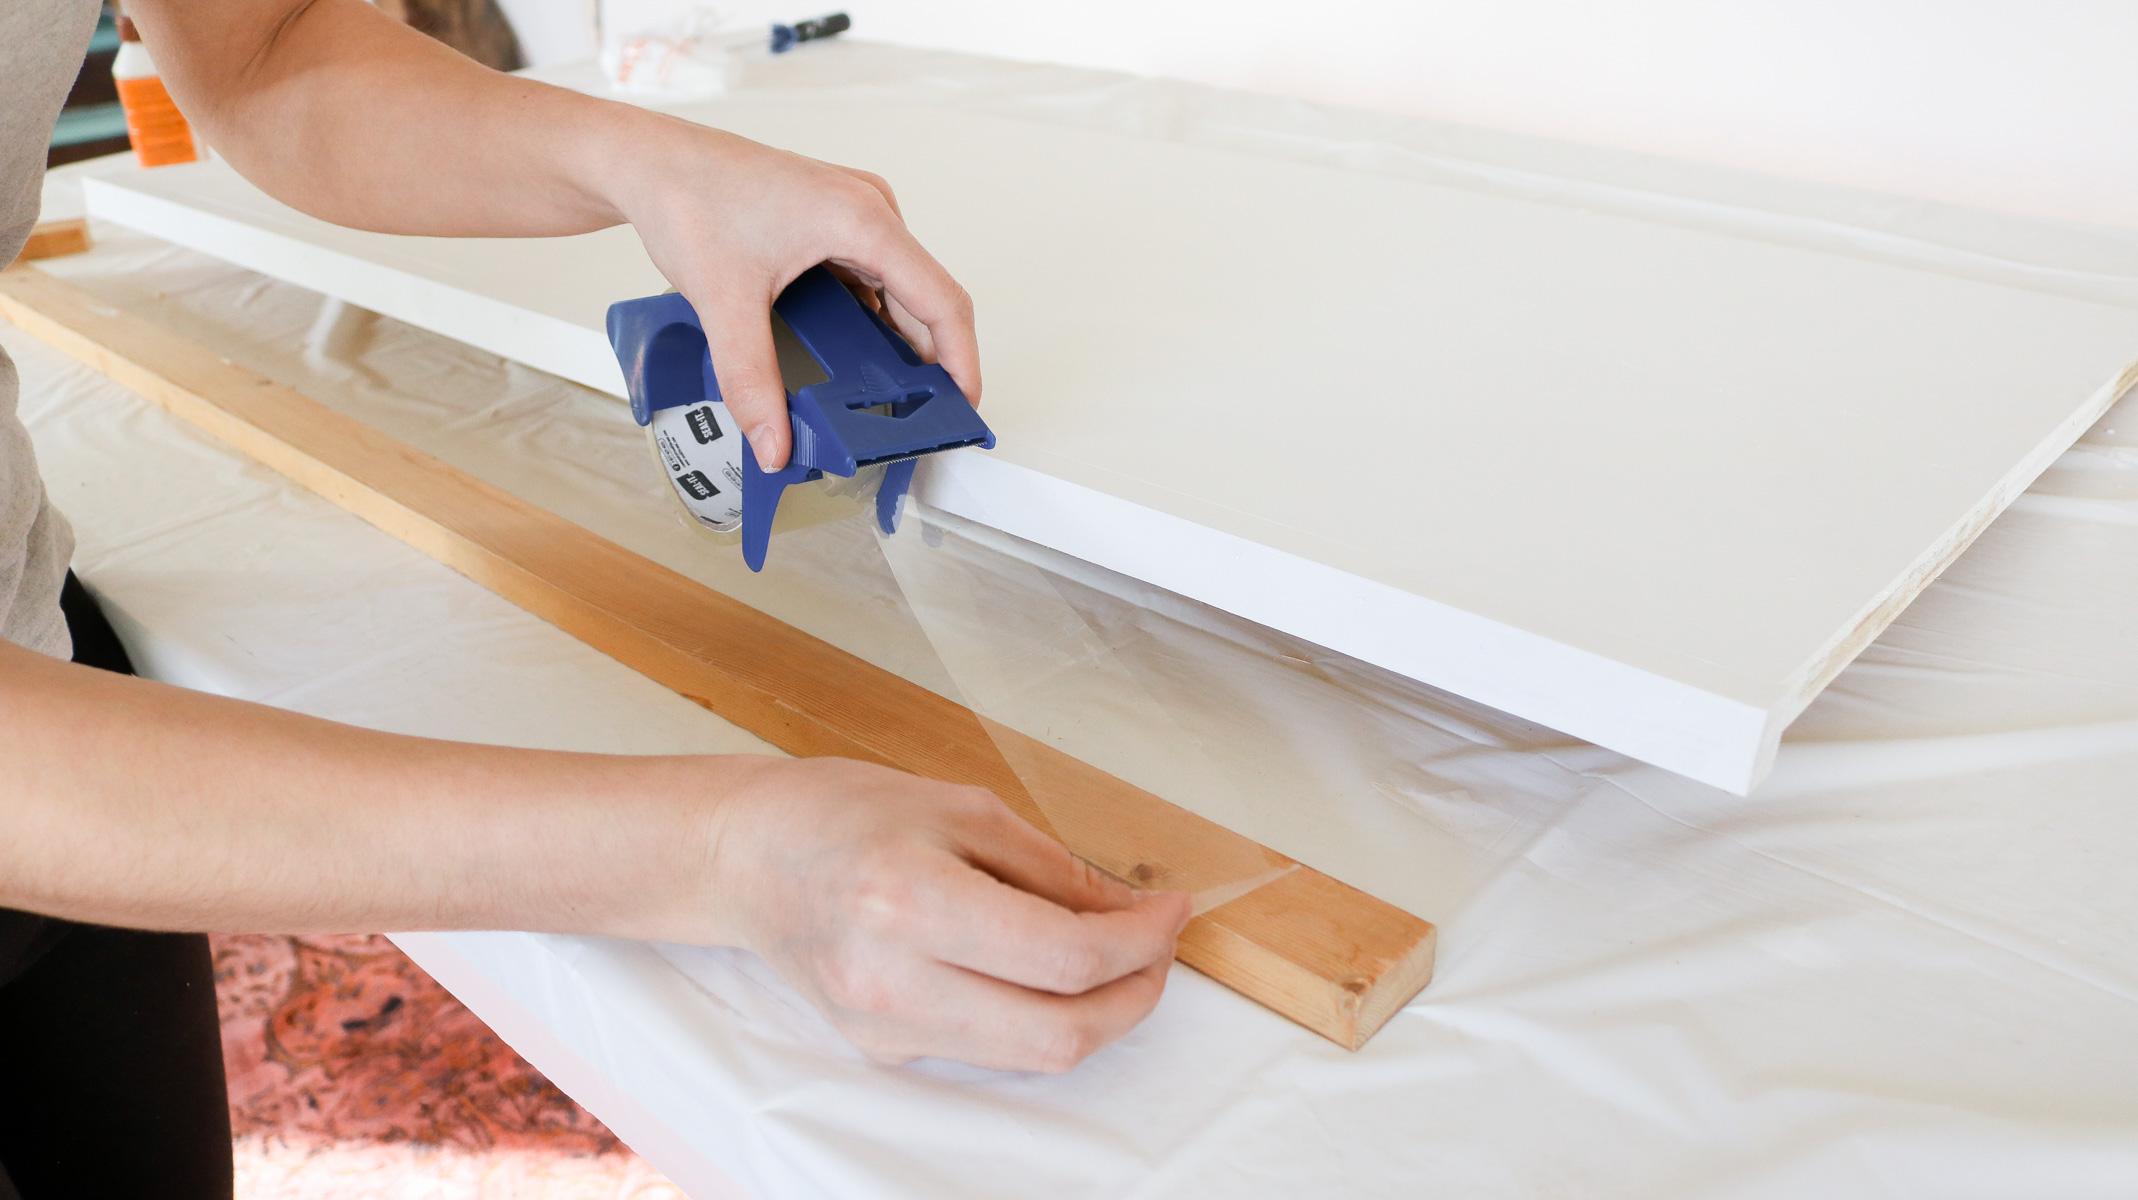

Flip the countertop over and tape the bottom so the resin doesn’t pour out. Any strong tape works. I’ve tried it with duct tape before and it worked great. Be sure to seal any holes or cracks with silicone so your resin doesn’t seep out as it starts to set.
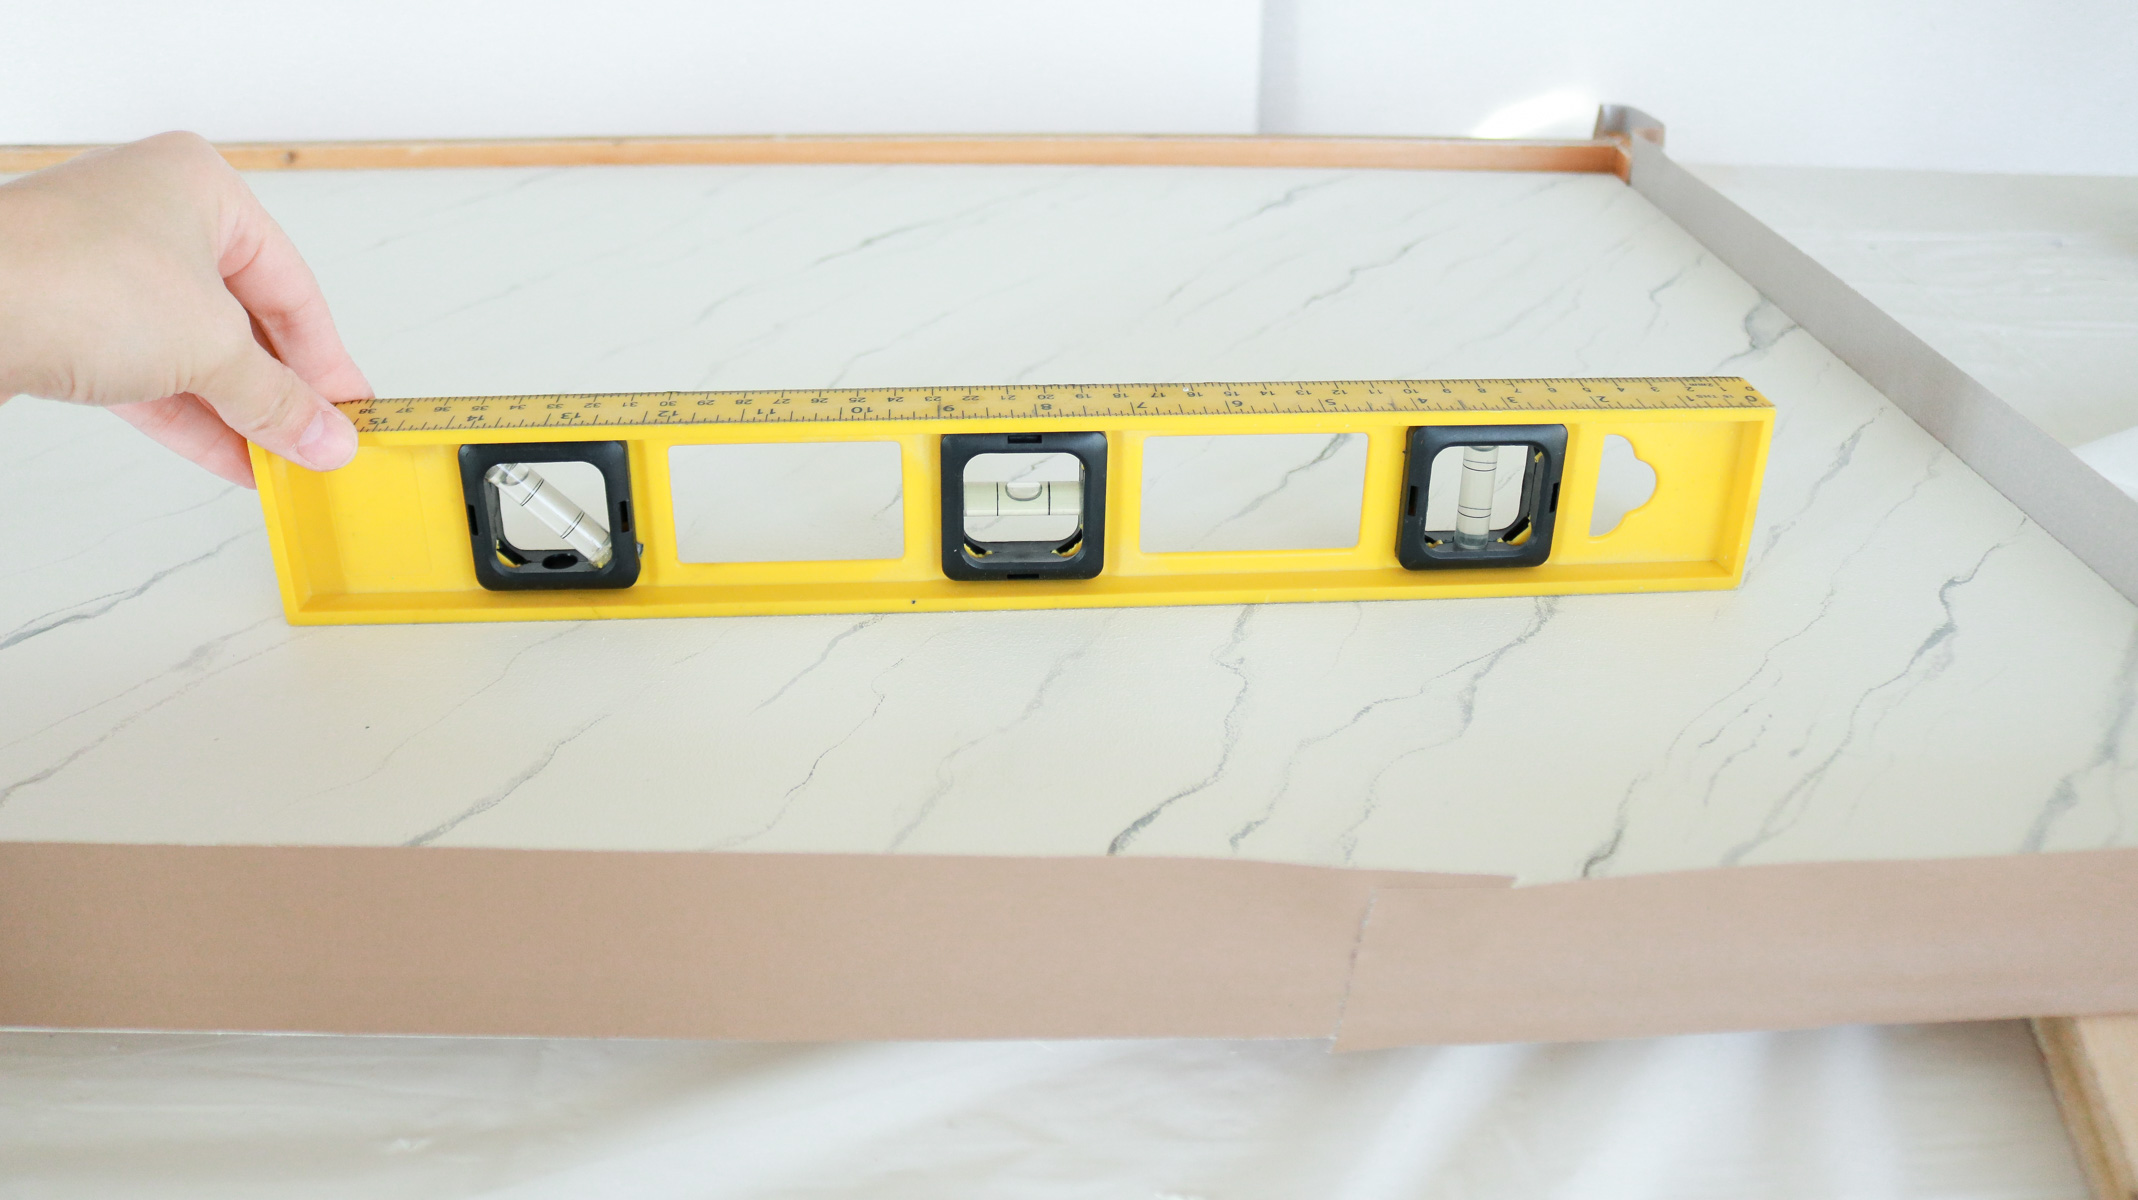
Than I made sure the surface was perfectly level and applied a tape wall to all the edges.
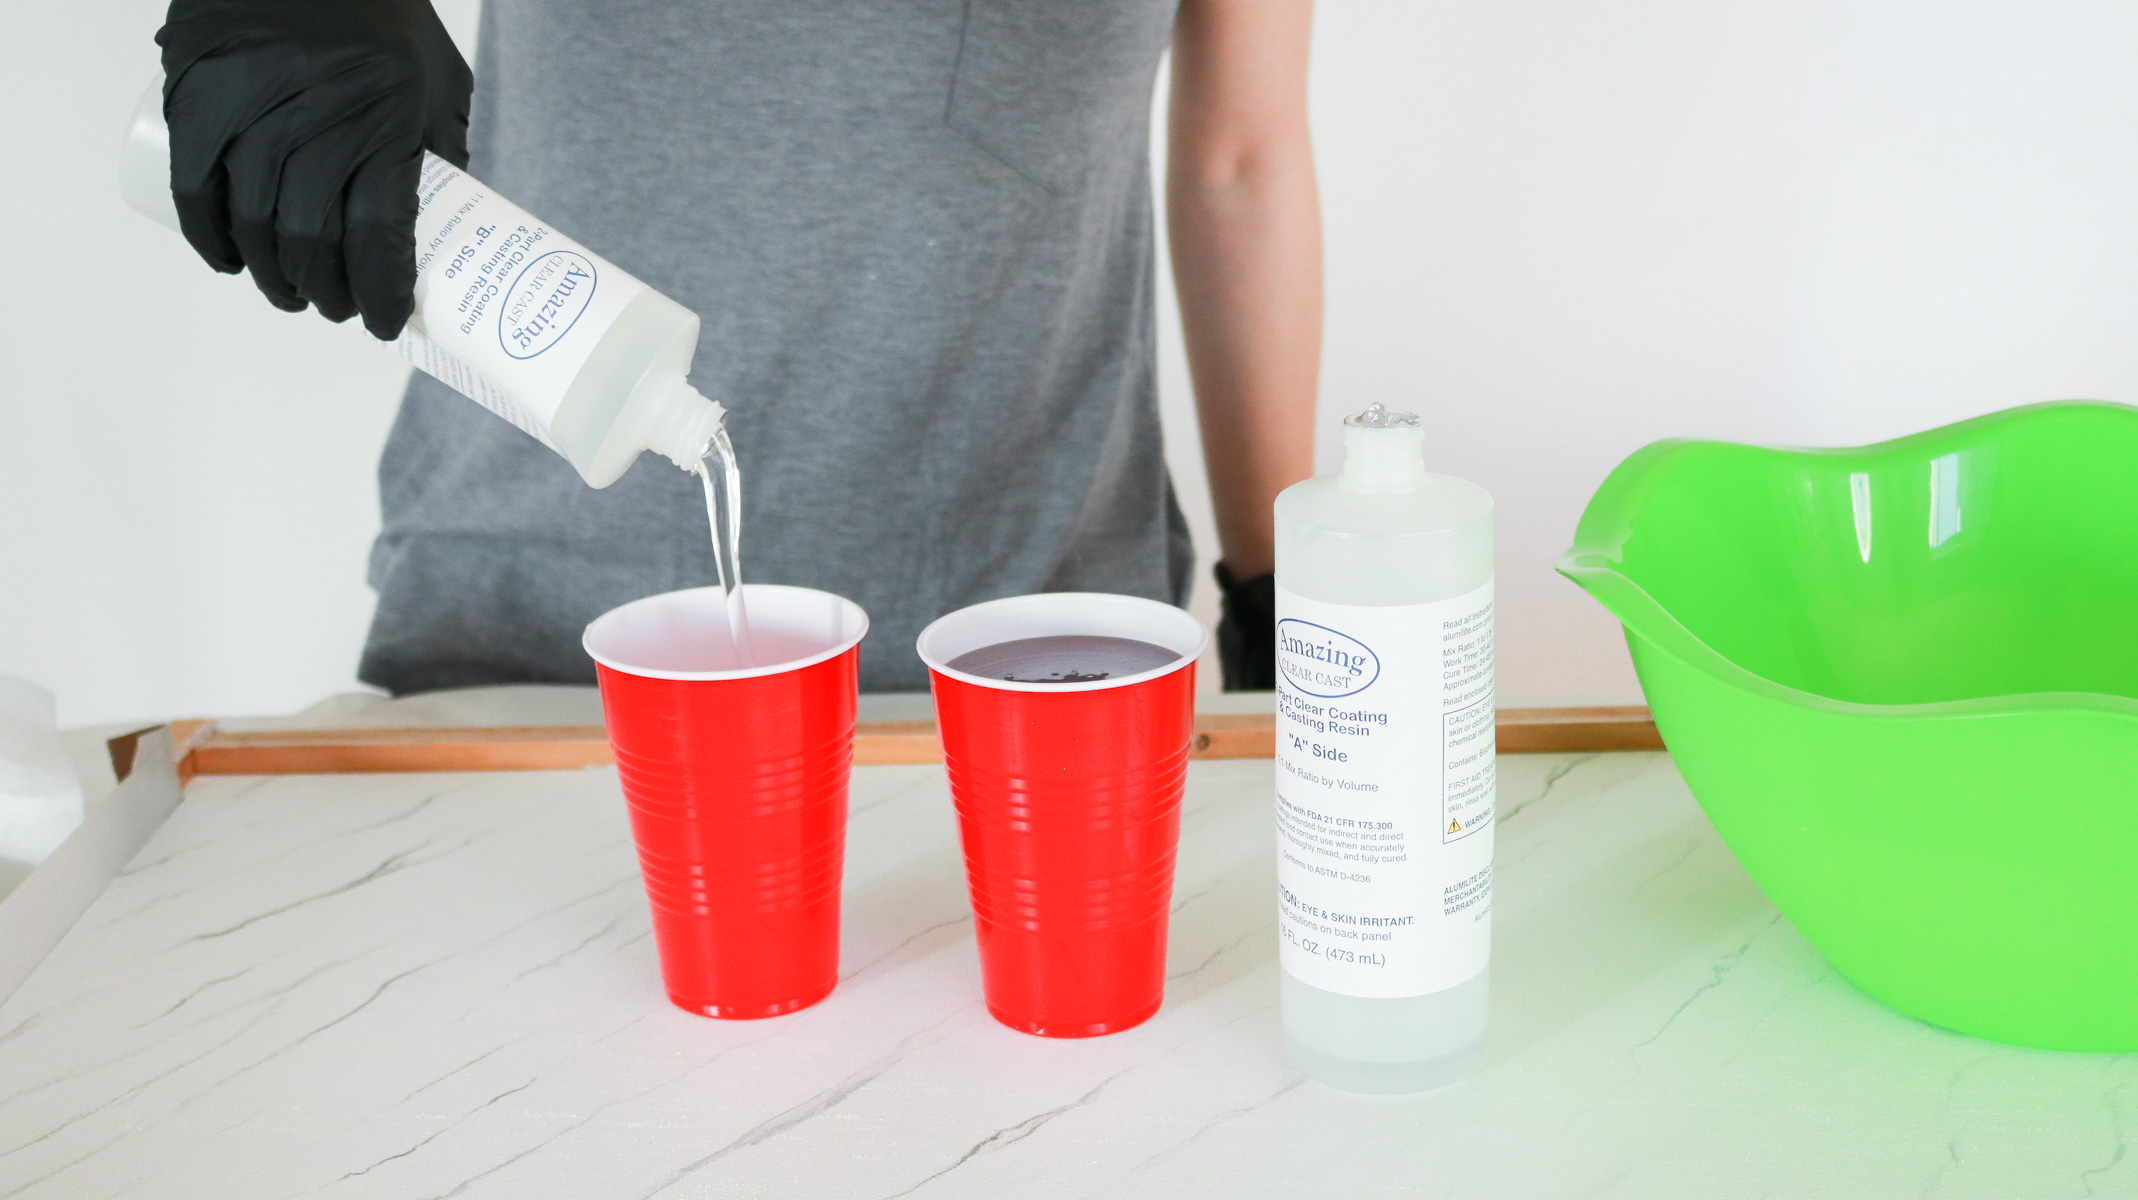
How to mix your resin!
Every resin is different and you should always follow the manufacturers instructions for safety. Be sure to work in a well ventilated area, wear a respirator mask and some gloves. Most resins require you to combine equal amounts of the two liquids provided. That’s what my resin required. I combined both bottles of the resin liquids into a mixing bowl and stirred it with a plastic spoon for three minutes. Stirring it well is important. You should also avoid stirring too fast as it creates bubbles. Than I added some white resin tint ( about 20 drops) and stirred for an additional minute. Be sure to scrape all the edges to combine the liquid properly or else it might not set.
Most resins will have a working time between 15-30 minutes before it starts setting and becomes hard to work with. My resin took about 20 minutes. It also depends on how much colorant you add to your resin. The more colorant you add the faster your resin will usually set. Too much colorant can also cause your resin to never cure fully .
To fully cure it takes between 24-72 hours.
Pouring your resin!
Pour your resin and spread it out. You can use your hands or a spoon. I did both.
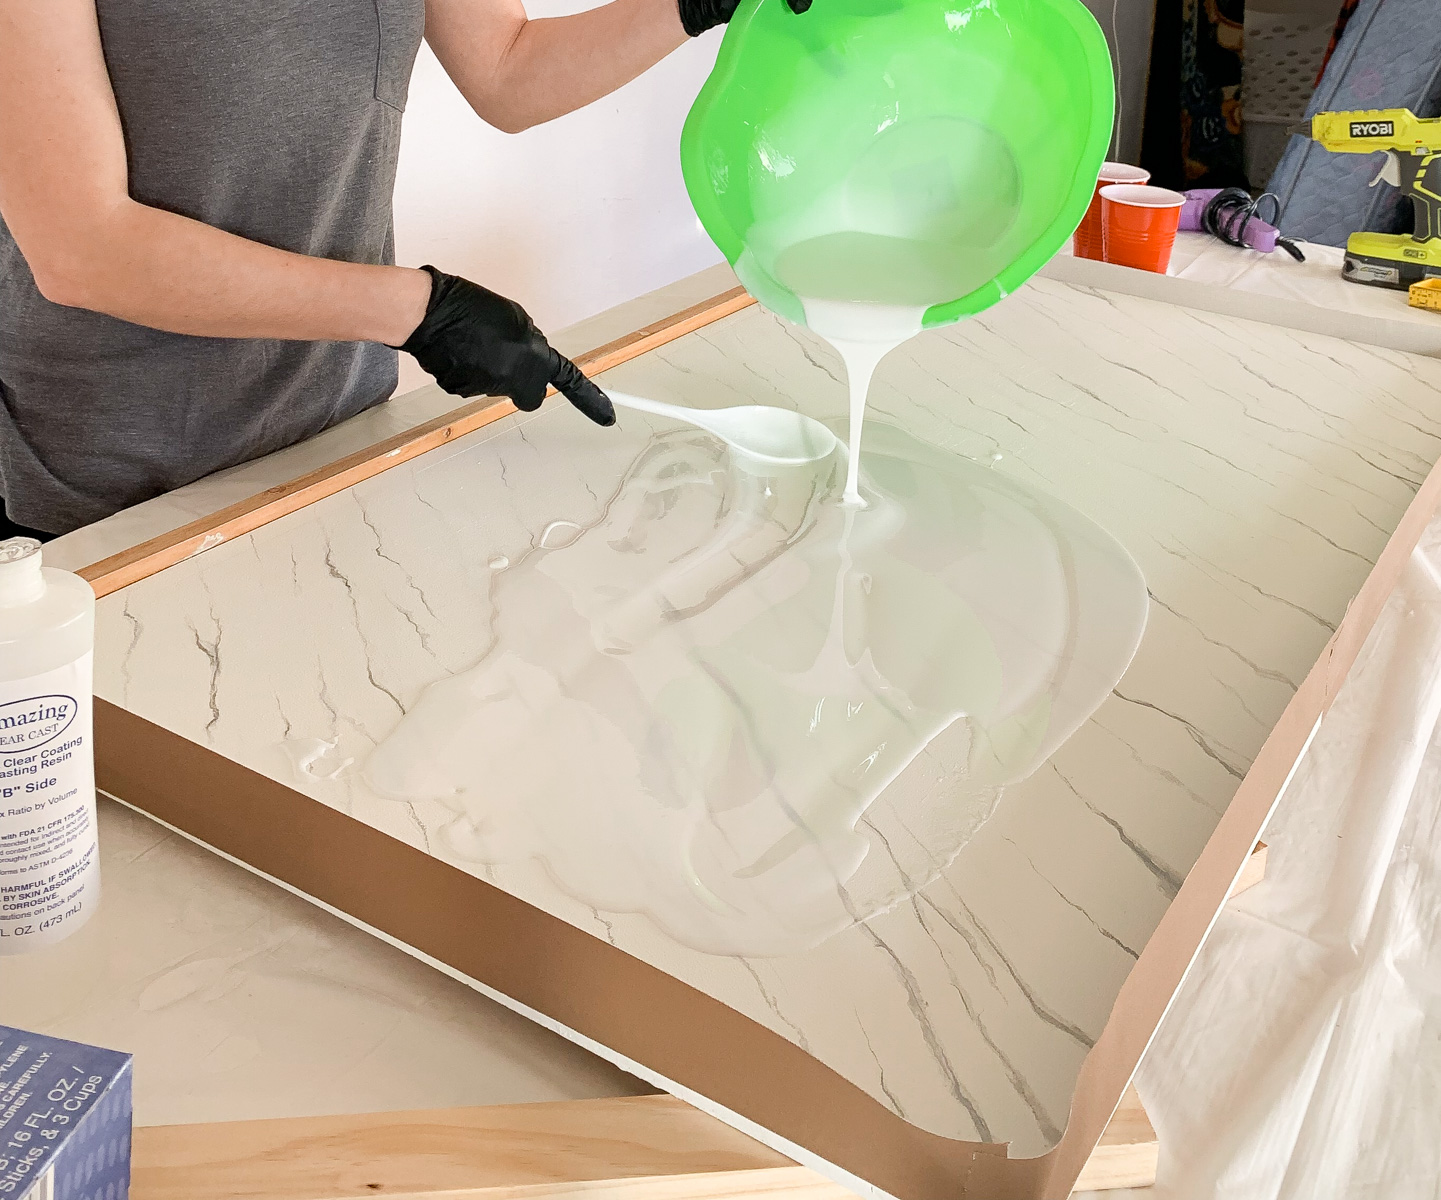
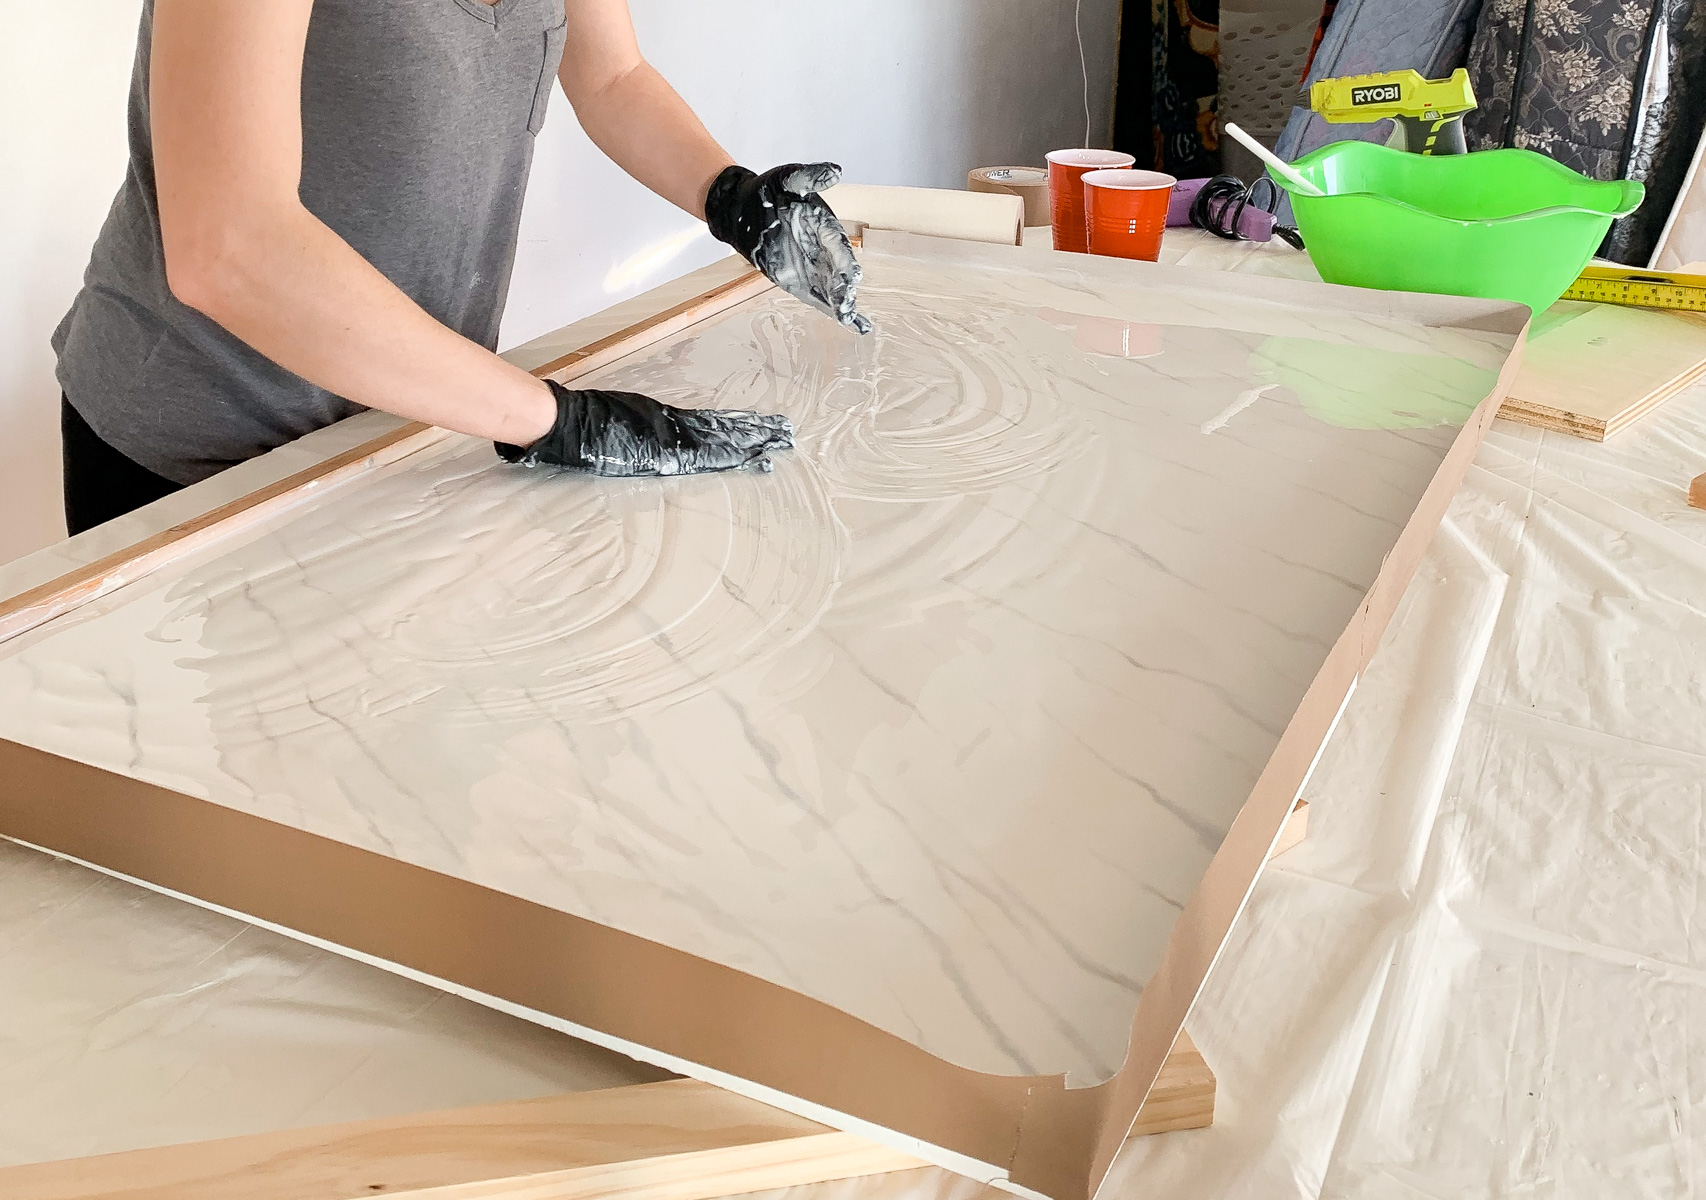
Than take a heat gun and gently heat up the resin. Try not to hold it in one area for too long so you don’t burn the resin. If you burn it it’ll become stringy or harden spotty. Once the resin is warmed it becomes a bit runny and settles in nicely. After about an hour remove your tape wall. Don’t worry about the drips on the sides it can easily be sanded down. If you don’t remove the tape it will create sharp edges you’ll need to sand down later. If there’s anything I would do different with this DIY marble resin countertop is not having to make the additional wood frame on the front and doing the tape all around.
OTHER DECOR PROJECT YOU’LL LOVE:
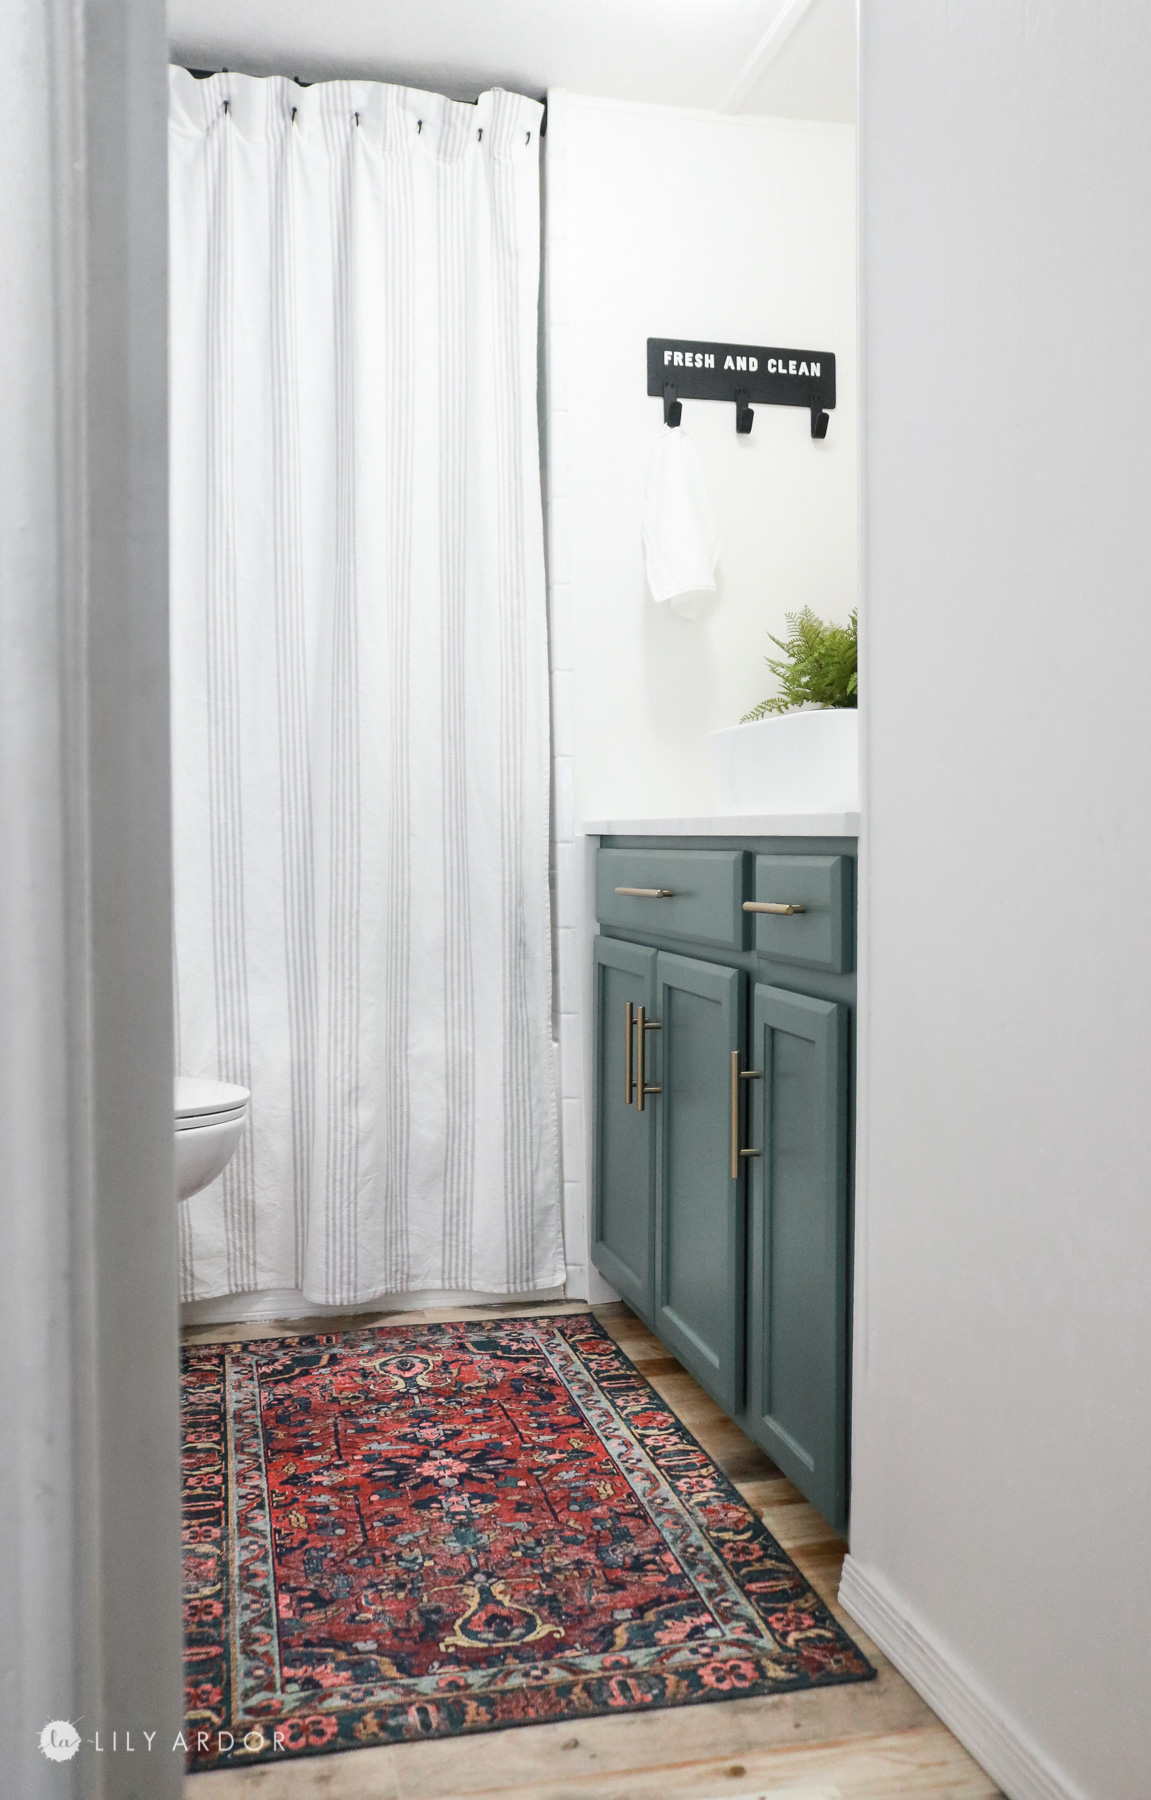
Our Extreme Bathroom Makeover Video
Here’s the finished result after at ton of sanding. You can check out the video to see what I mean by that.
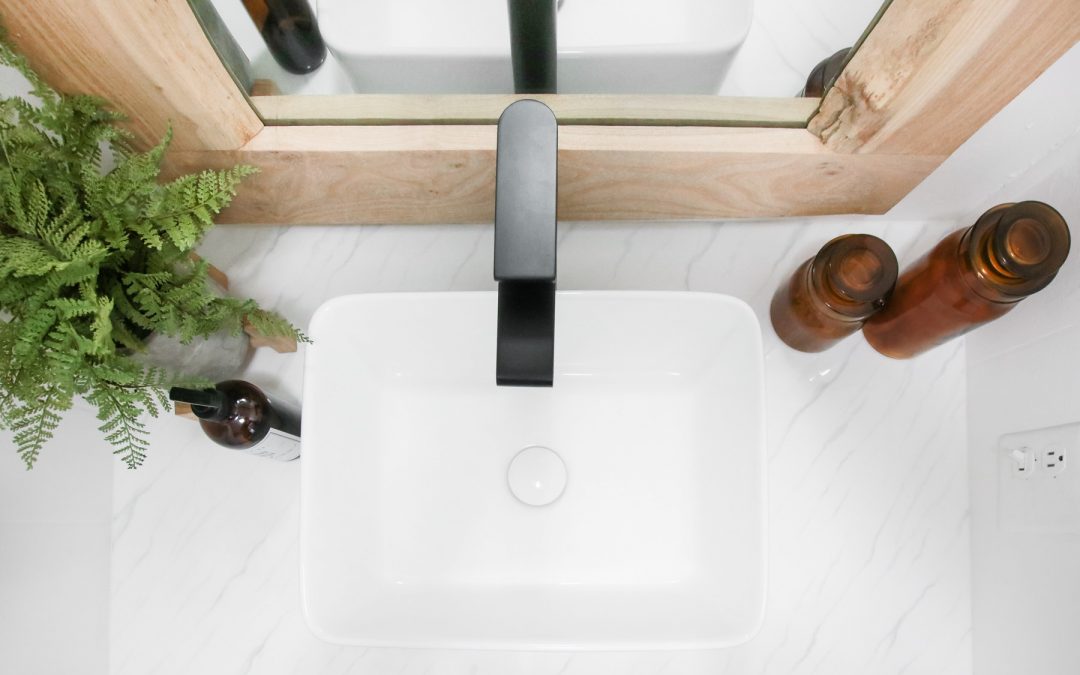
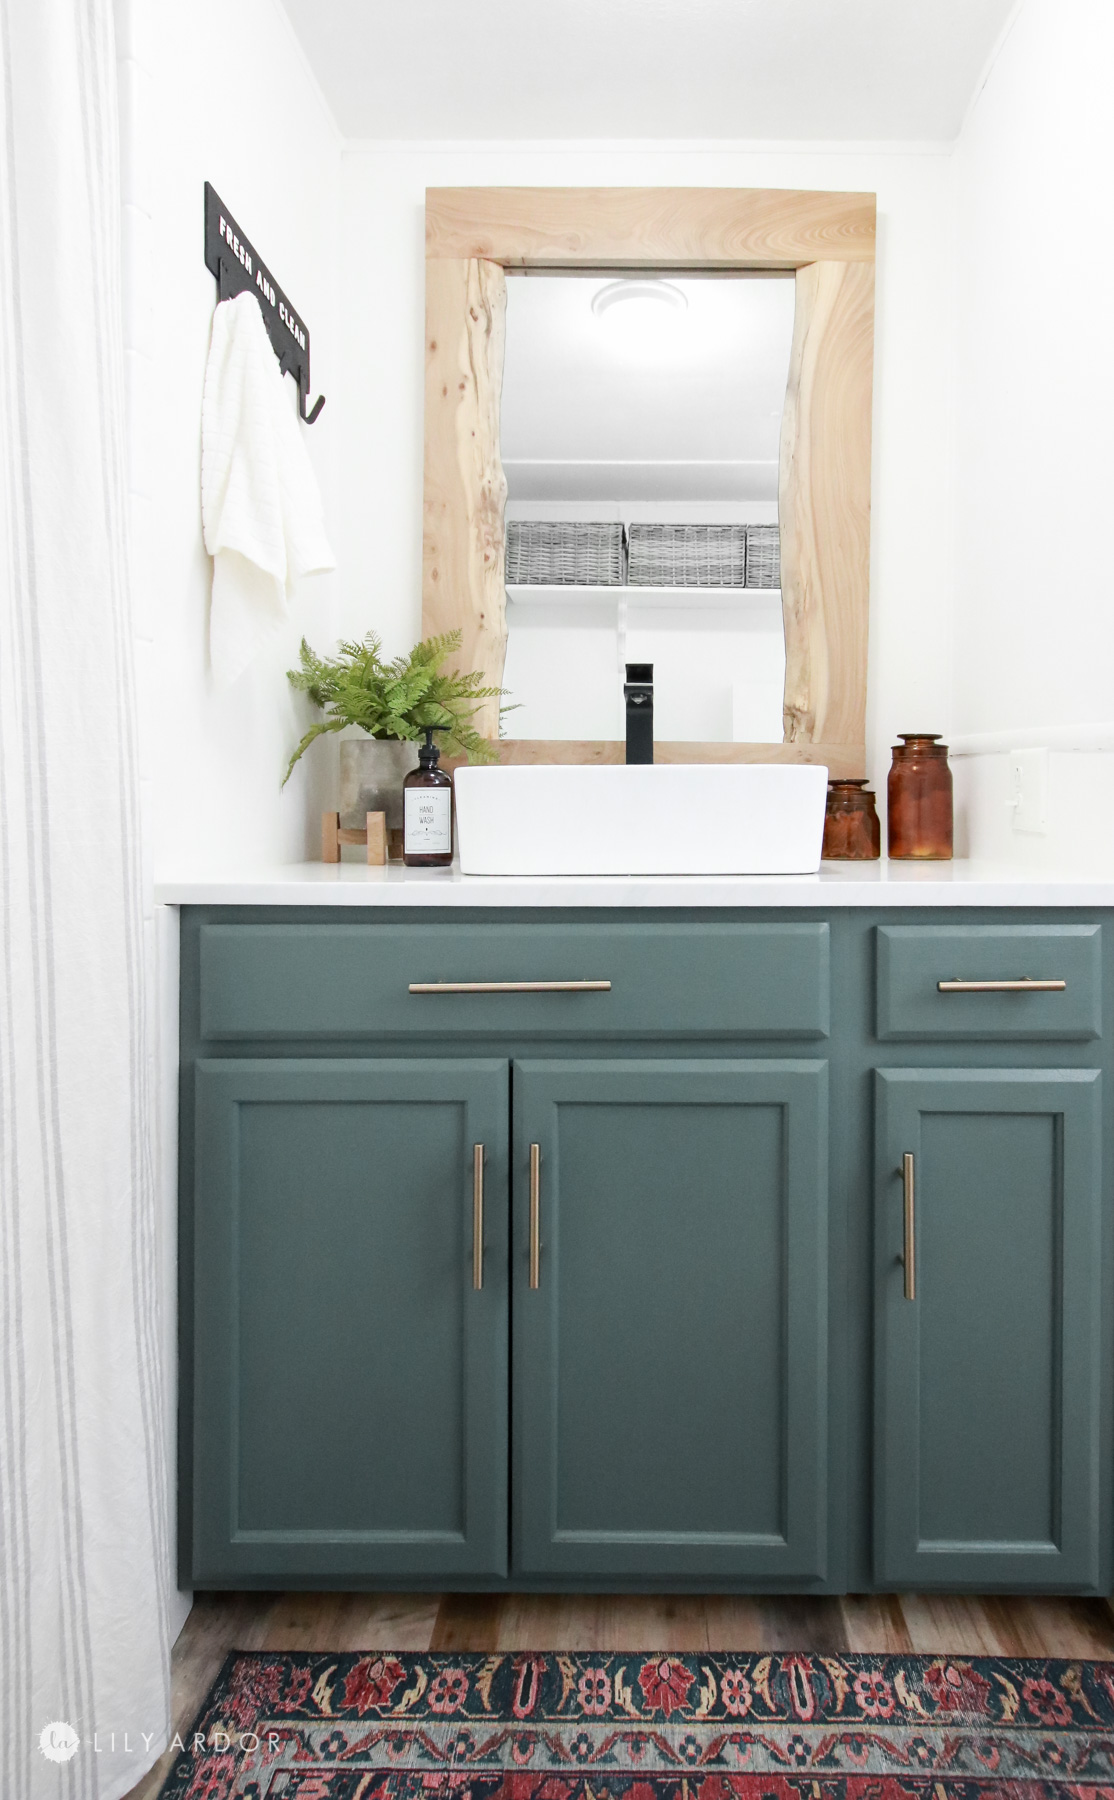
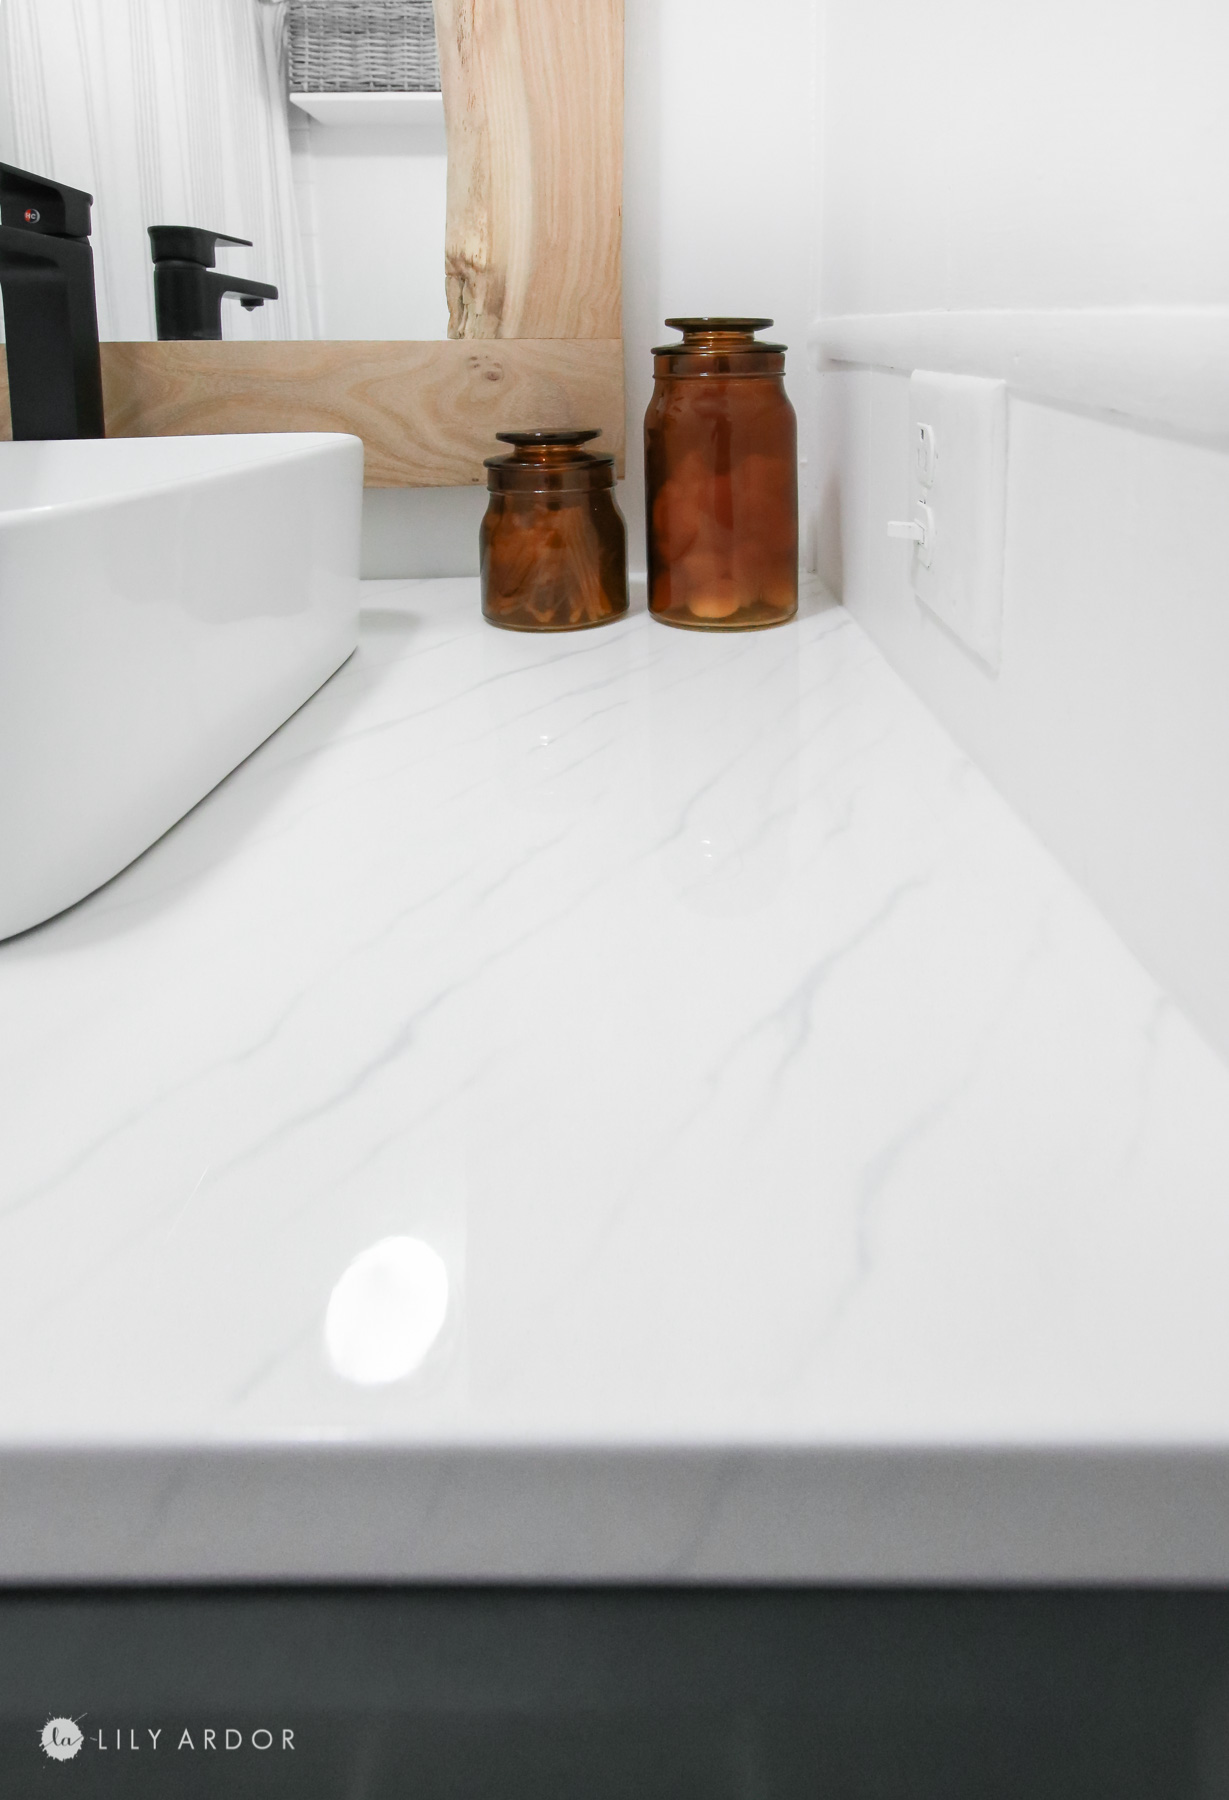
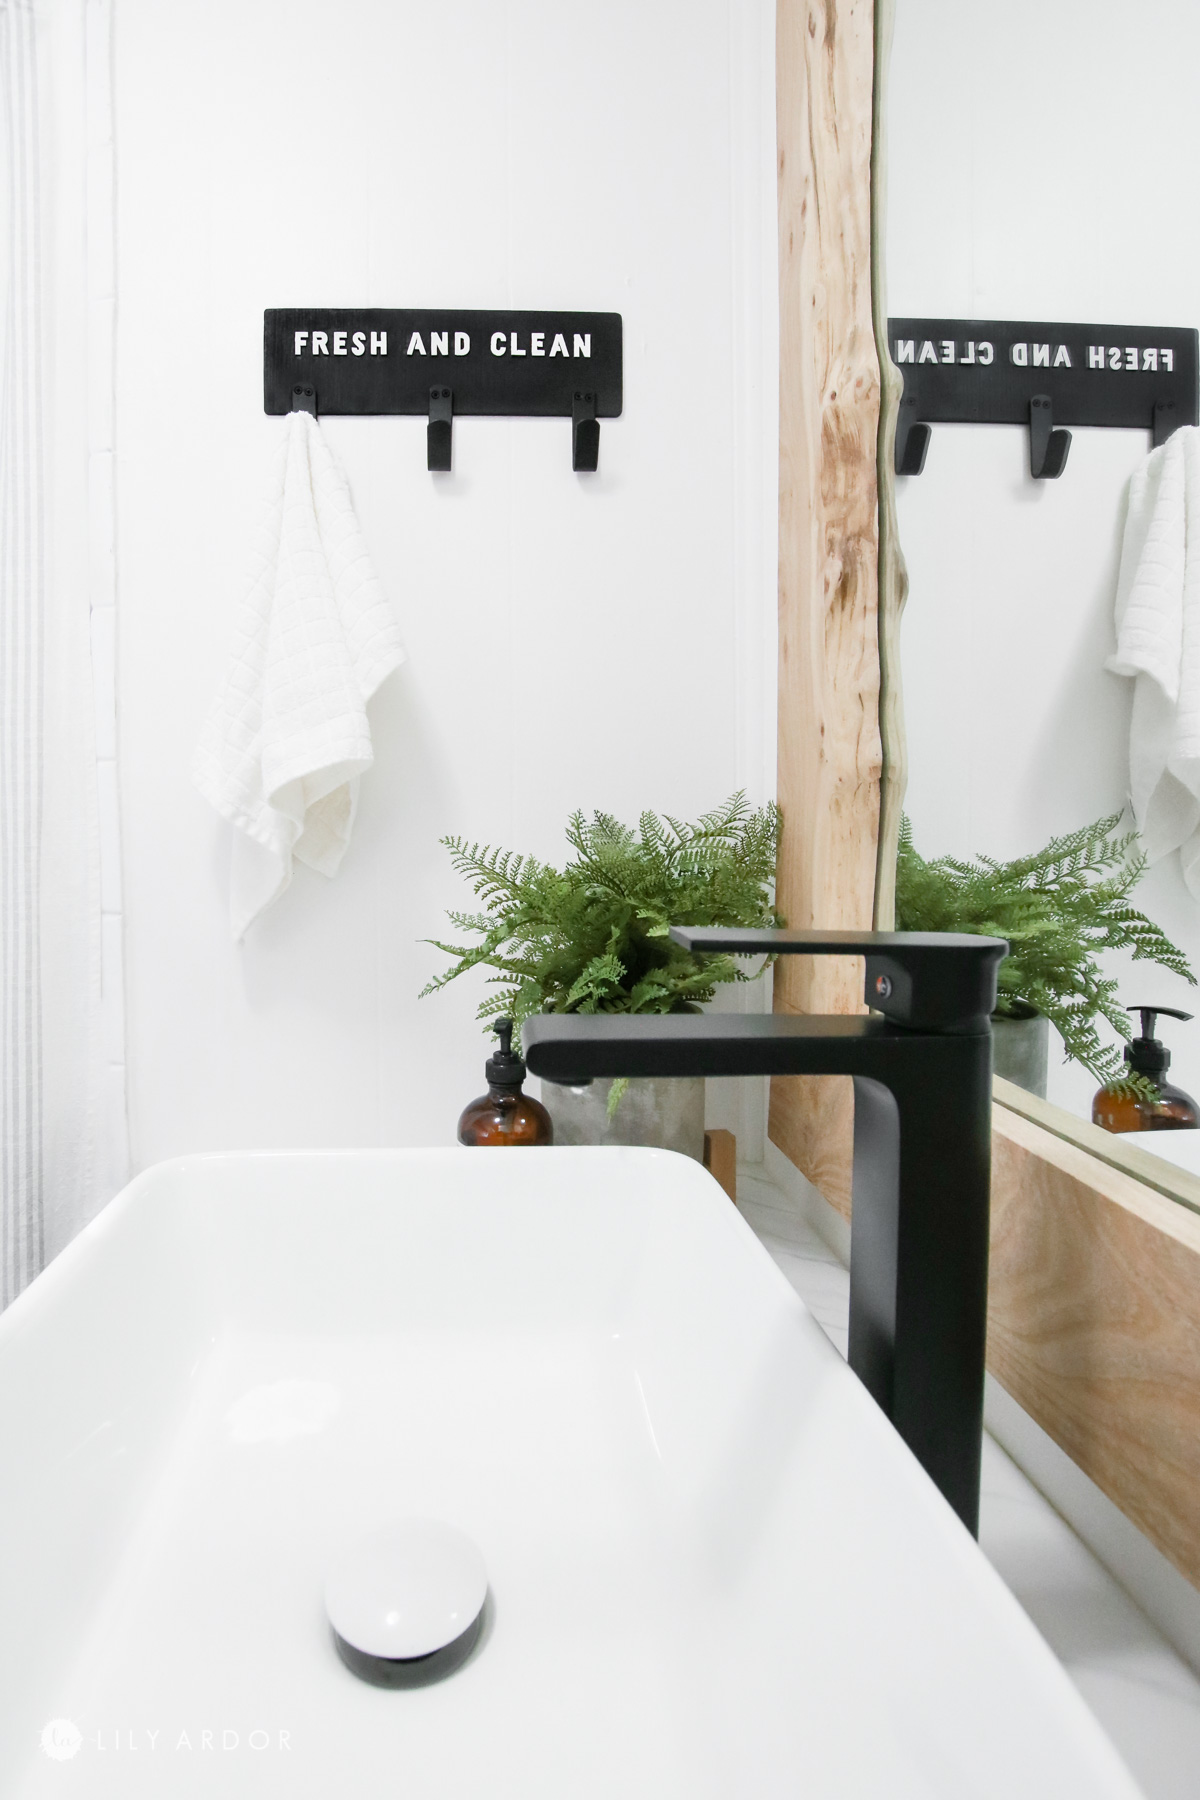
SSSO in love with this countertop! Can’t believe it’s not real! Should also mention that the pattern isn’t as visible once the countertop is installed.
Here’s how the edges look! 😀
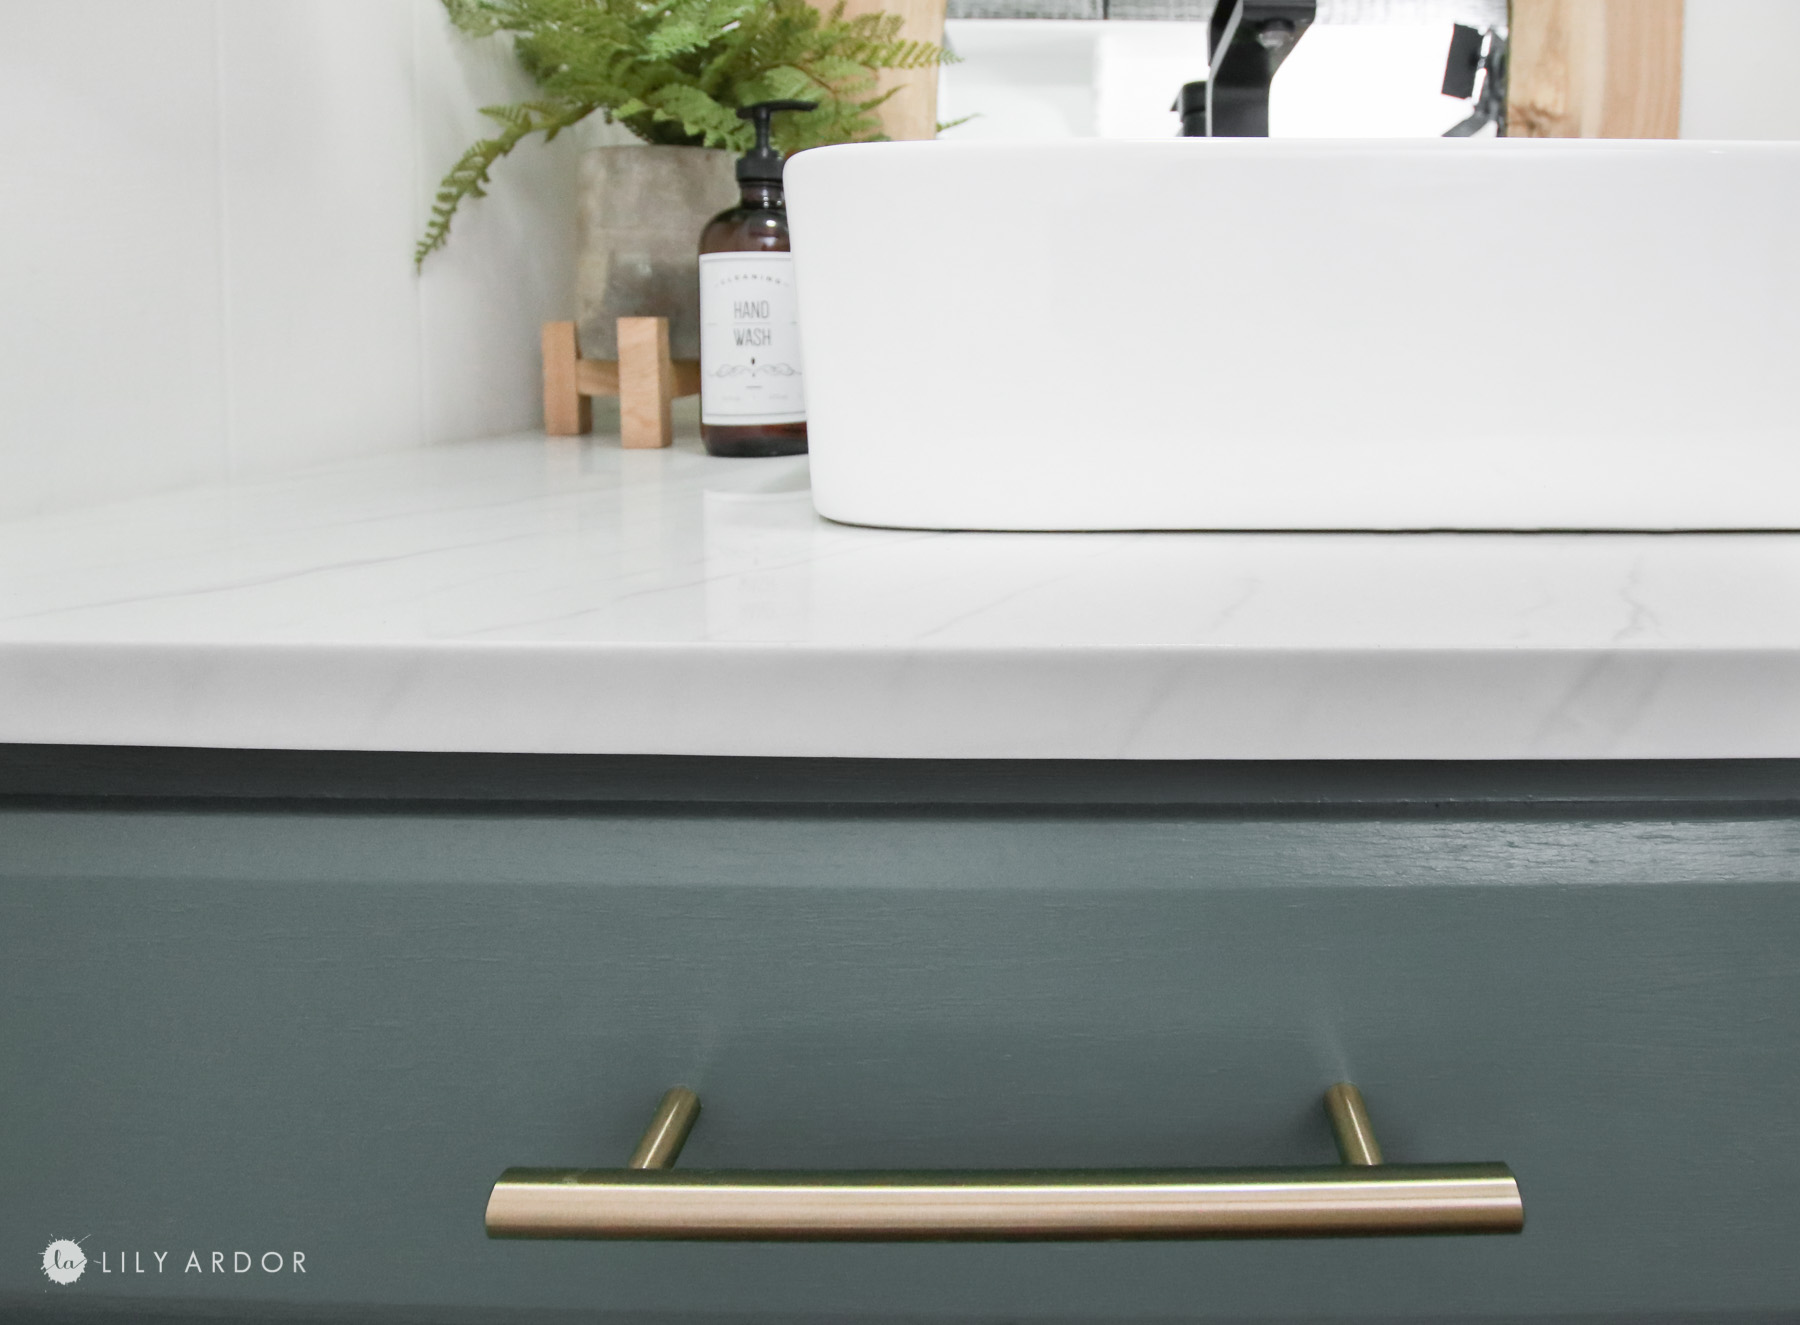
It’s actually really hard to get a good photo of the veining. Here’s the best I could do.
MONEY SAVING DIYS YOU’LL LOVE!
- CONCRETE PLANT STAND USING A BUCKET!
- HOW TO – FLUID RESIN WALL ART ( GREAT FOR BEGINNERS )
- USE A PLACE MAT TO TRANSFORM YOUR UGLY PLANTERS!
- EASY NO SEW PILLOW BED!
- TRANSFORM PLASTIC POTS INT FAUX POTTERY!

That’s it! I hope you find this helpful and it inspires you to make your own DIY marble resin countertop. You can make it any color and do less or more veining.
I’m so glad to have finally finished our bathroom makeover. I still have a bench in the mail for the little corner in the bathroom but, I’m hoping that’ll be a quick set it. I’ll see you all next time.
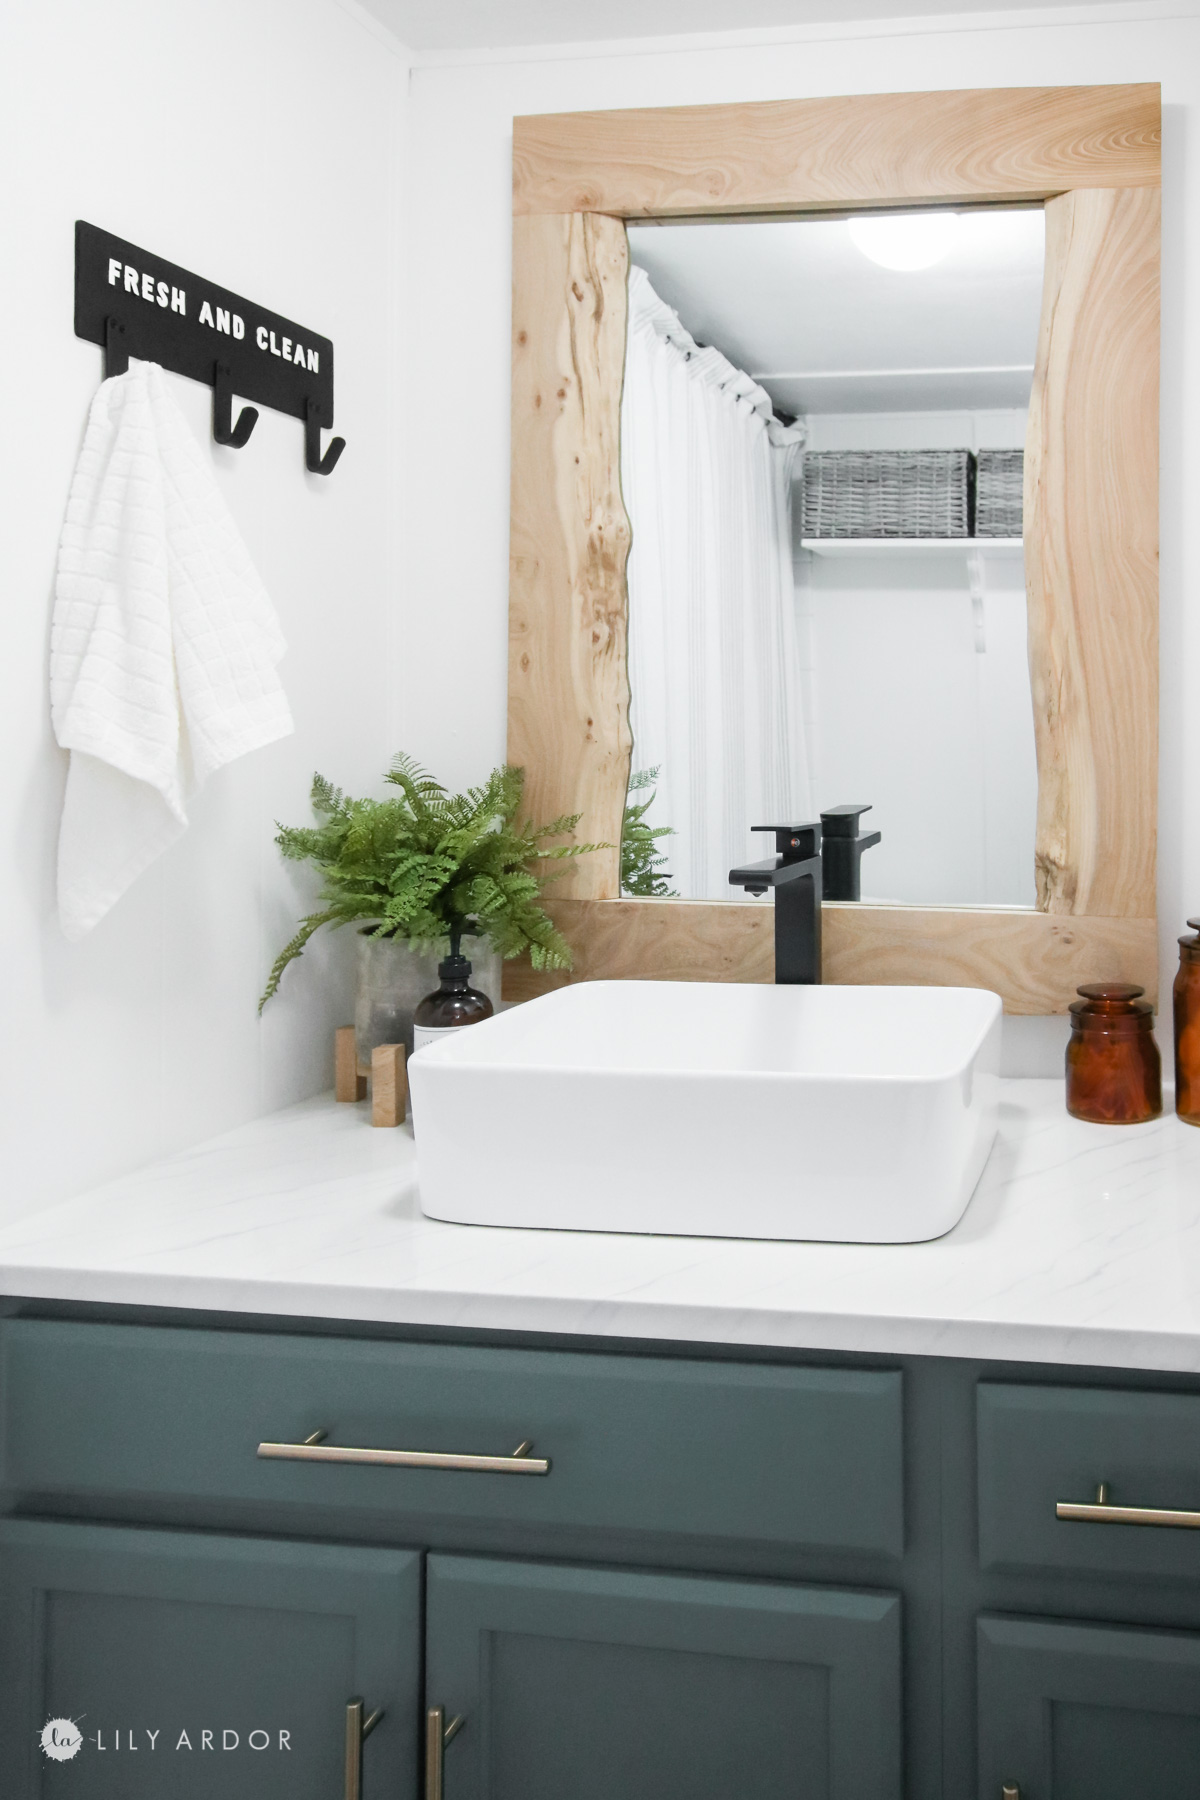
I got this faux fern from target. It was around $15 and came in a white pot. I ended up inserted it into this concrete pot I had and Tony made me a mini plant stand from some of the oak we had left over. I love that I don’t have to worry about the fern dying. So convenient! 
HOME DECOR HACKS YOU’LL LOVE!
- CUT THE BOTTOM OF YOUR DRESSER OFF FOR THE MAKEOVER!
- HOW TO PAINT YOUR COUCH TO LOOK LIKE REAL LEATHER!
- FAUX RATTAN CLOSET DOORS THAT COST ME UNDER $50!
- I MADE A BENCH FROM 2X4’S!
- OUR DIY DINNING ROOM TABLE FOR UNDER $60
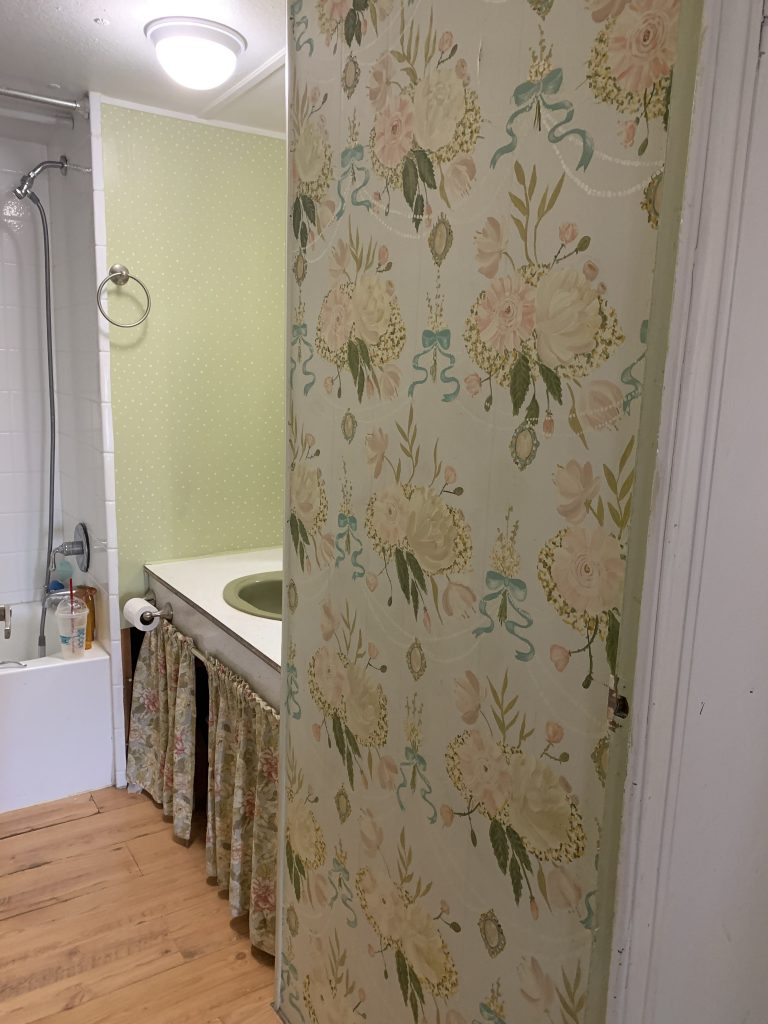
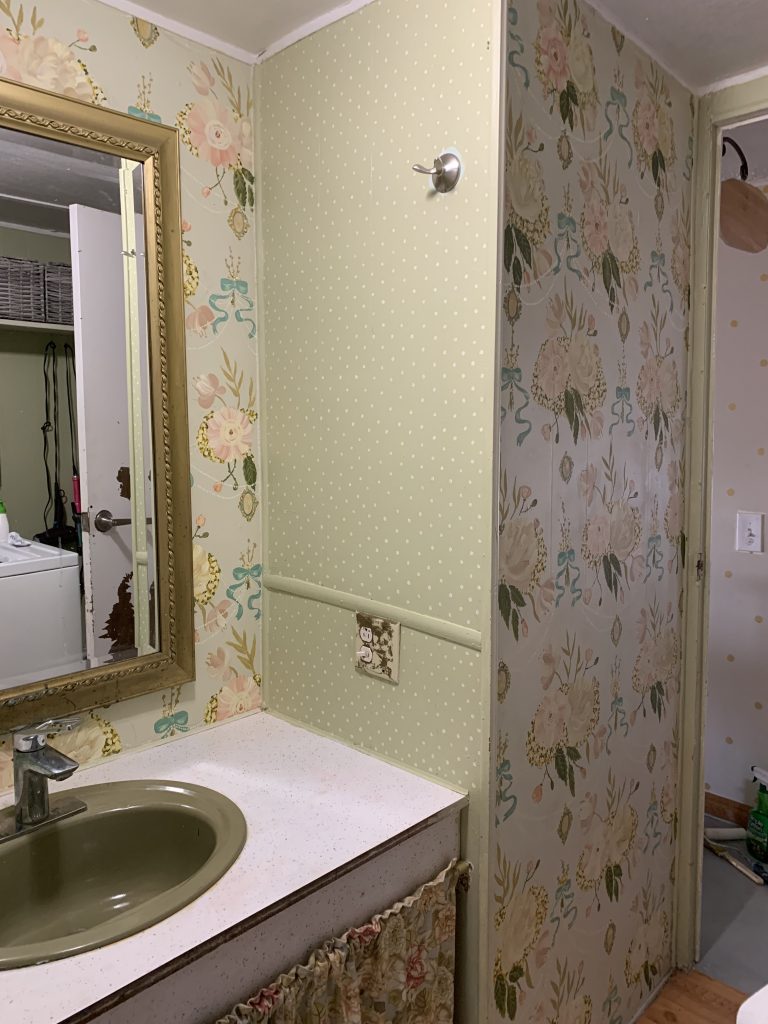
In case you missed it here’s how our bathroom looked like before the makeover. YUK RIGHT!! So glad this is in the past.
I think eventhough this DIY marble resin countertop was a lot of work, it was ssso worth it! What a difference it makes in the room. This would be a perfect DIY for your laundry room and small areas. I’m really tempted to try this in my kitchen 😬 !!
UPDATE: 2023 and they have not held up so well. Please look into using marine grade resin for this project. I’ve heard it holds up to stains really well and will not yellow like this cheap resin we used. This resin was great for about 6 months then yellowed. It stains really easy too.
I hope your have a great week! Stay calm and craft on.
Best Wishes,
Lily
MONEY SAVING DIYS YOU’LL LOVE!
- CONCRETE PLANT STAND USING A BUCKET!
- HOW TO – FLUID RESIN WALL ART ( GREAT FOR BEGINNERS )
- USE A PLACE MAT TO TRANSFORM YOUR UGLY PLANTERS!
- EASY NO SEW PILLOW BED!
- TRANSFORM PLASTIC POTS INT FAUX POTTERY!
Lily, I have been following your blog for a while and I think your creativity is inspired by God himself 🙂 cheers and love to your family
AWWE thank you so much!
Very nice! Where did you take the door handle metal?
Thank you Melanie we got the metal for the handles from home depot.
Thank you so much, it came out just Beautiful and such an inspiration to me
Very nice! Can this be made for kitchen countertops?
I wouldn’t recommend it for kitchen countertops. Regular polycrylic does better with keeping stains out.
Thank you 😀
Another absolutely fabulous result! Lily, your ideas and offerings are consistently tasteful and are so well thought out, and you take the time to educate readers about issues that could affect the outcome and how to avoid them. I think your blog should receive an award for its tasteful project offerings and excellent instructions. Thank you for sharing!
WOW thank you so much Sharlene! You are too kind and I am so happy to hear you found this inspiring and helpful! 🙂 Thank you
Great work! I don’t blame you for procrastinating..sometimes the most crucial part of the project are the most scary endeavors! Your persistence paid off! Bravo!!
Thank you Amy 😬🤗🤗
What a transformation! Great job! I have made many countertops with resin. Here is an option that turn out great: buy or make a trim board and miter cut the edges to fit your top. Epoxy the trims in the flat, sand the drips off the back, then glue them to your top. You can just tape them and let sit overnight or tack them in place. Now you have perfect outside edges. Completely fill in any gaps, and sand the top to ensure a smooth surface. Then you can basecoat and epoxy the top, and try to keep the epoxy just away from the edges until you are ready to torch out the bubbles. Then as the epoxy flows over the edges you can use a brush to ensure a thin smooth coat on the sides. Turns out terrific.
Thank you Toni I love those tips. I’ll have to try it if we decided to do the kitchen counters with resin. 🙂
How do you clean the new countertops? Do they stain easily? Your bathrm. looks gorgeous!
Thank you Mary 🙂 I clean it with soapy water, windex and just the regular household cleaners I usually use. I did notice a tiny stain from one of my colored vases. The color must of seeped out. I got it out with an sos sponge. 🙂 So far very durable.
What color is the vanity?
Dwarf spruce by ppg
Did you put the plywood right over the old sink? How do you make sure the wood can support a new sink? Looks good!
There was a built in ledge that the plywood lay on top.
what color are the bathroom counters – love the blue!
That’s a beautiful outcome! I get the money hustle but still stying to make your home updated. I’m glad you haven’t experienced the yellowing yet. I’ve read many bloggers that created epoxy countertops shared that the countertops started yellowing after a certain amount of time. Maybe it’s the light? Perhaps it’s the mixture? Perhaps it’s the reaction of the material to the epoxy? I hope that you don’t get to experience that.
Thank you Caroline. I’ve heard that too. Haven’t had it yellow yet. So far the only down side to it is that it stains. I find the a magic eraser helps sometimes. I think different brand of epoxy do make a difference.
Absolutely love this make over! Do you remember where you got the amber containers and the rug? I love them!
Thank you so much Michelle. I got the rug from world market and the amber containers from target magnolia line.
I haven’t checked in here for some time because I thought it was getting boring, but the last few posts are great quality so I guess I’ll add you back to my everyday bloglist. You deserve it my friend 🙂