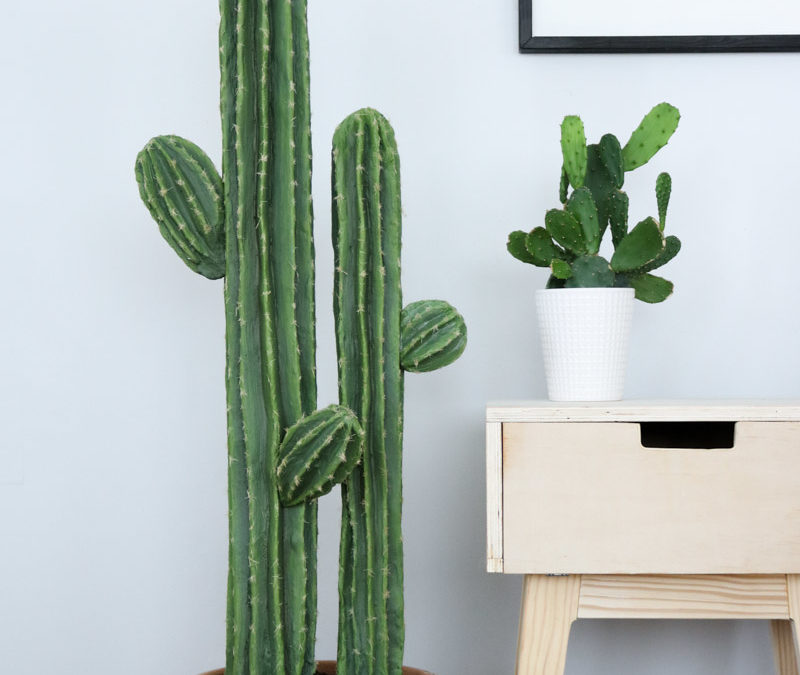
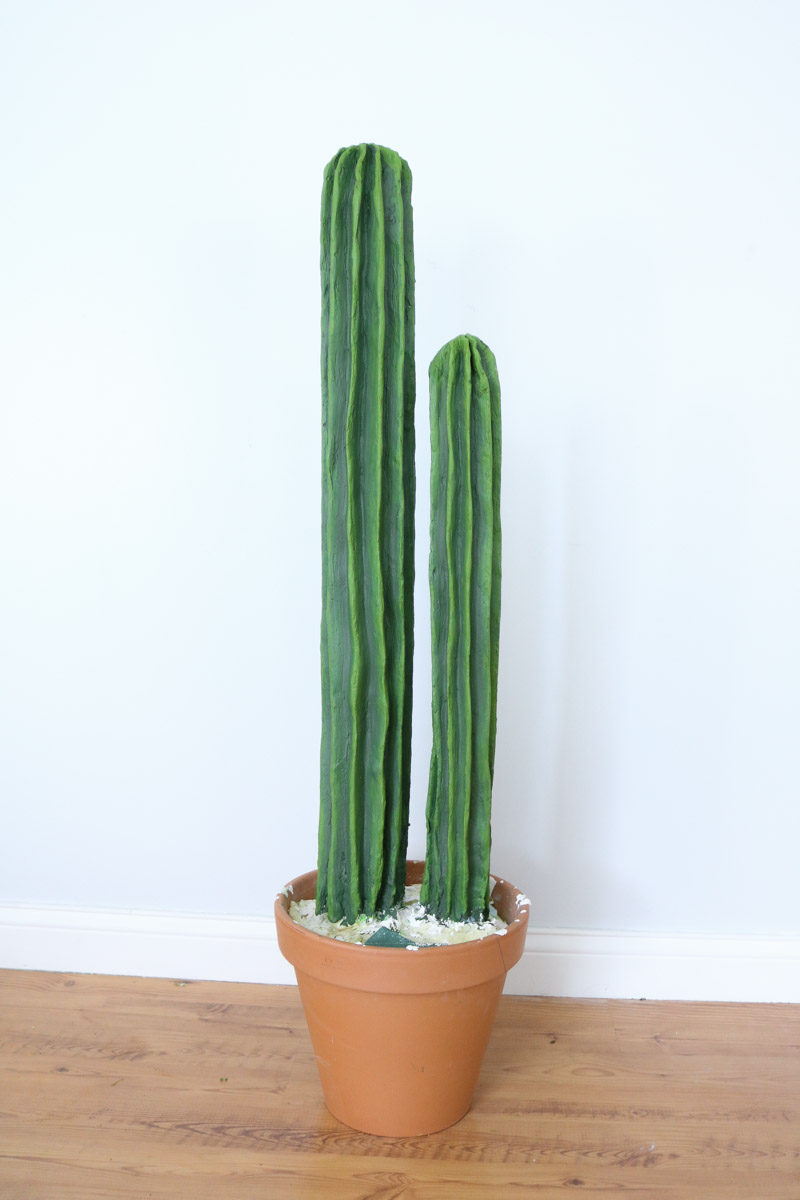
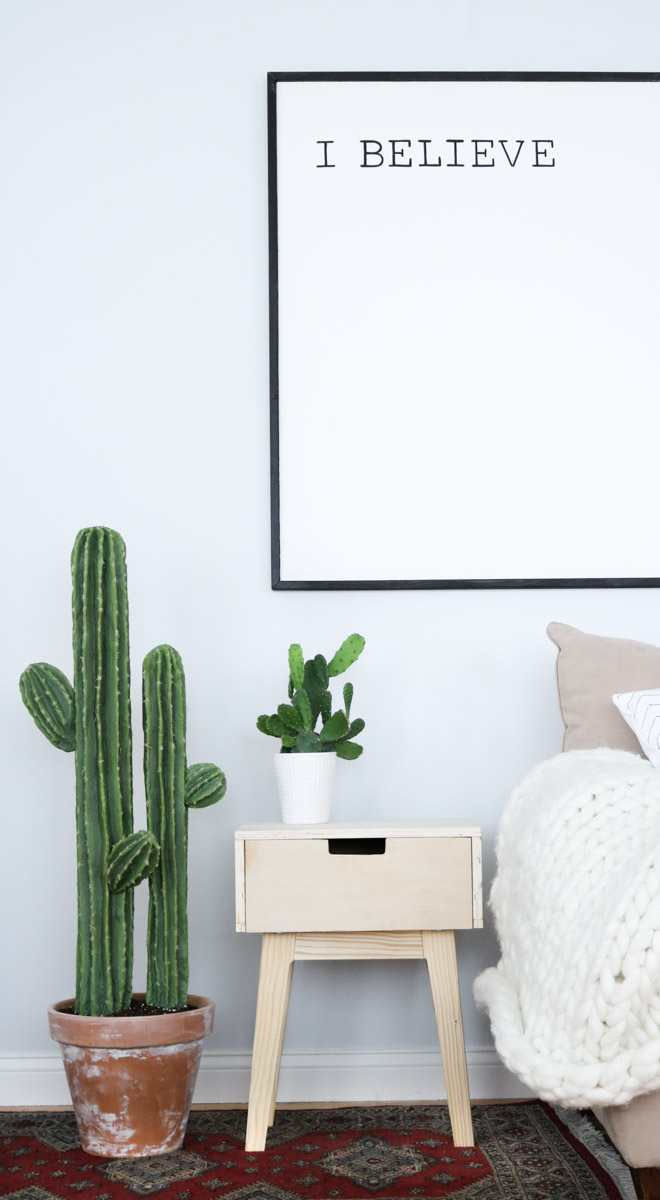
Cute Cactus Decor
Last Friday was the first day of this Cactus DIY journey. Where do I even begin🙈. This cute cactus definitely took me for a spin. Jumping into this DIY I knew it would be a hard one since I’ve never seen anything like this done before but, I sure wasn’t prepared for all the twists and turns. I think since I was going in blind and pretty much making things up as I went it was way more overwhelming than I intended. Thus my reason for being completely absent online for the past week. Sorry my awesome Insta/facebook fam😣. I hope this makes up for that.😊 Honestly at one point I through in the towel (for about an hour) LOL😂 than my sweet hubby insisted I finish it. Thanks to him this cute cactus was finally completed today.
I’ve seen these pretty giant cacti’s all over pinterest and have always wanted one. When I decided to look into buying one I realized the one I wanted was $299. 😐 LIKE WHAT!! REALLY for a fake cactus. I would think it would cost that much for a real one.
I’m a bit scared to buy a real one. Unfortunately I don’t really have a green thumb. Plus I can’t afford a big one and I’m not willing to buy a small one and grow it because, no plant ever really grows well in my house. Have you ever owned a cacti this big ? Yes this fake one might be a dust catcher but, I’m not to worried about that because I’ll be dusting it regularly 😉 I’m that won’t kill it.
Okay since I was going in pretty much blind making this cactus it was pretty overwhelming because I was making up things as I went. I know I didn’t get to document every little bit of this DIY and the video is probably going to look well put together but, I literally had to run to the store 4 times just for this project because,😑 I kept running out of supplies to finish it. First it was the foam spray, than it was the paint I ran out of and last but not least I had to run to the store and buy more brushes. I’m hoping that since I’ve been through all the bad with this DIY that you don’t have too. If you follow the directions and supply list you should be just fine. Okay than let’s make this cute cactus.
This article contains affiliate links*
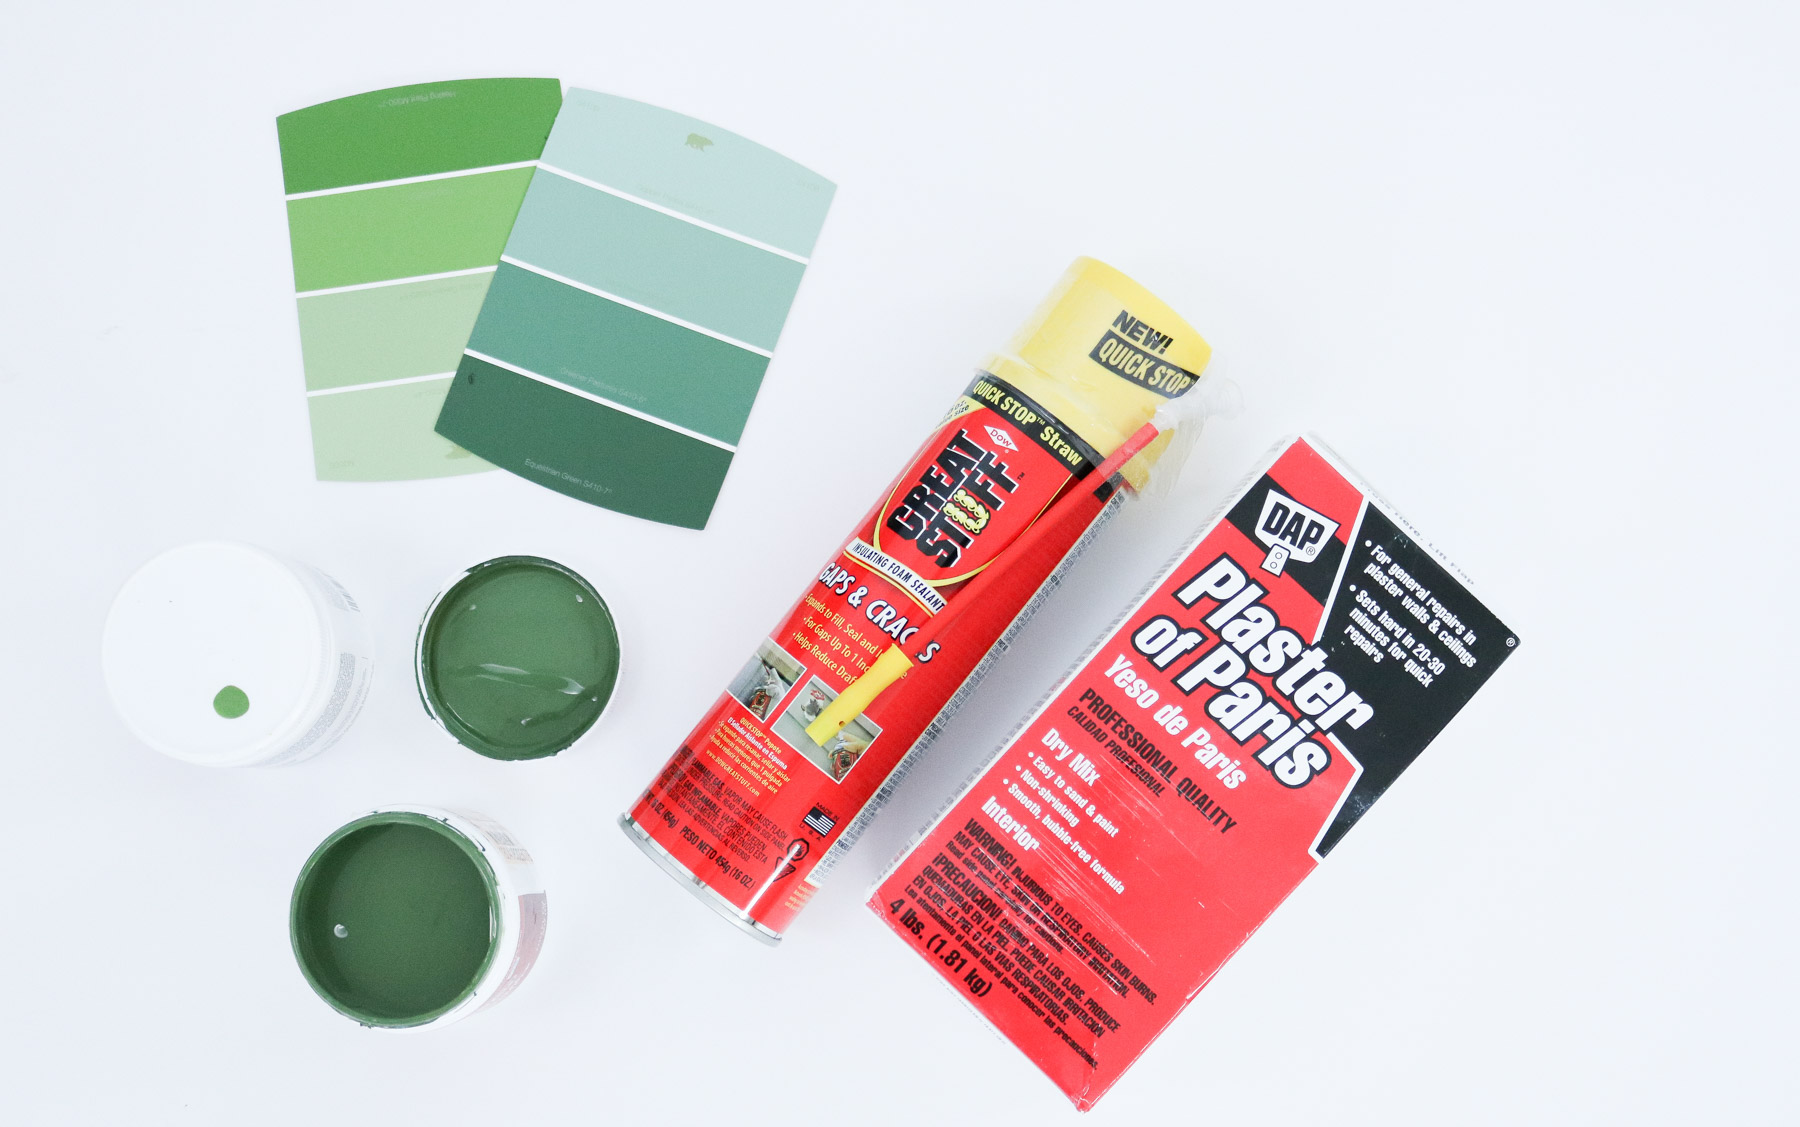
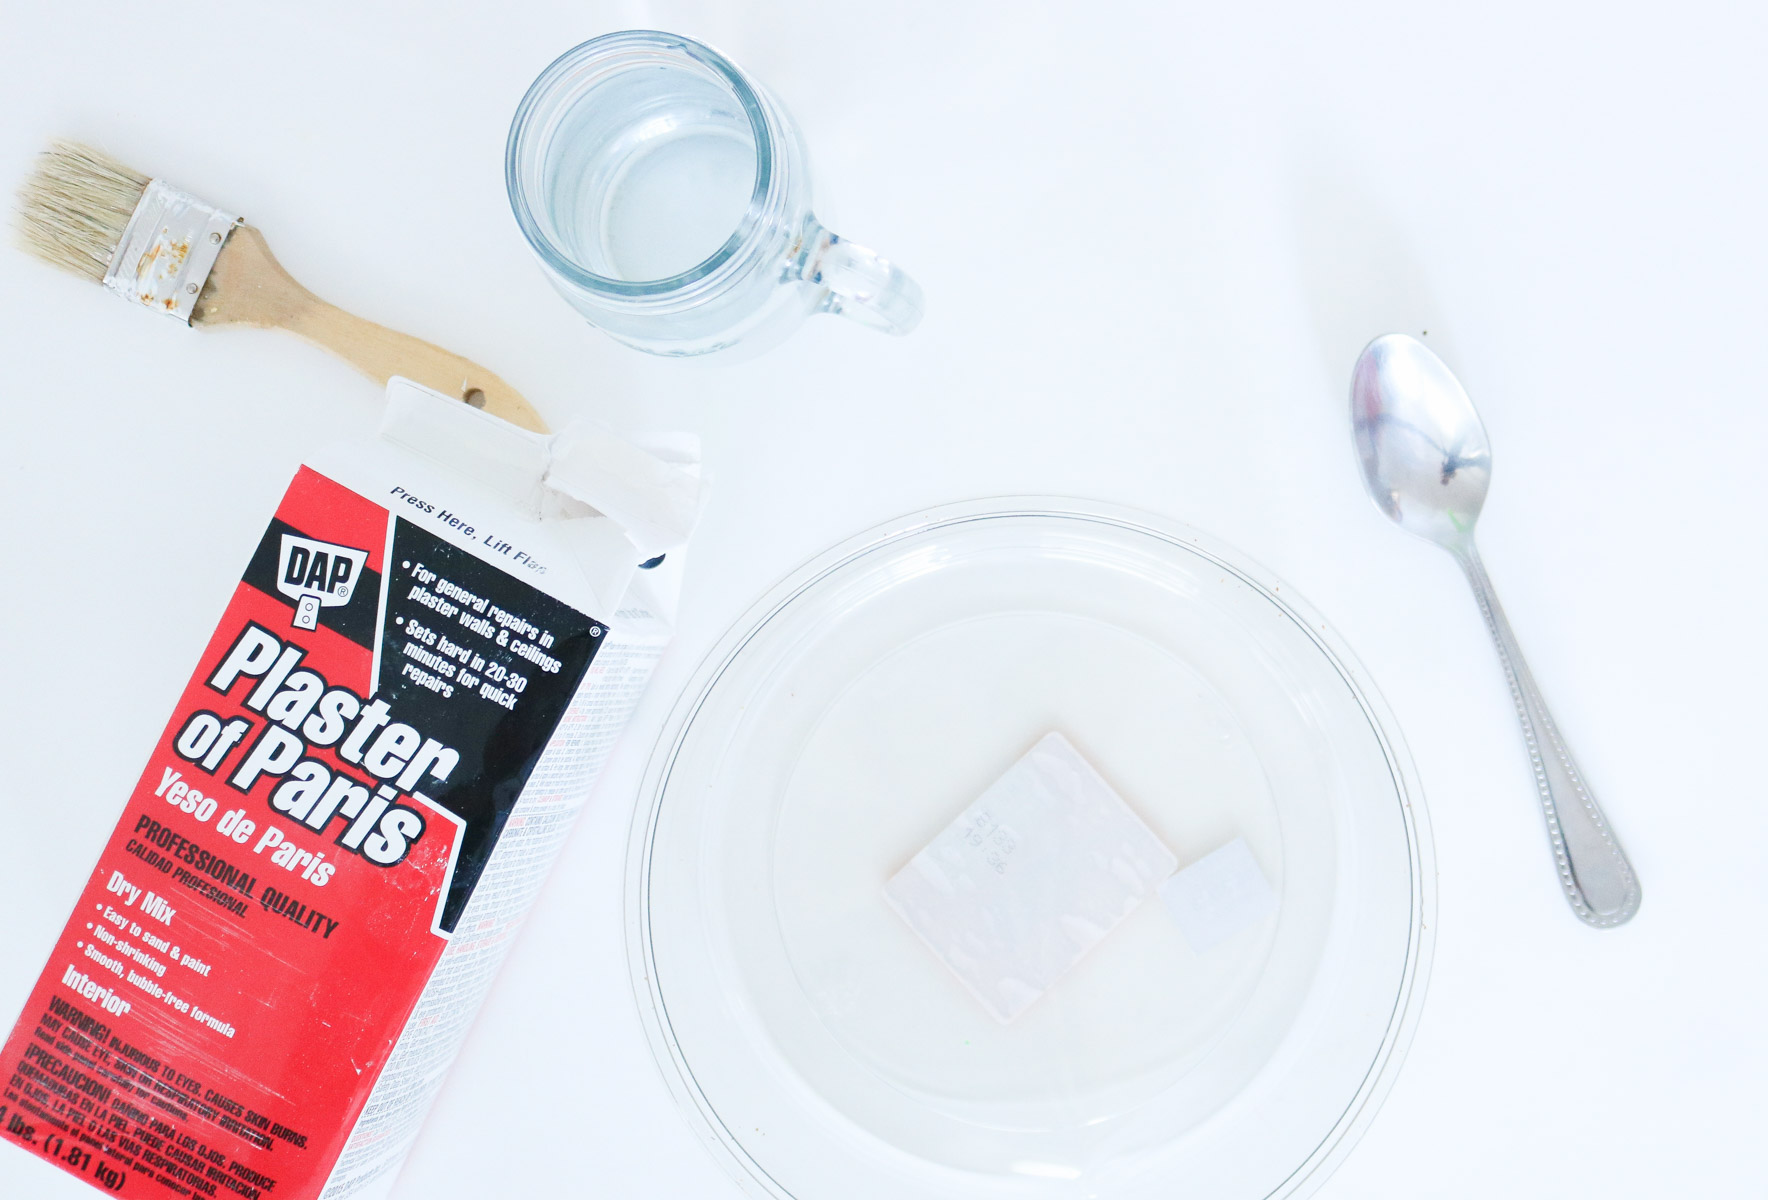
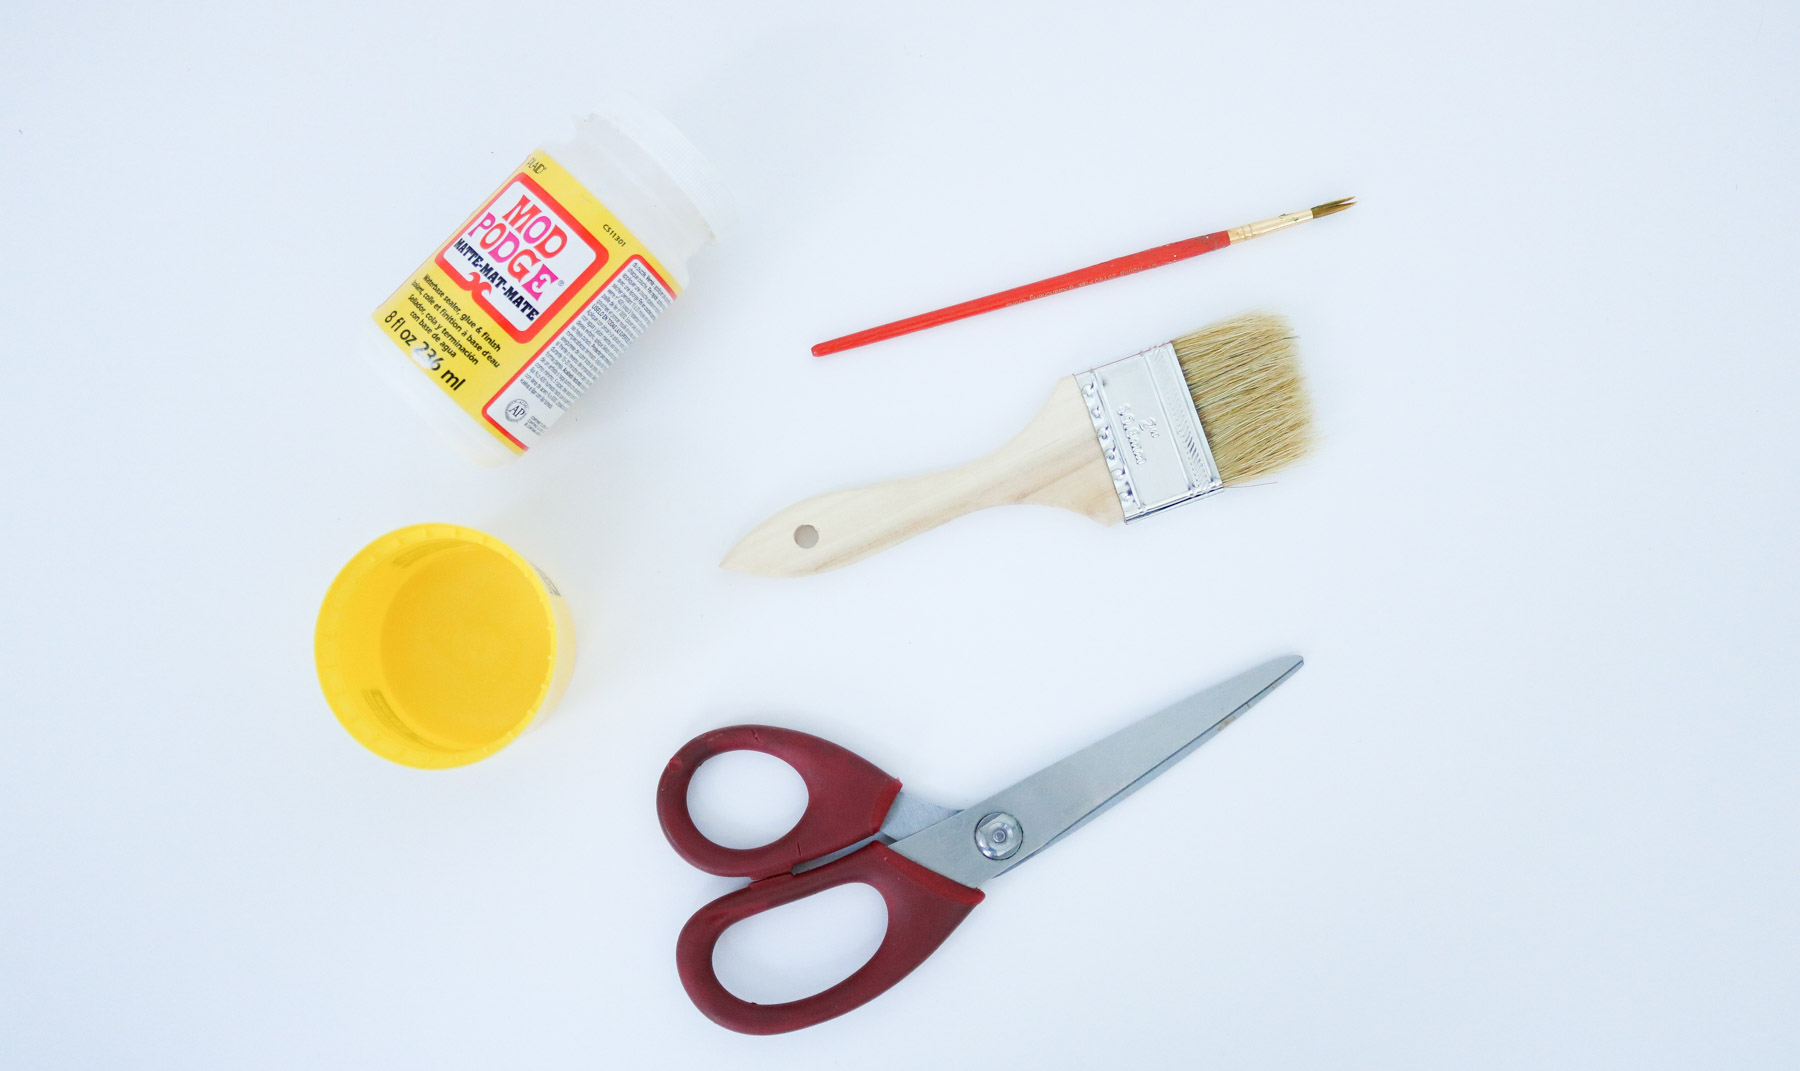
What you’ll need
- Utility knife
- foam sealant ( Amazon sells the same brand I used here – https://amzn.to/3e8JicN )
- plaster of paris ( I get the dry mix – https://amzn.to/3fvL9sd )
- Two dowels
- 2-3 paint brushes
- scissors
- level. ( https://amzn.to/2Cf9DYy )
- terracotta pot. ( amazon sells super cute white ones here – https://amzn.to/2N1myzk . Wish I would of seen them earlier )
- tape
- pool noodle (one big one small) You can get some on amazon here – https://amzn.to/30NAwgf
- mixing bowl + brush
- Sharpie
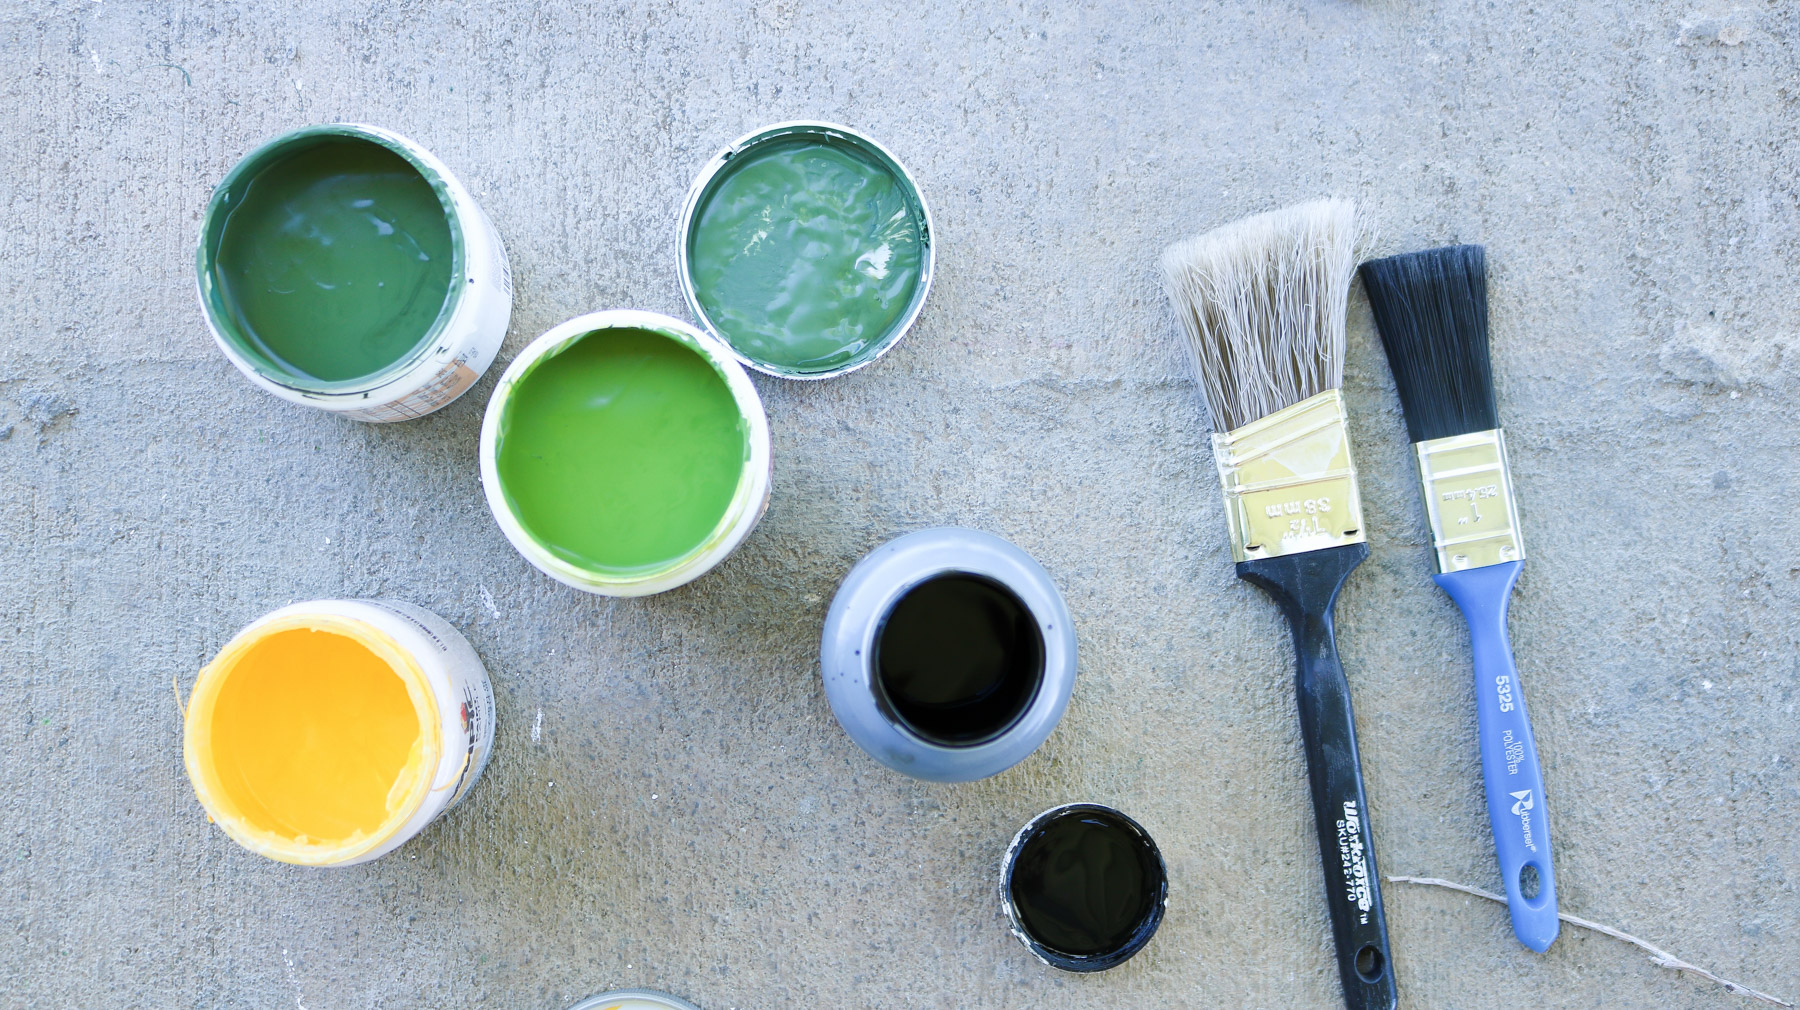
- Interior paint in dark green and light green. I used glidden samples from home depot. I got the colors from behir called ” Equestrain Green ( dark green)” and ” Healing Plant ( light green) .”
OTHER DIYS YOU’LL
- TRANSFORM OLD SWEATERS INTO THE CUTEST THROW PILLOWS
- DIY DRESSER MAKEOVER (I PAINTED IT GREEN)
- OUR DIY CLOSET DOORS UNDER $11 A PANEL
- DIY MEDIA SHELF IN 20 MINUTES
- AIRCLAY IN 5 MINUTES FROM INGREDIENTS YOU HAVE AT HOME!
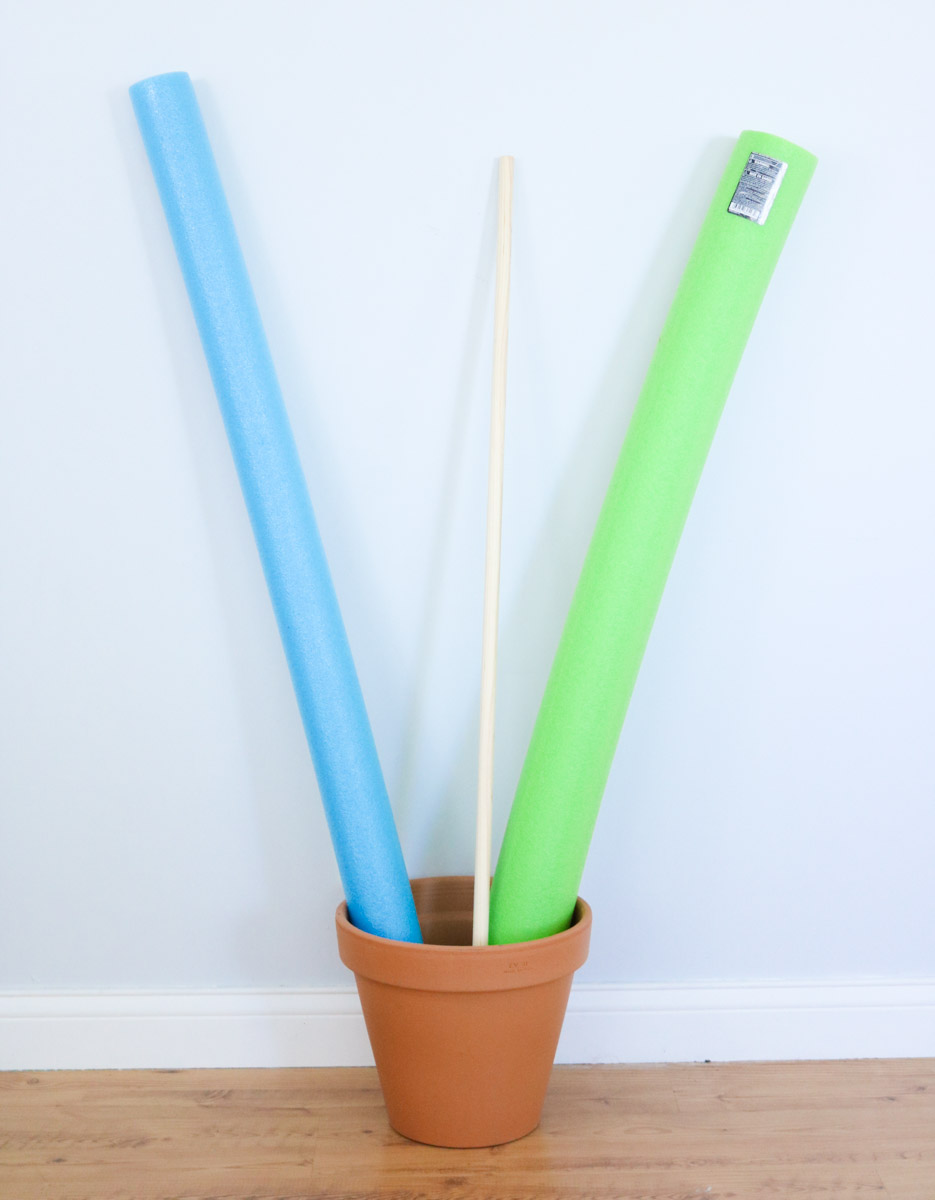
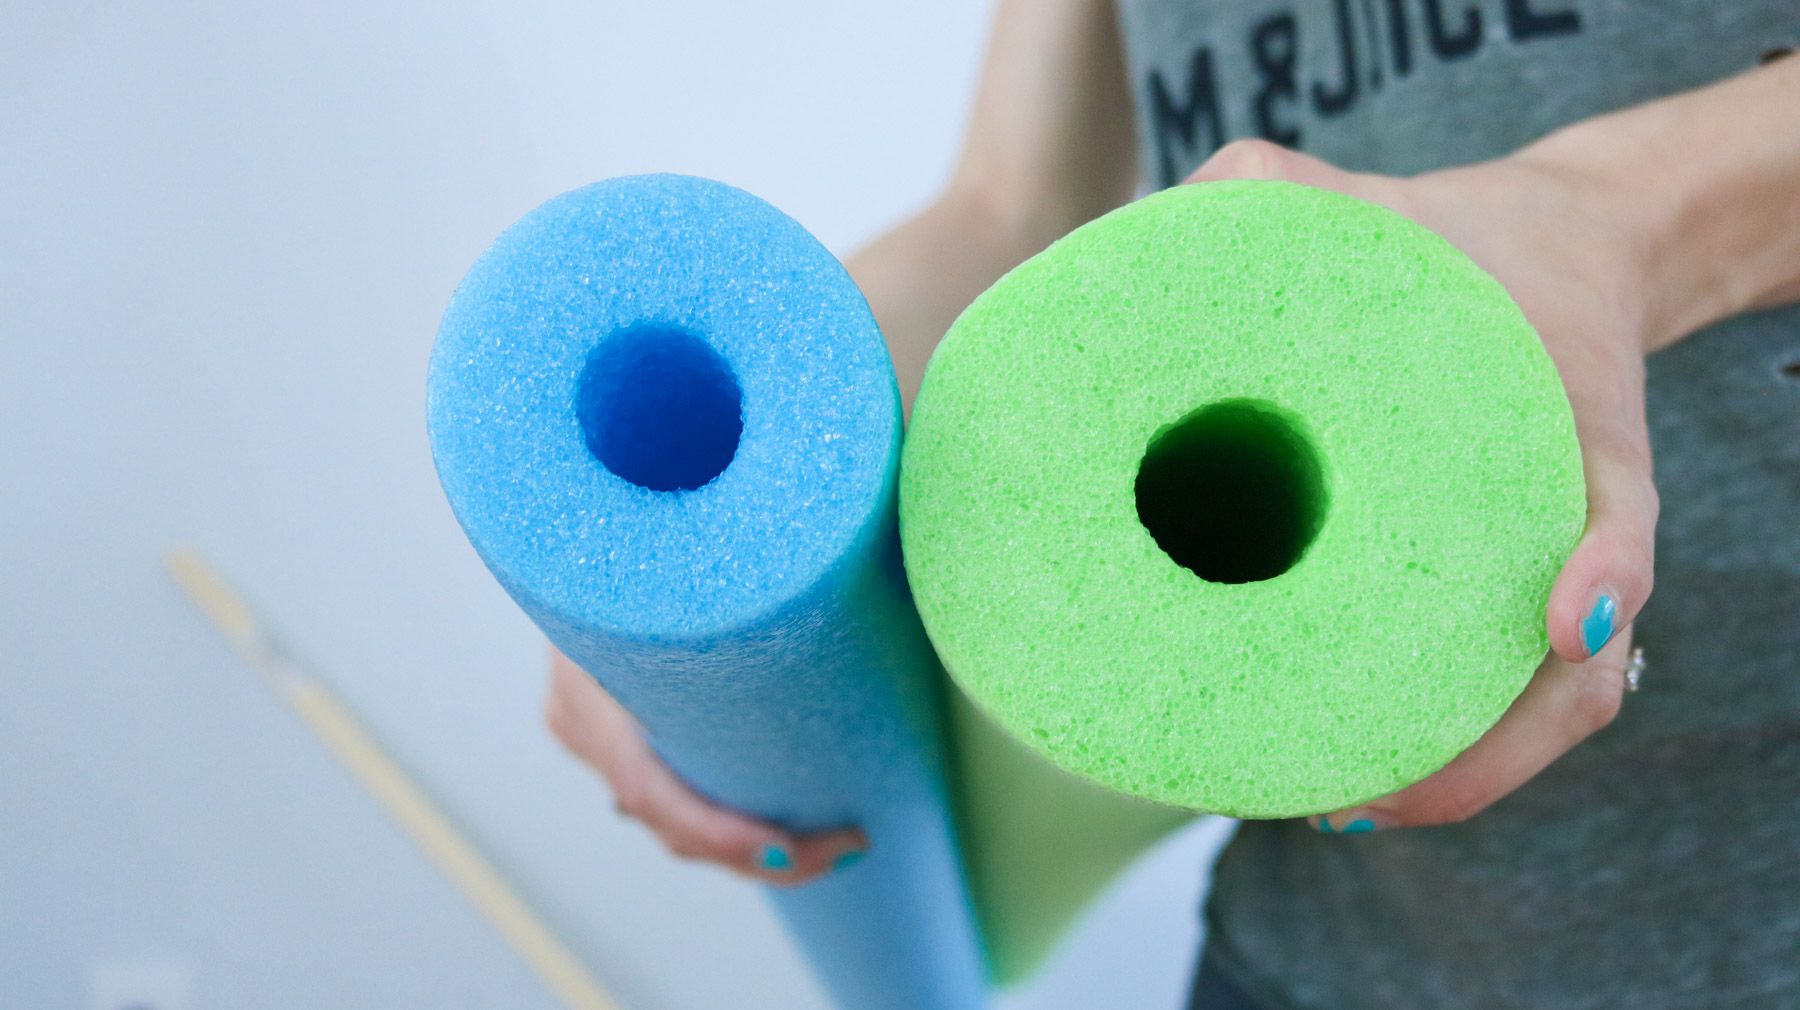
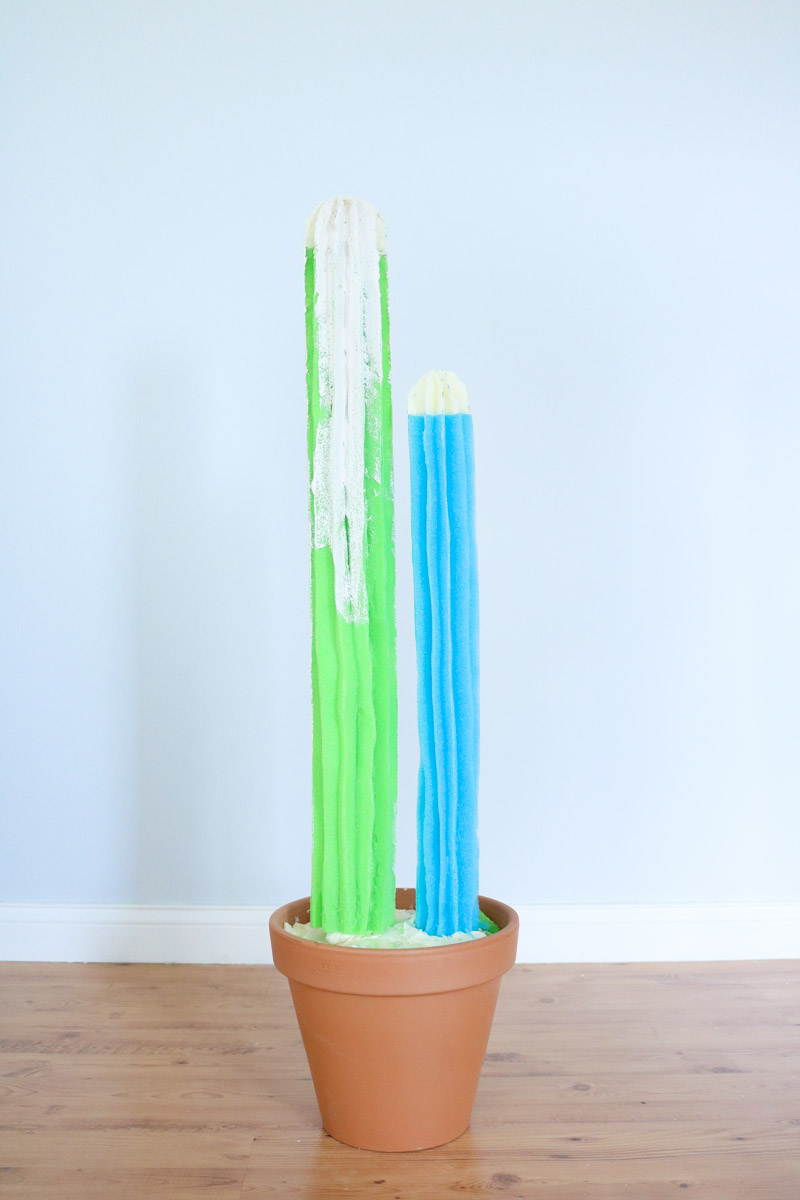
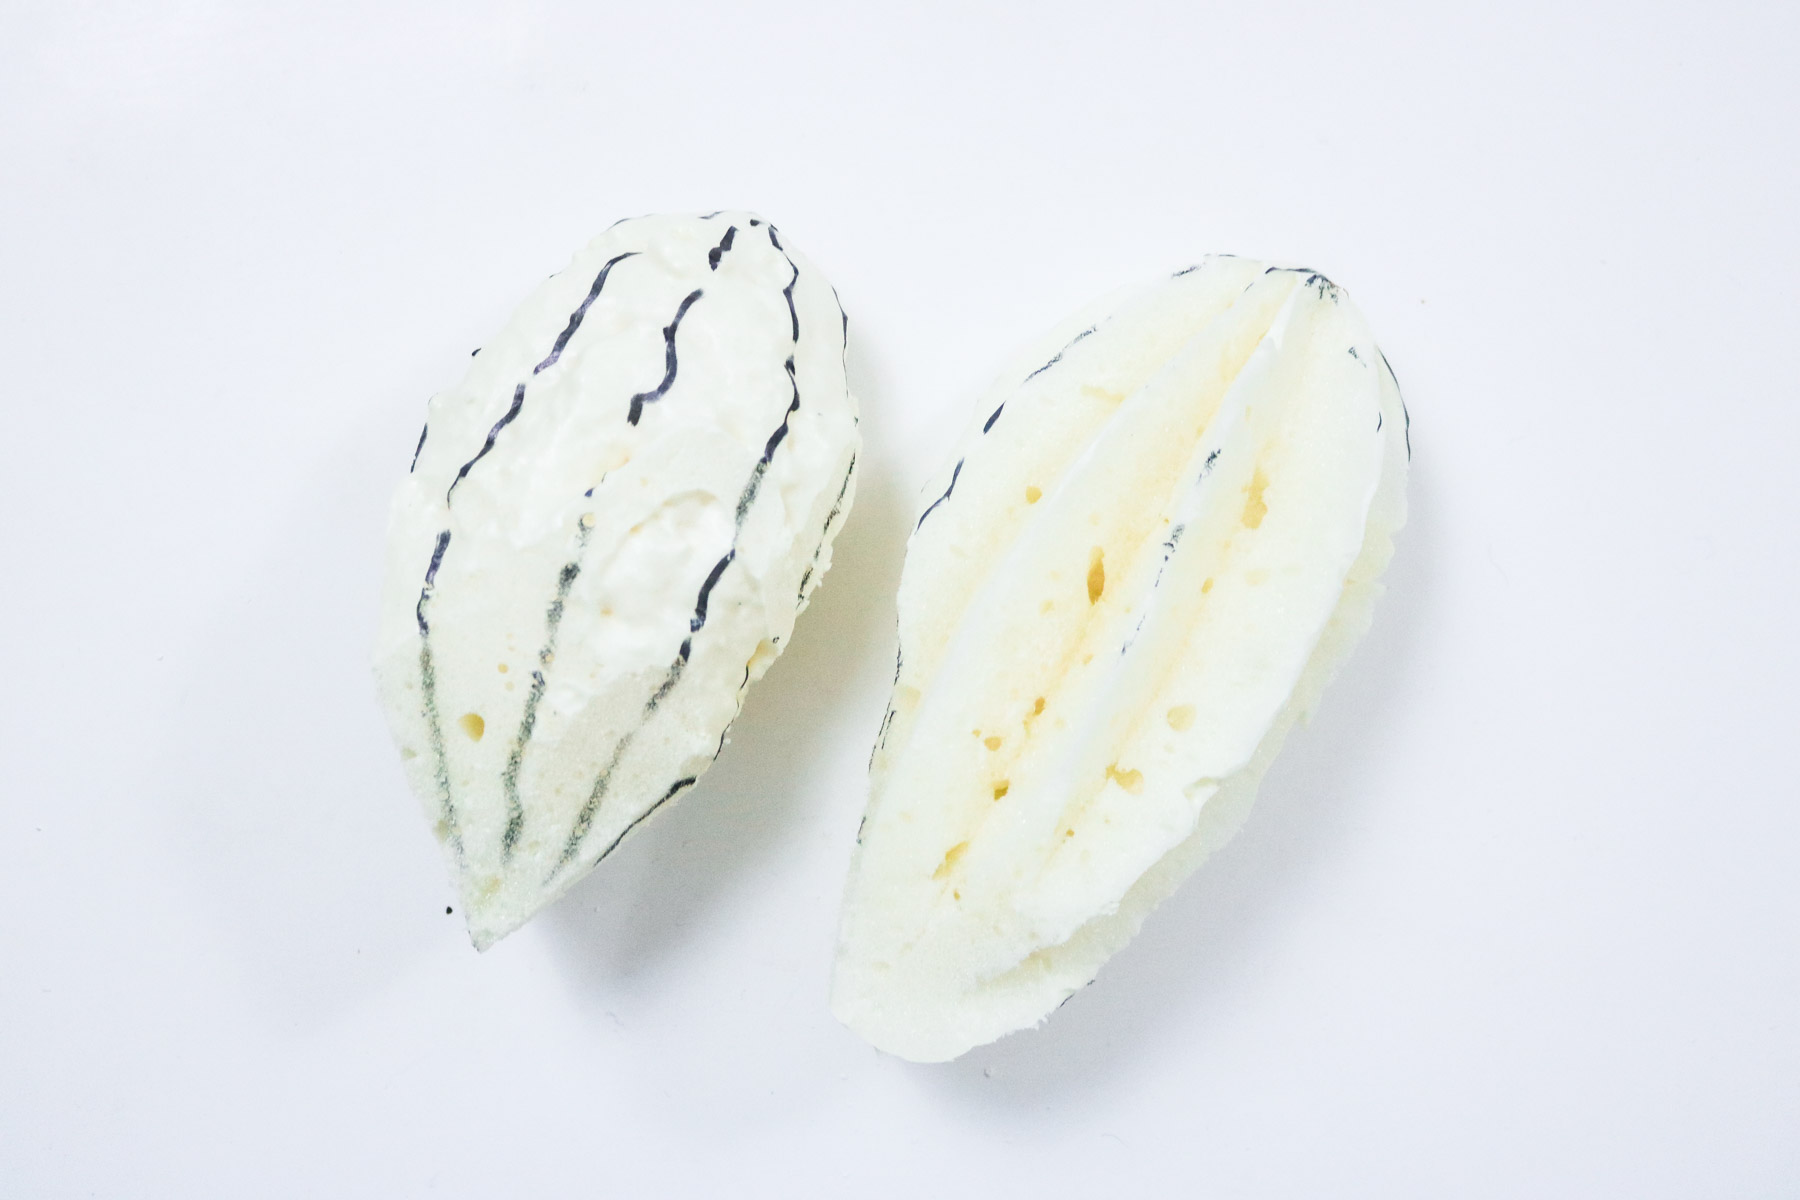
I used two different sizes of pool noodles for contrast. Found them at walmart.
STEP 1 – Installing your pool noodles!
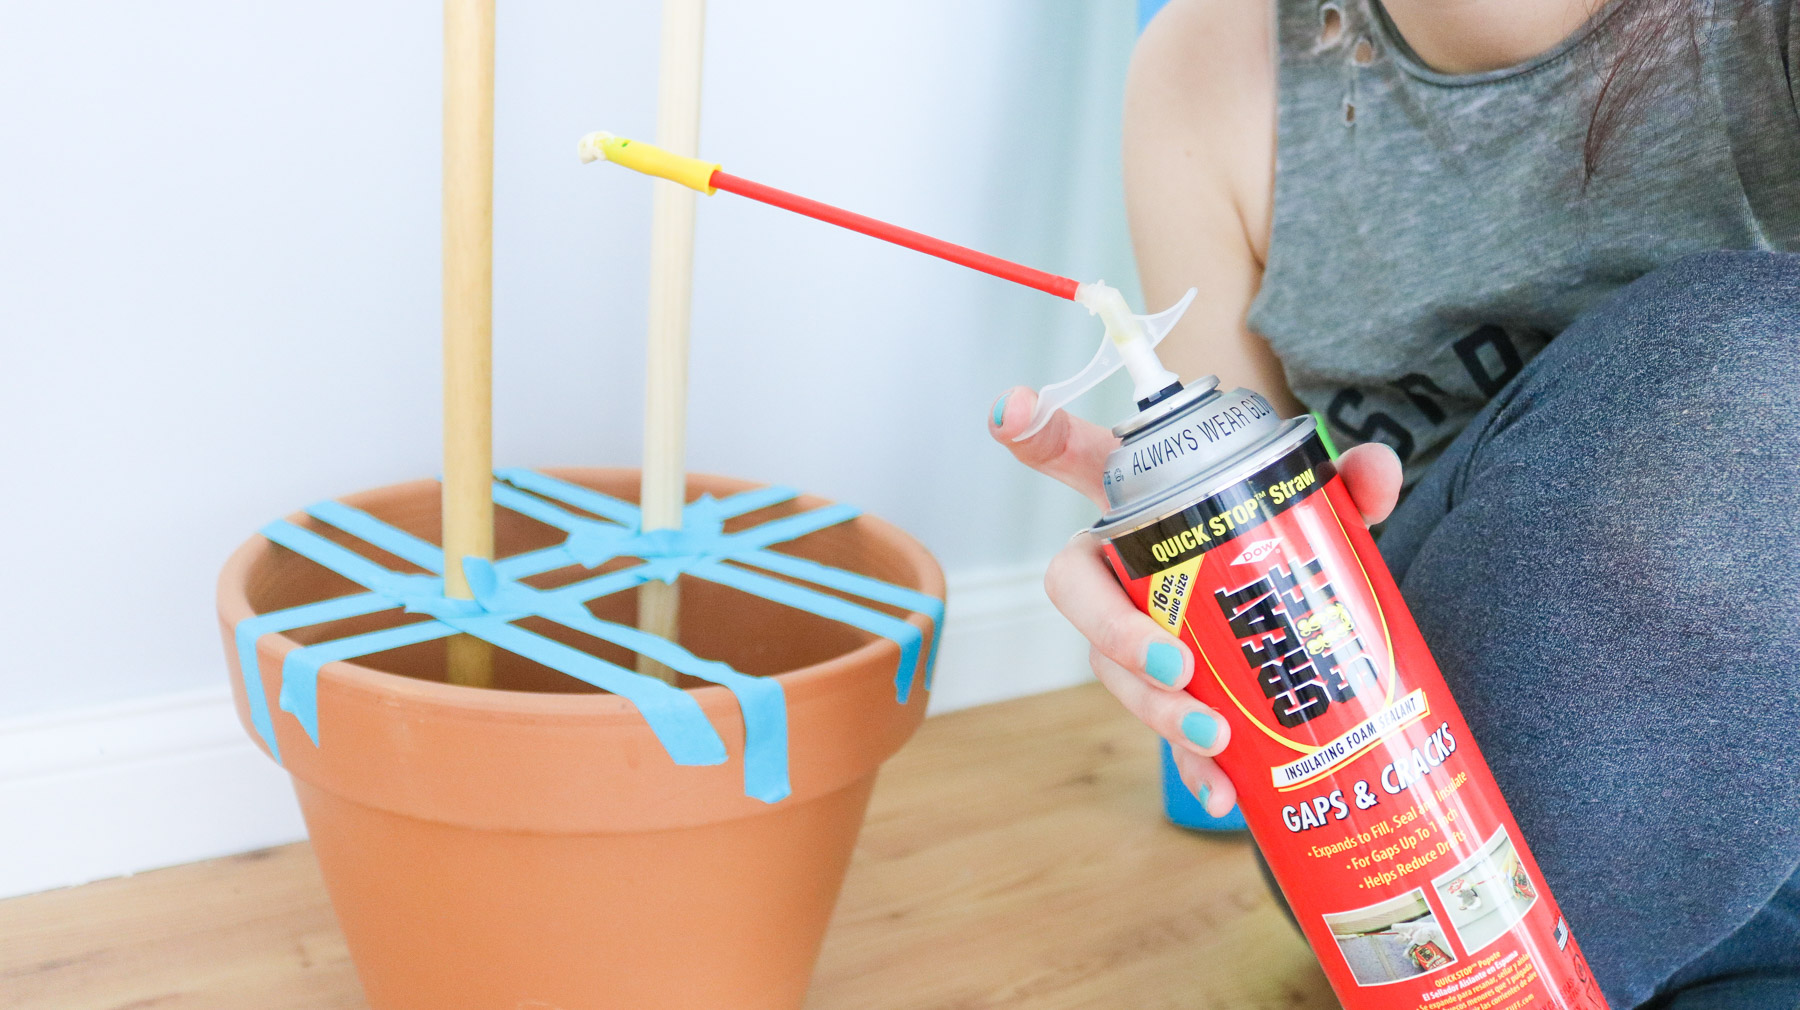
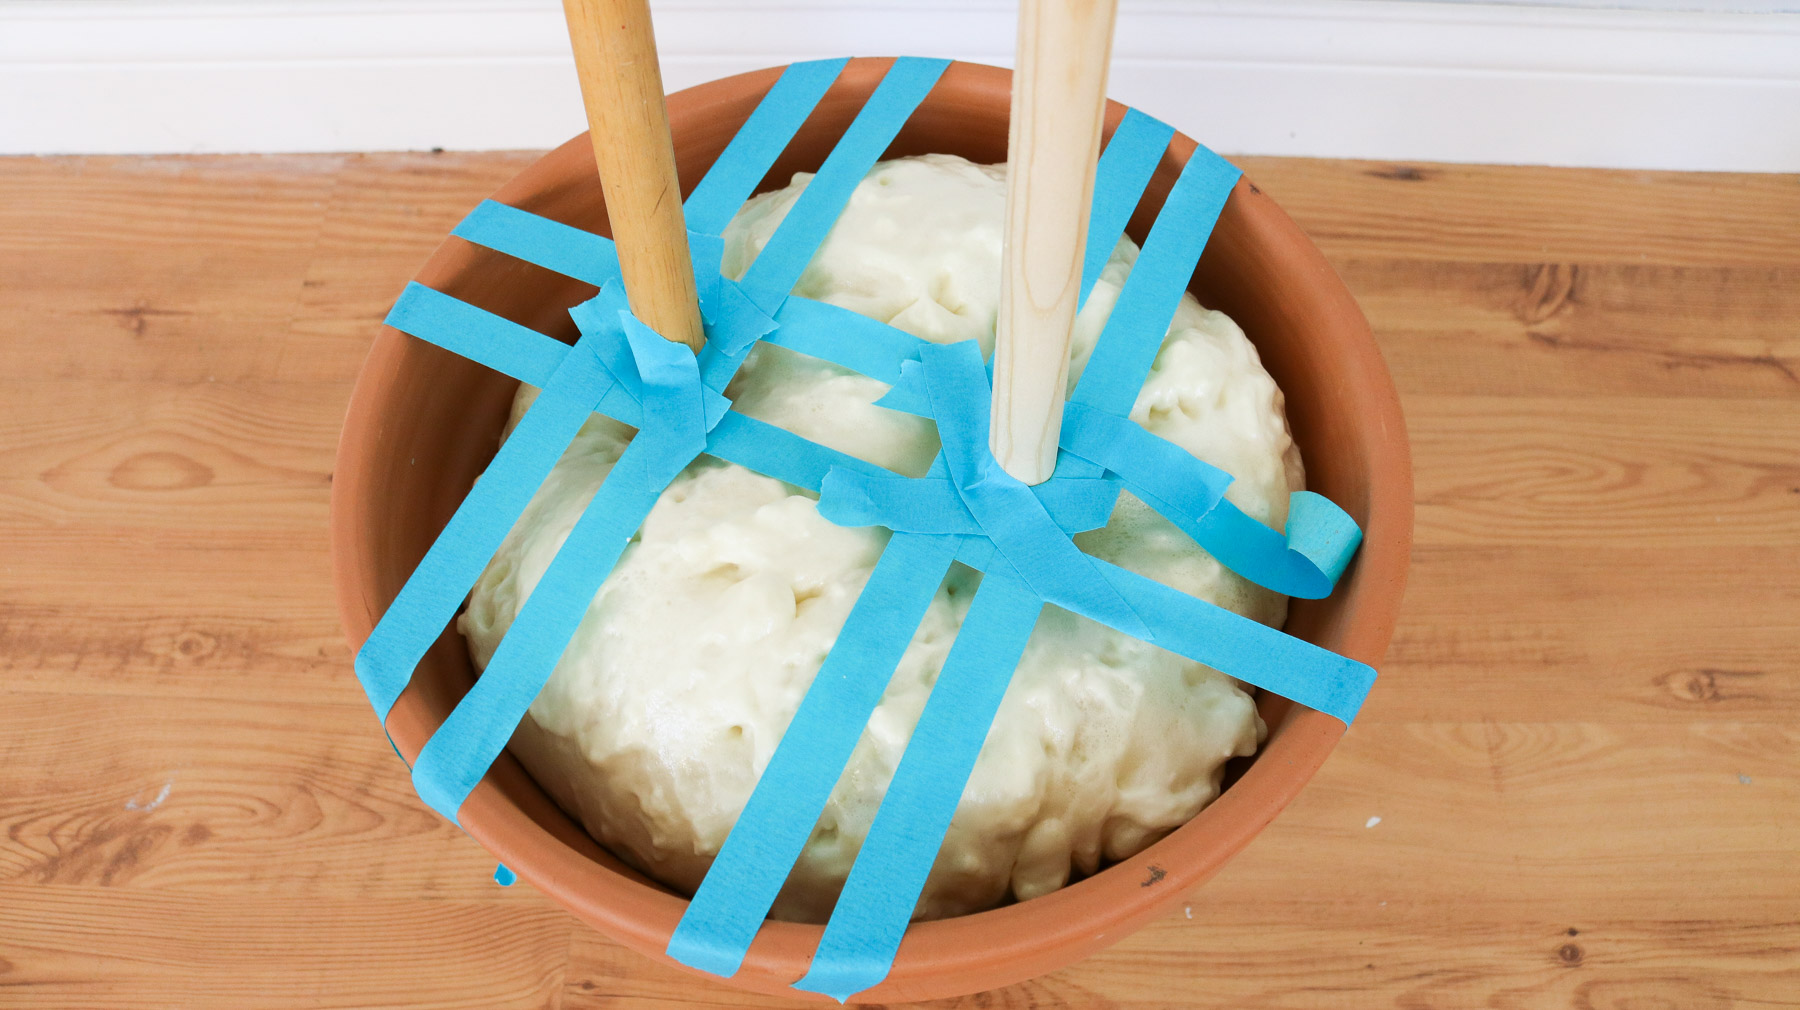
Ok so the idea I had was to have the dowels support the pool noodles. I first used some tape to support the dowels before using some foam sealant to fill the pot. 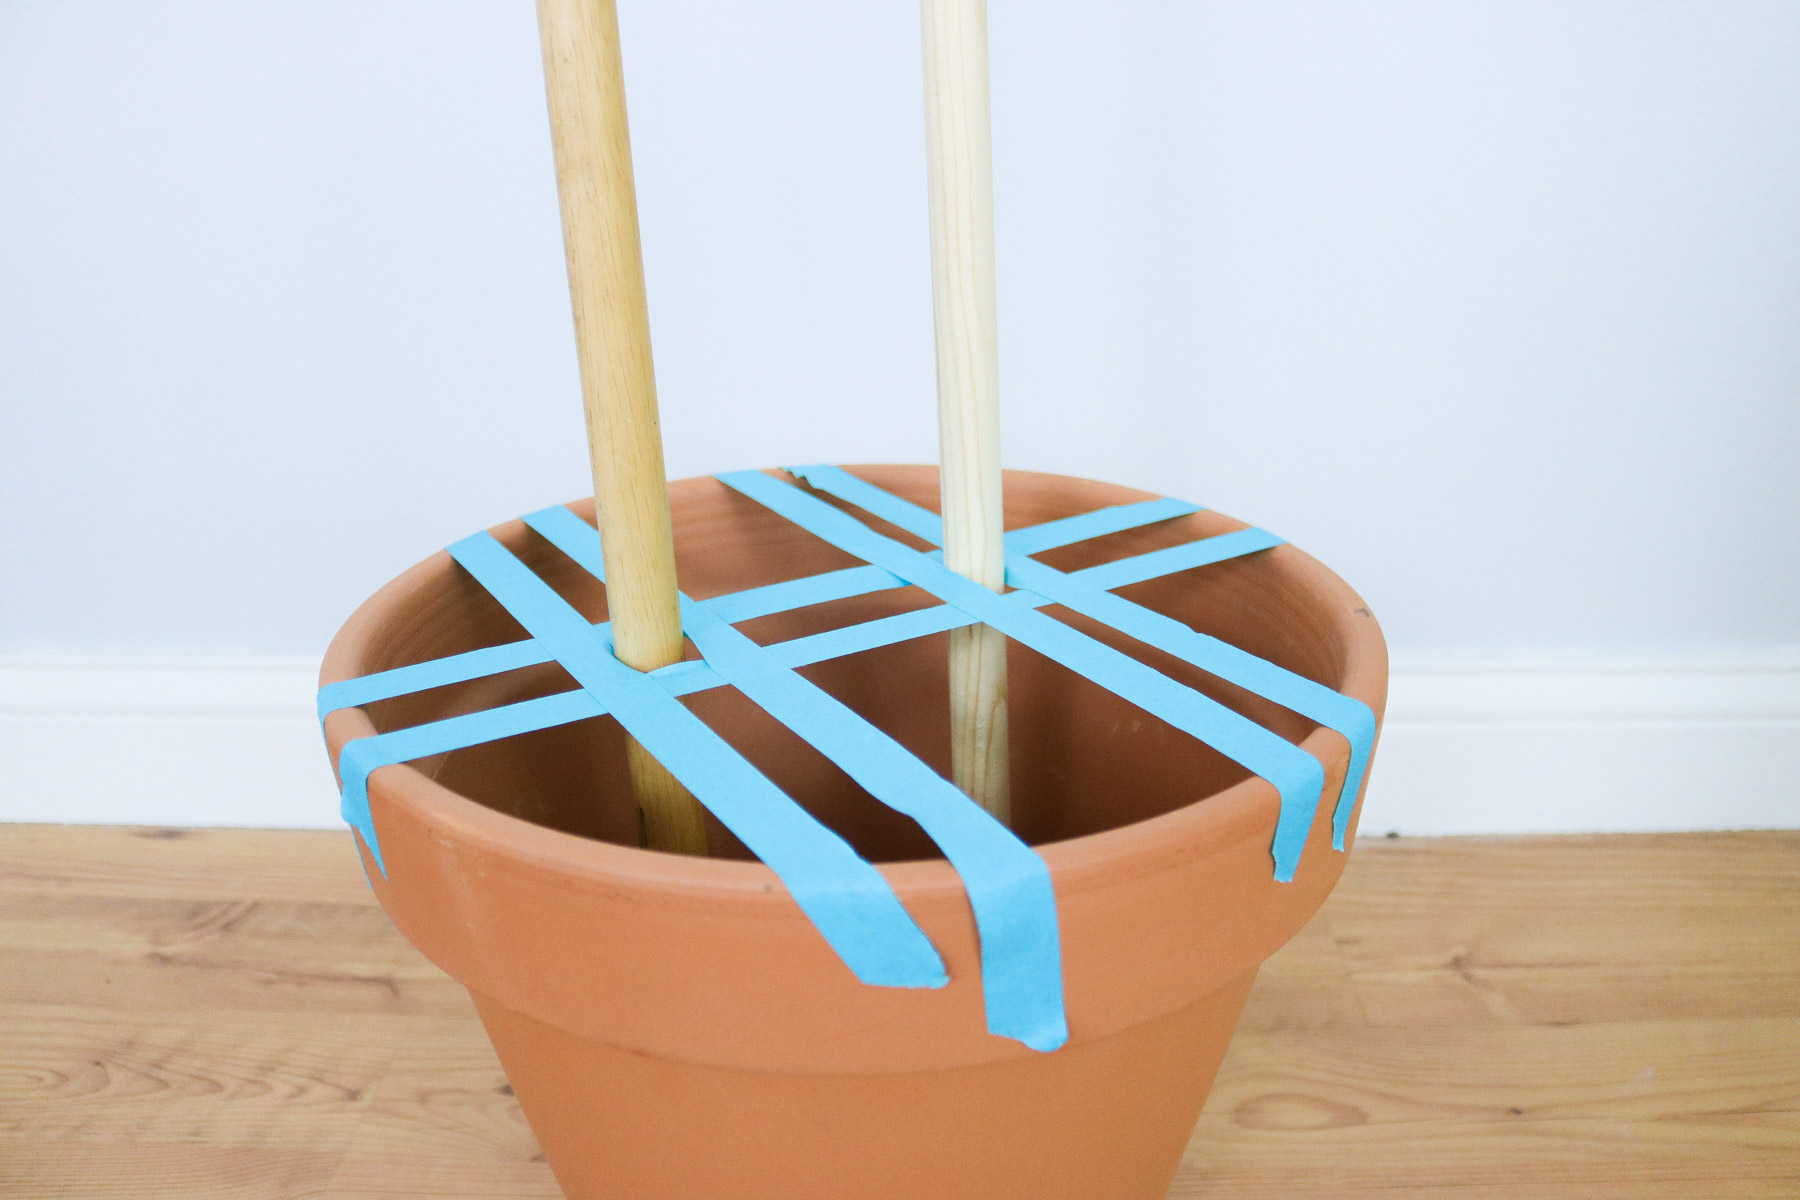
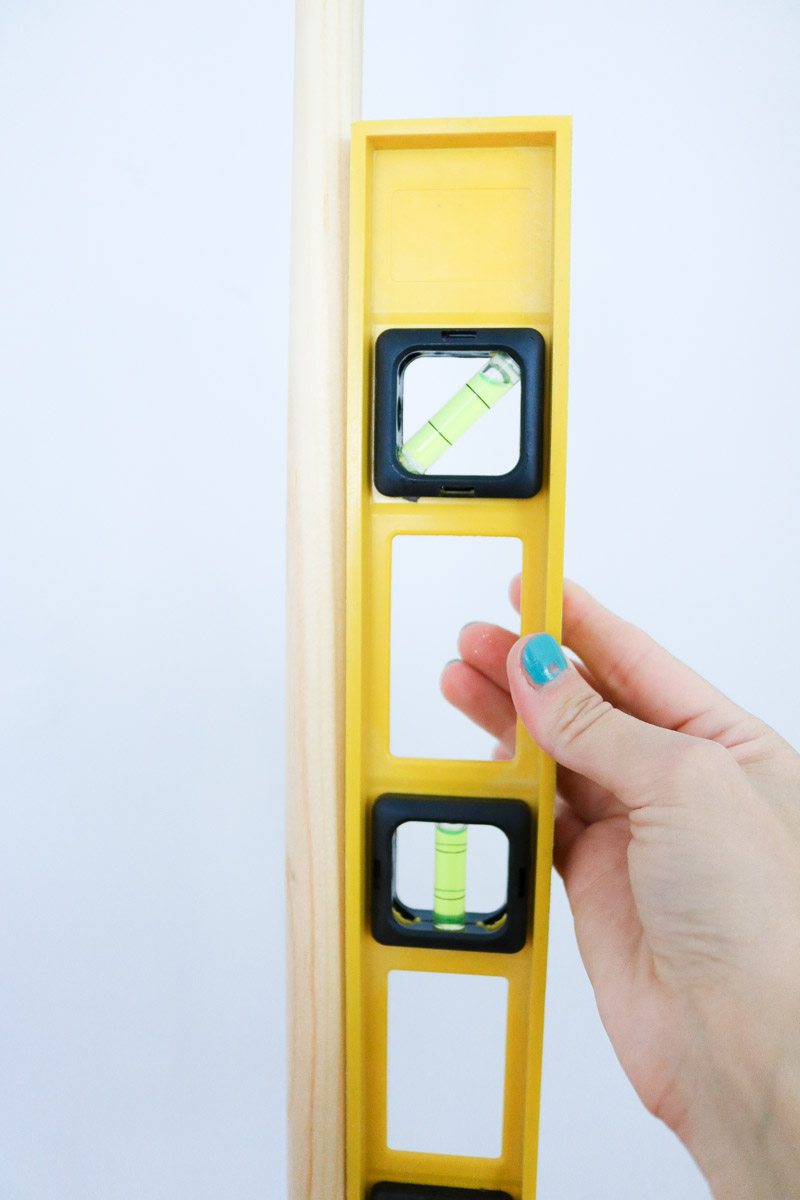
I used my level to make sure my dowels were straight.
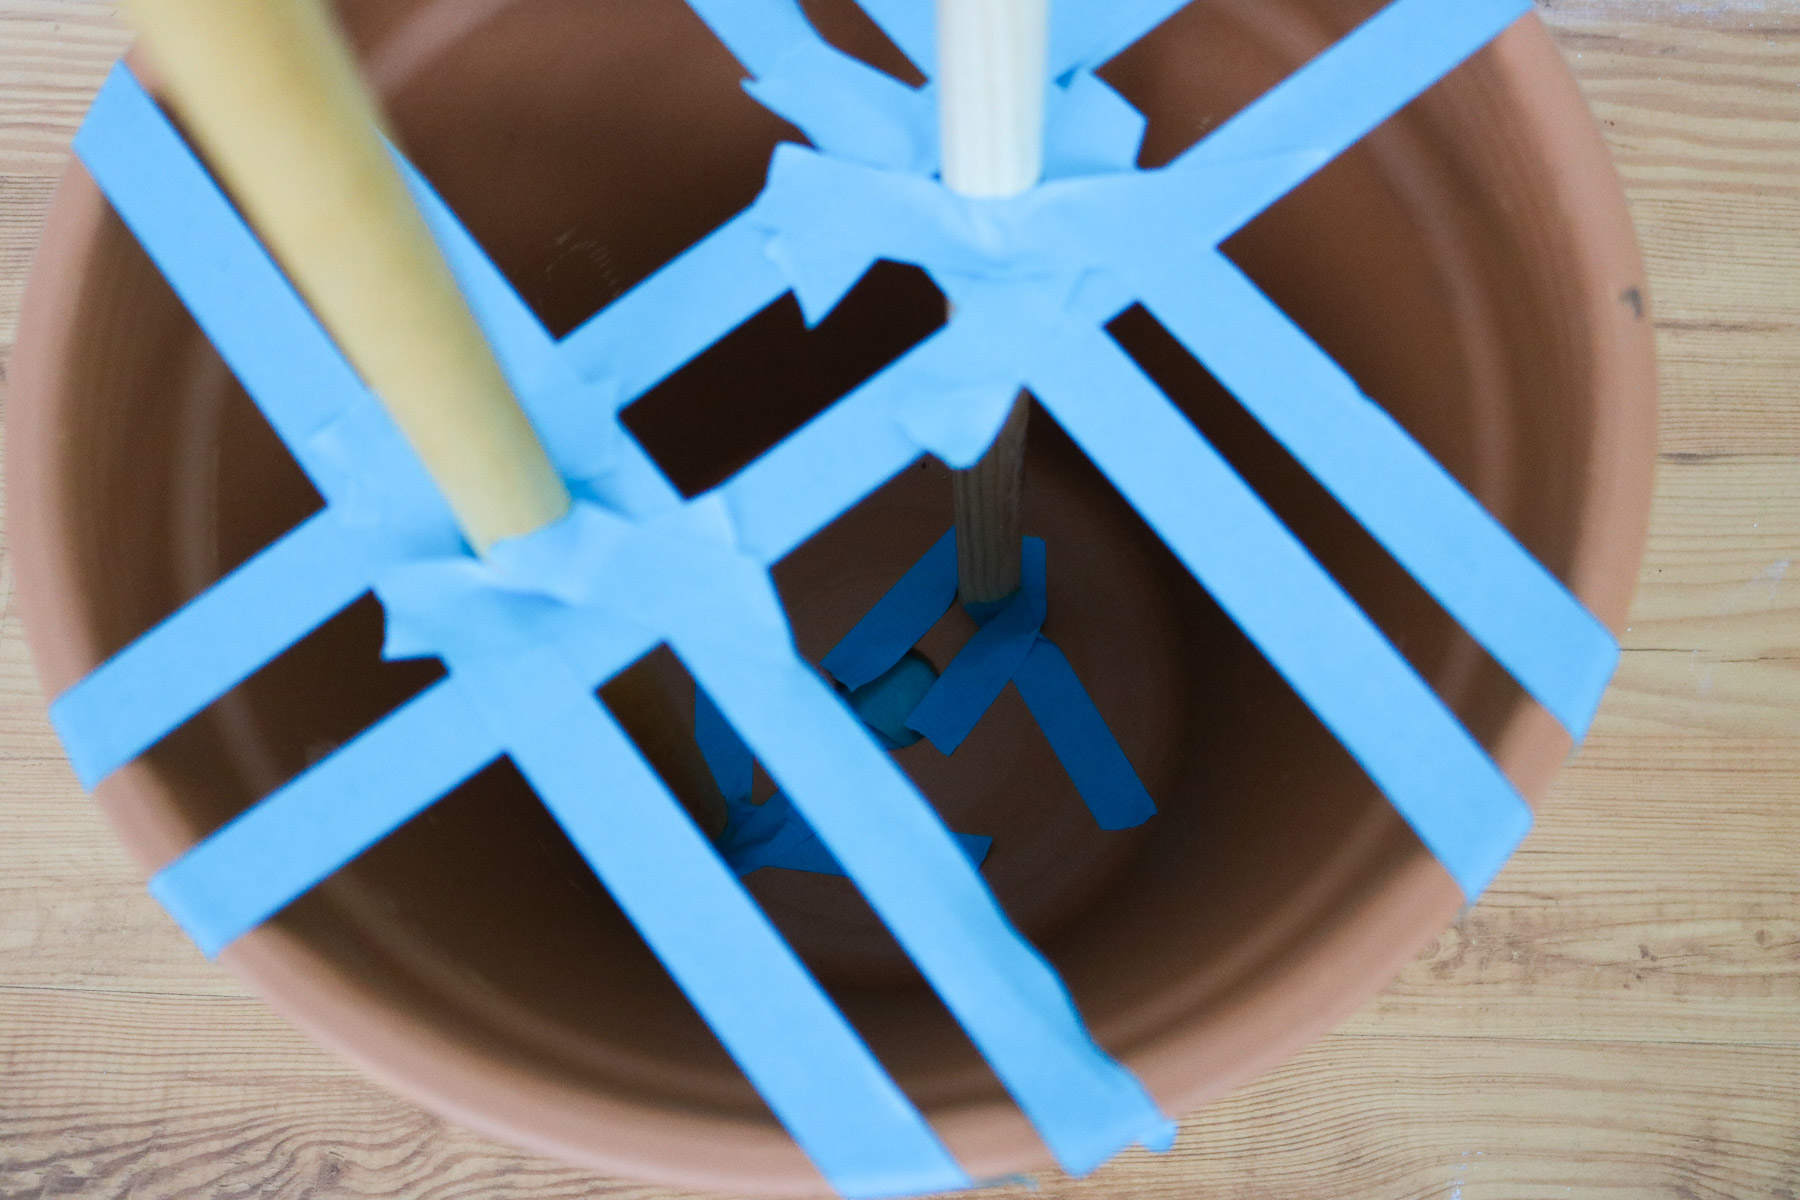
Than I added some more tape to the bottom and top so it stays still when I spray the foam.
This is the foam sealant I used. Make sure you don’t fill the pot to the top because the foam expands as it dries.
If you want your cute cactus to have arms add oblong shapes to some saran wrap.
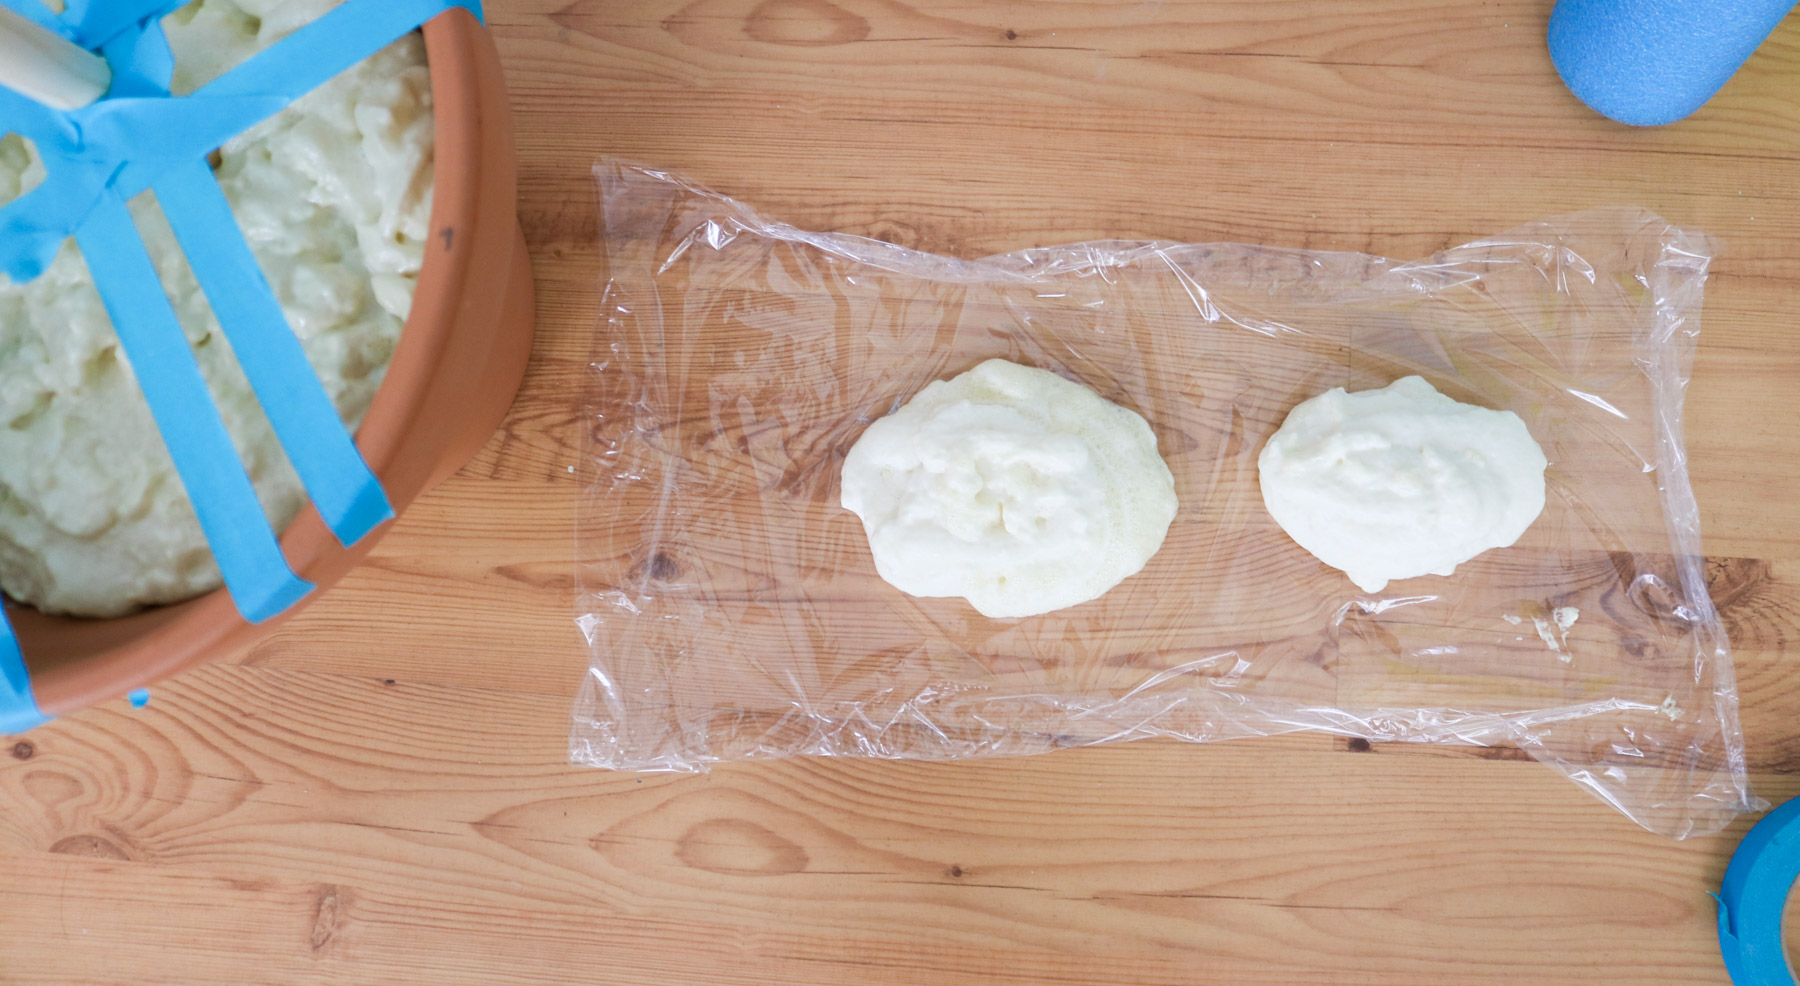
You will need to let it set for about 24 hours before touching it. Here’s what mine looked liked the next morning. It expanded a lot more than I was expecting.
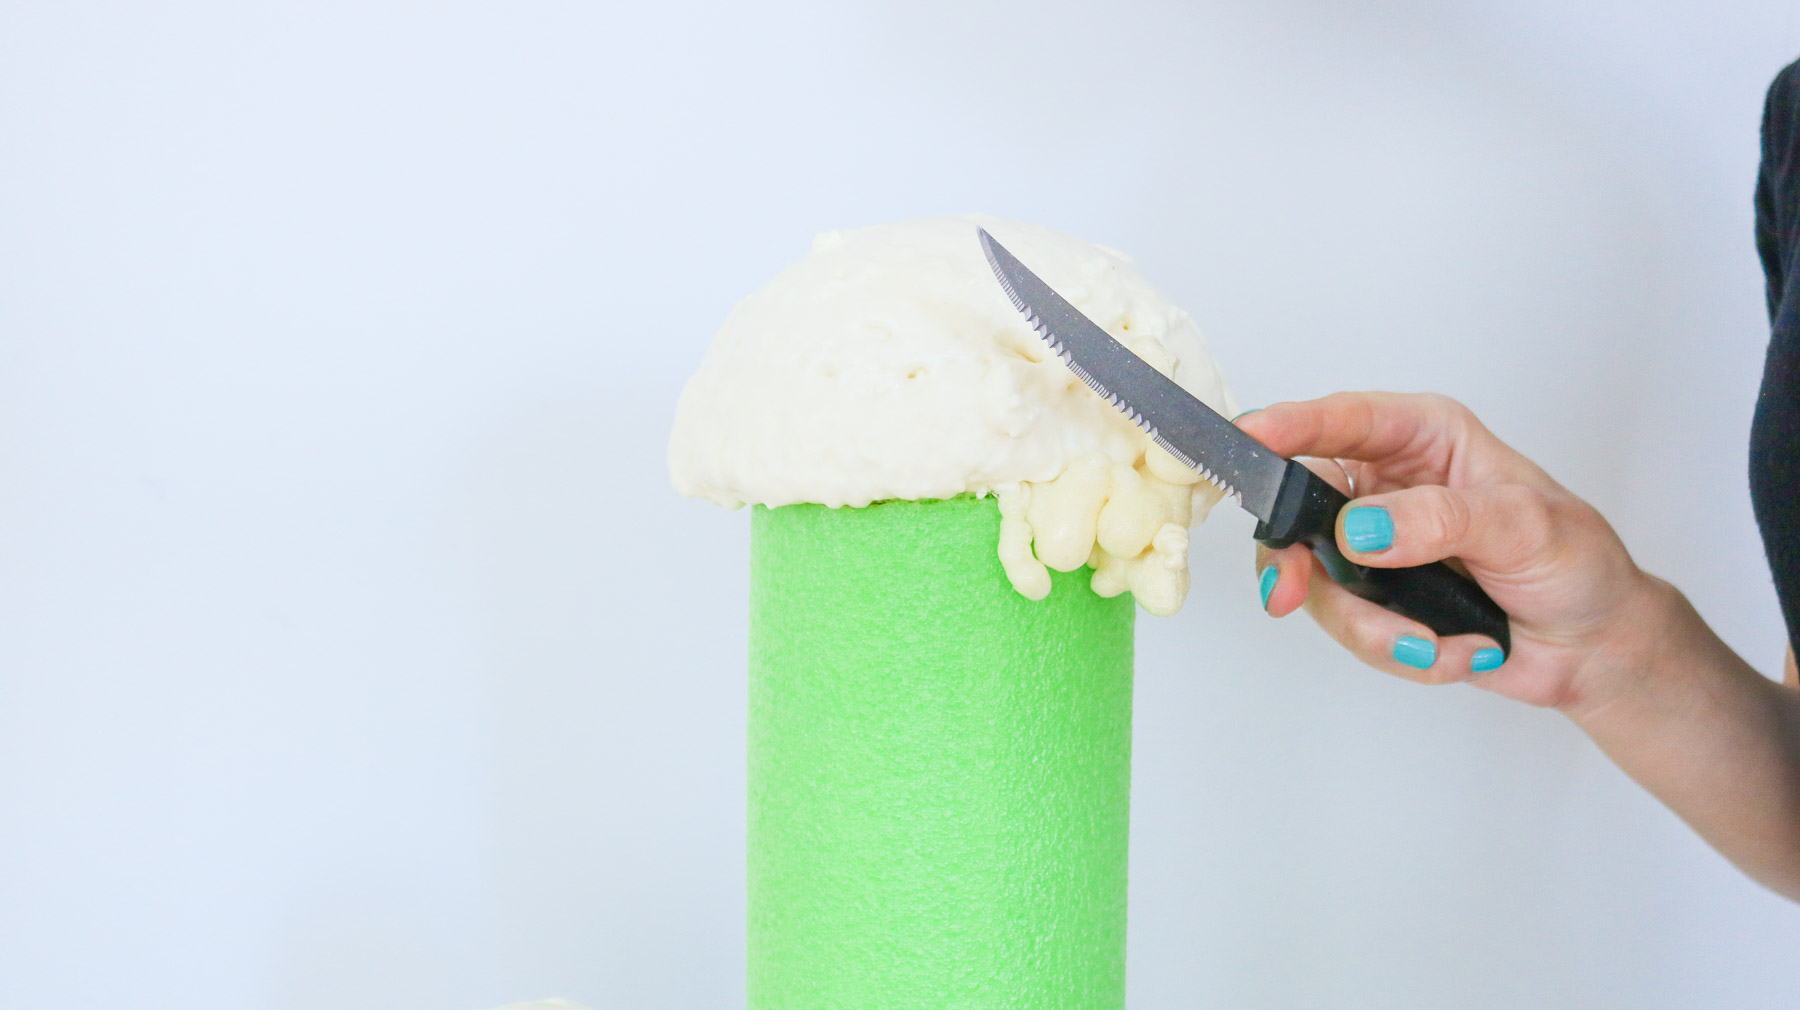
I used a knife to remove some off the top to even out the surface. 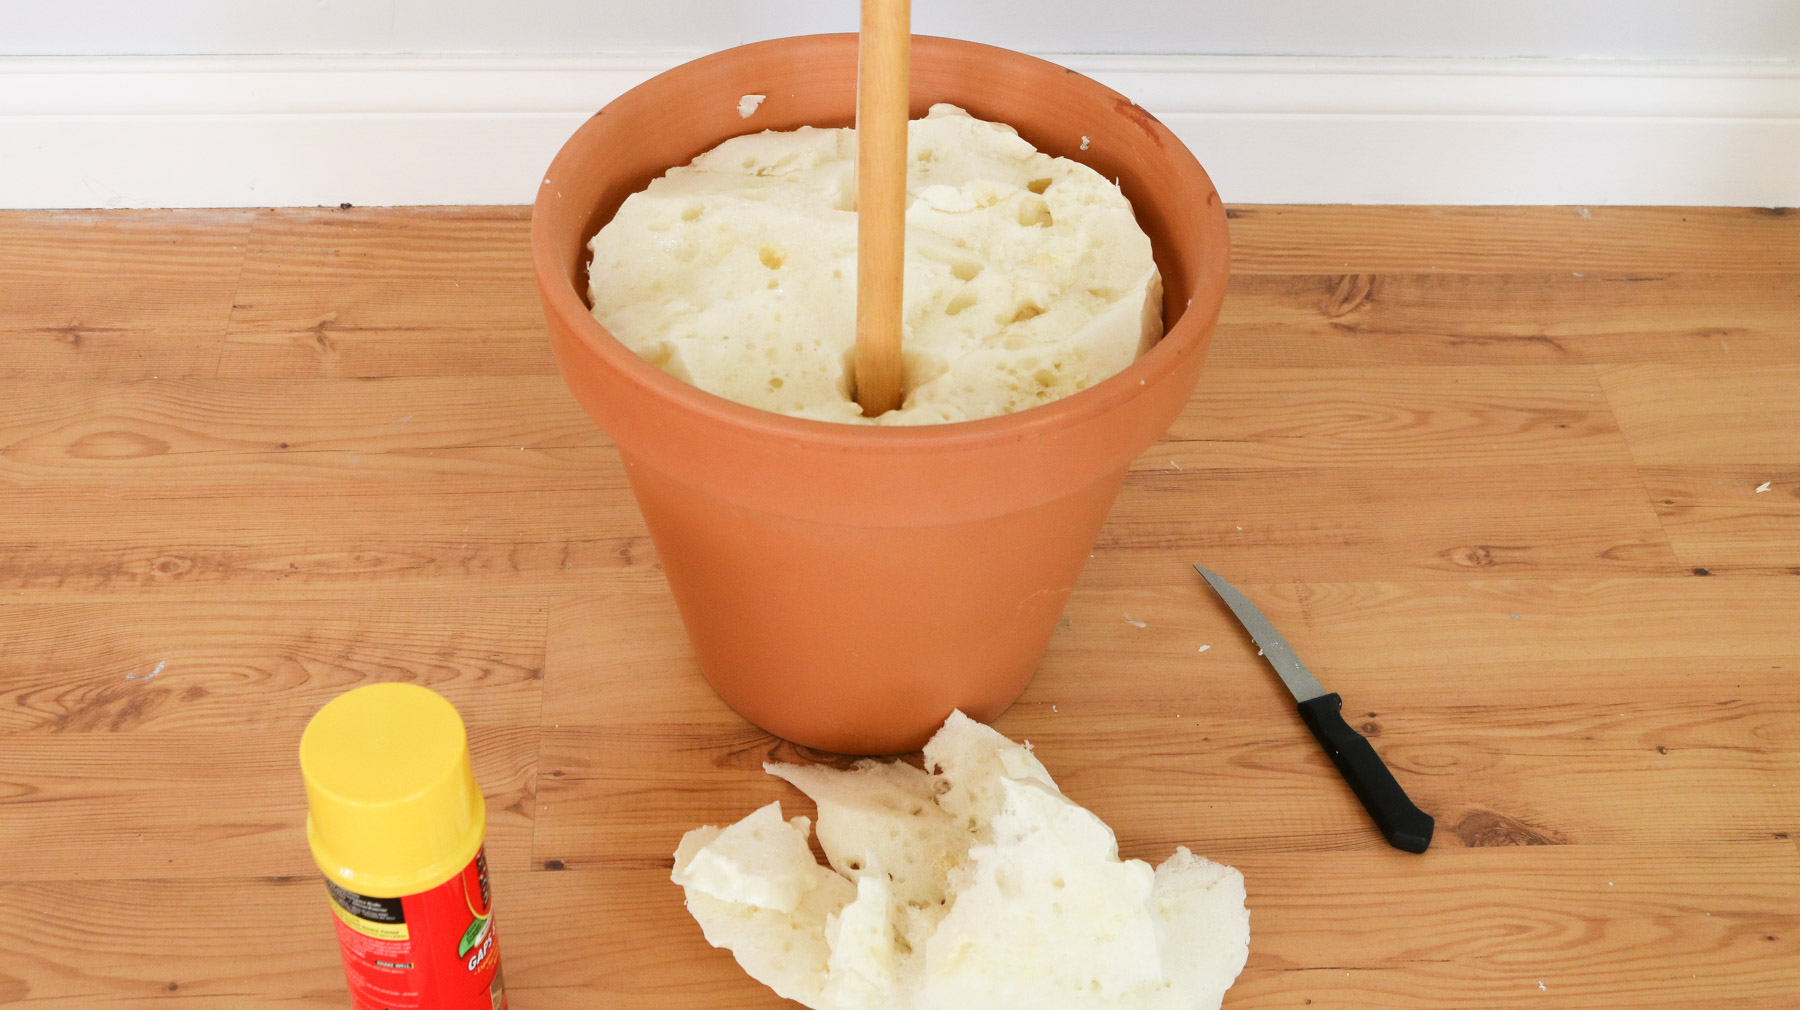
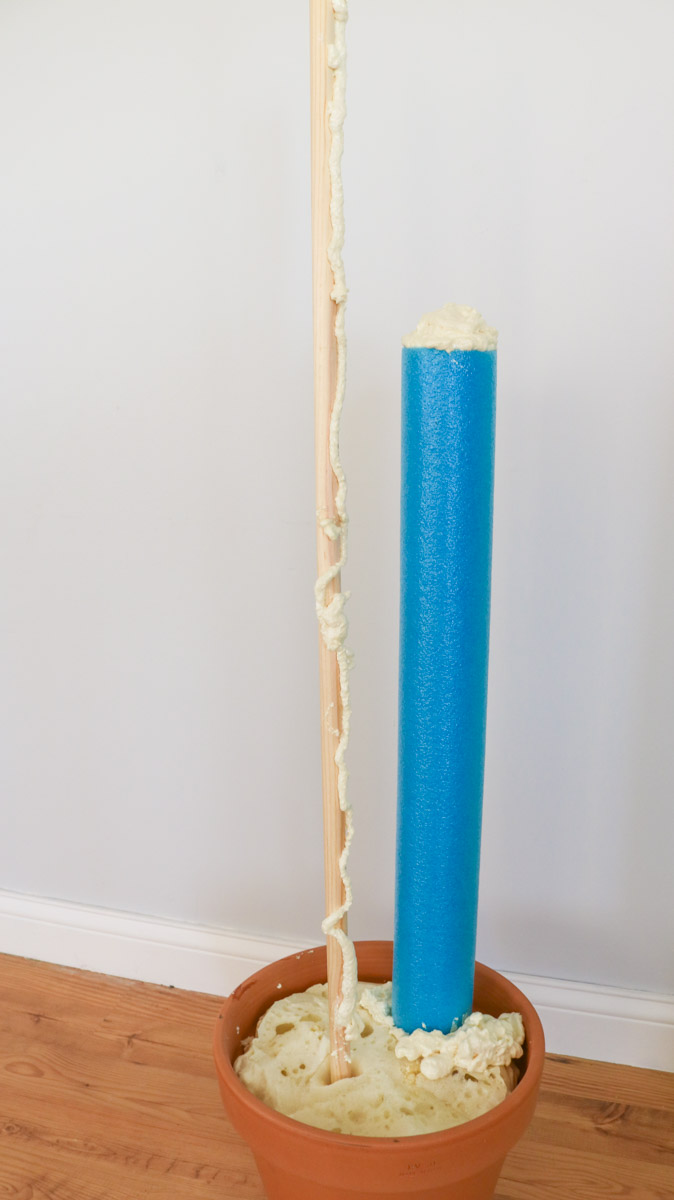
Following that to install your pool noodles add a little bit of foam on the dowels and insert your pool noodles onto it. If you do too much foam it’ll be a big mess. A little goes a long way for this step. (the blue pool noodle obviously had too much foam sealant on the dowel so it just push all the foam to the bottom) TIP: If this happens don’t bother cleaning it up right away. This foam sealant is easier to work with once dried. It’s super sticky when it’s not dry and won’t come off unless you use super strong chemicals. I got some on my hands and floor and had to use paint reducer to remove it. Oil didn’t help. Seams like it’s worse than tree sap. I also added as much foam as possible from the top of the pool noodle. Oh and don’t forget to leave a blog of foam sealant on top. This will help shape the top of your cactus.
If your pool noodle fits tightly onto your dowel you won’t need to add foam to your dowel.
Step 2 – Shaping your cute cactus
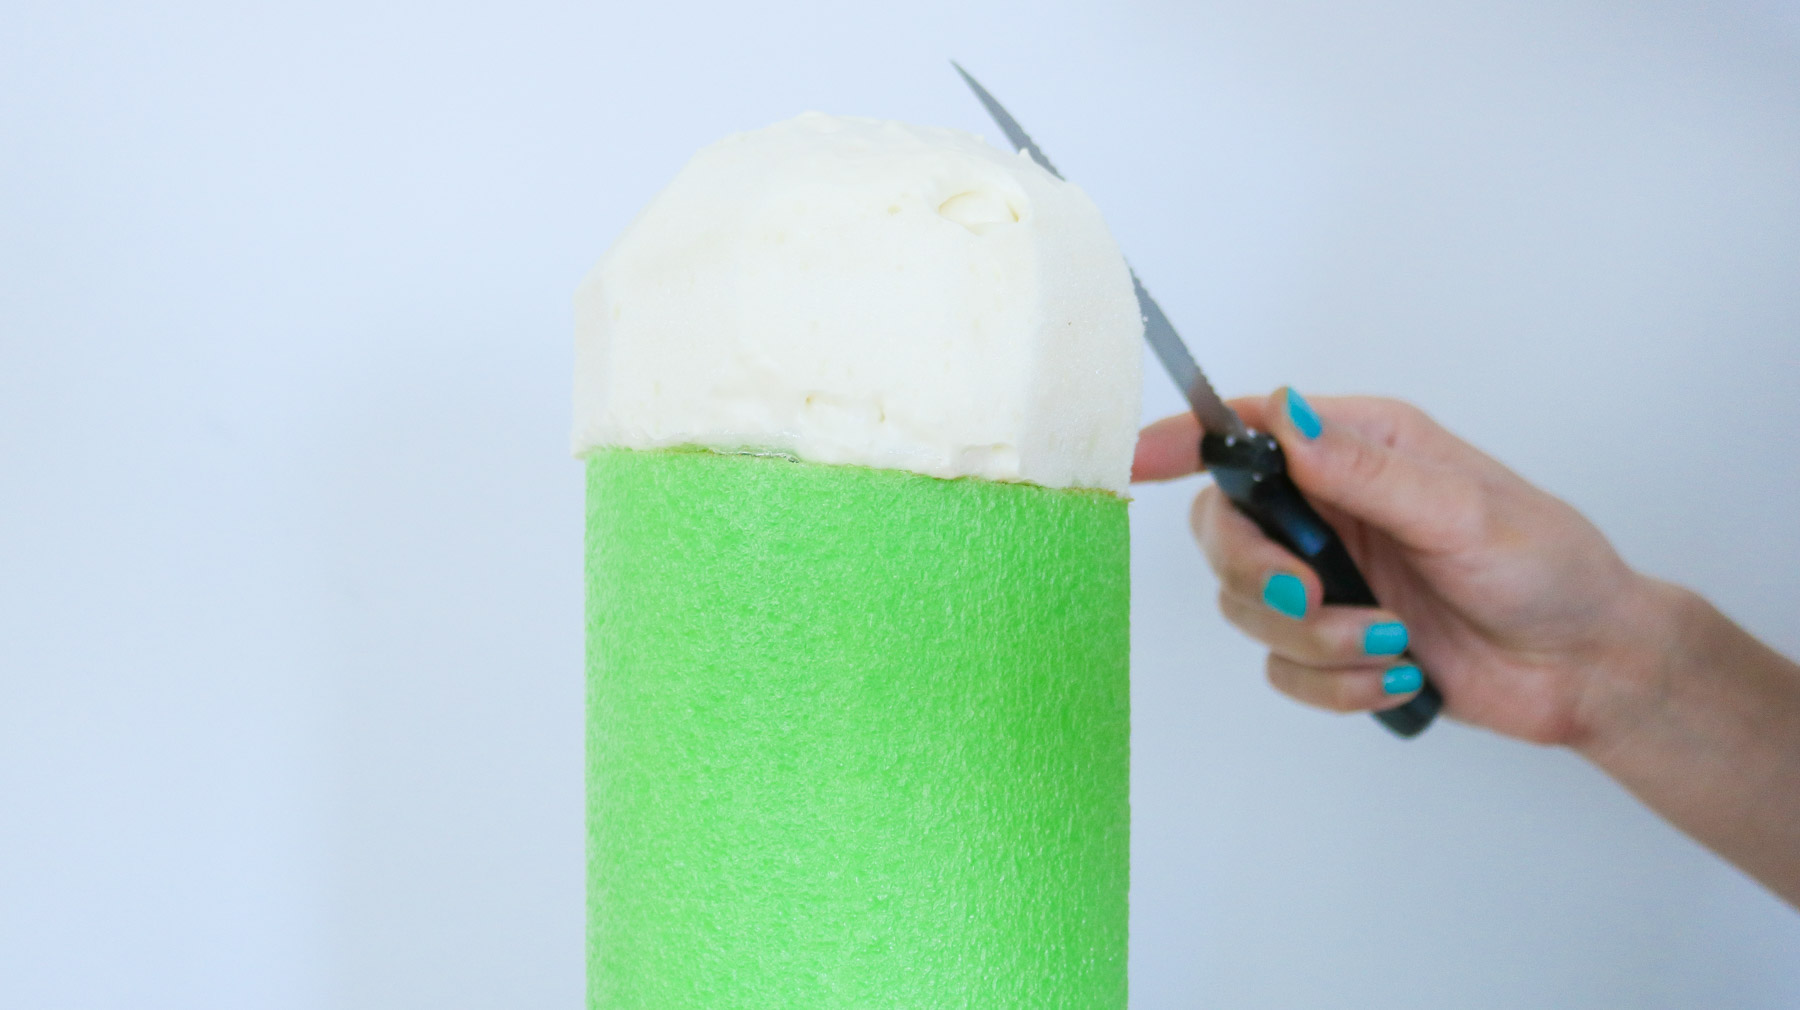
Let your pool noodle set for 24 hours. The top of your cactus at this point should look like the photo below. Use a knife to even out the edges creating an even rounded top.
Like this. (photo below) It doesn’t have to be perfect as long as it looks pretty rounded you should be good to go.
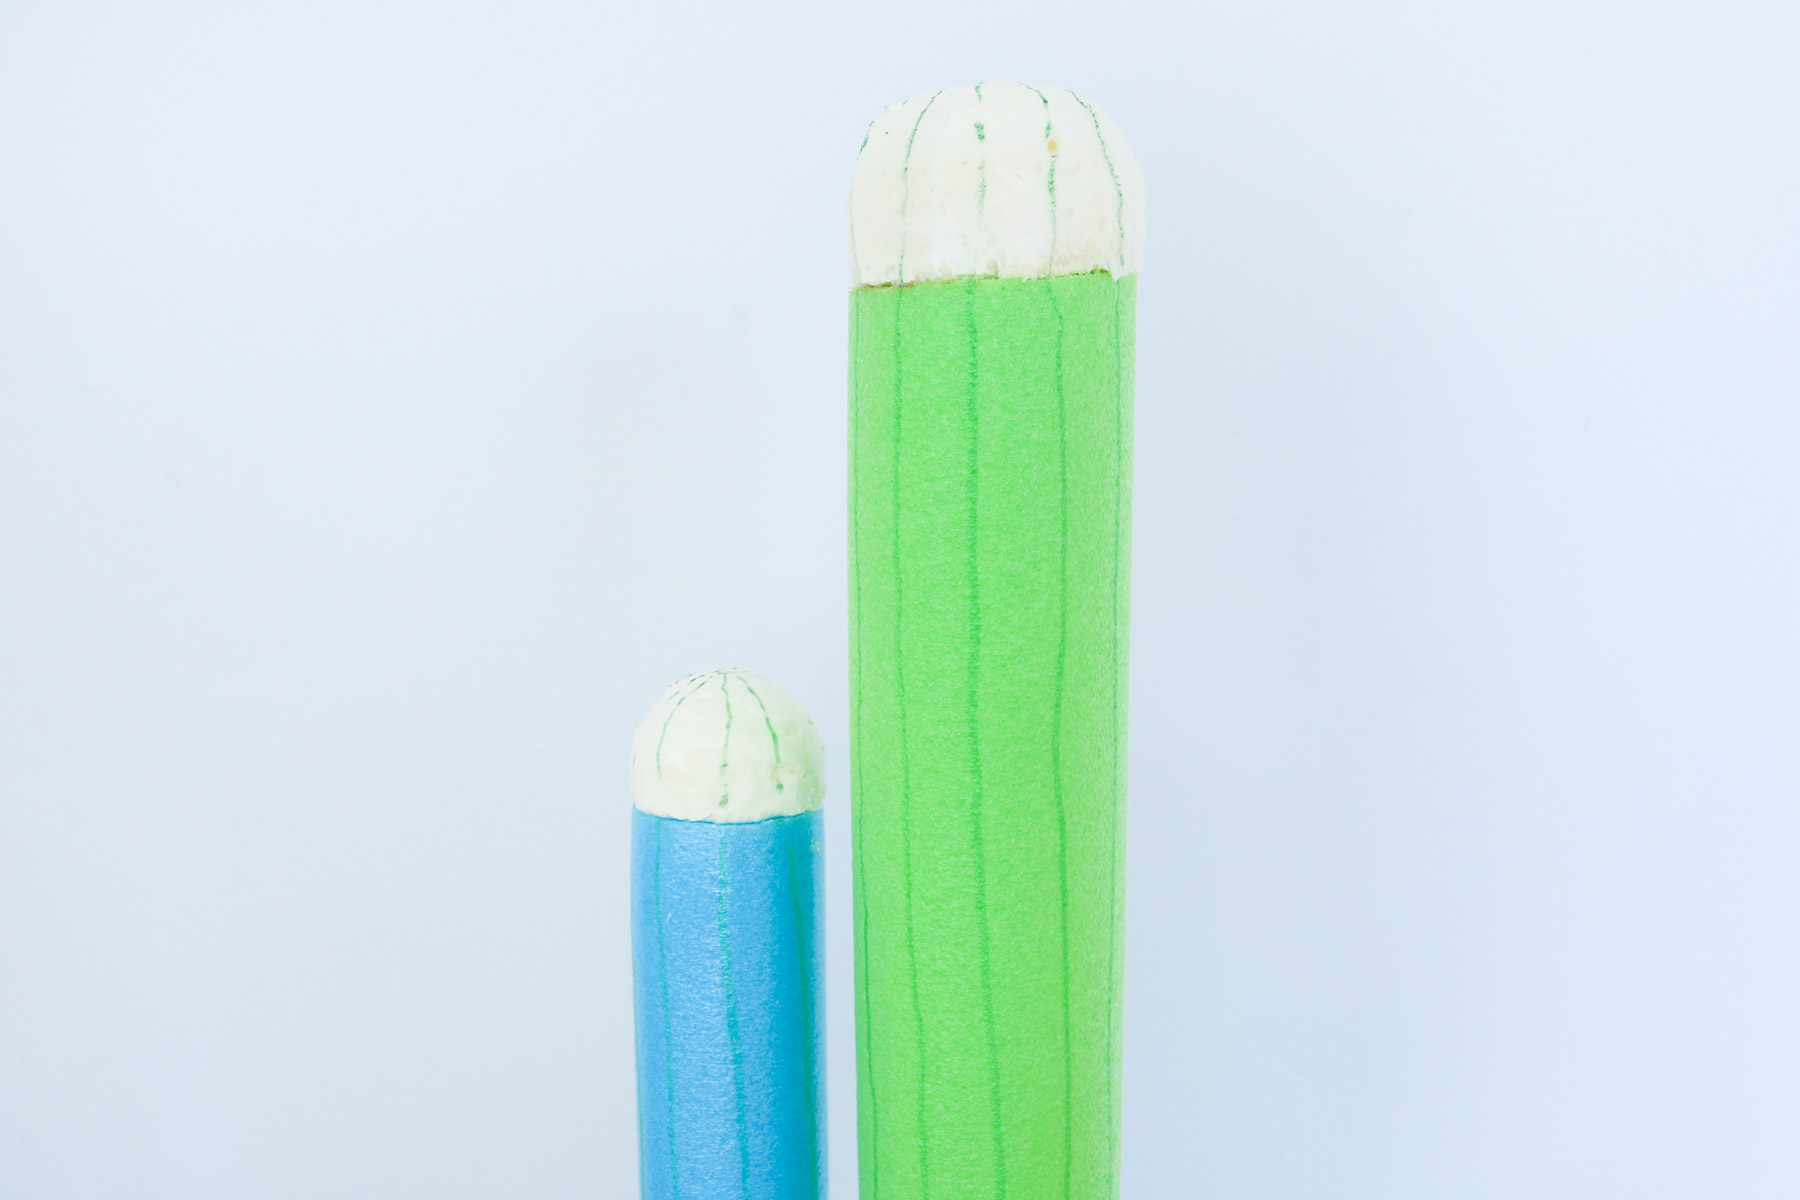
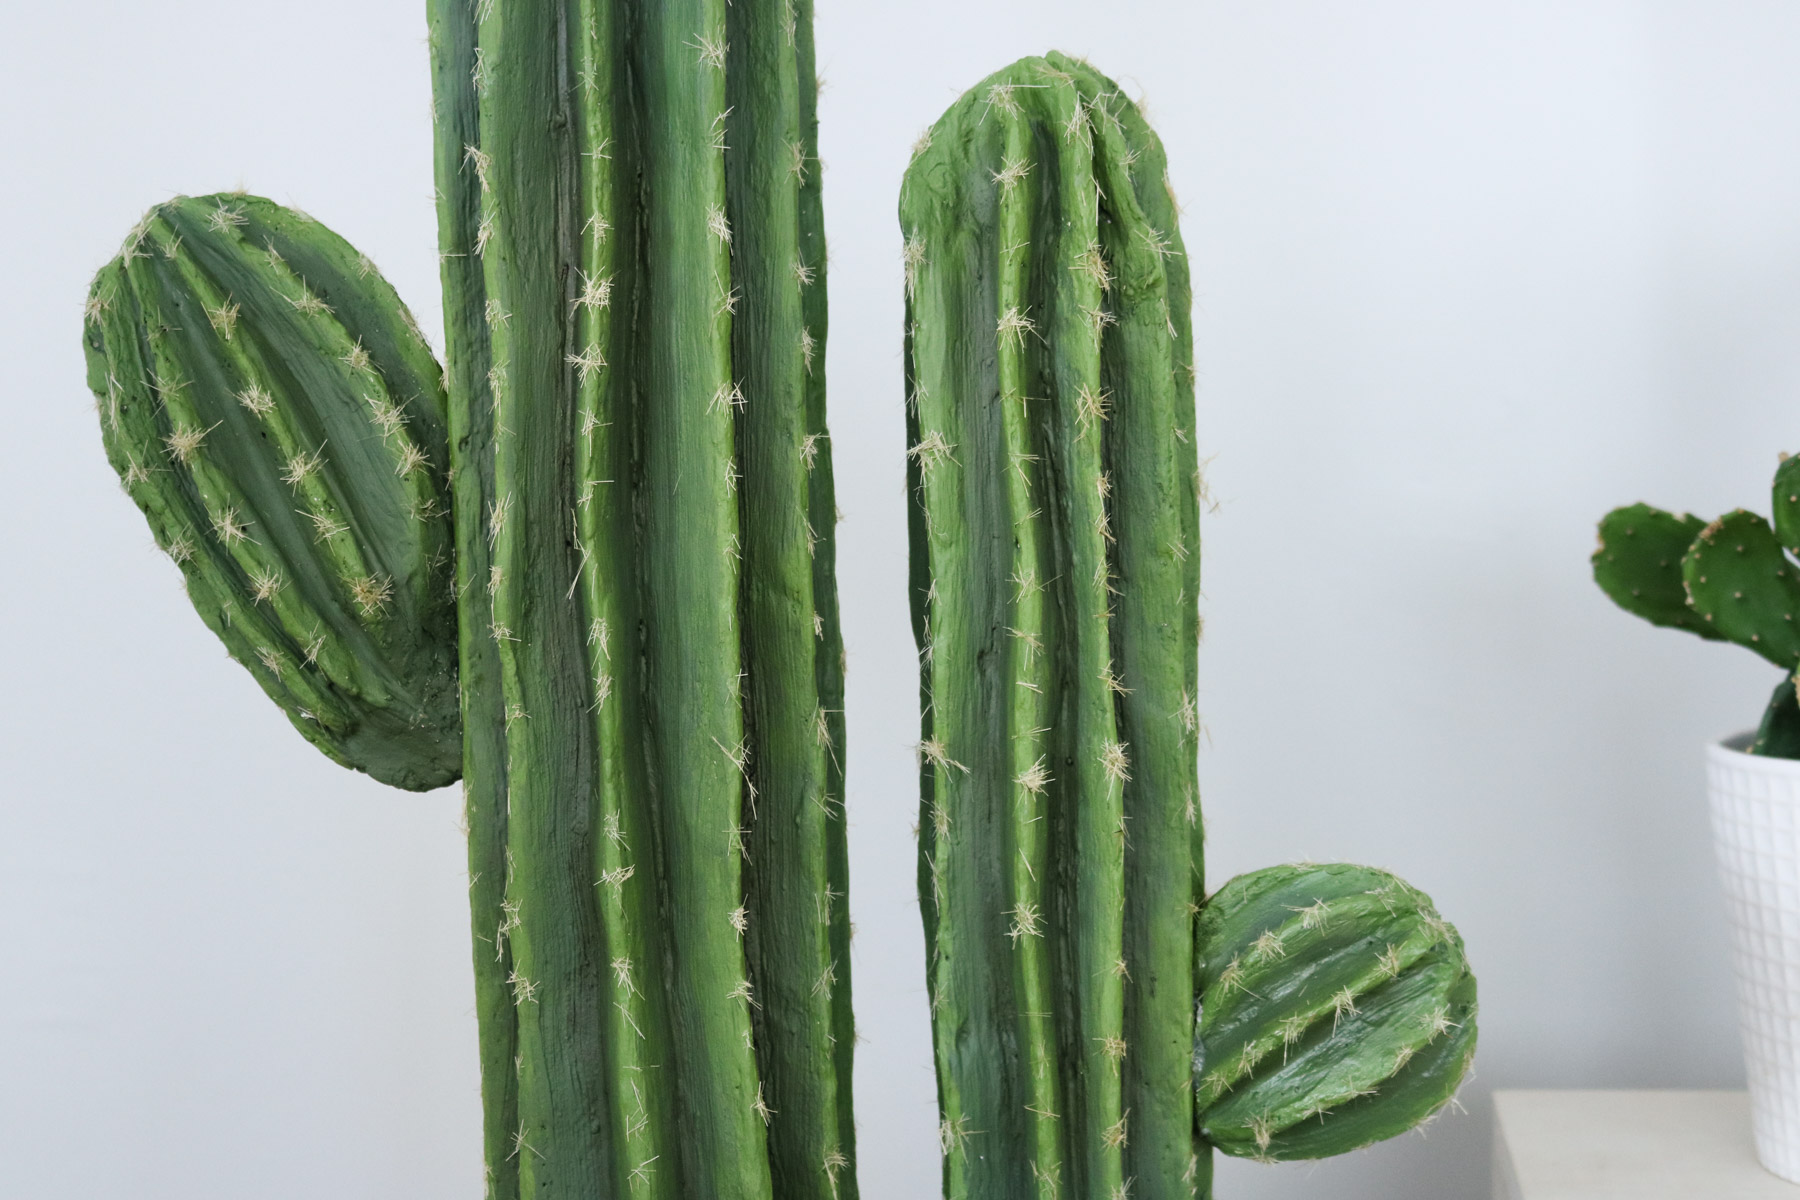
Okay following that you will need to use a sharpie and draw lines about and inch apart from the top to the bottom of your cacti. They don’t have to be perfectly straight in fact if they’re a little uneven it’ll add more character to your cactus.
Following that carefully use your utility knife to start cutting strips out of your cactus.
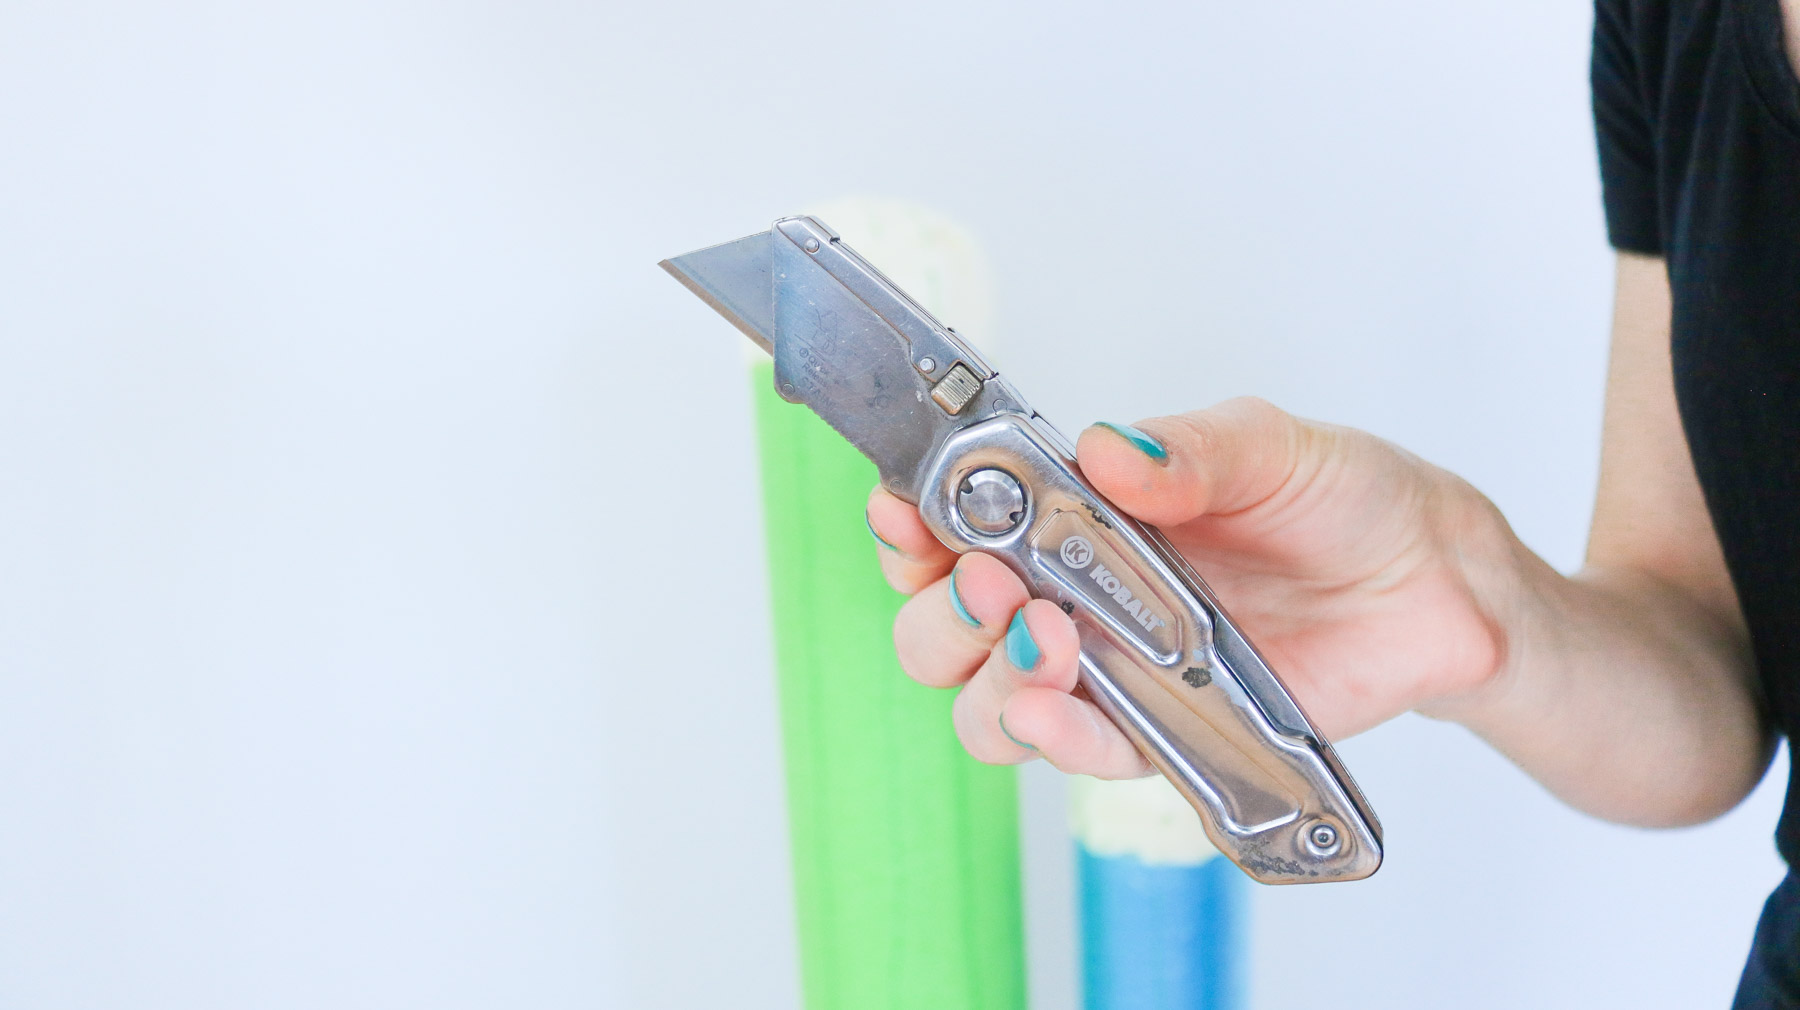
You will need to slightly tilt your knife in while cutting into your foam noodles to cut out triangle shaped strips. If cut correctly your strips should pop right out.

Here’s what it looks like from the top.

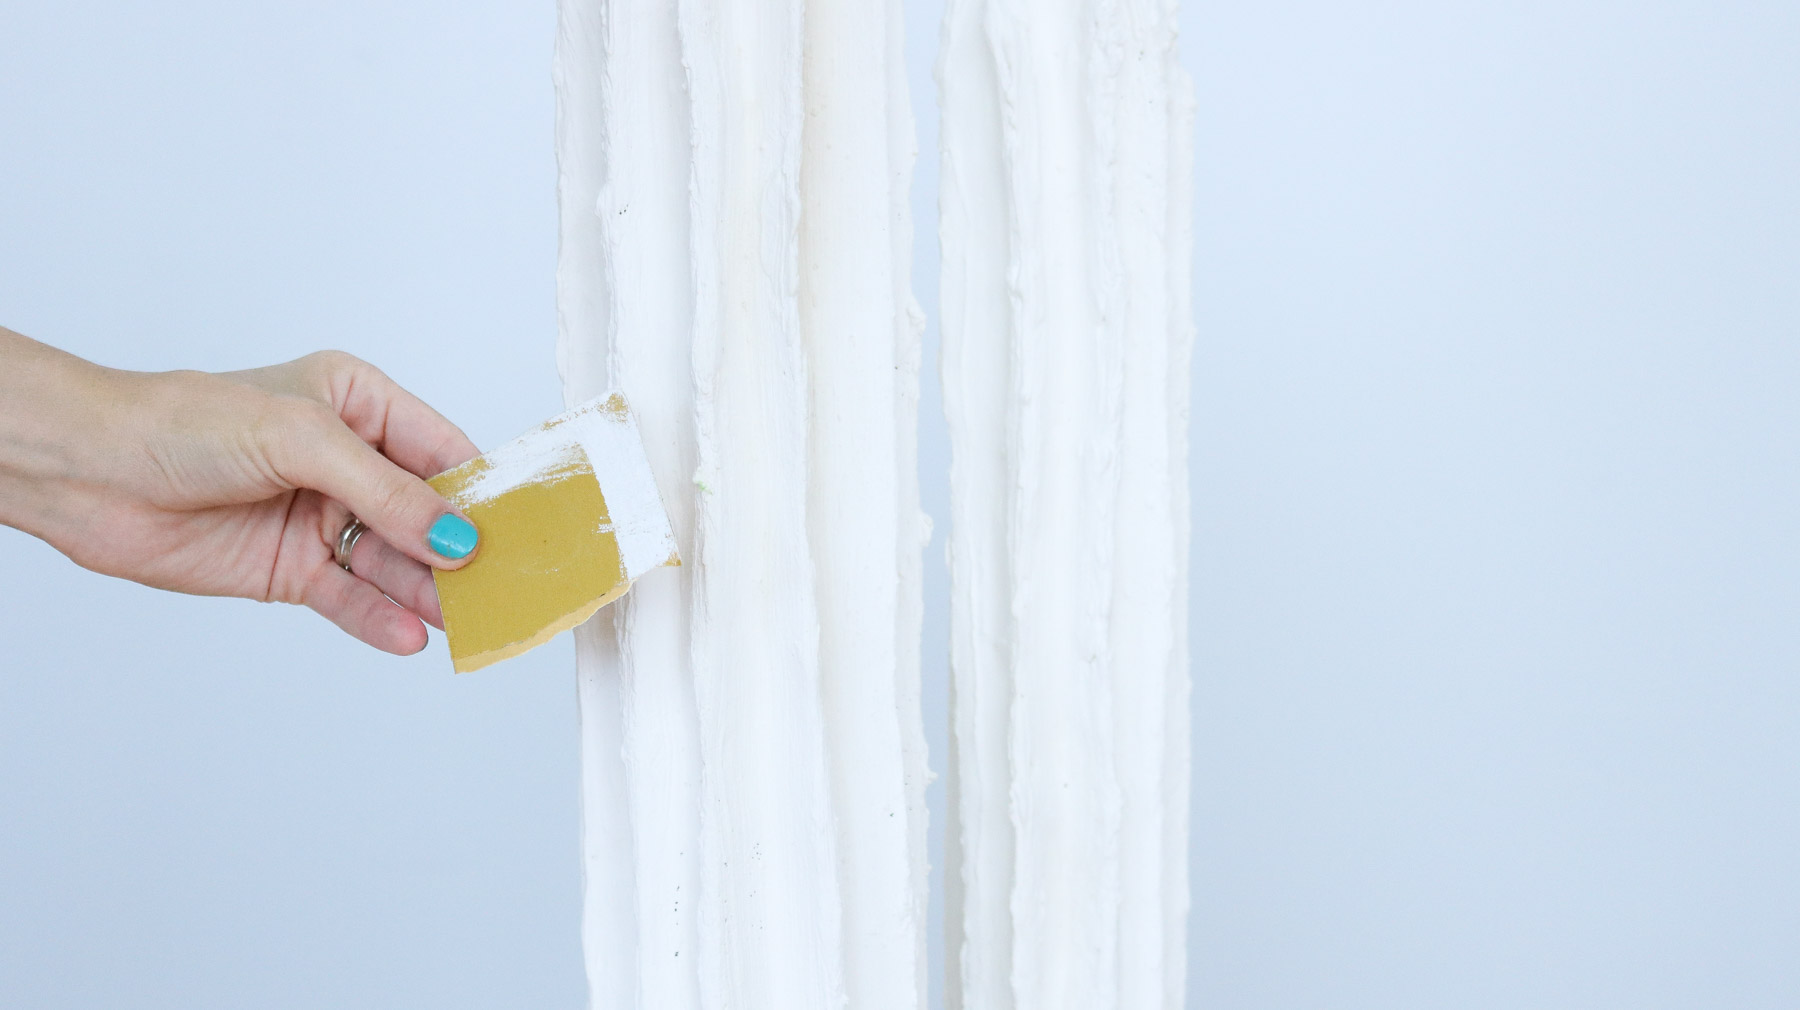
Step 3 – Smoothing out your Cute Cactus
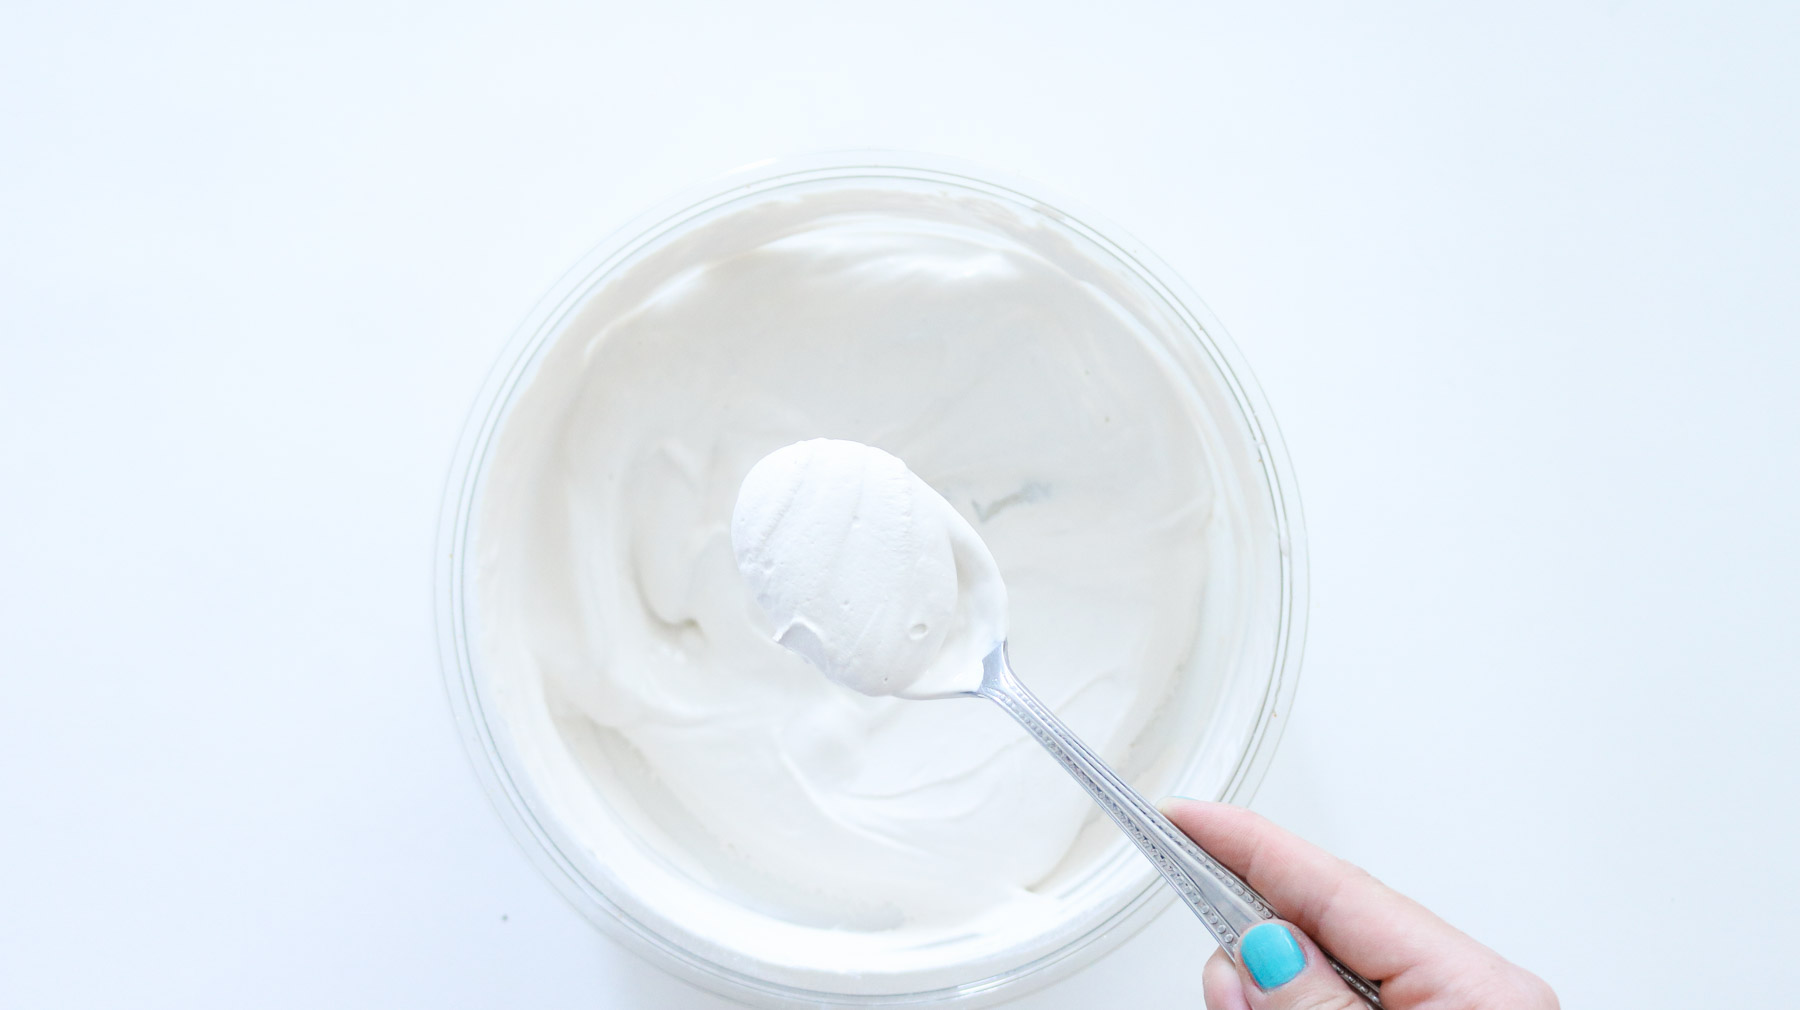
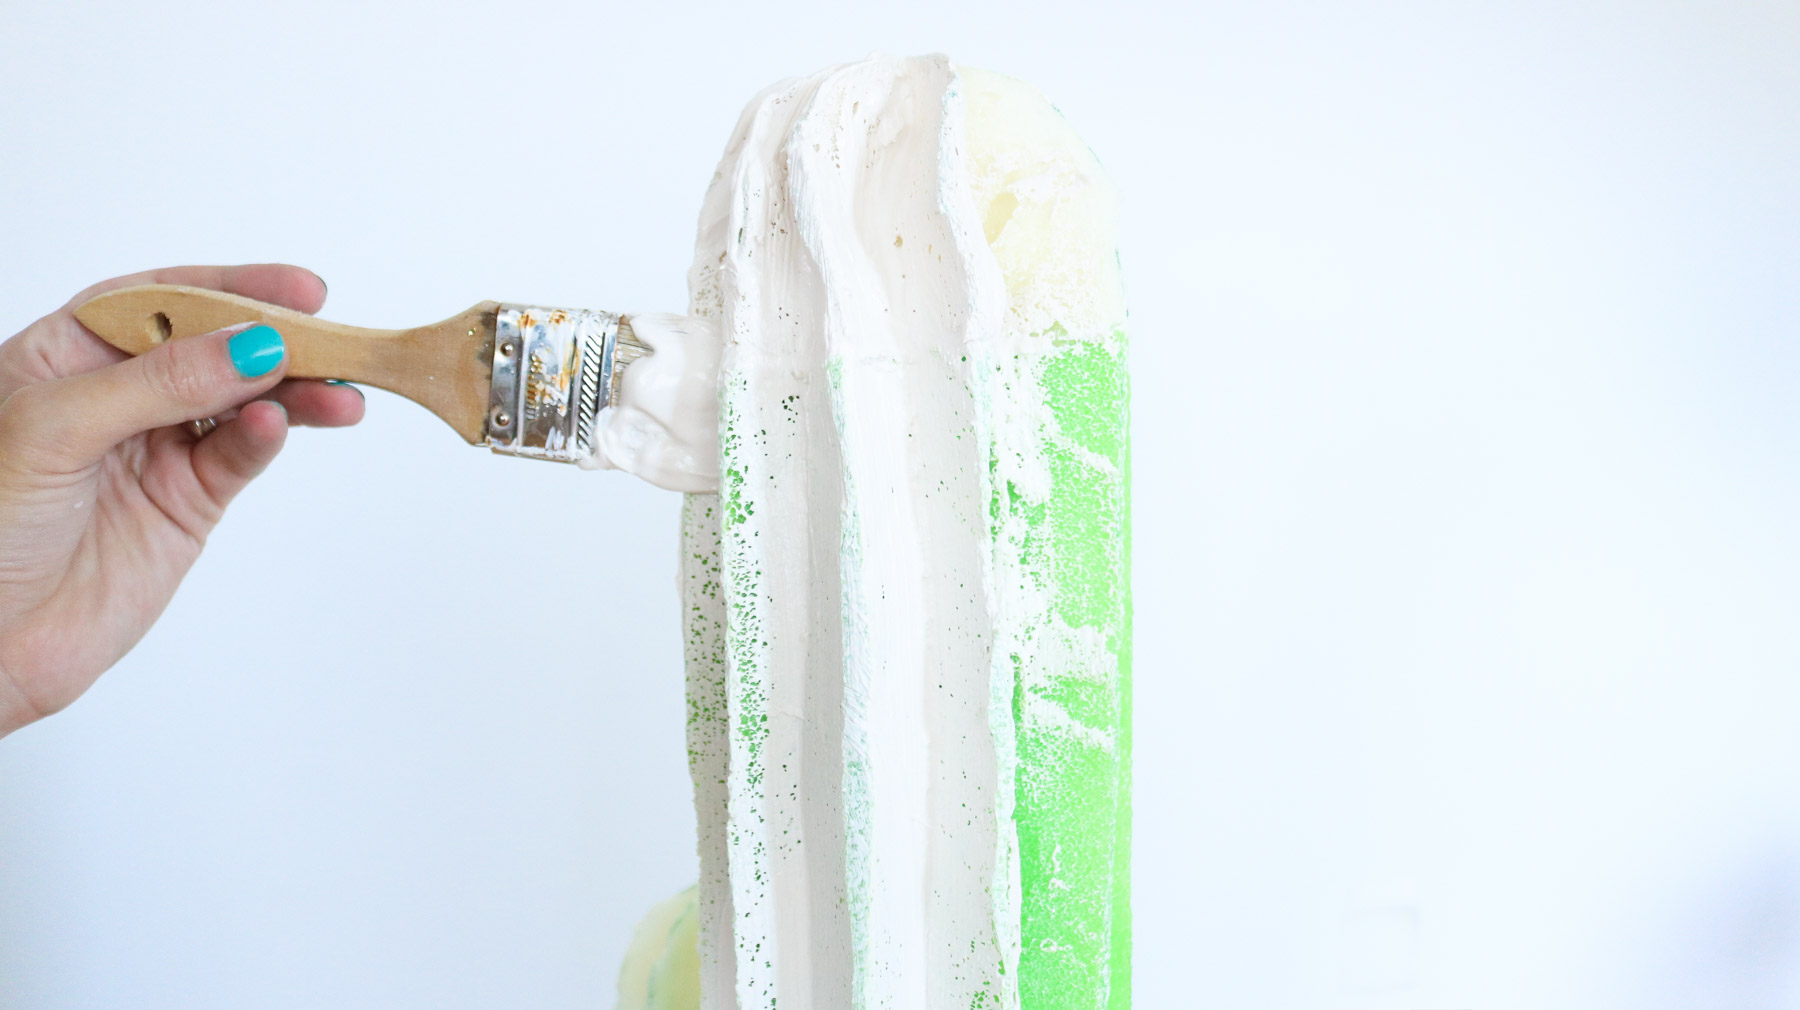
I decided to plaster my cactus to give it a smooth finish. Mix small amounts of plaster and work fast. This stuff has about a 7 minute work time. If you’re working with plaster for the first time be very careful. Use cold water to mix it and old dishes your willing to toss out if needed. Once plaster dries it does not come off. I would avoid rinsing any left over plaster in the kitchen sink or anywhere in the house. You don’t want it to get stuck in your pipes. Rinse any leftovers outside. I gave my cactus two coats of plaster and let it set for 24 hours before sanding it.
OTHER DIYS YOU’LL
- TRANSFORM OLD SWEATERS INTO THE CUTEST THROW PILLOWS
- DIY DRESSER MAKEOVER (I PAINTED IT GREEN)
- OUR DIY CLOSET DOORS UNDER $11 A PANEL
- DIY MEDIA SHELF IN 20 MINUTES
- AIRCLAY IN 5 MINUTES FROM INGREDIENTS YOU HAVE AT HOME!
If you’re making cactus arms follow all the same steps to turn your oblong foam shapes into cactus arms.
I was giving up a this point LOL 😂 the dry times were so overwhelming. I love fast DIY projects! It’s a pretty time consuming project but, as far as the steps being difficult I would say it’s pretty doable. My sweet hubby helped me sand down the cactus. We ended up using 40 grit sand paper. Honestly if it wasn’t for him this cactus would probably still be sitting half done. You don’t have to sand it to a super smooth finish as long as the bumps are gone you should be good.
Step 4- Painting your Cute Cactus
I ended up taking it outside to paint since I didn’t want paint all over my floors. The plaster got pretty messy. I started off by giving my cactus a solid coat of my darkest green.
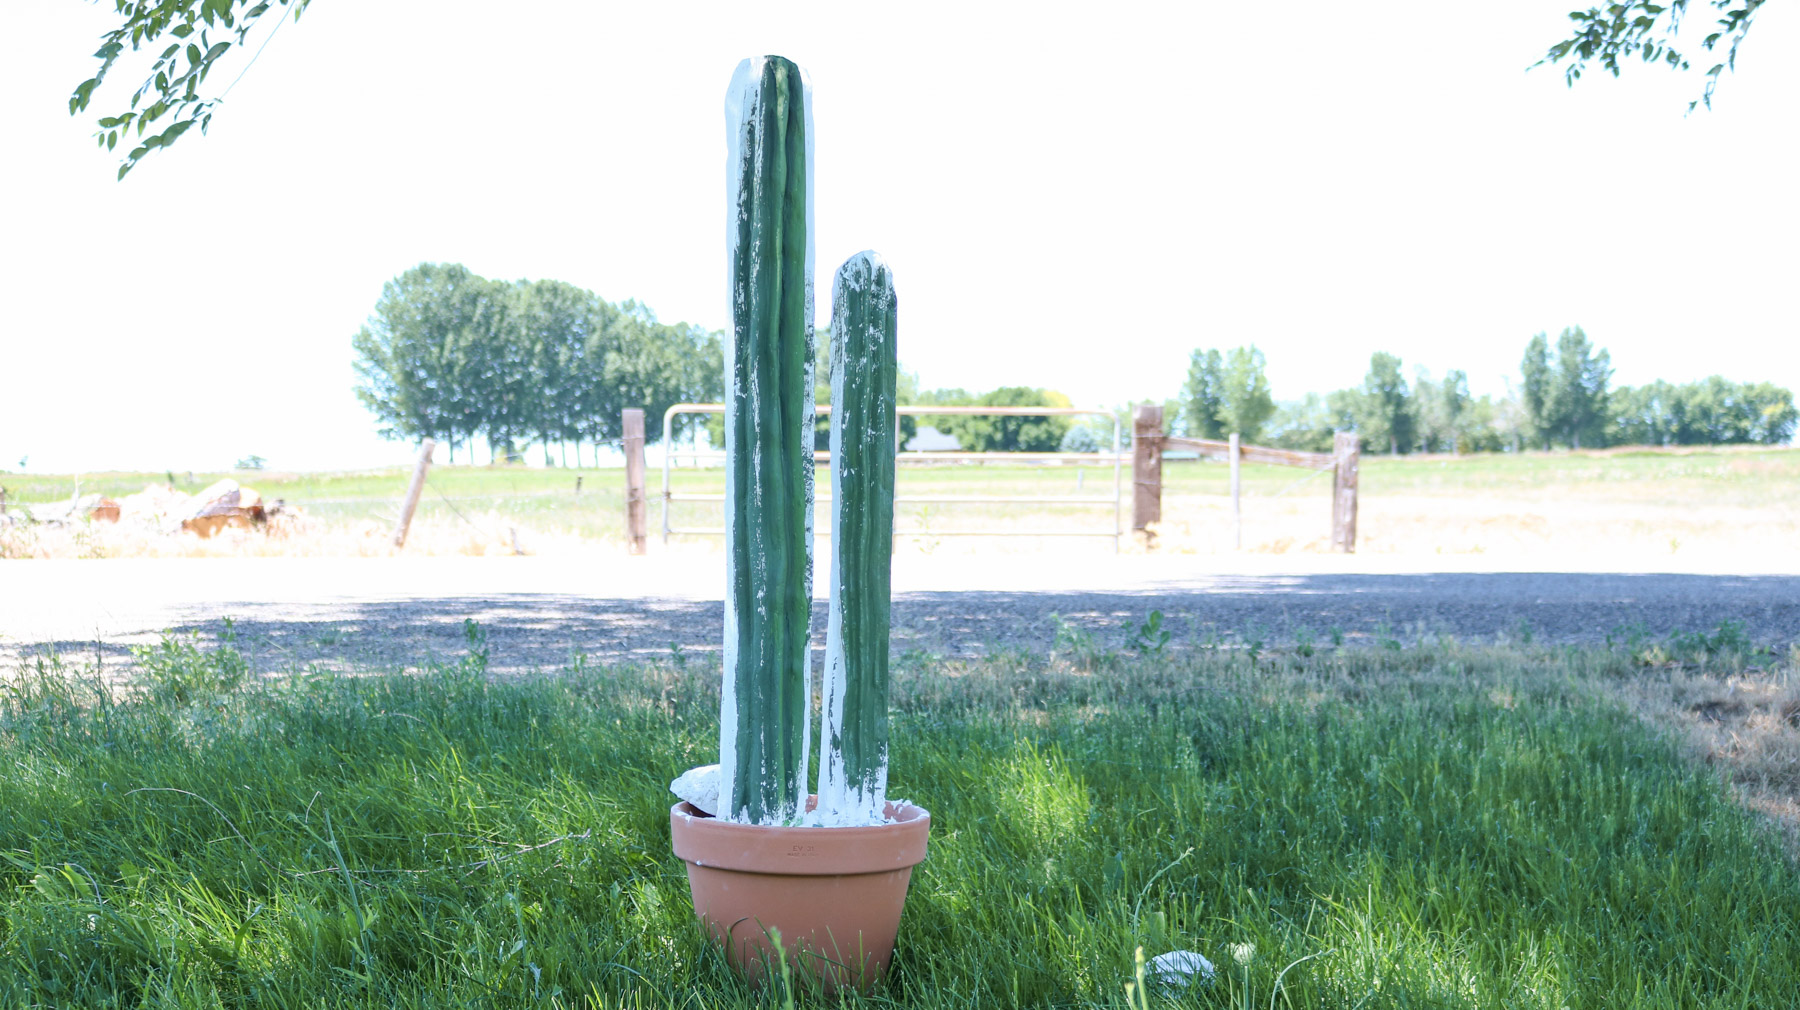
I used glidden sample size paint from home depot . (it was flat paint) I ended up running out of the darkest color green and had to go get more.
Following that I used my lighter green color with a smaller paint brush and painted the tips of each of the cactus sections. I used water to help blend. If you’ve missed the video I show how I did this.
HOME DECOR DIYS YOU’LL LOVE
- NEED A COUNTERTOP REFRESH? TRY THIS DIY MARBLE COUNTERTOP UNDER $50
- OLD PLANTERS INTO FAUX POTTERY
- GRAB SOME PLACEMATS FOR THIS DIY PLANTER HACK!
- AIRCLAY IN 5 MINUTES FROM INGREDIENTS YOU HAVE AT HOME!
- TRANSFORM AN OLD TV TRAY TABLE INTO A TEPEE!
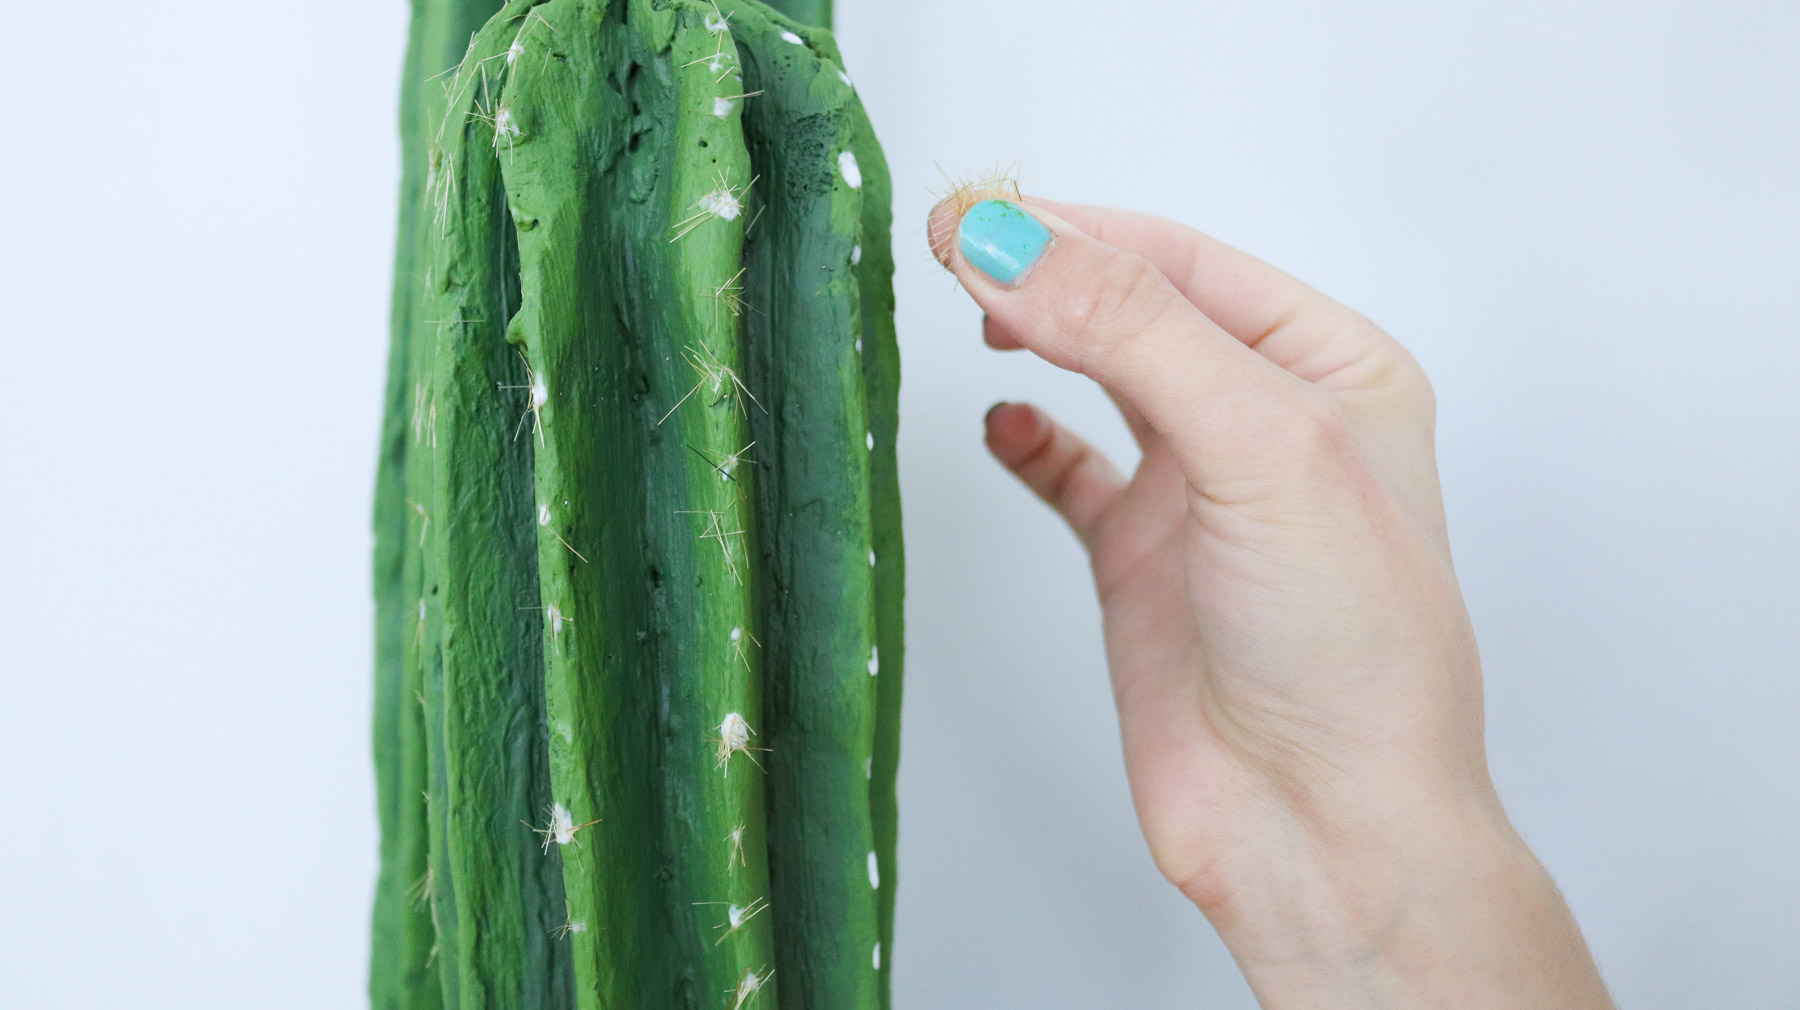
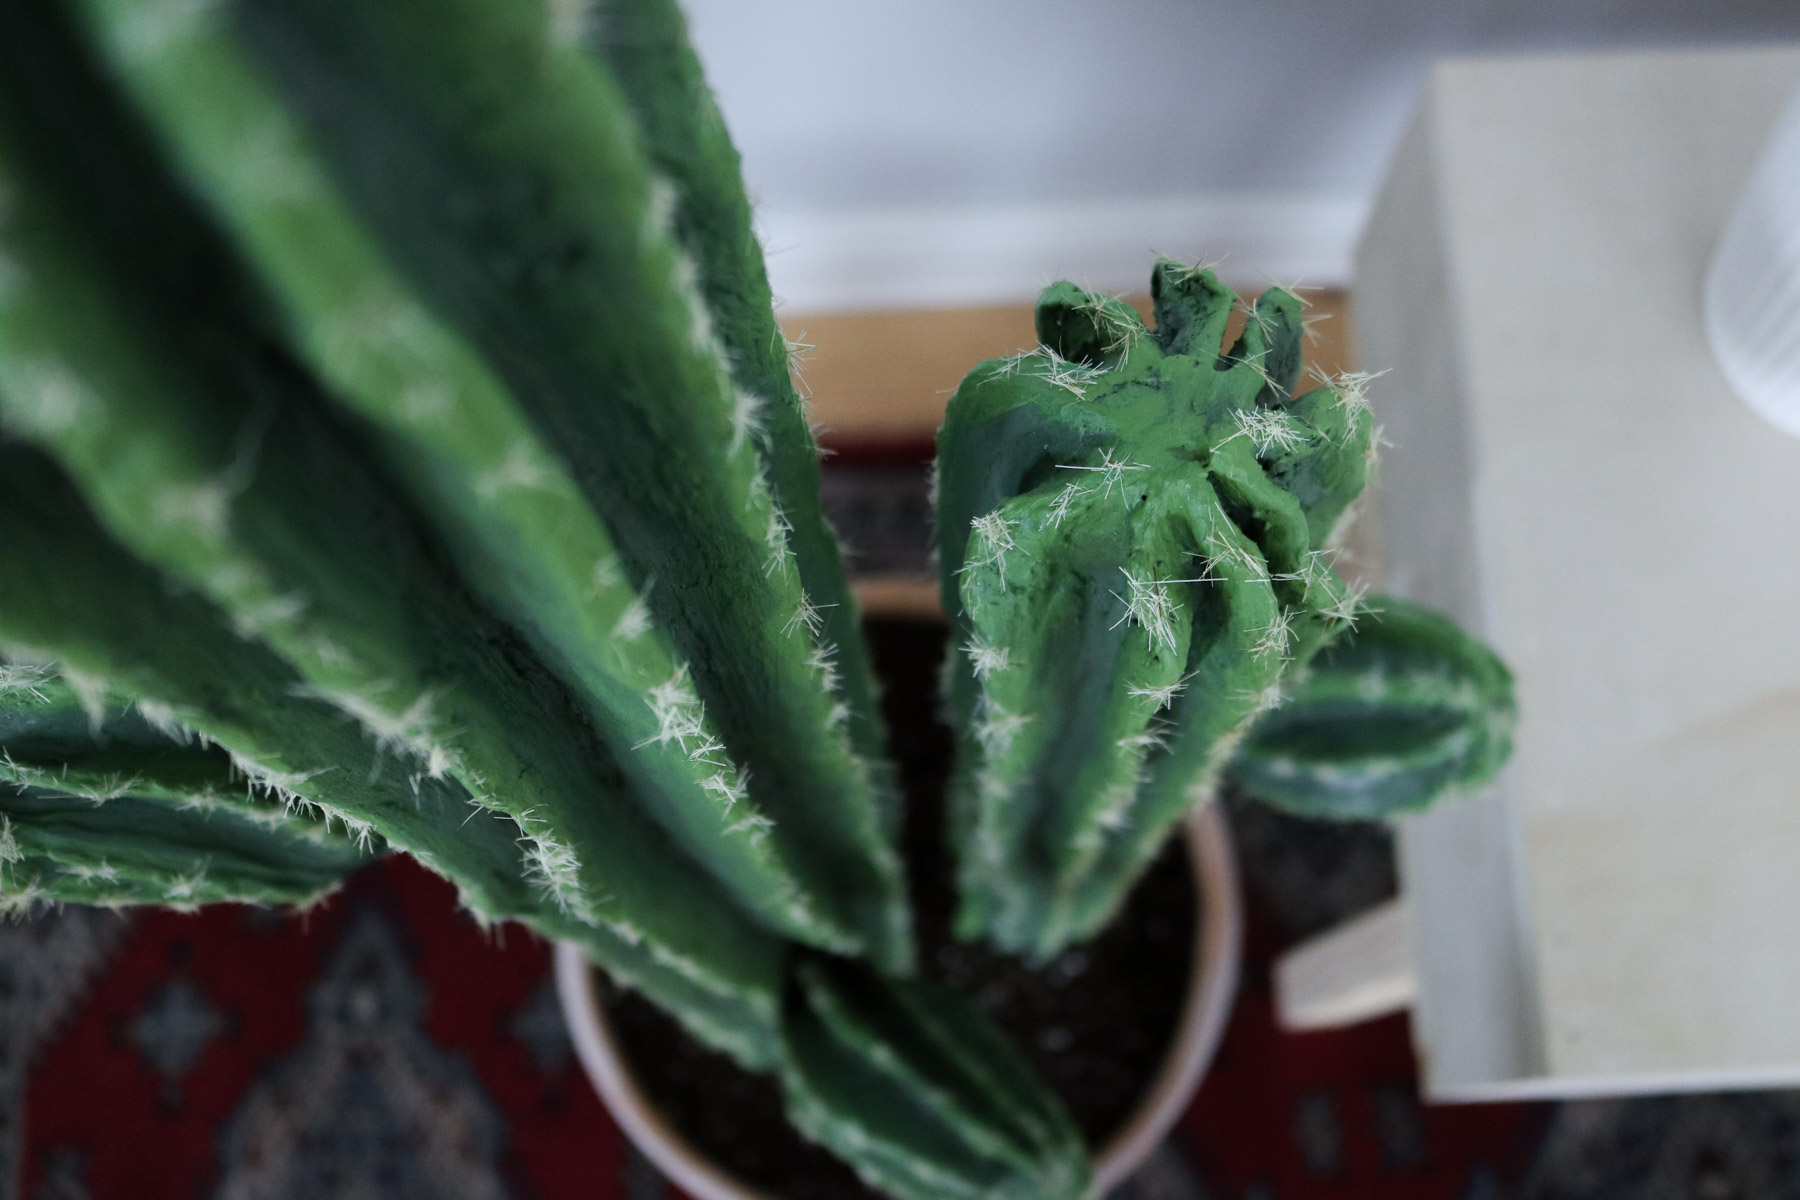
Step 5 – Adding your prickles!
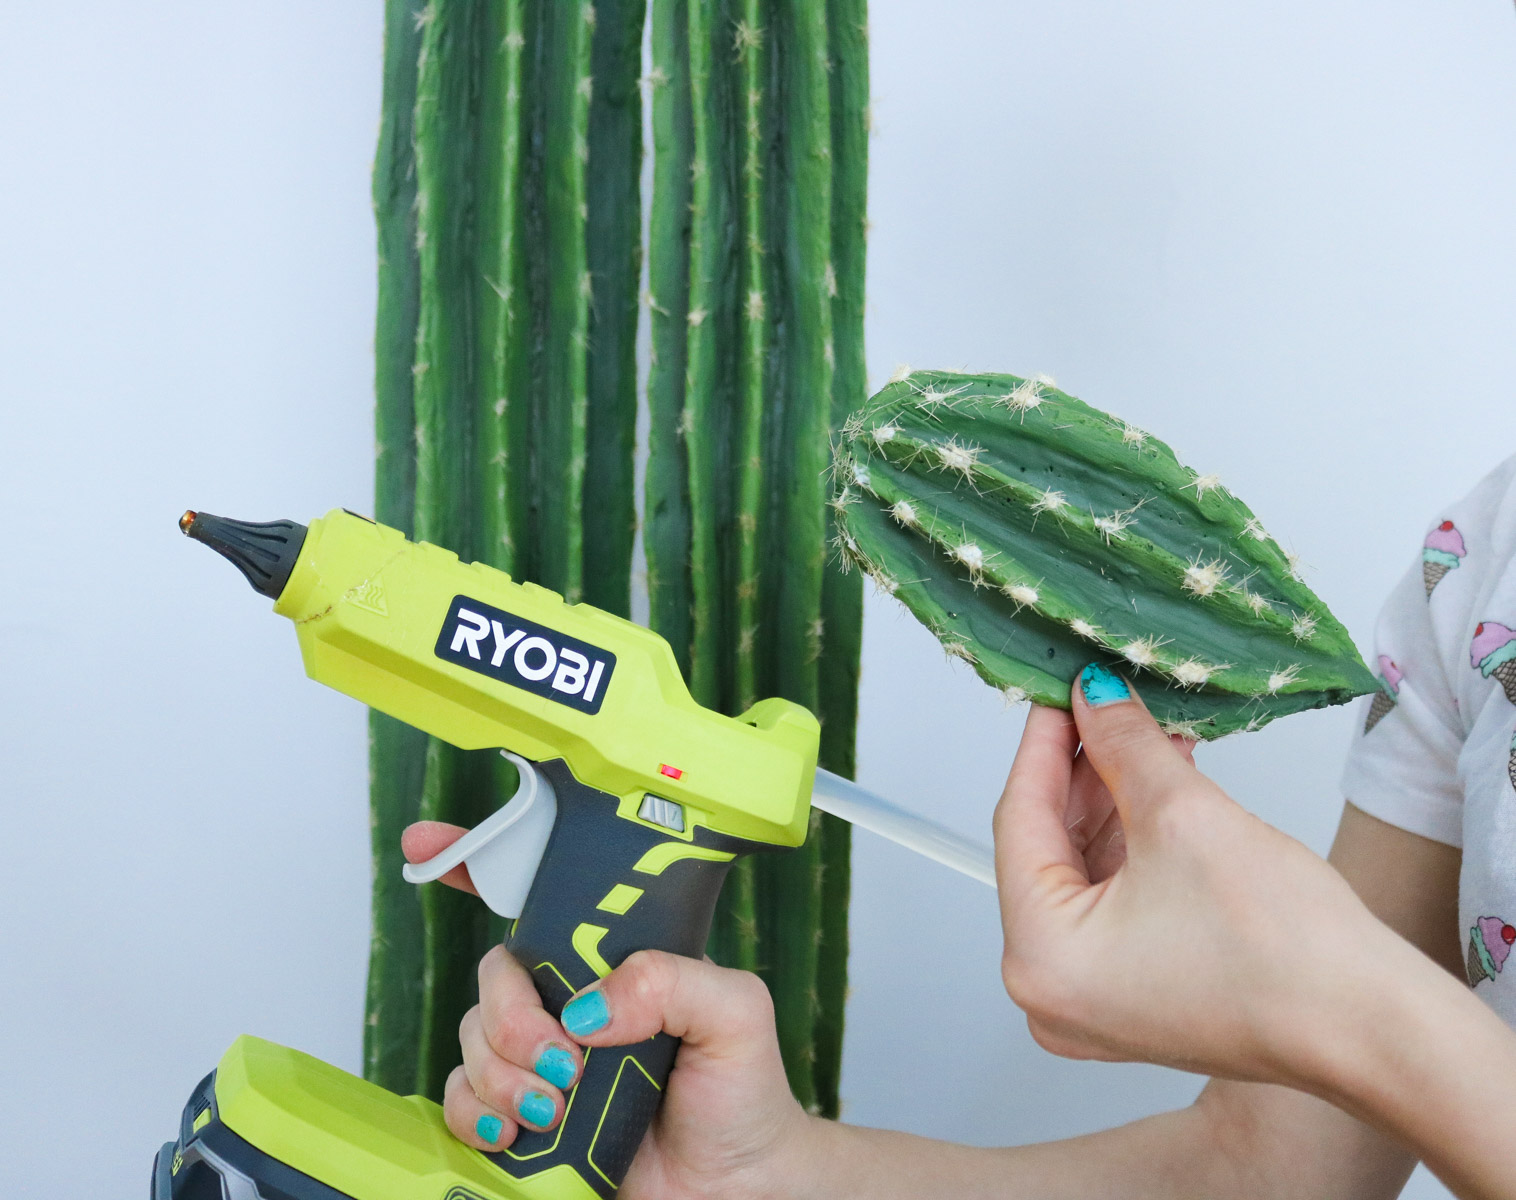
Okay so honestly the prickles were like my biggest debate for this cactus. I was thinking to do toothpicks than I was thinking maybe a broom and finally ended up using a brush. I feel like toothpicks wouldn’t be as delicate and look unreal because they’re too uniform. I ended up going through about 3 brushes. To make my prickles I simply used some scissors and cut the brush into pieces.
Than to add my prickles I dotted some mod podge onto the cacti and sprinkled the cut brush.
If you’re adding arms use some hot glue to secure them to the cactus and that’s it!!
Here’s the video version of this tutorial .
Here’s it is !! LOL😂 Every time Tony comes in the house he giggles and says “hun🤔 I think the cactus grew an inch😂! ” HAHA Good one! I am in LOVE with it! I think it kinda looks real! What do you think?
HOME DECOR DIYS YOU’LL LOVE
- NEED A COUNTERTOP REFRESH? TRY THIS DIY MARBLE COUNTERTOP UNDER $50
- OLD PLANTERS INTO FAUX POTTERY
- GRAB SOME PLACEMATS FOR THIS DIY PLANTER HACK!
- AIRCLAY IN 5 MINUTES FROM INGREDIENTS YOU HAVE AT HOME!
- TRANSFORM AN OLD TV TRAY TABLE INTO A TEPEE!
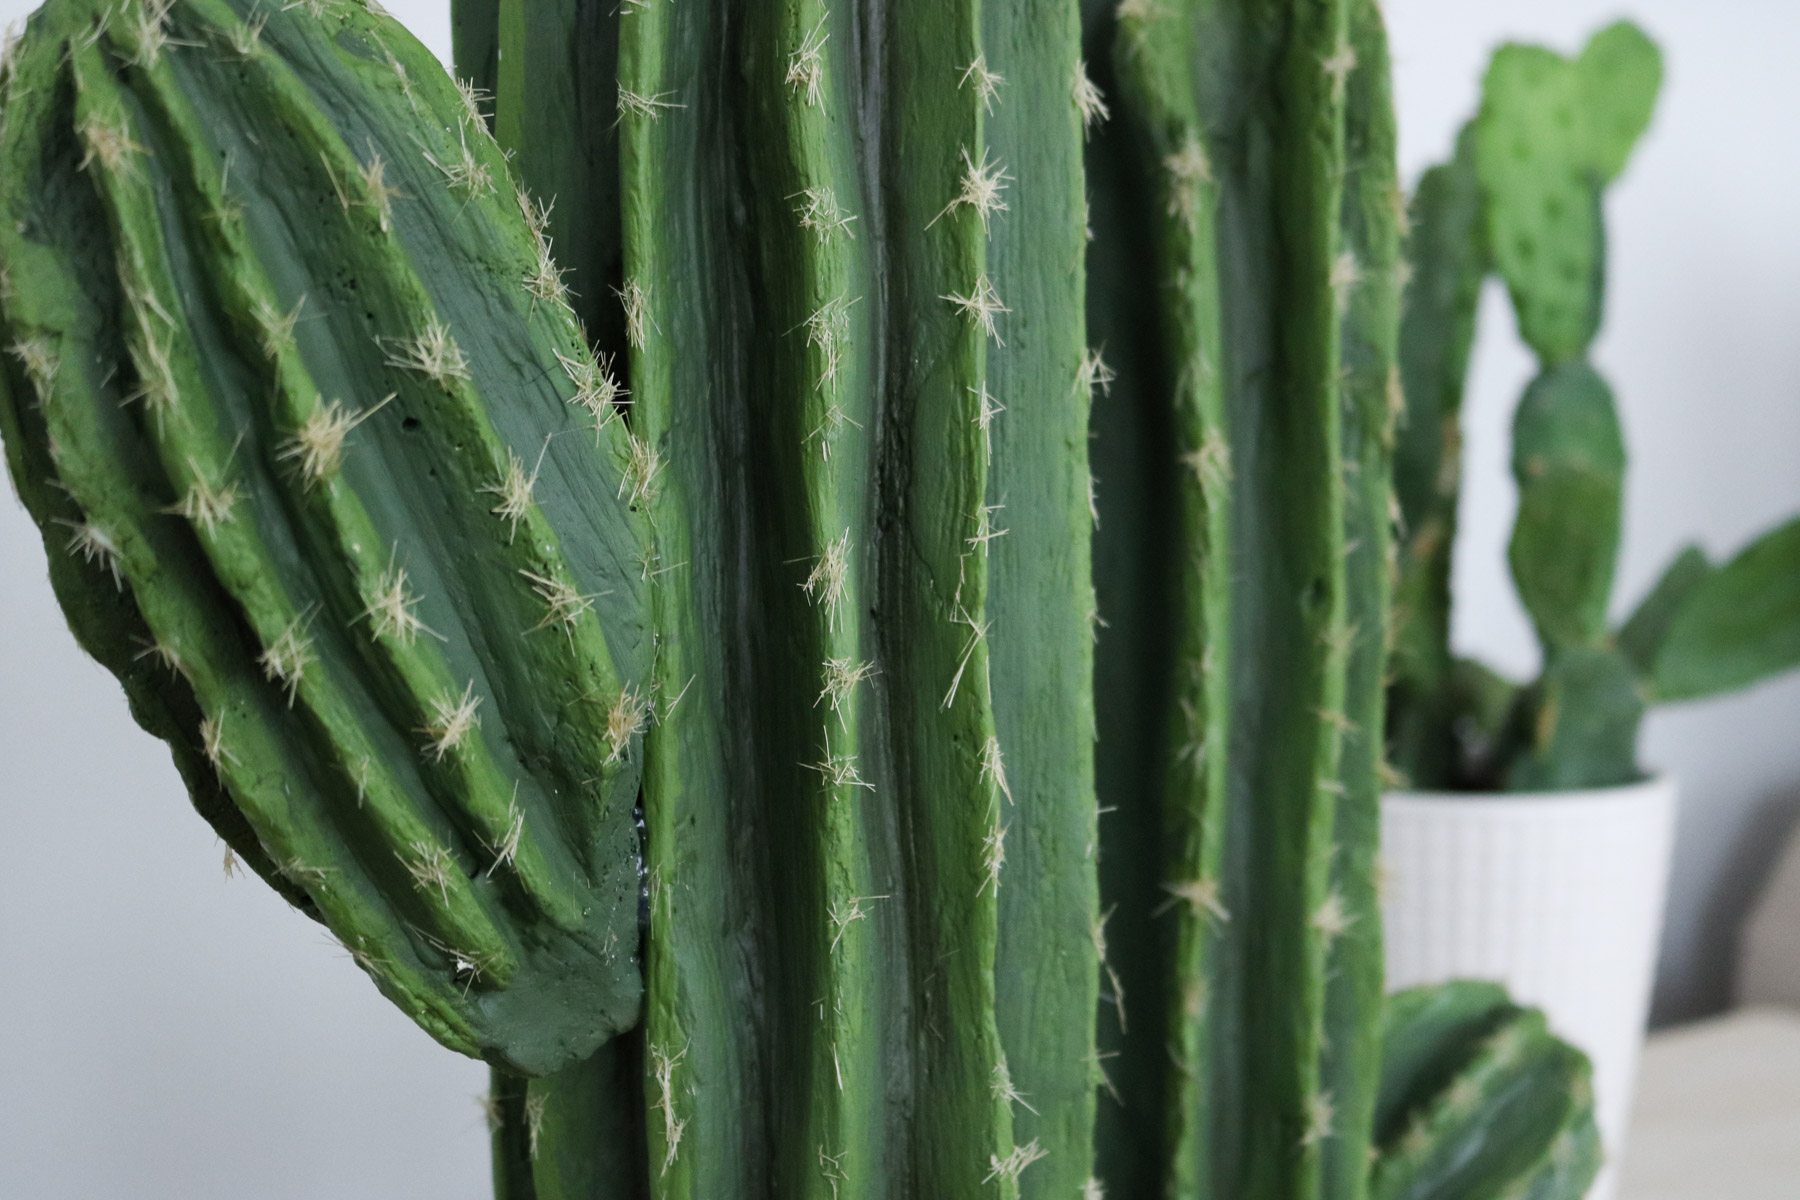
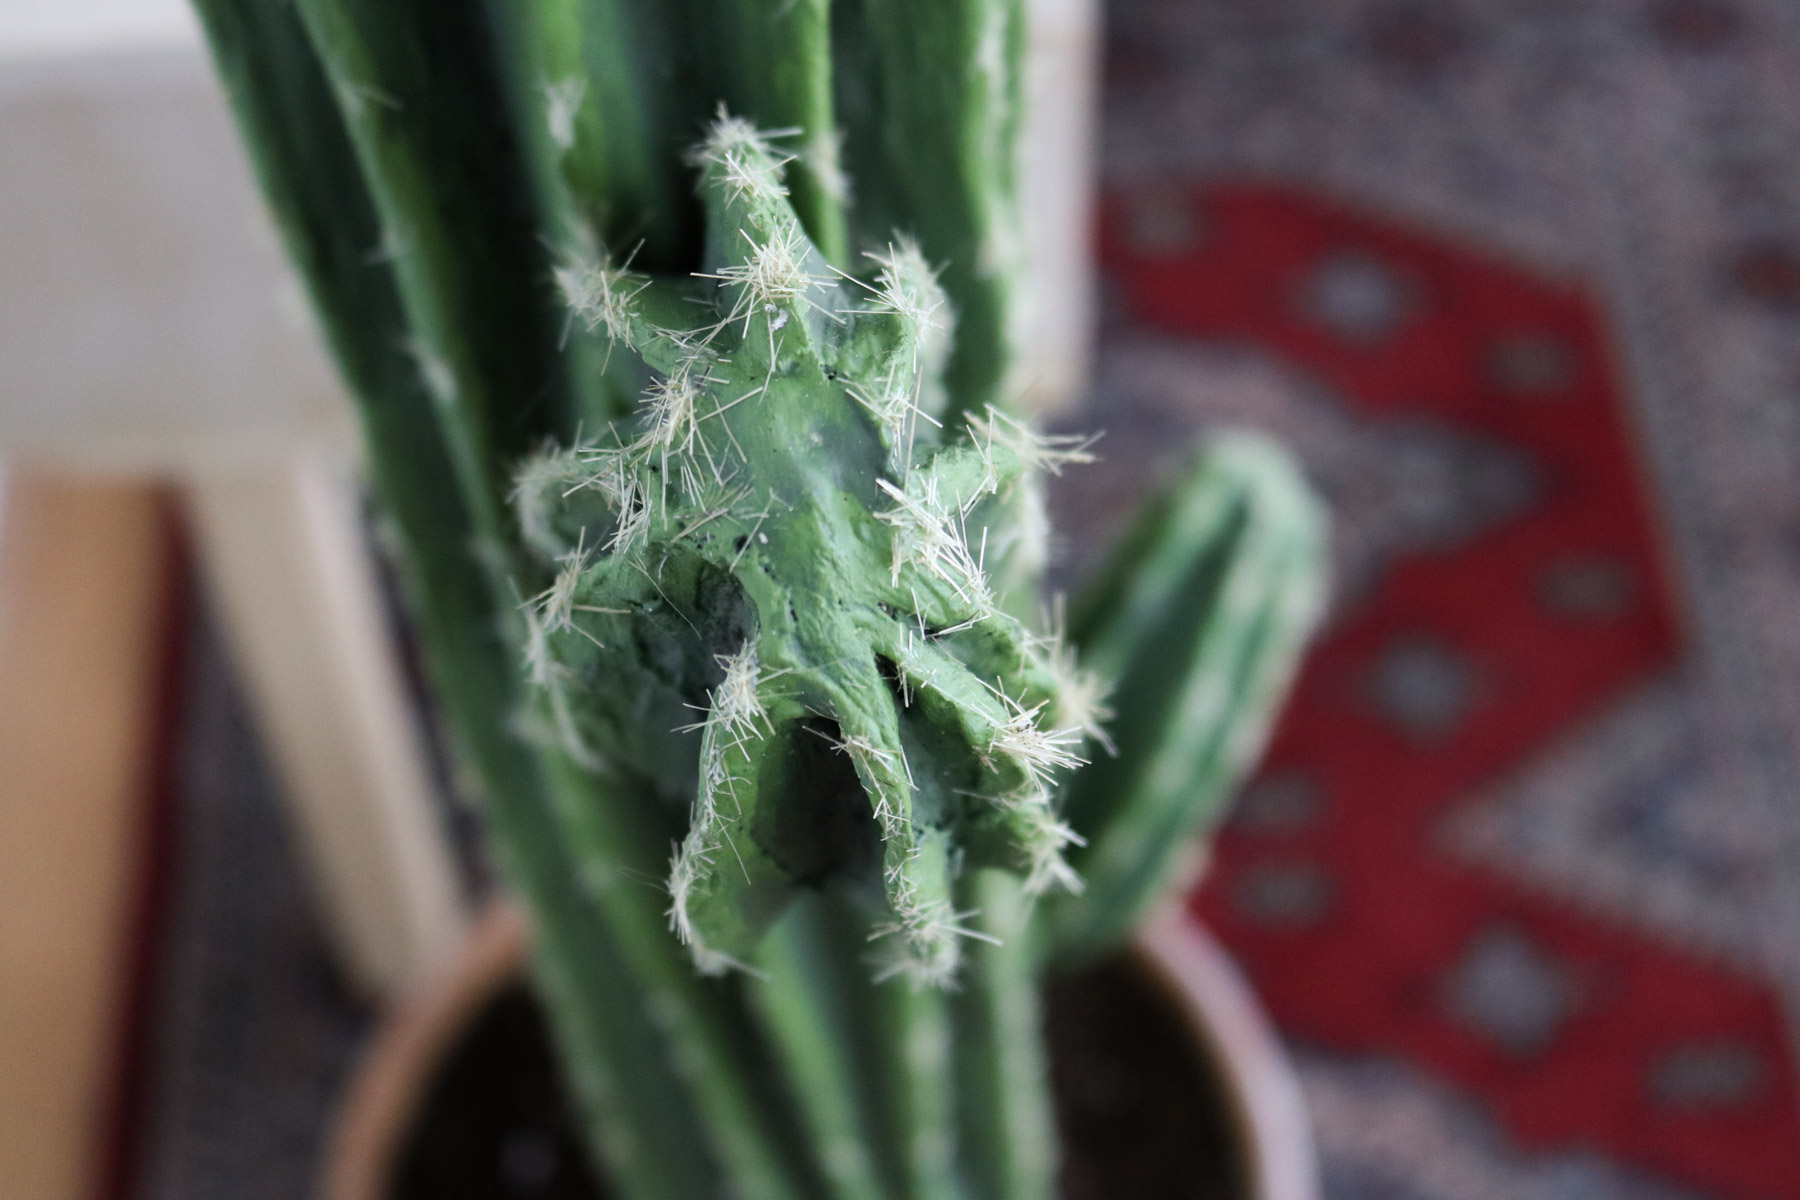
Here’s a close up on the cactus arms! Not exactly round 😐
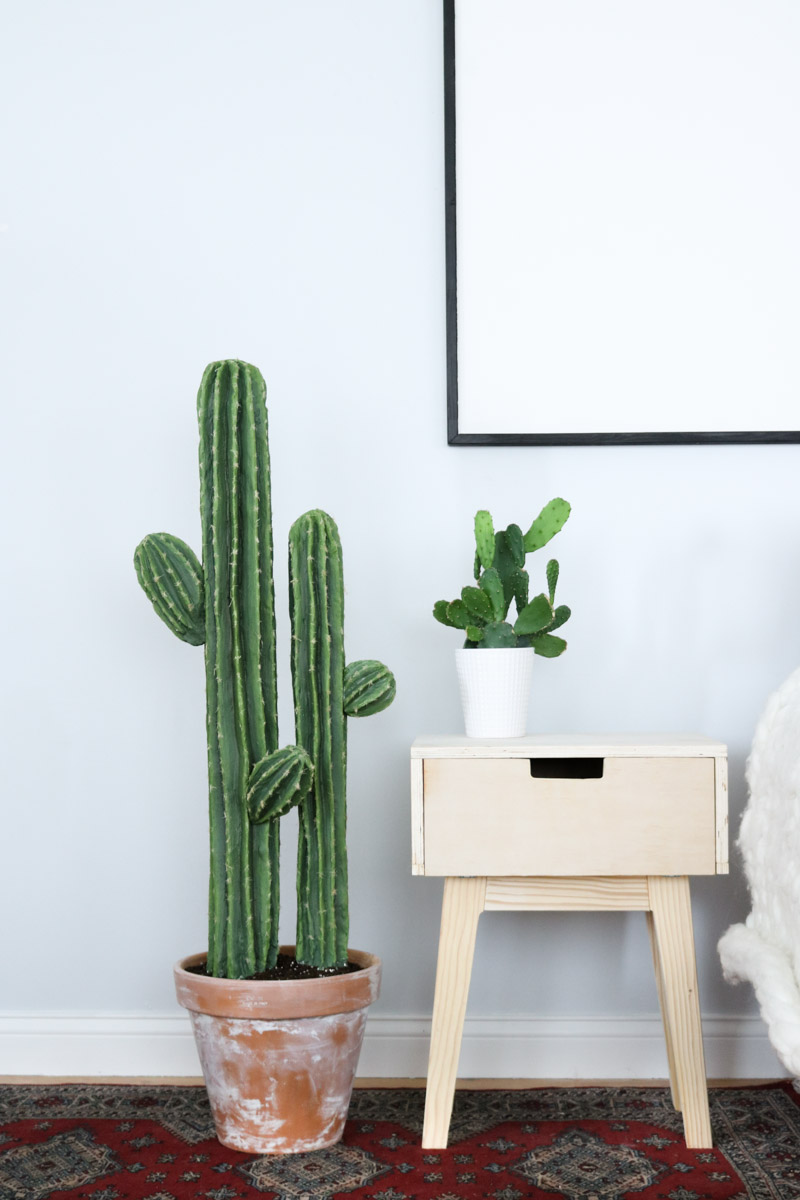
I love how it looks in my living room! It almost feels bohemian. What do you think? Oh btw the cute cactus on the side table is real! 😀
By the way how cute is this map! Thank you Grafomap. Love it! Currently set up next to my cactus! Simple and clean! (grafomap sells them in different colors and styles you can get one here. ) 
I hope you liked this DIY! Have you ever made anything from pool noodles?

That’s it for this one. Hope you’re enjoying your weekend!
I think it’s beautiful. The paint brush bristles were a great choice. They look real. I love your simple style and I’ve enjoyed looking at your projects.
Thank you Elizabeth 🙂 YAY!! I’m so happy to hear you liked my choice of prickles I was hoping I wouldn’t regret it. LOL I was so close to buying a broom instead of a brush. AWE thanks girl. It’s a relief to hear my style is simple. My biggest concern when decorating is keeping things simple and sometimes I feel it’s exploding with too many things (at least in my head it is). It feels great to hear this! I’m finally meeting my goals, Thank you! Going minimalist one step at a time! 🙂 😀
What size pot did you use ? I’m getting my materials together 🙂
I used a 12 inch pot.
This cactus is SO realistic! I would not recognize it as hand-made,even up close!
Great job!
Thank you Shelly! 😀
Hi! I LOVE this..I’m working on making one now…just a question , I might of missed it but what did you do to the pot? I like the aged look you did to it ..
OH I must of forgotten to share that. I used some plaster of paris brushed it on like a thin paste. Then after it dried I used a damp cloth to wipe it off to create that effect.
This was truly a project from he’ll for me! I began my struggle with the plaster of Paris step. I googled how to use it AFTER screwing up. I found our about adding the player powder to the water, not the other way around,and to use ICE water. After mine hardened essay too fast I tried a homemade version of flour and water which just flaked and crumbled when dry. I was so frustrated but thankfully am very tenacious. I’m now in the painting phase and optimistic! I’ll try post pics when and if I get done!
Hi Brenda, Oh no I’m sorry to hear that. I’ve had it harden quick before when I used warmer water but with cold water it should be good. Not sure why it did it. CAn’t wait to see it!
Oh wow!!!! Well done!
I just love it!
Tomorrow I am going to the stores to buy some pool noodles. Can’t wait to get started. Thank you for the tutorial! 🙂
Thank you ssso much!! Makes my day to hear you loved it! YAY!! Let me know how it goes! 😀 Would love to see photos 😀
Hi brenda I’m also at the stage where I want to light this cactus on fire and hope it burns in hell for eternity! Now that my rant is done and the anger is out what is the exact consistency of the plaster.coz whatever I do it seems to be hardening too fast my brunch is getting stiff as well. Thank you
Hi Brenda, OH NO! I’m so sorry to hear you’re struggling with your cactus! LOL your too funny but, I totally get you my first time around with this cactus wasn’t the best experience! The consistency should be on the runnier side kind of like thick paint ( something like that ) Are you using cold water to make the mixture. If your water is warm the plaster will harden pretty fast. Let me know how it goes 😀 and if you have anymore questions.
I was wondering if instead of plaster of Paris , you could use joint compound?
I think that would work great too.
I love it❤️ I’m just wondering if I want to try it, I have so many other diy projects I need to do, but it’s really cute and I have a place it would just go perfect in??
OMG Liz you totally should. It’s so worth all the effort. I’m still in love with mine. Can’t wait to fix up my room to make permanent home for it. Where were you thinking to place it?
Es divino! Lo voy a realizar para el cumple mexicano de mi hija y luego quedará de adorno en mi casa!!
Gracias x tanto!
I am so glad you liked it!
A labor of love ❤️ So perfect!!
I trust you when you say it was WORK😁🤪 I’ve been there. Makes it so much more awesome when it’s done. I am admiring it from here. Job well done
Thank you so much Sabrina! Yes the hard work definitely payed off 🙂 I’m glad I was persistent enough to finish it 🙂 and so happy to hear you loved it!
What did you use on the bottom for the “dirt”?
The bottom was filled with foam and sprinkled with dirt 😀
Can you please tell me what you used on top of the foam in the container to cover it up?? Awesome video and cactus are so life like!!
Just dirt 😀 I had a bag of potting soil. Thank you I’m so happy to hear it look real 😀
This is really, really impressive! Great job! Very realistic. Inspiring…though I should really think about finishing a few of the other 500 projects I have going first!
I’m so happy to hear this was inspiring. LOL I’m the same! I have so many project and keep planning more!
This is one of the coolest DIYs I have ever seen!!!!! It turned out so great! Seriously! It looks easy enough if you have the patience for the time. 😬 I’m trying to convince my daughter to try it lol.
AWE Thank you Rebecca! You are to sweet 🙂 ! YES patience and time is definitely needed with this DIY. Honestly I think if I was to re-do it, just the fact that I know what I’m jumping into I think it would be pretty easy to replicate! The first time is always the hardest! I hope your daughter decides to make one and I can’t wait to see it!
AWESOME! I want to do this!
YAY!! Glad you hear you liked it Anne. I can’t wait to see your Cacti!
Wow, this is so cool and very clever. I love your giant cacti.
Awe thank you Claire. I’m so glad you love it! 😀 😀
Dang girl!!! I usually never comment but this is amazing looks so real I can’t belive u made that out of pool noodles. Good job.im glad everything worked out the way u imagined.
Awe thank you. Glad you liked it. Crazy idea and I’m glad it worked.
How many cm is the hole diameter of the poolnoodle and the cylinder diameter? Where can i find it? Products on Amazon are slim 🙁
Sorry I’m not sure what the diameter is. I want to say around 5 inches. I got mine at walmart. darn Im not seeing any on amazon
C’est une idée géniale
Merci
So glad you like it! 😀 😀
I love cacti and succulents, i had a great collection many years ago, overnight they started to collapse.It seems it was ‘Vine Weavil’, at that time i had never heard of them, the female lays her eggs in pot plats and the grubs eat all the roots. Maybe this is the answer, have a pool noodle cactus.Thanks for sharing your brilliant idea.
Oh my gosh Catherine I didn’t even know such a thing existed. That’s’ so sad. I hate when plants die. I took my smaller real cacti out on the sun yesterday and it got sun burned!! LIKE WHAT how does a cacti get sun burned. Anyways it’s all brown now LOL I really hope it survives. YES definitely I choose faux over real! LOL
Lindo trabalho! Ficou perfeito. Tenho 2 cactus naturais com quase 1,80m cada. Aqui é fácil encontrar a preços módicos. Comprei os dois bem pequenos e cresceram bastante dentro de casa, em local iluminado. Parabéns pela persistência
Conceição – São Paulo, Brasil
Thank you I’m so glad you liked it. That’s awesome your real cacti’s must be so cute. 🙂 Good to know I took mine outside and didn’t realize it would be too much sunlight. Thanks for tuning in. 🙂
SO…DARN…CUTE!!! I’m going to try this!
YAY!!! I’m sssso glad you liked it 🙂
Very cool DIY project! It came out fantastic and is pretty realistic looking, at least for me. I would say brown-thumbs internationally are rejoicing with this DIY, lol.
HAHAHA Brittany you made me giggle. LOL Glad you loved this DIY and yes hopefully this will be a great resource for those that can’t keep a plant alive. 😀 😀
Wow, this is truly amazing!!! Looks very realistic and definitely more budget-friendly than the commercial faux cacti! Love it and this is going on my to-do list ASAP. Thanks so much for taking the time to share! 🙂
Awe thank you Donna. You are too sweet. Oh gosh yes definitely cheaper I don’t think I’d ever afford $300 for a cacti and if I did I’d probably buy it, enjoy it for a week and return because i’d feel so guilty. LOL! Oh how exciting I’m so happy to hear you’re going to make it. Oh sure I enjoy sharing my crazy ideas. LOL Thank you for taking the time out to comment.
I am trying to make the pool noodle cactus. But plaster of paris isnt sticking to the pool noodle. It just keeps sliding off. Even when i make it very dry. Any suggestions? Did you use a primer?
No i didn’t use primer. You plaster consistancy should be like pudding. Are you using a brush to apply it. The first layer will still have somewhat of a sheer finish with the plaster once you apply the second layer of plaster ontop of the first layer it should stick on real good.
If one adds lemon juice( citric acid) it retards the hardening time of plaster of paris. Really love the project
wow cool tip. Thank you
I’m so gona do this….I’ll do 2 one for me. One for a friend. You have done an awesome job
YAY!! So happy you liked it. Awesome. I’m sure your friend will love it. Happy crafting. 😀
Absolutely awesome, looks so real. I’m going to try making one, wish me luck. I hope it looks half as real as yours. Find your site by accident,glad I did !!
Awe thank you Peggy. I’m sure yours will look better than mine 😀 Happy crafting! So glad you came across my site 😀 😀 😀
Love love your cacti. This is a copy of saguaro cactus that grows only in and around Phoenix I believe. Looks a bit laborious but you have mastered the best way to achieve your look. Thanks sweetie
Thank you Patti 😀 I just googled the name of the cacti It looks just like it. I’ll have to show my hubby 😀 So glad it looks like a real cacti out there. LOL When I was making it my hubby kept saying the arms needed to be curved I told him it’s be to much work so left it with what I already had in mind. I’m so glad there’s actually cactis out there with arms like my cacti. 😀 😀 😀 I’m so glad you liked it.
I live in Arizona, and it would take about 80 years to grow a saguaro cactus this big. So cute! I plan to make one just so I can put lights on it for Christmas!
Oh WOW that’s a ling time. I had no idea it takes that long for them to grow. This one definitely beats 80 years. LOL Oh how cute. That would make a lovely Christmas tree, 😀
I’m blown away by your diy cactus! Looks amazing. Thank you for sharing.
Awe thank you Misty 😀 I’m so glad you loved it!
Woooo Hoooo this Is the most amazing diy I have ever seen. Girl you rock, I never would have guessed that it was not real. WOW. You are truly blessed with talent. Thank you so much for sharing your amazing creation. Looking forward to following you. Wishing you a Blessed Thanksgiving
HI TINA!! OH MY GOSH Your are too kind! THANK YOU SSSSO MUCH! Awe thank you , I couldn’t be more grateful to God for all my talents! 😀 😀 😀 Thanksgiving was amazing. We got to go see family which doesn’t happen often. So that was nice. I hope you had a blessed Thanksgiving as well and Merry soon to be Christmas 😀 😀
PS. I look forward to hearing from you again 😀
I have a tip that might help in the sanding of the plaster phase of the project. When the plaster just starts to set up, use a smaller brush dipped in water and smooth over the already setting plaster. It won’t effect the end result of the plaster but it will do wonders to smooth what plaster while it’s setting. You would have to do sections at a time because the plaster sets fast once that chemical reaction starts.
i love that TIP! Thank you Janette if I’m ever working with plaster again I’ll have to try it. 😀
I will have to try this as soon as I can find some pool noodles. I have a lady friend that I know would love to have this.
YAY let me know it goes. 😀 I’m still in love with mine 😀 I’m sure your friend will love it 😀
One of the cutest and most creative things I’ve seen in a long time! I can’t wait to make this! Then, when Christmas rolls around, it will be my Christmas tree!
Thank you so much Ruth! AWWE that sounds so cute! I’d love a cacti Christmas tree!
I absolutely love this!! I am about to try it! Do you mind sharing the shades of green you used? I am so picky with colors (especially greens) and yours looks perfect!
Thank you so much for sharing this idea, by the way!
Thank you Danielle 🙂 I’m so happy to hear you loved this idea! I used behir colors in Equestrain Green ( dark green)” and ” Healing Plant ( light green) Happy DIYing! 😀
LOVE THIS !Great job! My living room is done all in south western got a perfect spot for it but think I will add a few dried blooms to it to match a painting I have of cacti!
LOVE THIS! GREAT JOB! My living Room is all s South western so have the perfect setting for it.Think I will add some dried flowers to match the cacti picture I have.
Thank you Sheila! I’m so happy to hear you love it! OOH your living room sounds beautiful and the idea of adding dry flowers sounds lovely!
This is seriously one the coolest diy projects I’ve ever seen!! Thank you for all your clear instructions!! It’s gorgeous and you should be proud!!
Thank you for all your kind words Connie. 😀
I want to make an outdoor version for my rock garden in Kansas. Any suggestions on a suitable outdoor option for plaster? I’m stumped!
hmmm. The plaster is pretty durable however it does soak up water. Maybe try a fine concrete mix instead of the plaster. It’ll be a bit more heaver which might be better if it gets windy however you probably would have some texture left from the concrete and it wouldn’t be as smooth as plaster. I would give shapecrete a try. It’s probably the finest mix I’ve tried and worked with and it also smooths out well with a drop of water. I’m just wondering how it would stick to the pool noodle. It might be too heavy and fall off hhhmmmm gosh maybe a few thinner coats of concrete. I’m also thinking you could apply resin to the plaster that’ll keep it water proof however it’ll be shiny 🙁 Sorry I wish I was more helpful.
This is awesome
Thank you Shelli 😀
Hey! I am going to make this cactus. You are right! They are hard to find, and if you do find them, they are RIDICULOUSLY priced! What size dowel did you use? I was thinking 3/8″×48″. Am I right?
Hi Holly, I believe the size of the dowel was thicker. Somewhere around 3/4 of an inch. Also just make sure it fits in your pool noodle it doesn’t really matter what thickness it is as long as it fits. You can cut the dowel down to size length wise that’s what I did. I hope your project goes well! Happy Crafting and let me know if you have anymore questions.
I love it! They look so real! Thank you for sharing this project.
Thank you Charlotte! I’m so glad to hear that!
This is Brilliant!
Thank you 🙂
This is awesome! Definitely going on my project list 😁 Years ago I used to make topiary trees and used Plaster of Paris in the base to hold the dowel in the pot. In the pot I would wedge a piece of the cheap green floral styrofoam in my pot to stabilize my dowel before I added my PofP… held it right where I wanted it until it was all dry
Thank you Hannah! I’m so glad you liked it! Wow love that idea I should of done that with this cactus.
I love the cactus !! I want to put one in my classroom, I was wondering if you had the color numbers for the paints?
I got the colors from behir called ” Equestrain Green ( dark green)” and ” Healing Plant ( light green) .”
Wow, just what I’m looking for. Do have the qty of items used?
Sealant and Plaster of Paris was it just one of each?
Planning to make it for a Mexican Graduation Party. ABSOLUTELY LOVE IT!!!
Thank you and your hubby 😉
Hi Cecilia, I’m so happy to hear you Loved it! Darn I totally forget how much I used of each. Should of added it right away. I think I ended up using more than one box of plaster and probably just one sealant.
Hello!
I just made a Word doc from your instructions, printed it out and plan to hit the stores for my goodies to make this. I plan on using outside paint tho as I want it to sit by my front door here in AZ. Thank you for the tutorial!
YAY!! Let me know how it goes. Love the idea of displaying it outside.
This is so cute! I have a question as I get my supplies. I notice one of your pool noodle is larger. Do they come in different sizes? Where did you find the larger noodle? Thank you!
Thank you Ronsanne 🙂 Yes poodle noodles come in different sizes. I believe I got mine at walmart.
Thankyou for making this DIY, I get new idea for my craft bussines. Hope you stay healthy and happy
Happy to hear this was helpful! 🙂
You got me!! I love the cactus and started making it today! Thanks for sharing your idea with us all ….
YAY! So happy to hear you liked it Connie! You’re so very welcome 😀
I’ve almost completed my cactus, but omggggg the fried plaster keeps falling off. Every time I touch it, it falls off. I made 4 to put in our elementary school’s front windows because we have a cactus theme this year. I spent so much time on this and I’m terrified it’s going to totally fall apart when I put them in my car to bring them to the school.
That’s such a cute theme! Oh no I’m so sorry to hear that Haley. Maybe try a fine cement mix. I know the cement all concrete mix works very well. It’s workable for about 10-20 minutes. Will probably stick better. You can rub it over and if it’s too gritty either sand or apply a thickened paint ( thickened with plaster ? ) I dunno what else to think of. It might be good to just paint over and leave. I made concrete pumpkins with it here- https://www.lilyardor.com/succulent-concrete-pumpkins/ You can tell the texture looks very fine. I know how annoying it can be to try and fix a project you put so much time into. AND wow you made 4! I hope this helps. Let me know if you have anymore questions?
Best Wishes,
Lily
Absolutely love this. Thank you so much for going to the trouble of sharing
I’m so happy to hear you loved it Cathy 🙂
Honesty, you are so creative. Every project you do looks amazing. I don’t know how you think of these things- like brushes for cactus needles – Ingenious !
Awe you’re to sweet Margi! Thank you so much!
could these be used outside? I love these. i do window displays for a little boutique. these will be so cute for my western window theme!
I would seal it with a gloss finish if you plan on leaving it outside. I probably would avoid leaving it in pouring rain unless I sealed it with resin to make it completely waterproof. Hope this helps. I think this would look lovely in a window display.
This looks amazing! But sooo much time and work. I don’t really understand why you didn’t just get a real one? They’re about the most low maintenance plant you could have..
I love this. What a great job you did. No one would know it was fake.
Thank you Claire 🙂
WOWZA BALLS!!!! This is CRA CRA! I’ve never seen a DIY like this that looks absolutely real. If I had t seen this on Hometalk, I’d never believed it was a fake.
AWE thank you so much Kelly!
Thank you Judy